
To upload and resize an image to Node.js, use the “multer” library to upload an image and the “sharp” library to resize it. We will build Web APIs through an express web framework very quickly, and it has tremendous support for the NoSQL databases like MongoDB.
Here is the step-by-step guide:
Step 1: Create Node Express Project
Create a project folder by the following command.
mkdir resize-app

cd resize-app
Next, install the Express web framework, ejs as a template engine, body-parser, multer as a node.js middleware for handling multipart/form-data, uuid for getting the random name, sharp as an image resize library using NPM, and dotenv to use the .env file in our project.
npm install express body-parser ejs uuid multer sharp dotenv
Step 2: Define environment variables
Create a file called .env in your root project and define the PORT value.
PORT=4000
Also, we will use the ES6 import/export instead of require, so modify the package.json file and add the type:module key-value pair. This tells Node.js to treat .js files as ES modules.
{
  "type": "module",
  "dependencies": {
    "body-parser": "^1.20.2",
    "dotenv": "^16.4.5",
    "ejs": "^3.1.10",
    "express": "^4.19.2",
    "multer": "^1.4.5-lts.1",
    "sharp": "^0.33.4",
    "uuid": "^9.0.1"
  }
}
Step 3: Create the main application file
Create one file in the project root called the server.js and add the following code.
import express from 'express';
import { config } from 'dotenv';

config();

const app = express();
const port = process.env.PORT;

app.listen(port, () => {
    console.log(`Server is running on PORT ${port}`);
});
Here, we imported the express module and config() function to load environment variables in our application.
Then, I created an instance of the Express application and booted up the Node.js application using the app.listen() method.
Step 4: Configure the EJS templating engine.
To include the CSS, JS, and Image files in the express, create a static directory called public in the root. In that, we will put our CSS and JS files. So, create the first public directory.
Add the following code inside the server.js file.
// server.js

app.use(express.static('public'));
The next step is to set up the ejs template engine. To do so, add the following code to the server.js file.
// server.js

app.set('view engine', 'ejs');
We need to create a folder inside our root called views.
In the views folder, create a new file called index.ejs.
Add the code below to the index.ejs file:
<!DOCTYPE html>
<html>
  <head>
    <meta charset="utf-8" />
    <title>EJS Engine</title>
  </head>
  <body>
    <p>Node Express Image Upload and Resize Example</p>
  </body>
</html>
Step 4: Configure Express Router
Express application comes with a routing module by default. Use the Router module provided by Express js. Create a file in the root folder called router.js.
Now, write the following code inside the router.js file.
import express from 'express';

const router = express.Router();

router.get('/', async (req, res) => {
    await res.render('index');
});

export default router;
Now in the server.js file, we need to require the router.js file and add the body-parser module.
// server.js

import express from 'express';
import { config } from 'dotenv';
import bodyParser from 'body-parser';
import router from './router.js';

config();

const app = express();
const port = process.env.PORT;

app.use(express.static('public'));
app.set('view engine', 'ejs');

app.use(bodyParser.json());
app.use(bodyParser.urlencoded({ extended: true }));

app.use('/upload', router);

app.listen(port, () => {
    console.log(`Server is running on PORT ${port}`);
});
Step 5: Create a form
Inside the index.ejs file, add a file upload component:
<!DOCTYPE html>
<html lang="en">
  <head>
    <meta charset="UTF-8" />
    <meta name="viewport" content="width=device-width, initial-scale=1.0" />
    <title>Image Upload</title>
    <link
      href="https://cdn.jsdelivr.net/npm/bootstrap@5.3.0/dist/css/bootstrap.min.css"
      rel="stylesheet"
    />
  </head>
  <body>
    <div class="container">
      <h1 class="mt-5">Upload an Image</h1>
      <form action="/upload/post" method="post" enctype="multipart/form-data">
        <div class="mb-3">
          <label for="image" class="form-label">Image</label>
          <input
            type="file"
            class="form-control"
            id="image"
            name="image"
            required
          />
        </div>
        <button type="submit" class="btn btn-primary">Upload</button>
      </form>
    </div>
    <script src="https://cdn.jsdelivr.net/npm/bootstrap@5.3.0/dist/js/bootstrap.bundle.min.js"></script>
  </body>
</html>
We added CDN to import bootstrap 5.
Step 6: Create file upload middleware
To handle the multipart/form-data in Node.js, we need the multer library, which we already installed.
Let’s create a middleware inside the project’s root called uploadMiddleware.js and add the below code:
// uploadMiddleware.js

import multer from 'multer';

const upload = multer({
    limits: {
        fileSize: 4 * 1024 * 1024, // 4MB
    },
    fileFilter(req, file, cb) {
        if (!file.originalname.match(/\.(jpg|jpeg|png)$/)) {
            return cb(new Error('Please upload an image file (jpg, jpeg, png)'));
        }
        cb(null, true);
    }
});

export default upload;
Now, import this middleware inside the router.js file to handle the POST request.
// router.js

import express from 'express';

const router = express.Router();

router.get('/', async (req, res) => {
    await res.render('index');
});

router.post('/post', upload.single('image'), async function (req, res) {
    await console.log('post');
});

export default router;
Here, we used the node async-await feature.
So, when the user tries to upload an image to the server, the router.post() function will be executed.
Step 7: Resize the image
Sharp is a good module for resizing JPEG, PNG, WebP, and TIFF images and achieving high performance in image processing. We have already installed Sharp.
Now, create a file inside the root called resize.js and add the following code.
// resize.js

import sharp from 'sharp';
import { v4 as uuidv4 } from 'uuid';
import path from 'path';

class Resize {
    constructor(folder) {
        this.folder = folder;
    }

    async save(buffer) {
        const filename = Resize.filename();
        const filepath = this.filepath(filename);

        await sharp(buffer)
            .resize(300, 300, {
                fit: sharp.fit.inside,
                withoutEnlargement: true
            })
            .toFile(filepath);

        return filename;
    }

    static filename() {
        return `${uuidv4()}.png`;
    }

    filepath(filename) {
        return path.resolve(`${this.folder}/${filename}`);
    }
}

export default Resize;
In the above file, we have created a class called resize.js, which accepts one argument: the path to the images folder.
Now, you need to create the images folder inside the public directory.
Then, we defined the static function filename, which returns the filename’s random string, and then defined the filepath function, which returns the complete filepath of the uploaded image.
Then, we defined the save() function, which accepts the file buffer from the user request, resizes the image, uploads it to the filepath, and returns the filename to the User.
Now, import the Resize.js file inside the router.js file.
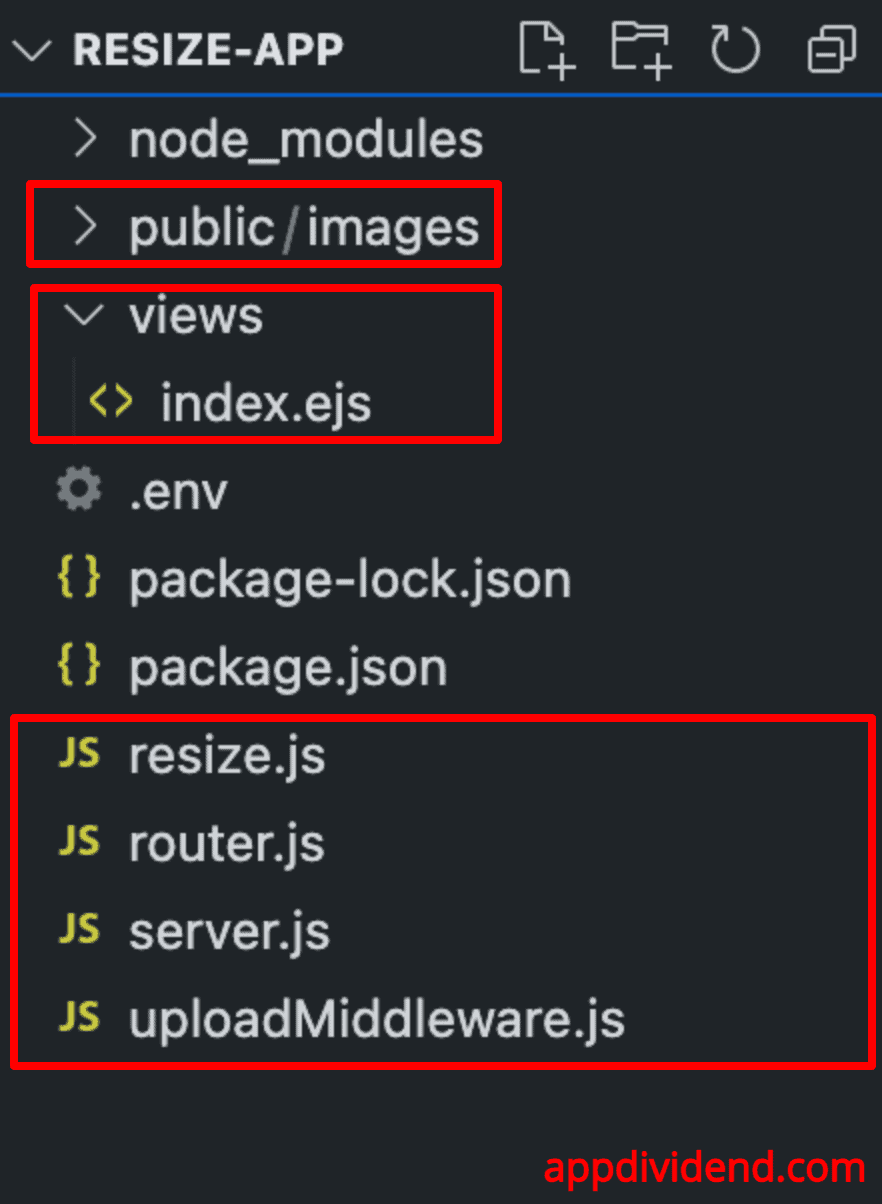
Our final project directory looks like this:
Step 8: Save the image in the file system
We need to import the Resize.js file inside the router.js file because we handle the post request there. So, write the following code inside the router.js file.
// router.js

import express from 'express';
import upload from './uploadMiddleware.js';
import Resize from './resize.js';
import path from 'path';
import { fileURLToPath } from 'url';

const router = express.Router();
const __filename = fileURLToPath(import.meta.url);
const __dirname = path.dirname(__filename);

router.get('/', async (req, res) => {
    await res.render('index');
});

router.post('/post', upload.single('image'), async function (req, res) {
    const imagePath = path.join(__dirname, '/public/images');
    const fileUpload = new Resize(imagePath);
    if (!req.file) {
        return res.status(401).json({ error: 'Please provide an image' });
    }
    const filename = await fileUpload.save(req.file.buffer);
    return res.status(200).json({ name: filename });
});

export default router;
First, inside the router.post() function, we defined the provided path for the “/public/images” folder and then passed that folder to the constructor of Resize class.
It will return the object, and then we call the save() method on that object, give the image buffer as an argument to the save() function, and return the file name.
For now, we are just displaying the filename in JSON format to the User.
If the file is not there, we display an error message to the user in JSON format.
Step 9: Run the Project.
To run the project, we need to start the development server using the below command:
node server
Go to the browser and navigate to this URL: http://localhost:4000/upload

Now, if you try to upload an image, you will see the output in the browser, like the image below.

So, we got the correct JSON response. Now, go to the file system, and inside the public >> images folder, you can see the randomly named image.
That’s it.

Ulrich Bosbach
Dear Krunal,
up to step 4 all things are working fine. After modifying server.js with the rooter path I get Error message “Cannot find module ‘./router’ “. In your description you write “So, create a file in the root folder called router.js. ” That might be wrong. Could you please correct it. The tutorial is good to understand. In this case I would apritiate to continue.
Thanks in advance
Ulrich
Brody
Hey Ulrich, I think you’ve included an extra fullstop before your path declaration to the router module
RE
You need to have router middleware, you should register your router to middleware so that error will be gone !