

Laravel’s localization features provide a convenient way to retrieve strings in various languages, allowing us to support the multiple languages within your application quickly.
Language strings are stored in the files within the resources/lang directory.
In addition, there should be a subdirectory for each language supported by the application within that directory.
We will create the middleware to check if the locale is set, then change the application’s locale.
Step 1: Install Laravel
composer create-project laravel/laravel localization
By default, our application’s local language is English or en.
You can find it on the config >> app.php file.
// app.php

/*
    |--------------------------------------------------------------------------
    | Application Locale Configuration
    |--------------------------------------------------------------------------
    |
    | The application locale determines the default locale that will be used
    | by the translation service provider. You are free to set this value
    | to any of the locales which will be supported by the application.
    |
*/

'locale' => 'en',
Here, the locale is set to en.
Step 2: Publishing lang folder
By default, the Laravel application skeleton does not include the lang directory.
If you would like to customize Laravel’s language files, you may publish them via the lang:publish Artisan command like this:
php artisan lang:publish
It will create a “lang” folder in the root of your Laravel project.
Inside the lang folder, there is one folder called en and inside the en folder, there are files like auth.php, pagination.php, passwords.php, and validation.php.
So, these files are translation files. But first, let’s check the auth.php file.
<?php

return [

    /*
    |--------------------------------------------------------------------------
    | Authentication Language Lines
    |--------------------------------------------------------------------------
    |
    | The following language lines are used during authentication for various
    | messages that we need to display to the user. You are free to modify
    | these language lines according to your application's requirements.
    |
    */

    'failed' => 'These credentials do not match our records.',
    'password' => 'The provided password is incorrect.',
    'throttle' => 'Too many login attempts. Please try again in :seconds seconds.',
];
This file returns an array that has a key-value pair.
So, here you can define any key you like, but the values are on your language-specific statements.
Inside the “lang” folder, create a folder called “fr” for French translation files.
If the folder is fr, which means French translation,
Now create an auth.php file under the “fr” folder and add the below code:
<?php

return [

    /*
    |--------------------------------------------------------------------------
    | Authentication Language Lines
    |--------------------------------------------------------------------------
    |
    | The following language lines are used during authentication for various
    | messages that we need to display to the user. You are free to modify
    | these language lines according to your application's requirements.
    |
    */

    'failed' => "Ces informations d'identification ne correspondent pas à nos enregistrements",
    'password' => "Le mot de passe fourni est incorrect.",
    'throttle' => "Trop de tentatives de connexion. Veuillez réessayer dans: secondes secondes.",
];
Remember, you need to add the same keys for all your translation files across the different languages and change the values respective to your languages.
In the above code, we have written three items: failed, password, and throttle, and the values are translated into French.
So, when the user changes the languages, these statements will be displayed because, in the view file, we will call it by its key, and due to middleware, it will map to the correct languages.
That is how you will create translation files. Let’s create two more folders for two different languages
Step 3: Creating Translation Files
Now we will have four languages. English is already there.
- French
- Spanish
- Japanese
Your directory structure looks like this:
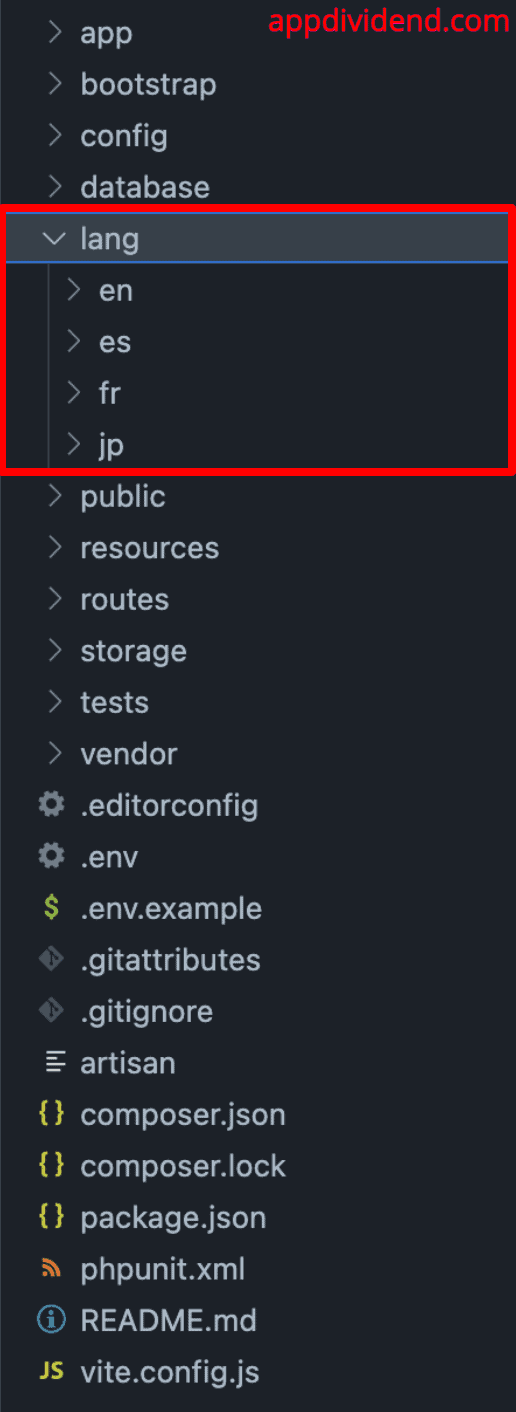
Create a file called sentence.php inside the en folder and add the following code:
For en/sentence.php file:
<?php

// sentence.php

return [
  'welcome' => 'Welcome Friend'
];
Create this file for another three folders like this:
For es >> sentence.php file:
<?php

// sentence.php

return [
  'welcome' => 'Bienvenido amigo'
];
For fr >> sentence.php file:
<?php

// sentence.php

return [
  'welcome' => 'Bienvenue mon ami'
];
And last, jp >> sentence.php file:
<?php

// sentence.php

return [
  'welcome' => 'ようこそ友達'
];
You can put as many texts as you want. I have just taken one text for this demo.
Now that we have placed all translations, let’s start working on the views and make our application load the above translations.
Step 4: Set up the view
Inside the resources/views folder, create a file called layout.blade.php file and add the following code.
<!DOCTYPE html>
<html lang="{{ str_replace('_', '-', app()->getLocale()) }}">
<head>
    <meta charset="utf-8">
    <meta name="viewport" content="width=device-width, initial-scale=1">

    <title>{{ config('app.name', 'Laravel') }}</title>

    <!-- Bootstrap 5 Stylesheet -->
    <link href="https://cdn.jsdelivr.net/npm/bootstrap@5.0.2/dist/css/bootstrap.min.css"
    rel="stylesheet"
    integrity="sha384-EVSTQN3/azprG1Anm3QDgpJLIm9Nao0Yz1ztcQTwFspd3yD65VohhpuuCOmLASjC"
    crossorigin="anonymous">

    <!-- Bootstrap 5 JavaScript (includes Popper.js) -->
    <script src="https://cdn.jsdelivr.net/npm/@popperjs/core@2.9.2/dist/umd/popper.min.js" integrity="sha384-IQsoLXl5PILFhosVNubq5LC7Qb9DXgDA9i+tQ8Zj3iwWAwPtgFTxbJ8NT4GN1R8p" crossorigin="anonymous"></script>
    <script src="https://cdn.jsdelivr.net/npm/bootstrap@5.0.2/dist/js/bootstrap.min.js" integrity="sha384-cVKIPhGWiC2Al4u+LWgxfKTRIcfu0JTxR+EQDz/bgldoEyl4H0zUF0QKbrJ0EcQF" crossorigin="anonymous"></script>
</head>
<body>
    <div id="app">
        <nav class="navbar navbar-expand-md navbar-light bg-light">
            <div class="container">
                <a class="navbar-brand" href="{{ url('/') }}">
                    {{ config('app.name', 'Laravel') }}
                </a>
                <button class="navbar-toggler" type="button" data-bs-toggle="collapse" data-bs-target="#navbarSupportedContent" aria-controls="navbarSupportedContent" aria-expanded="false" aria-label="{{ __('Toggle navigation') }}">
                    <span class="navbar-toggler-icon"></span>
                </button>

                <div class="collapse navbar-collapse" id="navbarSupportedContent">
                    <!-- Left Side Of Navbar -->
                    <ul class="navbar-nav me-auto"></ul>

                    <!-- Right Side Of Navbar -->
                    <ul class="navbar-nav ms-auto">
                        <li class="nav-item dropdown">
                            <a id="navbarDropdown" class="nav-link dropdown-toggle" href="#" role="button" data-bs-toggle="dropdown" aria-haspopup="true" aria-expanded="false">
                                Language <span class="caret"></span>
                            </a>
                            <div class="dropdown-menu dropdown-menu-end" aria-labelledby="navbarDropdown">
                                <a class="dropdown-item" href="lang/en">English</a>
                                <a class="dropdown-item" href="lang/fr">French</a>
                                <a class="dropdown-item" href="lang/es">Spanish</a>
                                <a class="dropdown-item" href="lang/jp">Japanese</a>
                            </div>
                        </li>
                    </ul>
                </div>
            </div>
        </nav>

        <main class="py-4">
            @yield('content')
        </main>
    </div>
</body>
</html>
In this code, we imported Bootstrap CSS and JS files and added a dropdown menu for users to select a specific language.
Open your welcome.blade.php file, which is by default inside the resources >> views folder, and place below code, including a markup just for a languages dropdown.
@extends('layout')

@section('content')
<div class="container">
    <div class="row justify-content-center">
        <div class="col-md-8">
            <div class="card">
                <div class="card-body">
                    hello
                </div>
            </div>
        </div>
    </div>
</div>
@endsection
Save the file and start the Laravel development server using this command:
php artisan serve
Go to the browser and navigate to this URL: http://localhost:8000

Step 5: Setup route, controller, and middleware
Create a TranslationController.php file using this command:
php artisan make:controller TranslationController
It will create a file inside the App/Http/Controllers folder and add the following code inside the TranslationController.php file:
<?php

namespace App\Http\Controllers;
use Illuminate\Support\Facades\App;

class TranslationController extends Controller
{
    public function lang($locale)
    {
        App::setLocale($locale);
        session()->put('locale', $locale);
        return redirect()->back();
    }
}
This lang() function will see the locale and put it into the session.
Inside routes >> web.php, add the following route.
<?php

use Illuminate\Support\Facades\Route;
use App\Http\Controllers\TranslationController;

Route::get('/', function () {
    return view('welcome');
});

Route::get('lang/{locale}', [TranslationController::class, 'lang']);
Now, create a middleware using the following command.
php artisan make:middleware Localization
It will create a file called Localization.php inside the app >> Http >> Middleware folder.
Now open your newly created middleware file, Localization.php, and update the handle method with the code below. Our final file should look like this:
<?php

namespace App\Http\Middleware;

use Closure;
use Illuminate\Http\Request;
use Symfony\Component\HttpFoundation\Response;
use Illuminate\Support\Facades\App;
class Localization
{
    /**
     * Handle an incoming request.
     *
     * @param  \Closure(\Illuminate\Http\Request): (\Symfony\Component\HttpFoundation\Response)  $next
     */
    public function handle(Request $request, Closure $next): Response
    {
        if (session()->has('locale')) {
            App::setLocale(session()->get('locale'));
        }
        return $next($request);
    }
}
Step 6: Attach the Localization Middleware
You can attach this middleware to specific routes like this inside the routes/web.php file like this:
<?php

use Illuminate\Support\Facades\Route;
use App\Http\Controllers\TranslationController;
use App\Http\Middleware\Localization;

Route::get('/', function () {
    return view('welcome');
})->middleware(Localization::class);

Route::get('lang/{locale}', [TranslationController::class, 'lang']);
In our case, we attached the Localization middleware to the “/” root route.
Add the following code inside the resources >> views >> layout.blade.php file:
<!DOCTYPE html>
<html lang="{{ str_replace('_', '-', app()->getLocale()) }}">
<head>
    <meta charset="utf-8">
    <meta name="viewport" content="width=device-width, initial-scale=1">

    <title>{{ config('app.name', 'Laravel') }}</title>

    <!-- Bootstrap 5 Stylesheet -->
    <link href="https://cdn.jsdelivr.net/npm/bootstrap@5.0.2/dist/css/bootstrap.min.css"
    rel="stylesheet"
    integrity="sha384-EVSTQN3/azprG1Anm3QDgpJLIm9Nao0Yz1ztcQTwFspd3yD65VohhpuuCOmLASjC"
    crossorigin="anonymous">

    <!-- Bootstrap 5 JavaScript (includes Popper.js) -->
    <script src="https://cdn.jsdelivr.net/npm/@popperjs/core@2.9.2/dist/umd/popper.min.js" integrity="sha384-IQsoLXl5PILFhosVNubq5LC7Qb9DXgDA9i+tQ8Zj3iwWAwPtgFTxbJ8NT4GN1R8p" crossorigin="anonymous"></script>
    <script src="https://cdn.jsdelivr.net/npm/bootstrap@5.0.2/dist/js/bootstrap.min.js" integrity="sha384-cVKIPhGWiC2Al4u+LWgxfKTRIcfu0JTxR+EQDz/bgldoEyl4H0zUF0QKbrJ0EcQF" crossorigin="anonymous"></script>
</head>
<body>
    <div id="app">
        <nav class="navbar navbar-expand-md navbar-light bg-light">
            <div class="container">
                <a class="navbar-brand" href="{{ url('/') }}">
                    {{ config('app.name', 'Laravel') }}
                </a>
                <button class="navbar-toggler" type="button" data-bs-toggle="collapse" data-bs-target="#navbarSupportedContent" aria-controls="navbarSupportedContent" aria-expanded="false" aria-label="{{ __('Toggle navigation') }}">
                    <span class="navbar-toggler-icon"></span>
                </button>

                <div class="collapse navbar-collapse" id="navbarSupportedContent">
                    <!-- Left Side Of Navbar -->
                    <ul class="navbar-nav me-auto"></ul>
                    <!-- Right Side Of Navbar -->
                    <ul class="navbar-nav ms-auto">
                        @php $locale = session()->get('locale'); @endphp
                        <li class="nav-item dropdown">
                            <a id="navbarDropdown" class="nav-link dropdown-toggle" href="#" role="button" data-bs-toggle="dropdown" aria-haspopup="true" aria-expanded="false">
                            @switch($locale)
                                @case('fr') French @break
                                @case('es') Spain @break
                                @case('jp') Japanese @break
                                @case('en') English @break
                            @endswitch
                            <span class="caret"></span>
                            </a>

                            <div class="dropdown-menu dropdown-menu-end" aria-labelledby="navbarDropdown">
                                <a class="dropdown-item" href="lang/en">English</a>
                                <a class="dropdown-item" href="lang/fr">French</a>
                                <a class="dropdown-item" href="lang/es">Spanish</a>
                                <a class="dropdown-item" href="lang/jp">Japanese</a>
                            </div>
                        </li>
                    </ul>
                </div>
            </div>
        </nav>

        <main class="py-4">
            @yield('content')
        </main>
    </div>
</body>
</html>
Finally, add the following code inside the resources >> views >> welcome.blade.php file.
@extends('layout')

@section('content')
<div class="container">
    <div class="row justify-content-center">
        <div class="col-md-8">
            <div class="card">
                <div class="card-body">
                    <p>{{ __('sentence.welcome') }}</p>
                </div>
            </div>
        </div>
    </div>
</div>
@endsection
You can retrieve translation strings from your language files using the __ helper function.
If you are using “short keys” to define your translation strings, you should pass the file that contains the key and the key itself to the __ function using the “dot” syntax.
Let’s change the locale from dropdown and see if we get the correct locale and translation strings.
Go to this URL: http://localhost:8000/ and set the locale to French like this:

Change the locale to Spanish:

Change the locale to Japan:

If we change the locale, it perfectly fines and that’s it for setting localization in Laravel 11.

Ty
Using session as your locale is not good for SEO.
Zikrulloh
What do you recommend
Martin
Thank you for this tutorial.
محمد ابراهيم
how setup this in web.php route file
localhost:8000 which get lang strings from resources/lang/en directory
localhost:8000/en default which get lang strings from resources/lang/en directory
localhost:8000/ar which get lang strings from resources/lang/ar directory
Gal
One issue I had and have since fixed, is that the links for changing the language need to be absolute to work on every page. I had some pages with URLs like ‘example.com/one/two’, and when i clicked on the link to change the language it redirected me to the URL ‘example.com/one/lang/en’ – which does not exist and just gives a 404. To fix this just make your language changing links absolute.
Before (doesn’t work on all pages)
English
After (notice the forward slash before ‘lang’) – WORKS
English
Other than that thank you for an amazing tutorial!
ashishprajapati
this post very helpfull to me thank you sir
Divyesh
It’s a grate article. Please also tell me, how do I translate values coming from database.
vandan
Thank you save my day
elhoussaine elkhariji
thank @Krunal it is very helpfull
VISHAL SIRKA
It’s a great tutorial.
Isaac Rosario Durán
I having a problem making a CRUD with the multilanguage website
when i make the edit button it say missing parameters, i doing that way:
{{ route(‘user.edit’, $user->id, App()->getLocale()) }}
Md Al imrun
great
Mukesh
your solution works but how do we make changes to URL when we switch the language? Eg: when we switch from English ‘en’ to Hindi ‘hi’ the URL should also change. like /en/posts to /hi/posts !
Petr Vurm
Thanks for help, man 😀