
To send an email in Node.js, use the “nodemailer” module. The nodemailer module allows you to send emails easily and without hassle. It uses the Simple Mail Transfer Protocol (SMTP) to send email messages between servers.
Most email systems that send mail over the Internet support SMTP-based sending.
Here is the step-by-step guide to sending an email in Node.js.
Step 1: Create a project and configure it.
Create a project directory by the below command:
mkdir mail-app

cd mail-app
Now, install the below libraries:
npm install loadenv nodemailer express body-parser ejs
We installed the loadenv module to import .env variables, the nodemailer library to send an email, the express web server, and ejs for the template engine.
Step 2: Create a .env file
Create a .env file in the root of your project directory and define the following variables:
PORT=4000

SMTP_HOST=your_email_host
SMTP_PORT=465
SMTP_USER=your_user_name
SMTP_PASS=your_password (we will put 16-character password without spaces)
EMAIL_FROM=your email_id
Here, you need to add your email service provider credentials.
For example, I use Gmail as an email service provider to put the Gmail credentials in the .env file.
Make sure you put them in the file, and don’t expose this file publicly.
Now, we will use ES Modules to import packages. So, open the package.json file and add type:module.
{
  "type": "module",
  "dependencies": {
    "body-parser": "^1.20.2",
    "dotenv": "^16.4.5",
    "ejs": "^3.1.10",
    "express": "^4.19.2",
    "nodemailer": "^6.9.13"
  }
}
In the root directory, create a javascript called app.js and add the below code:
import express from 'express';
import nodemailer from 'nodemailer';
import bodyParser from 'body-parser';
import { config } from 'dotenv';

config();

const app = express();
The config() function will import all the environment variables in this file.
We also created an instance of an express application.
Step 3: Use EJS as a templating engine
We will use the EJS templating engine.
Create a directory called “public” in the root folder.
Add the code below to the “app.js” file.
// app.js

app.set('view engine', 'ejs');
app.use(express.static('public'));
We are setting up an ejs templating engine for our application. Also, we are serving static files from the public directory.
Create another folder called views in the root folder. In that, create a file called index.ejs and add the code below.
<!DOCTYPE html>
<html lang="en">
<head>
    <meta charset="UTF-8">
    <meta name="viewport" content="width=device-width, initial-scale=1.0">
    <title>Node.js Email Application</title>
    <link href="https://cdn.jsdelivr.net/npm/bootstrap@5.3.0/dist/css/bootstrap.min.css" rel="stylesheet">
</head>
<body>
    <div class="container">
        <h1 class="mt-5">Node.js Email Application</h1>

        <% if (message) { %>
            <div class="alert alert-info" role="alert">
                <%= message %>
            </div>
        <% } %>

        <form action="/send-email" method="post">
            <div class="mb-3">
                <label for="to" class="form-label">To</label>
                <input type="email" class="form-control" id="to" name="to" required>
            </div>
            <div class="mb-3">
                <label for="subject" class="form-label">Subject</label>
                <input type="text" class="form-control" id="subject" name="subject" required>
            </div>
            <div class="mb-3">
                <label for="body" class="form-label">Body</label>
                <textarea class="form-control" id="body" name="body" rows="3" required></textarea>
            </div>
            <button type="submit" class="btn btn-primary">Send Email</button>
        </form>
    </div>
    <script src="https://cdn.jsdelivr.net/npm/bootstrap@5.3.0/dist/js/bootstrap.bundle.min.js"></script>
</body>
</html>
Step 4: Use the body-parser module
Add the below code inside the app.js file:
app.set('view engine', 'ejs');

app.use(express.static('public'));
Step 5: Configure Nodemailer and send emails
To send emails, you must create a NodeMailer transporter object, and here are the steps:
- Create a transporter object
- Configure the mailoptions object
- Deliver a message with sendMail()
Here is the complete code to create a transporter object, configure the mailoptions object, and use the sendMail() function to send an email:
const PORT = process.env.PORT;
const SMTP_HOST = process.env.SMTP_HOST;
const SMTP_PORT = process.env.SMTP_PORT;
const SMTP_USER = process.env.SMTP_USER;
const SMTP_PASS = process.env.SMTP_PASS;
const EMAIL_FROM = process.env.EMAIL_FROM;

let transporter = nodemailer.createTransport({
        host: SMTP_HOST,
        port: SMTP_PORT,
        secure: true,
        auth: {
            user: SMTP_USER,
            pass: SMTP_PASS
        }
});

let mailOptions = {
        from: EMAIL_FROM, // sender address
        to: req.body.to, // list of receivers
        subject: req.body.subject, // Subject line
        text: req.body.body, // plain text body
        html: `<b>${req.body.body}</b>` // html body
};

transporter.sendMail(mailOptions, (error, info) => {
        if (error) {
            console.log(error);
            return res.render('index', { message: 'Error occurred, message not sent.' });
        }
        console.log('Message %s sent: %s', info.messageId, info.response);
        res.render('index', { message: 'Email successfully sent!' });
});
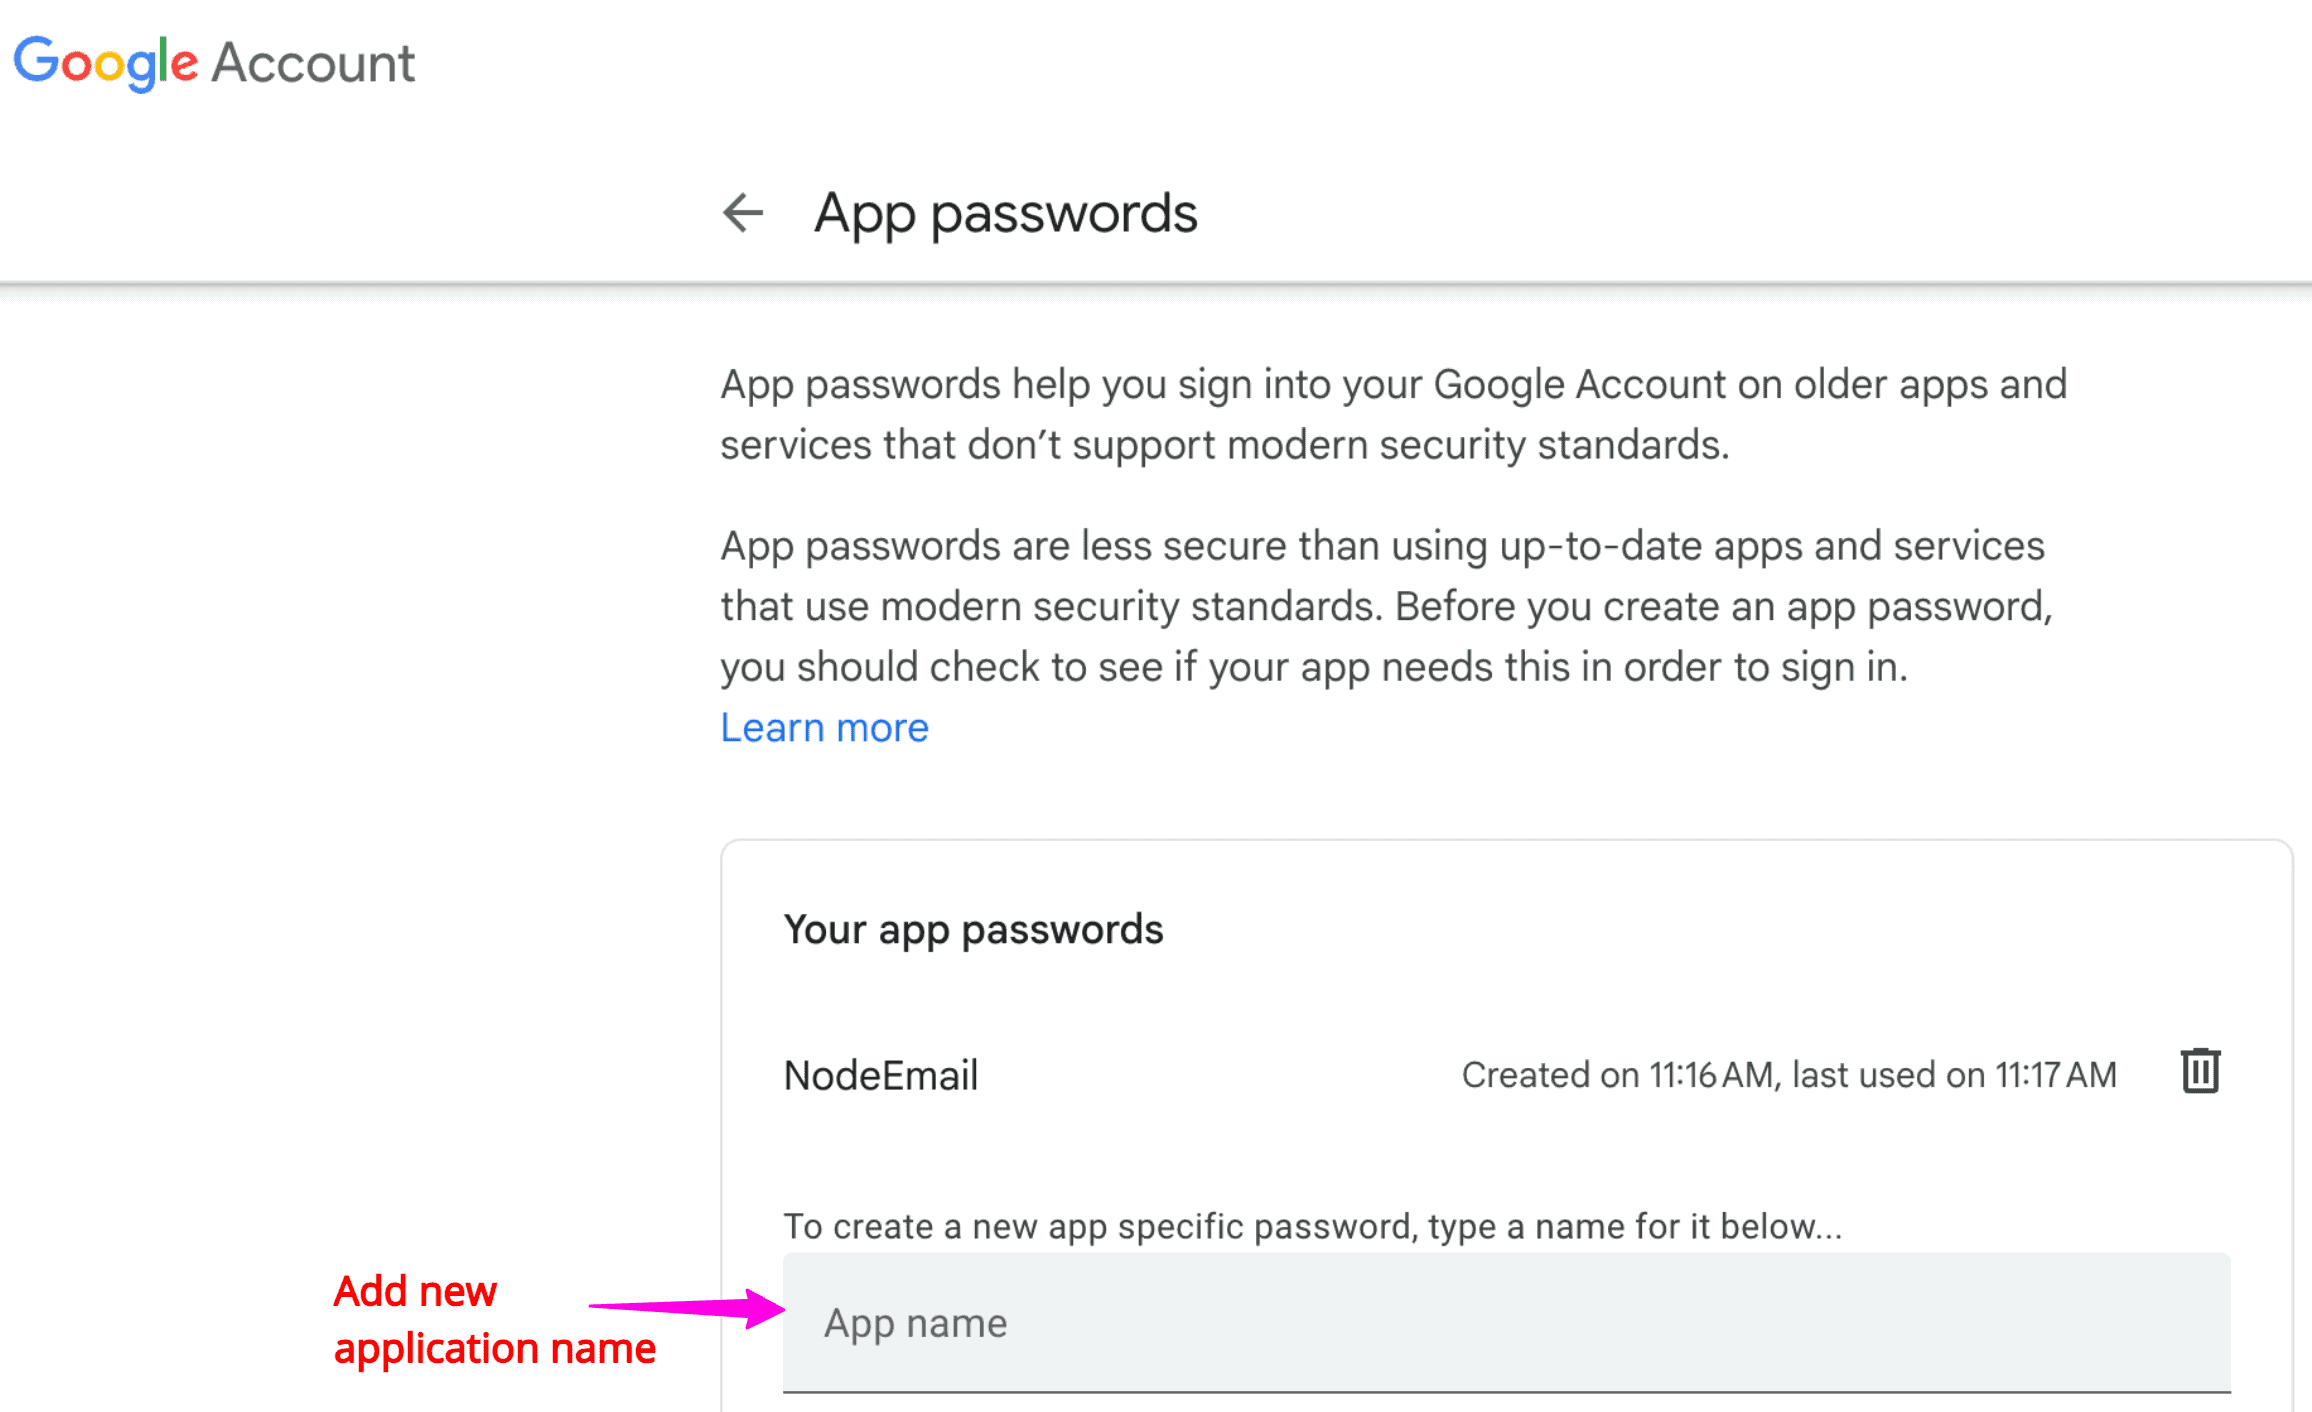
Step 6: Configure the GMAIL account
Since we are sending an email from a Gmail account, we need the SMTP host, SMTP port, Gmail username, Gmail password, and the email address from which we must send the email.
You don’t need to put your actual Gmail password here. To use your Gmail account, we need to generate a 16-character app password.
To create an App-Specific Password:
- Go to your Google Account.
- Under “Security,” search for “App passwords.” in the search bar.
- You might need to sign in again.
- You need to create a new Gmail application that will provide a 16-character password.

- Add a new application name
- You’ll see a 16-character app password. Copy this password (without spaces). Put this password inside the .env file like this:
SMTP_PASS=your_password (we will put 16-character password without spaces)
Step 7: Start the node server
Now, put everything together. Add the below code inside the app.js file:
import express from 'express';
import nodemailer from 'nodemailer';
import bodyParser from 'body-parser';
import { config } from 'dotenv';

config();

const app = express();

app.set('view engine', 'ejs');
app.use(express.static('public'));

app.use(bodyParser.urlencoded({ extended: true }));
app.use(bodyParser.json());

const PORT = process.env.PORT;
const SMTP_HOST = process.env.SMTP_HOST;
const SMTP_PORT = process.env.SMTP_PORT;
const SMTP_USER = process.env.SMTP_USER;
const SMTP_PASS = process.env.SMTP_PASS;
const EMAIL_FROM = process.env.EMAIL_FROM;

app.get('/', (req, res) => {
    res.render('index', { message: null });
});

app.post('/send-email', (req, res) => {
    let transporter = nodemailer.createTransport({
        host: SMTP_HOST,
        port: SMTP_PORT,
        secure: true,
        auth: {
            user: SMTP_USER,
            pass: SMTP_PASS
        }
    });

    let mailOptions = {
        from: EMAIL_FROM, // sender address
        to: req.body.to, // list of receivers
        subject: req.body.subject, // Subject line
        text: req.body.body, // plain text body
        html: `<b>${req.body.body}</b>` // html body
    };

    transporter.sendMail(mailOptions, (error, info) => {
        if (error) {
            console.log(error);
            return res.render('index', { message: 'Error occurred, message not sent.' });
        }
        console.log('Message %s sent: %s', info.messageId, info.response);
        res.render('index', { message: 'Email successfully sent!' });
    });
});

app.listen(PORT, () => {
    console.log(`Server is running at port: ${PORT}`);
});
Here, we defined two routes:
- app.get(): It will return a web form through which we will send an email.
- app.post(): It accepts a post request with form data and uses this data to send an email.
At last, we start the development server using the app.listen() function.
Go to the terminal and type the following command to boot up the server:
node app
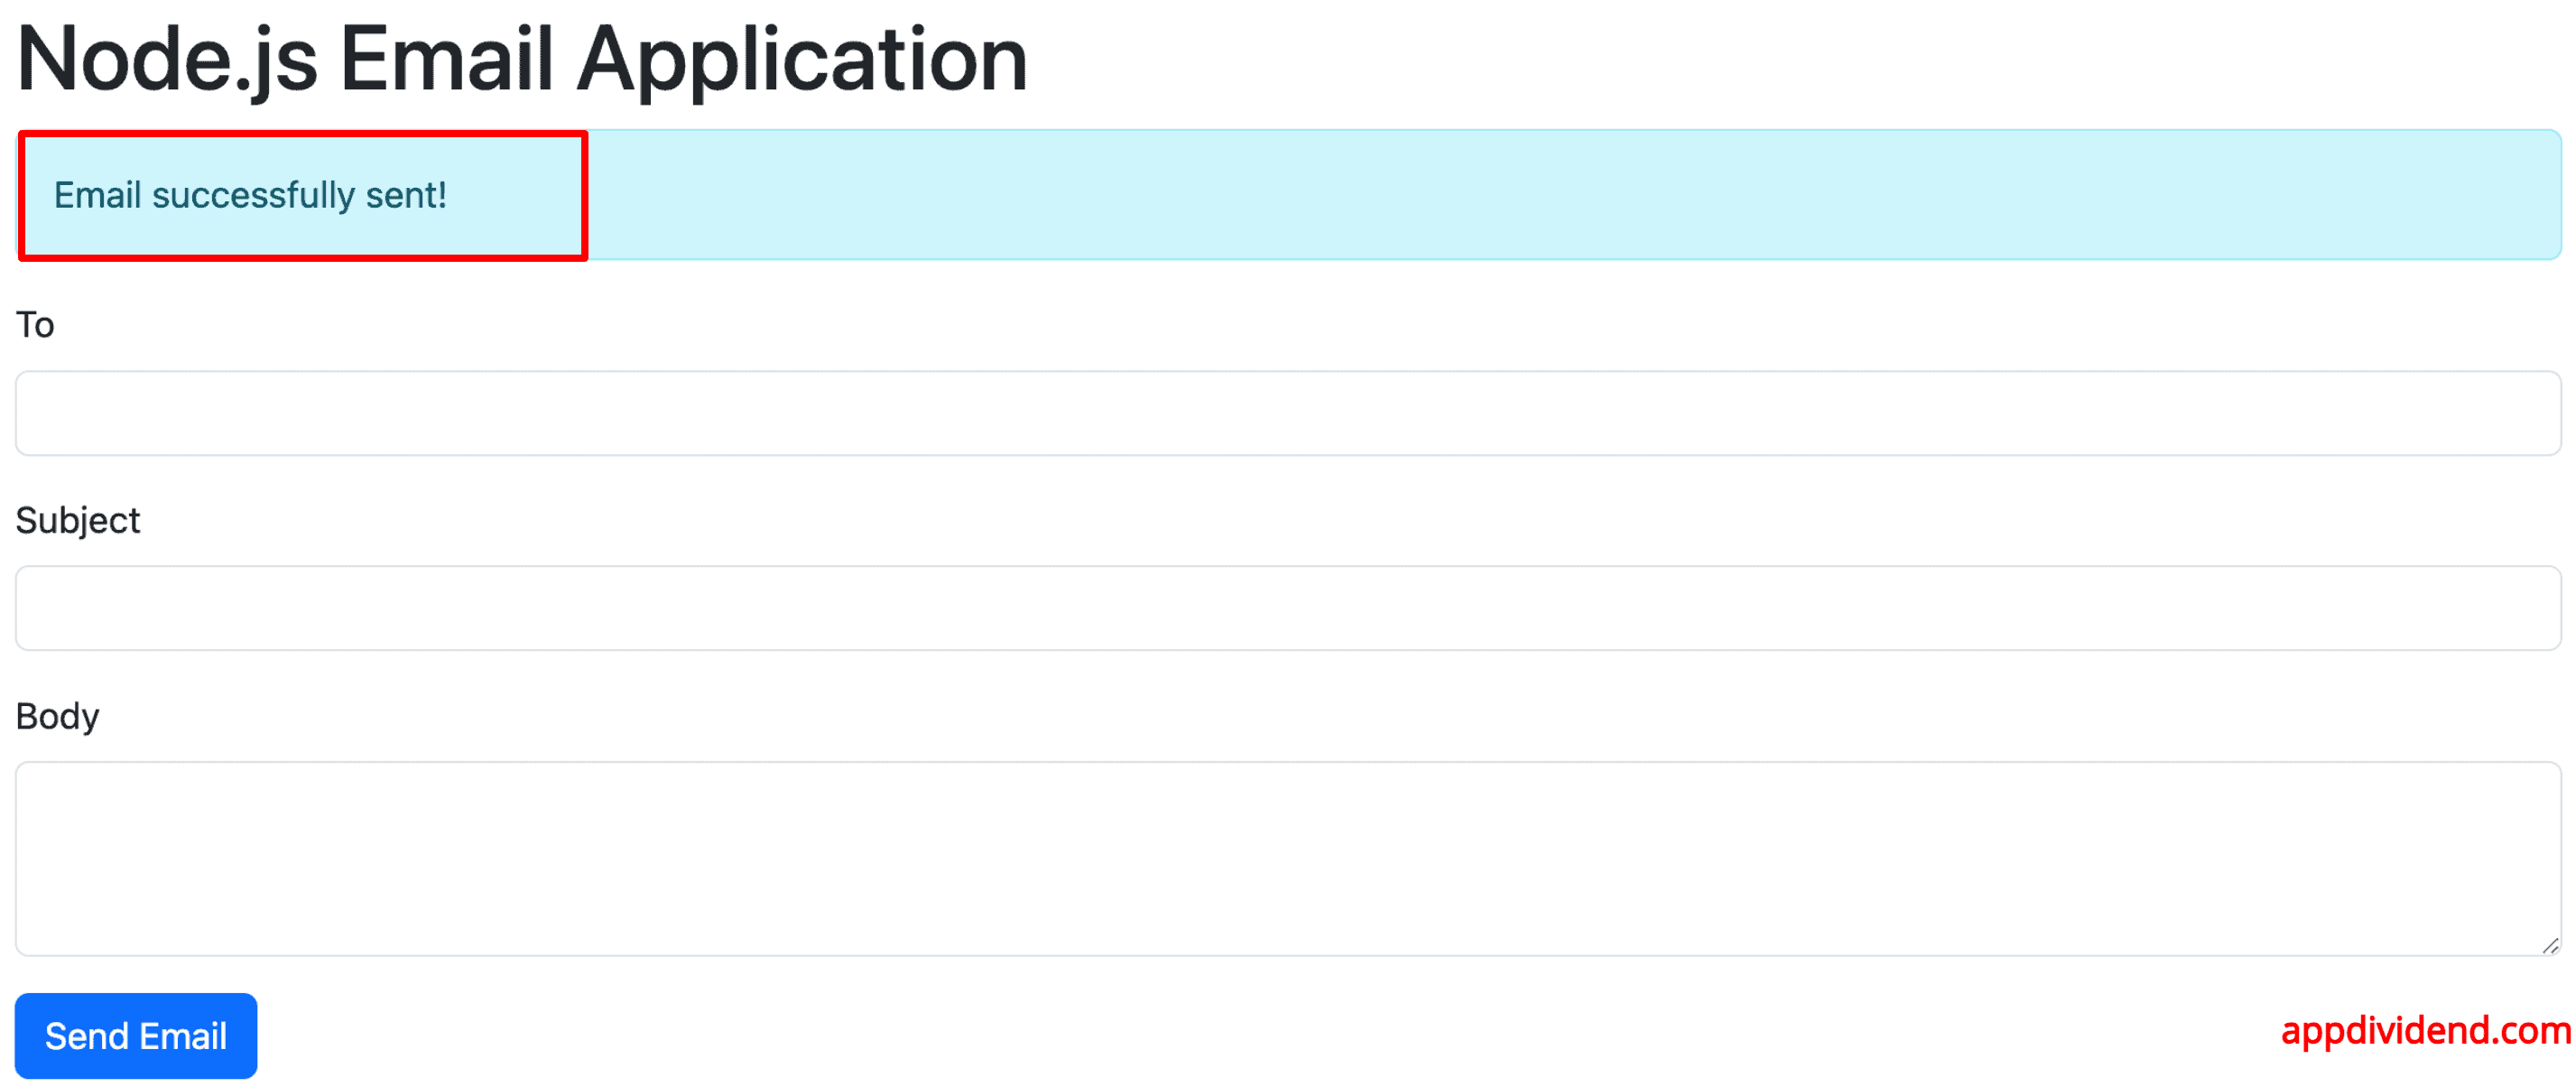
Navigate to this URL: http://localhost:4000/, and you will see the webpage like this:

If everything is configured correctly and if you fill the form with proper data, it will redirect this page again with a success message saying “Email sent successfully”.
That’s it.

Xander
Hello,
I am trying to send files and images using nodemailer.
I know I can do attachments: from nodemailer but I want to be able to upload something using and then being able to do req.body.something.
People say I need to use multer for this and enctype=”multipart/formdate” in the tag.
This first of all would upload it to my server and secondly I can’t seem to get that work either.
I am already stuck on trying to get this to work for quite a while so I was wondering if you could make a tutorial on this or help me out when ever you have some spare time.
I can also give you a copy of my code I am using at the moment and all the modules I have on there.
I am sorry if I am asking to much from you but I am stuck for a while now and couldn’t find a good or clear answer for some beginning node.js developer.
-A desperate person
Wayne
Hi,
Trying this but all I get in the console is { submit: ‘ ‘ }
app.post(‘/send-email’, function (req, res) {
console.log(req.body);
});
Any help would be awesome.
jaay
@Krunal
Hi, i have been searching the same using Angular 2.! Can you pls post tutorial on how to send mail using Angualr 2
J4GD33P 51NGH
What if two step verification is enabled for sender email?
Meer Hama
it works locally but it does not work when i deploy it
Mudrak Patel
Hi Krunal, nice article. I am working on a MEAN stack project. I have a contact form that has 4 fields: to, from, subject and body. The contact form has a button that when clicked should send email to the email address written in the “to” field. Now I DONOT want to include my email password in any file in my entire project. Is there any way to do this?
Amit
you can put it in the .env file and put .env file into the .gitignore file so that when you push your code,
your credentials will not get posted.
raju vais
hello,
thanks for it
if i am not using gmail service instead of that i am using info@motivesite.com
so what will be host name and port
please help me
Greg Wilson
Awesome stuff!! This should help me to get email notifications sending for my React – Node app!!