
Laravel many-to-many relationships are defined by writing a method that returns the result of the belongsToMany.
Many-to-many relationships are slightly more complicated than hasOne and hasMany relationships.
The join (or pivot) table is the key to the many-to-many relationship. It allows the relationship ID from one model to be related to many other models and vice versa.
Here are the step-by-step instructions:
Step 1: Install Laravel
composer create-project laravel/laravel relationship --prefer-dist
Go inside the project.
cd relationships
Step 2: Create a model and migration
We are defining two models for our example.
- Category
- Product
Let’s create two models with migrations.
php artisan make:model Category -m
php artisan make:model Product -m
It will create products and categories, tables, and models.
Inside create_categories_table, define the following schema.
<?php

use Illuminate\Database\Migrations\Migration;
use Illuminate\Database\Schema\Blueprint;
use Illuminate\Support\Facades\Schema;

return new class extends Migration
{
    /**
     * Run the migrations.
     */
    public function up(): void
    {
        Schema::create('categories', function (Blueprint $table) {
            $table->id();
            $table->string('title');
            $table->timestamps();
        });
    }

    /**
     * Reverse the migrations.
     */
    public function down(): void
    {
        Schema::dropIfExists('categories');
    }
};
Write the following schema inside the create_products_table.
<?php

use Illuminate\Database\Migrations\Migration;
use Illuminate\Database\Schema\Blueprint;
use Illuminate\Support\Facades\Schema;

return new class extends Migration
{
    /**
     * Run the migrations.
     */
    public function up(): void
    {
        Schema::create('products', function (Blueprint $table) {
            $table->id();
            $table->string('name');
            $table->float('price');
            $table->timestamps();
        });
    }

    /**
     * Reverse the migrations.
     */
    public function down(): void
    {
        Schema::dropIfExists('products');
    }
};
Go to the terminal and create the tables using the following command.
php artisan migrate
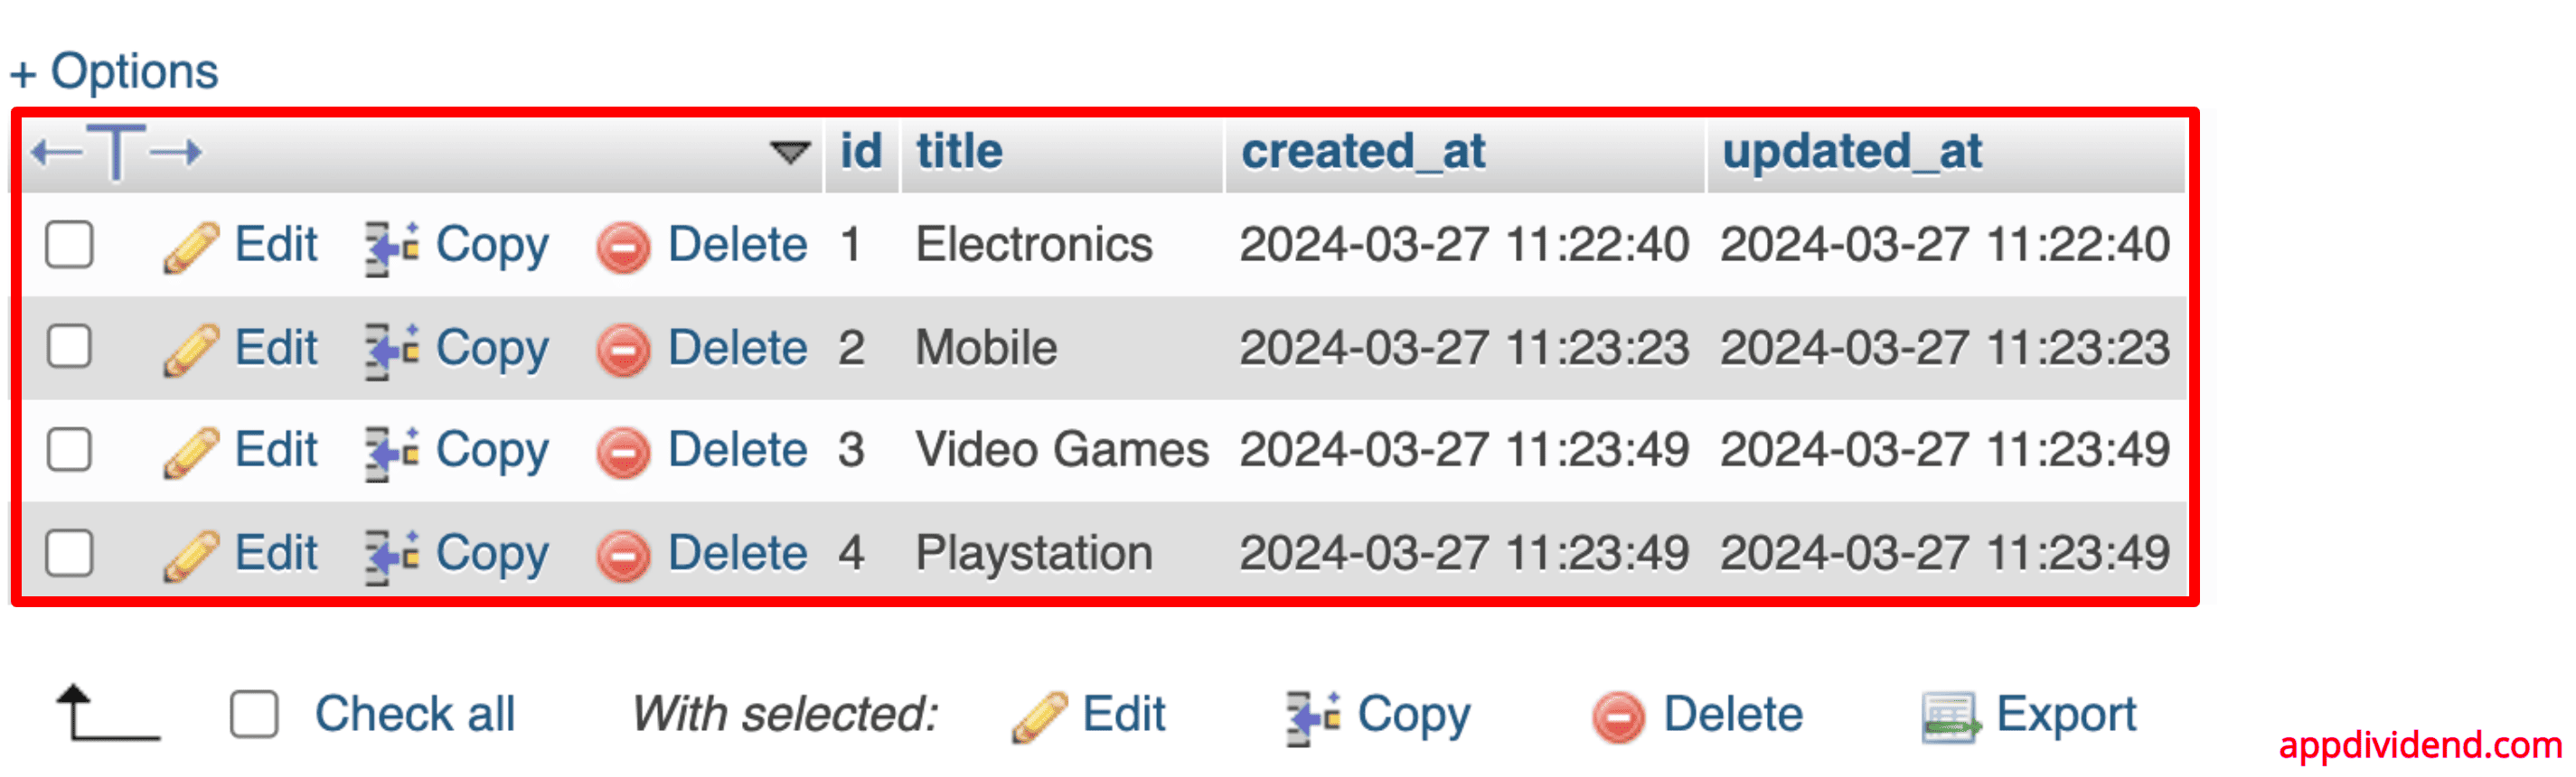
Step 3: Define random categories manually
Here, I will manually insert four rows in the categories table inside phpmyadmin like this:
Step 4: Define a Pivot table
Many-to-many relations require an intermediary table to manage the relationship.
The most straightforward implementation of the intermediary table, known as a pivot table, would consist of just two columns for storing the foreign keys pointing to each related pair of records.
Creating a Pivot table
- The pivot table should consist of the singular names of both tables, separated by underscore symbols. These names should be arranged in alphabetical order, so we have to have category_product, not product_category.
- To create a pivot table, we can create the simple migration with artisan make:migration. For example, we have the command artisan make:migration:pivot.
- Pivot table fields: By default, there should be only two fields – the foreign key to each table, in our case, category_id and product_id. You can insert more fields if you need, then you need to add them to the relationship assignment.
The Pivot table has these columns.
- id
- category_id
- product_id
php artisan make:migration create_category_product_table --create=category_product
Define the following schema in the migration file.
<?php

use Illuminate\Database\Migrations\Migration;
use Illuminate\Database\Schema\Blueprint;
use Illuminate\Support\Facades\Schema;

return new class extends Migration
{
    /**
     * Run the migrations.
     */
    public function up(): void
    {
        Schema::create('category_product', function (Blueprint $table) {
            $table->id();
            $table->integer('category_id')->unsigned();
            $table->integer('product_id')->unsigned();
        });
    }

    /**
     * Reverse the migrations.
     */
    public function down(): void
    {
        Schema::dropIfExists('category_product');
    }
};
Migrate the schema file.
php artisan migrate
Step 5: Define Many-to-many relationships
Multiple Categories belong to Multiple Products. So inside the Product.php file, we can define the belongsToMany relationship.
<?php

namespace App\Models;

use Illuminate\Database\Eloquent\Factories\HasFactory;
use Illuminate\Database\Eloquent\Model;

class Product extends Model
{
    use HasFactory;
    public function categories()
    {
        return $this->belongsToMany(Category::class);
    }
}
The same is true for the products. Multiple Products belong To Multiple Categories. So inside the Category.php file, we can define the belongsToMany relationship.
<?php

namespace App\Models;

use Illuminate\Database\Eloquent\Factories\HasFactory;
use Illuminate\Database\Eloquent\Model;

class Category extends Model
{
    use HasFactory;

    public function products()
    {
        return $this->belongsToMany(Product::class);
    }
}
We have defined the relationship between them.
Now, let us create a new product and assign the category to the Product.
Step 6: Create a Product
Create a ProductController using the following command.
php artisan make:controller ProductController
The next step, define the route to store the Product.
I am using a GET request to save the data because we have not created the form, so we take every data manually.
<?php

use Illuminate\Support\Facades\Route;
use App\Http\Controllers\ProductController;

Route::get('/', function () {
    return view('welcome');
});

Route::get('product/create', [ProductController::class, 'create'])->name('product.create');
Import both models in this ProductController.php file.
What we are going to do is we will create one Product that belongs To Many Categories.
In this example tutorial, we will create a God of War product.
Now, the God of War belongs to two categories.
- Video Games
- Playstation
So, when we create a product, we also need to fill the pivot table with the two categories.
So, our product_id will be one, but the category_id will be different, creating two rows in the category_product table.
Write the following code inside ProductController’s create() function.
<?php

namespace App\Http\Controllers;

use App\Models\Product;
use App\Models\Category;

use Illuminate\Http\Request;

class ProductController extends Controller
{

    public function create(Request $request)
    {
        $product = new Product;
        $product->name = 'God of War';
        $product->price = 40;

        $product->save();

        $category = Category::find([3, 4]);
        $product->categories()->attach($category);

        return 'Success';
    }
}
The attach() function will assign those category IDs to the newly created Product and create two new rows inside the pivot table. Each row has a relationship with its Product and category.
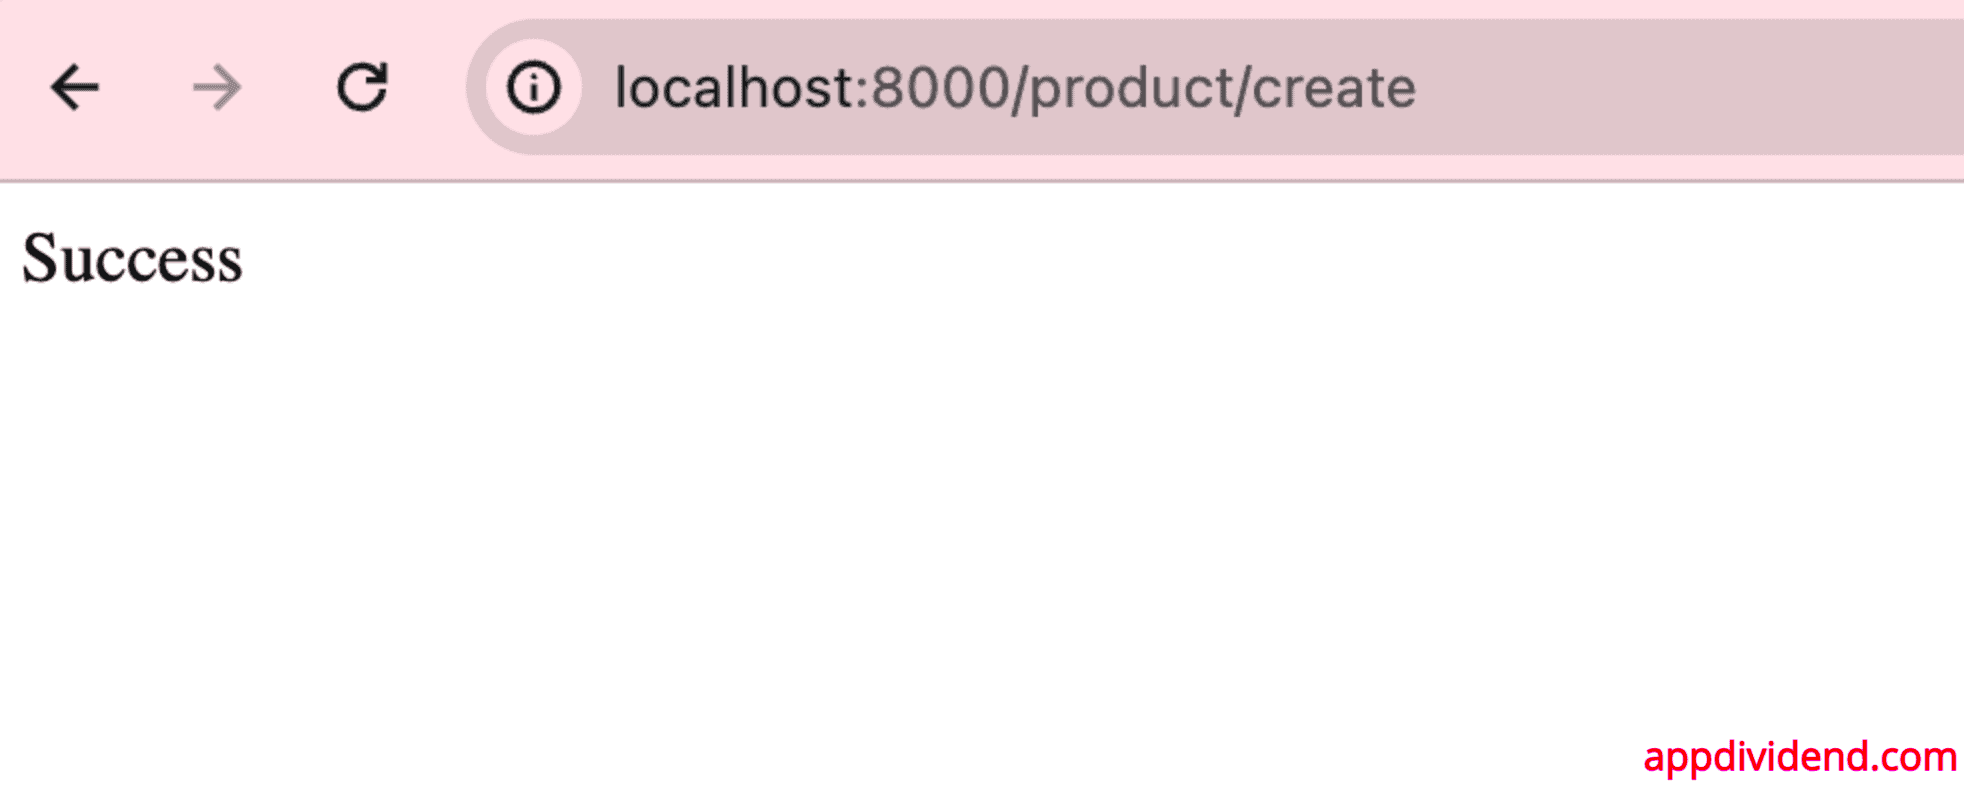
The next step is going to this URL: http://localhost:8000/product/create
You can see the “Success.”
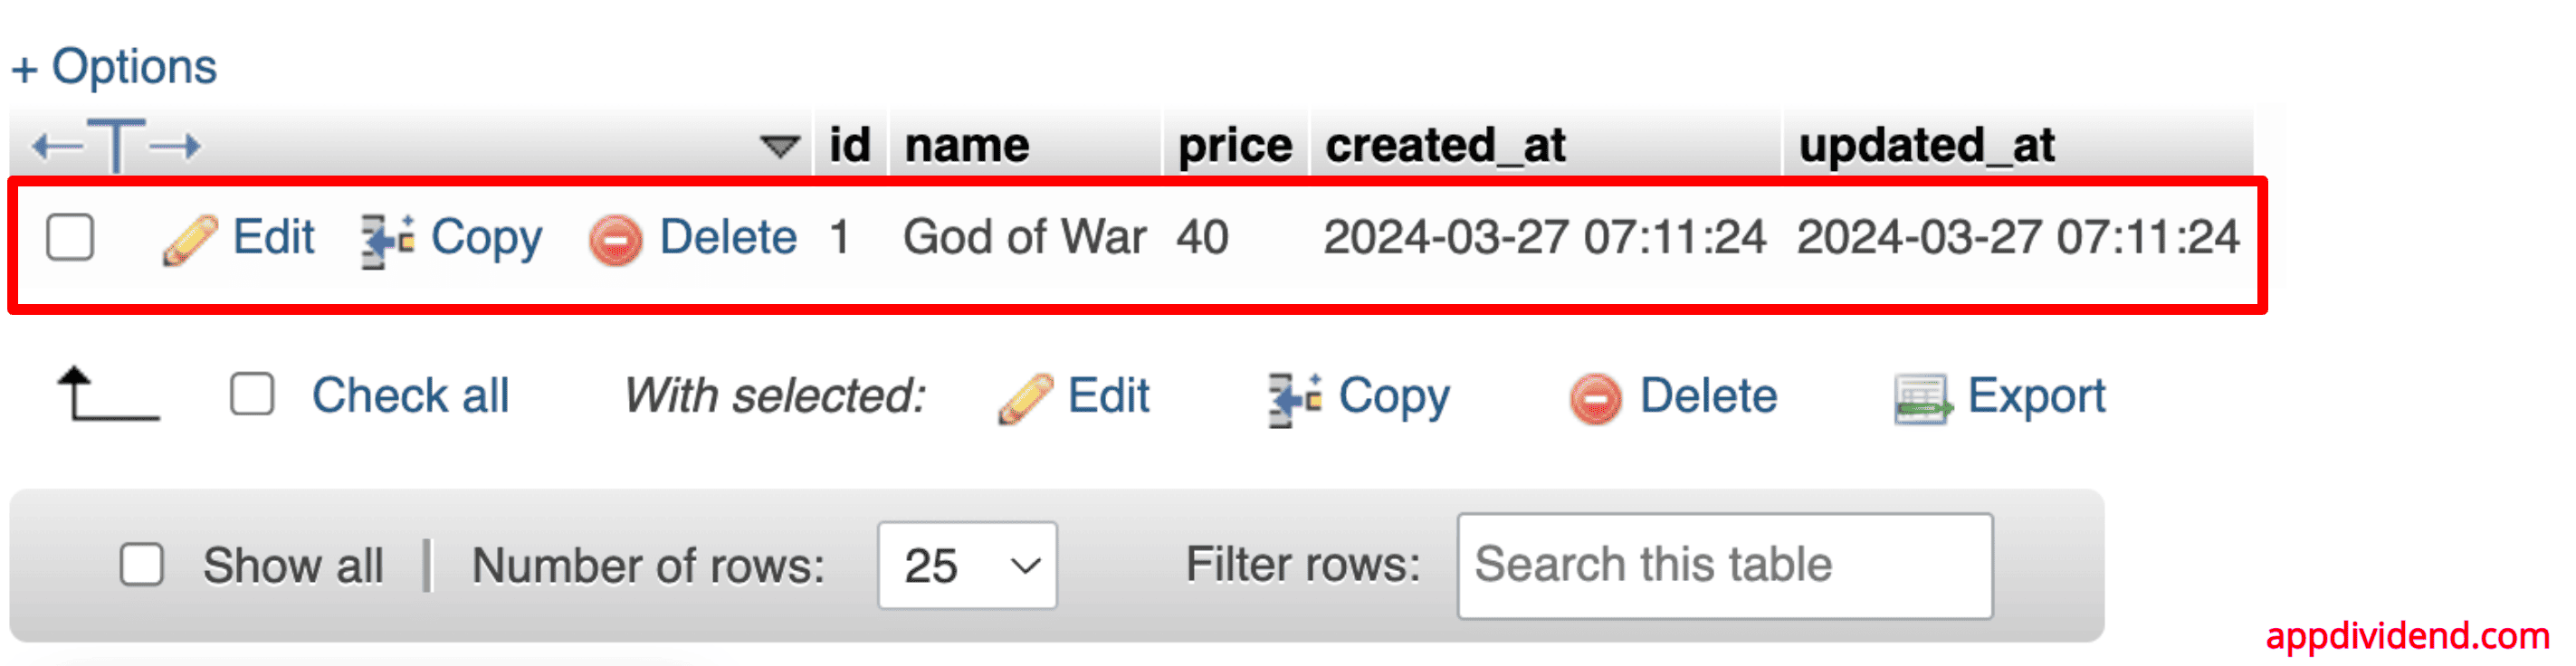
Go to the database and see the products table.
Also, you can check the Pivot Table, a create_product table.
If we have done everything correctly, we can see the two rows inside the table, where product_id is the same, 1, for both rows, but category_ids are different, 3 and 4.

Yay!!, we have successfully attached the two categories to one Product.
The next step is to display the Product Information and all the Categories inside that Product.
Step 7: Display Product Information
Define the route that can display all the information.
// web.php

Route::get('product/{product}', [ProductController::class, 'show'])->name('product.show');
Define the ProductController’s show() function.
In this function, I am using Routing Model Binding.
// ProductController.php

public function show(Product $product)
{
   return view('show', compact('product'));
}
We pass the product ID in the get request, fetch the product details via Route Model Binding directly, and give that product detail to the view.
Inside the views folder, create one file called show.blade.php.
Write the following code inside the show.blade.php file. We display the product name, price, and belongs to categories.
// show.blade.php

<h2>Product Name: </h2>
<p>{{ $product->name }} || ${{ number_format($product->price, 2) }}</p>

<h3>Product Belongs to</h3>

<ul>
  @foreach($product->categories as $category)
    <li>{{ $category->title }}</li>
  @endforeach
</ul>
As we have defined the relationship, we can directly fetch all the categories from the Product model, which is the magic of Eloquent Relationships in Laravel.
Now, go to this URL: http://localhost:8000/product/1
As you can see, we have only one Product created to see only one product detail.

This is how you can add multiple categories to a product and display multiple categories for a product.
Now, you can create as many products as you want and assign multiple categories to them.
You can also delete the relationship between the tables using the detach() function.
Detach() function
public function removeCategory(Product $product)
{
        $category = Category::find(3);

        $product->categories()->detach($category);

        return 'Success';
}
Define the following route inside a web.php file.
Route::get('category/product/{product}',
    [ProductController::class, 'removeCategory'])->name('category.product.delete');
Next, type this URL: http://localhost:8000/category/product/1.
Hit enter, and we get success now. Go to the MySQL database and check the category_product table.
You can see that the category_id = 3 row is deleted, and we no longer belong to category_id = 3.

That’s it!
Related posts
Laravel OneToMany Relationship

Alex
Hi,
I think there are some error in the “Define the relationships” section (the code is the same for both models)
Krunal
Yes, sorry, I have updated the code.
Igor
Thank you for your post, Krunal! It really contains useful info for me. I have only one question about defining the schema in the create_category_product_table migration file. Do I need to create an ID field there using this line: $table->increments(‘id’);???
Or may be this will be enough?:
Schema::create(‘category_product’, function (Blueprint $table) {
$table->integer(‘category_id’)->unsigned();
$table->integer(‘product_id’)->unsigned();
});
Nevio
Thanks a lot, exactly what I was looking for.
Something you could add (to avoid stupidly losing time like me), is that Eloquent will look for a table model1_model2 in alphabetical order by default(can be overridden).
In my case I was working with a User and Hotel model and I created a user_hotel table instead of a hotel_user one.
Kyle
Very helpful, thank you!
Krunal
I will keep posting the article like this. Thanks mate!
Mohammad
I am getting this error
Call to a member function attach() on null
on line this line
$product->categories()->attach($category);
Mujahid
You have not created any category, please create category then attach product to that category.
Naung Ye Htet
this is helpful for me, thanks….
Sergio Rey
Hello, this is a topic I have struggled with for some time and you explained it in a very clear way thank you
Krunal
Thank you for your time to appreciate this post! I will keep posting the helpful content like this.
steven
i want to add the category in my form by selecting the specific categories how will I modify the public function store code
$category = Category::find([3, 4]);
thank you in advance
Rachna Gajjar
In CreateCategoryProductTable
$table->integer(‘category_id’)->unsigned();
$table->integer(‘product_id’)->unsigned();
after that we add foreign’s cloumns:
$table->foreign(‘category_id’)
->references(‘id’)
->on(‘categories’)->onDelete(‘cascade’);
$table->foreign(‘product_id’)
->references(‘id’)
->on(‘products’)->onDelete(‘cascade’);
Kapil
thanks for the tutorial
Krunal
Keep sharing!
juansc
Hi, in find(..) you have add the id of your table product, if product register one category “B” then your get your id of “B” , then your have $product->category_id, well I created my table data base with related bettwen tables and added this relations. then are like this -> find($product->category_id)
Naren
Thanks. Good article
Krunal
Thank you!