Intervention Image has optional support for Laravel and comes with a Service Provider and Facades for easy integration.
In addition, laravel includes the vendor/autoload.php file, so you don’t have to require or autoload manually.
Also, I have used the intervention/image package to resize the image and then save the image into the database.
Here is the step-by-step guide:
Step 1: Install Laravel Project
composer create-project --prefer-dist laravel/laravel laravelinterventionimage
Step 2: Set up a MySQL database
Configure this database in the .env file.
DB_CONNECTION=mysql
DB_HOST=127.0.0.1
DB_PORT=8889
DB_DATABASE=laravelinterventionimage
DB_USERNAME=root
DB_PASSWORD=root
I have set up local database credentials.
Step 3: Construct a model and migration file
Type the following command in your terminal.
php artisan make:model ImageModel -m
It will create two files.
- ImageModel.php model.
- timestamp_create__image_models_table migration file.
We need to create a Schema for the passports table. So navigate to Laravel >> database >> migrations >> create__image_models_table.
public function up(): void
   {
       Schema::create('image_models', function (Blueprint $table) {
           $table->id();
           $table->string('filename');
           $table->timestamps();
       });
   }
Migrate the table to the database.
php artisan migrate
Step 4: Build a view file to add the image to the database
Create a file in the resources >> views >> createimage.blade.php and put the following code in it.
<html lang="en">
<head>
  <title>Laravel 11 Image Intervention</title>
  <script
      src="https://code.jquery.com/jquery-3.7.1.min.js"
      integrity="sha256-/JqT3SQfawRcv/BIHPThkBvs0OEvtFFmqPF/lYI/Cxo="
      crossorigin="anonymous"></script>
  <link rel="stylesheet" href="https://cdn.jsdelivr.net/npm/bootstrap@3.3.7/dist/css/bootstrap.min.css"
    integrity="sha384-BVYiiSIFeK1dGmJRAkycuHAHRg32OmUcww7on3RYdg4Va+PmSTsz/K68vbdEjh4u" crossorigin="anonymous">
</head>
<body>

  <div class="container">
    <h3 class="jumbotron">Laravel  Image Intervention </h3>
    <form>
        <div class="row">
          <div class="col-md-4"></div>
          <div class="form-group col-md-4">
          <input type="file" name="filename" class="form-control">
          </div>
        </div>
        <div class="row">
          <div class="col-md-4"></div>
          <div class="form-group col-md-4">
          <button type="submit" class="btn btn-success" style="margin-top:10px">Upload Image</button>
          </div>
        </div>
  </form>
  </div>
</body>
</html>
Step 5: Create one controller and route
php artisan make:controller ImageController --resource
It will create one controller file called ImageController.php.
We register routes in routes >> web.php file. So let us do it.
Route::get('image/create', [ImageController::class, 'create'])->name("image.create");
The next step would be to go to the ImageController.php file and add some code to the create() function.
public function create()
  {
      return view('createimage');
  }
After that, we require the beginning Laravel Development server. So, in the terminal, follow the following command.
php artisan serve
Go to the browser and hit this URL: http://localhost:8000/create
Step 6: Install Intervention Image Package
Move to your terminal and type the following command.
composer require intervention/image:^2
Find the providers in bootstrap >> providers.php file and register the ImageServiceProvider.
<?php

return [
    App\Providers\AppServiceProvider::class,
    Intervention\Image\ImageServiceProvider::class,
];
Locate the aliases in config >> app.php file and register the aliases.
'aliases' => [
        'Image' => Intervention\Image\Facades\Image::class,
    ],
The Intervention Image uses PHP’s GD library extension to process all images by default. However, to switch to Imagick, you can pull a configuration file into your application by running one of the following artisan commands.
php artisan vendor:publish --provider="Intervention\Image\ImageServiceProviderLaravelRecent"
Step 7: Save Data into the Database
We require coding the store function in sequence to store the data in the database. We can programmatically create the two folders, but let us manually create two folders in the public directory called images and thumbnails.
//ImageController.php

use App\Models\ImageModel;
use Image;
use Illuminate\Support\Facades\File;

public function store(Request $request)
    {
        $thumbnailPath = public_path('/thumbnails/');
        $originalPath  = public_path('/images/');

        if (!File::isDirectory($originalPath)) {
            File::makeDirectory($originalPath, 0775, true, true);
        }

        if (!File::isDirectory($thumbnailPath)) {
            File::makeDirectory($thumbnailPath, 0775, true, true);
        }

        $originalImage= $request->file('filename');
        $thumbnailImage = Image::make($originalImage);

        $thumbnailImage->save($originalPath.time().$originalImage->getClientOriginalName());
        $thumbnailImage->resize(150,150);
        $thumbnailImage->save($thumbnailPath.time().$originalImage->getClientOriginalName());

        $imagemodel= new ImageModel();
        $imagemodel->filename=time().$originalImage->getClientOriginalName();
        $imagemodel->save();

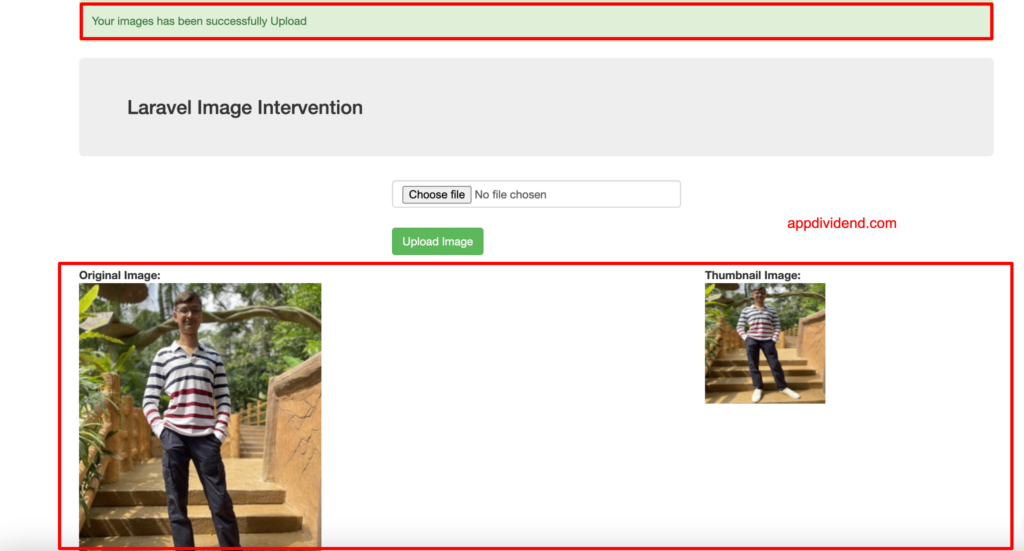
        return back()->with('success', 'Your images has been successfully Upload');
    }
We need to register routes in routes >> web.php file.
Route::post('image/create', [ImageController::class, 'store'])->name("image.store");
Now, we need to change the createimage.blade.php file.
<html lang="en">
<head>
  <title>Laravel 11 Image Intervention</title>
  <script
      src="https://code.jquery.com/jquery-3.7.1.min.js"
      integrity="sha256-/JqT3SQfawRcv/BIHPThkBvs0OEvtFFmqPF/lYI/Cxo="
      crossorigin="anonymous"></script>
  <link rel="stylesheet" href="https://cdn.jsdelivr.net/npm/bootstrap@3.3.7/dist/css/bootstrap.min.css"
    integrity="sha384-BVYiiSIFeK1dGmJRAkycuHAHRg32OmUcww7on3RYdg4Va+PmSTsz/K68vbdEjh4u" crossorigin="anonymous">
</head>
<body>

  <div class="container">
  @if(session('success'))
        <div class="alert alert-success">
          {{ session('success') }}
        </div>
        @endif
        @if (count($errors) > 0)
      <div class="alert alert-danger">
        <strong>Whoops!</strong> There were some problems with your input.<br><br>
        <ul>
          @foreach ($errors->all() as $error)
              <li>{{ $error }}</li>
          @endforeach
        </ul>
      </div>
      @endif
    <h3 class="jumbotron">Laravel  Image Intervention </h3>
  <form method="post" action="{{url('image/create')}}" enctype="multipart/form-data">
        @csrf
        <div class="row">
          <div class="col-md-4"></div>
          <div class="form-group col-md-4">
          <input type="file" name="filename" class="form-control">
          </div>
        </div>
        <div class="row">
          <div class="col-md-4"></div>
          <div class="form-group col-md-4">
          <button type="submit" class="btn btn-success" style="margin-top:10px">Upload Image</button>
          </div>
        </div>
  </form>
  </div>
</body>
</html>
Step 8: Define Validation for Image
Add validation in the Store function.
public function store(Request $request)
    {
       $request->validate([
            'filename' => 'required',
            'filename.*' => 'image|required|mimes:jpeg,png,jpg,gif,svg'
        ]);
    }
If there is any validation, Fail it through error.
Next, we pass an image to the blade file to display images.
//ImageController.php
public function create()
    {
        $image = ImageModel::latest()->first();
        return view('createimage', compact('image'));
    }
The final Code of Controller looks like this below.
public function store(Request $request)
    {
       $request->validate([
            'filename' => 'required',
            'filename.*' => 'image|required|mimes:jpeg,png,jpg,gif,svg'
        ]);

        $originalPath = public_path('/images/');
        $thumbnailPath = public_path('/thumbnails/');

        if (!File::isDirectory($originalPath)) {
            File::makeDirectory($originalPath, 0775, true, true);
        }

        if (!File::isDirectory($thumbnailPath)) {
            File::makeDirectory($thumbnailPath, 0775, true, true);
        }

        $originalImage= $request->file('filename');
        $thumbnailImage = Image::make($originalImage);

        $thumbnailImage->save($originalPath.time().$originalImage->getClientOriginalName());
        $thumbnailImage->resize(150,150);
        $thumbnailImage->save($thumbnailPath.time().$originalImage->getClientOriginalName());

        $imagemodel= new ImageModel();
        $imagemodel->filename=time().$originalImage->getClientOriginalName();
        $imagemodel->save();

        return back()->with('success', 'Your images has been successfully Upload');
    }
Step 9: Modify the View File
We can display an image in the view file, so add some code in the createimage.blade.php file to display the image.
@if($image)
  	    <div class="row">
        <div class="col-md-8">
             <strong>Original Image:</strong>
             <br/>
             <img src="/images/{{$image->filename}}" />
       </div>
       <div class="col-md-4">
           <strong>Thumbnail Image:</strong>
           <br/>
           <img src="/thumbnails/{{$image->filename}}"  />
      	 </div>
  		</div>
       @endif
The final Code of View file looks like the one below.
<html lang="en">
<head>
  <title>Laravel 11 Image Intervention</title>
  <script
      src="https://code.jquery.com/jquery-3.7.1.min.js"
      integrity="sha256-/JqT3SQfawRcv/BIHPThkBvs0OEvtFFmqPF/lYI/Cxo="
      crossorigin="anonymous"></script>
  <link rel="stylesheet" href="https://cdn.jsdelivr.net/npm/bootstrap@3.3.7/dist/css/bootstrap.min.css"
    integrity="sha384-BVYiiSIFeK1dGmJRAkycuHAHRg32OmUcww7on3RYdg4Va+PmSTsz/K68vbdEjh4u" crossorigin="anonymous">
</head>
<body>

  <div class="container">
  @if(session('success'))
        <div class="alert alert-success">
          {{ session('success') }}
        </div>
        @endif
        @if (count($errors) > 0)
      <div class="alert alert-danger">
        <strong>Whoops!</strong> There were some problems with your input.<br><br>
        <ul>
          @foreach ($errors->all() as $error)
              <li>{{ $error }}</li>
          @endforeach
        </ul>
      </div>
      @endif
    <h3 class="jumbotron">Laravel  Image Intervention </h3>
  <form method="post" action="{{url('image/create')}}" enctype="multipart/form-data">
        @csrf
        <div class="row">
          <div class="col-md-4"></div>
          <div class="form-group col-md-4">
          <input type="file" name="filename" class="form-control">
          </div>
        </div>
        <div class="row">
          <div class="col-md-4"></div>
          <div class="form-group col-md-4">
          <button type="submit" class="btn btn-success" style="margin-top:10px">Upload Image</button>
          </div>
        </div>
        @if($image)
   	    <div class="row">
         <div class="col-md-8">
              <strong>Original Image:</strong>
              <br/>
              <img src="/images/{{$image->filename}}" />
        </div>
        <div class="col-md-4">
            <strong>Thumbnail Image:</strong>
            <br/>
            <img src="/thumbnails/{{$image->filename}}"  />
       	 </div>
   		</div>
        @endif
  </form>
  </div>
</body>
</html>
Our database looks like this:
That’s it.


Jacques Matike
Hello,
Thanks for this tutorial, it’s well explained. But I am on Windows platform with Laragon and I have issues on saving file.
I got the message :
Intervention \ Image \ Exception \ NotWritableException
Can’t write image data to path (D:\htdocs\shareholders\public/avatars/images/1534280739logo.png)
I create another code which uses Illuminate\Support\Facades\Storage. There I can save the file but when I got the path and set it on ‘src’ image tag, the file is not rendered although the path is corect and the file exists.
Vishal
You can first add folders in your public folder then only you can use these codes, if you will not make folders in advance it will give these WRITE ERRORS.
Folder names are images and thumbnail
Krunal
We have made changes in the code; please let me know if you are still facing an issue.
leafmanDHunter
Nice tutorial, please can this example be used while trying to upload multiple images?
Danish
thanks Dear, nice work . Keep it Up.
javad mohammadi
thank you my friend
You explained very well
Krunal
Your welcome. Keep learning and sharing.