

To upload files in Angular 18, we will create a FileComponent using the Material library. For managing the uploaded files at the backend, we use the multer library. Multer is a node.js middleware for handling multipart/form-data, primarily for uploading files.
Here is the step-by-step guide to uploading a file:
Step 1: Setup an Angular 18 project
Install Angular CLI if you have not installed it already!
npm install -g @angular/cli
Create a local project using the following command.
ng new upload-app
Go inside the project folder and install the Angular Material library.
ng add @angular/material
Start the application using the following command.
ng serve --open
Step 2: Configuring HttpClient
For a long time, the HttpClient was provided by the HttpClientModule that you imported into your application module. When the standalone APIs were introduced in Angular 14, it opened the door to writing applications without modules.
In Angular 18, provideHttpClient() is a function used to provide and configure the HTTP client module within the new API. This function allows you to use the Angular HTTP client in standalone components or within an Angular application configured using the standalone API.
To use HTTP Service, you need to import provideHttpClient() in the src/app/app.config.ts file like this:
// app.config.ts

import { ApplicationConfig, provideZoneChangeDetection } from '@angular/core';
import { provideRouter } from '@angular/router';
import { provideHttpClient } from '@angular/common/http';

import { routes } from './app.routes';
import { provideAnimationsAsync } from '@angular/platform-browser/animations/async';

export const appConfig: ApplicationConfig = {
  providers: [
    provideZoneChangeDetection({ eventCoalescing: true }),
    provideRouter(routes),
    provideAnimationsAsync(),
    provideHttpClient(),
  ],
};
Now, you can use the HTTPClient to make GET or POST requests to an API server.
Step 3: Create a file upload service
You can create a file upload service using the below command:
ng g service upload
Add the following code inside the src/app/upload.service.ts file:
// upload.service.ts

import { Injectable } from '@angular/core';
import { HttpClient, HttpEventType, HttpRequest } from '@angular/common/http';
import { Observable, Subject } from 'rxjs';
import { map } from 'rxjs/operators';

@Injectable({
  providedIn: 'root',
})
export class FileUploadService {
  private cancelUpload$ = new Subject<void>();

  constructor(private http: HttpClient) {}

  uploadFile(file: File): {
    uploadProgress$: Observable<number>;
    cancelUpload: () => void;
  } {
    const formData = new FormData();
    formData.append('file', file);

    const req = new HttpRequest('POST', 'http://localhost:4000/add', formData, {
      reportProgress: true,
    });

    const uploadProgress$ = this.http.request(req).pipe(
      map((event) => {
        switch (event.type) {
          case HttpEventType.UploadProgress:
            return Math.round((100 * event.loaded) / (event.total ?? 1));
          case HttpEventType.Response:
            return 100;
          default:
            return 0;
        }
      })
    );

    return {
      uploadProgress$: uploadProgress$,
      cancelUpload: () => this.cancelUpload$.next(),
    };
  }
}
In this code, we defined the uploadFile() function, which accepts a file as an argument. We then append that file to the formData object.
Then, we send a POST request with a file as payload to the API server for uploading.
Meanwhile, uploading, we are showing the upload progress, and after it is uploaded successfully, we will display a message saying that we successfully uploaded an image.
Step 4: Adding a file upload component
We have created an upload service to upload a file to the server, but we have not created a component that will display to the user through which he can upload a file.
Add the following code inside the src/app/app.component.ts file:
// app.component.ts

import { Component } from '@angular/core';
import { ReactiveFormsModule } from '@angular/forms';
import { MatButtonModule } from '@angular/material/button';
import { MatCardModule } from '@angular/material/card';
import { MatProgressBarModule } from '@angular/material/progress-bar';
import { FileUploadService } from './upload.service';
import { CommonModule } from '@angular/common';

@Component({
  selector: 'app-root',
  templateUrl: './app.component.html',
  styleUrls: ['./app.component.css'],
  standalone: true,
  imports: [
    ReactiveFormsModule,
    MatButtonModule,
    MatCardModule,
    CommonModule,
    MatProgressBarModule,
  ],
})
export class AppComponent {
  uploadProgress: number | null = null;
  isUploading = false;
  file: File | null = null;
  uploadSuccess: boolean = false;
  fileError: string | null = null;

  constructor(private fileUploadService: FileUploadService) {}

  onFileSelected(event: any) {
    this.file = event.target.files[0];
    if (this.file) {
      const fileType = this.file.type;
      if (fileType !== 'image/png' && fileType !== 'image/jpeg') {
        this.fileError = 'Only PNG or JPG files are allowed';
        this.file = null; // Reset the file
        this.uploadSuccess = false;
      } else {
        this.fileError = null;
      }
    }
  }

  uploadFile() {
    if (!this.file) return;

    this.isUploading = true;
    this.uploadSuccess = false;
    const { uploadProgress$, cancelUpload } = this.fileUploadService.uploadFile(
      this.file
    );

    uploadProgress$.subscribe({
      next: (progress) => {
        this.uploadProgress = progress;
        if (progress === 100) {
          this.isUploading = false;
          this.uploadSuccess = true;
          this.fileError = null;
        }
      },
      error: (err) => {
        console.error('Upload failed', err);
        this.isUploading = false;
      },
      complete: () => {
        this.isUploading = false;
      },
    });
  }

  cancelUpload() {
    this.isUploading = false;
    this.uploadProgress = null;
    this.uploadSuccess = false;
  }
}
From the start, we imported necessary modules, including Angular material, CommonModule, core modules, and services. Then, we add the list of modules that the component needs in the imports array.
Inside the component class, we defined five variables:
- uploadProgress: It tracks the upload progress percentage.
- isUploading: It suggests whether an upload is in progress.
- file: It is a holder that holds the selected file.
- uploadSuccess: It is a boolean value that suggests if the file upload was successful.
- fileError: It holds any file-related error messages.
The onFileSelected() function is called when a file is selected. Within this function, we validate the file type to ensure it is either PNG or JPG, set fileError if the file type is invalid, and reset the file.
The uploadFile() function is called when you submit the file for upload. This function initiates the file upload process and uses the upload service to upload the file. It subscribes to the uploadProgress$ observable to track the upload progress. Based on the progress, it also updates the uploadProgress, isUploading, and uploadSuccess.
The cancelUpload() function cancels the ongoing upload process.
Step 5: Adding an HTML template
We wrote a component that handles file uploading, but we still need to add an HTML code that renders the view. Write the following code in the src/app/app.component.html file:
<div class="file-upload-container">
  <input type="file" (change)="onFileSelected($event)" />
  <button mat-button (click)="uploadFile()" [disabled]="!file || isUploading">
    Upload
  </button>
  <button mat-button (click)="cancelUpload()" [disabled]="!isUploading">
    Cancel
  </button>

  <div *ngIf="fileError">
    <p class="error">{{ fileError }}</p>
  </div>

  <div *ngIf="isUploading">
    <mat-progress-bar
      mode="determinate"
      [value]="uploadProgress"
    ></mat-progress-bar>
    <p>Uploading: {{ uploadProgress }}%</p>
  </div>

  <div *ngIf="uploadSuccess && !isUploading">
    <p>File uploaded successfully!</p>
  </div>
</div>
In this view file, we are displaying the upload component. If the file is not valid, we will display an error message, and if the file upload is successful, we will display a success message.
Save the file and make sure that the development server is running.
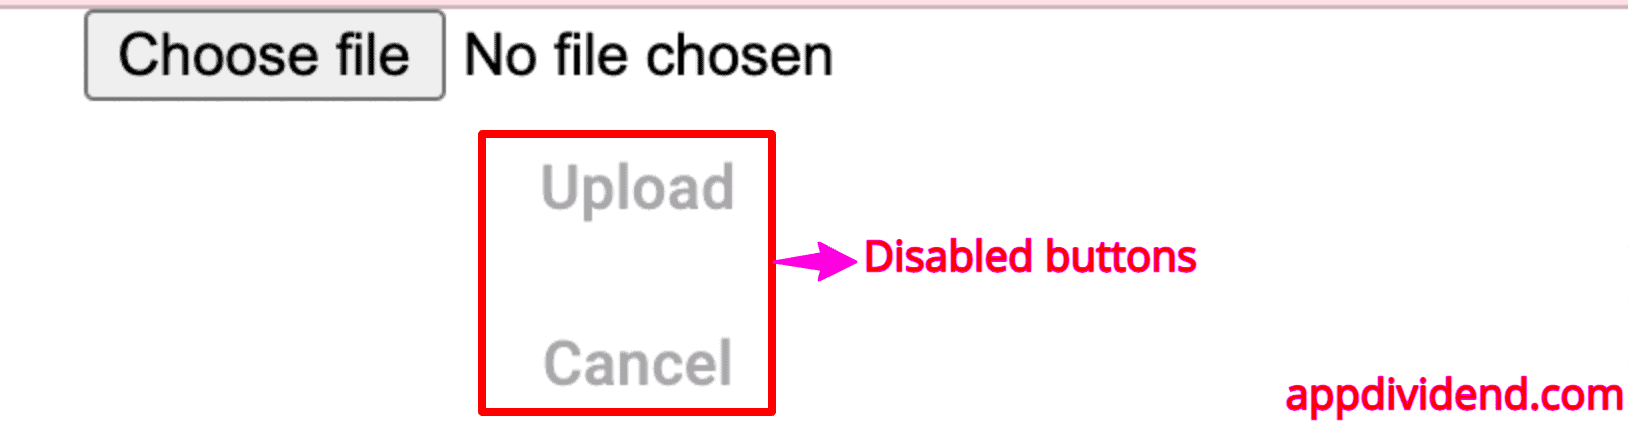
The output looks like this:
Step 6: Start creating Node.js backend
Create a new folder called “api” inside the root of the “upload-app” folder.
Go inside the project folder and initialize the package.json file using this command:
npm init
Now, install the following node modules.
npm install express multer body-parser cors --save
We have installed Express as a web framework for Node.js development.
Create a new directory inside the root of api folder called uploads.
Step 7: Creating a multer config file
Inside the “api” folder, create a new file called “multerConfig.js” and add the below code:
const multer = require('multer');

const storage = multer.diskStorage({
    destination: function (req, file, cb) {
        cb(null, './uploads'); // Ensure this directory exists
    },
    filename: function (req, file, cb) {
        const uniqueSuffix = Date.now() + '-' + Math.round(Math.random() * 1E9);
        cb(null, file.fieldname + '-' + uniqueSuffix + '.' + file.originalname.split('.').pop());
    }
});

const fileFilter = (req, file, cb) => {
    if (file.mimetype === 'image/jpeg' || file.mimetype === 'image/png') {
        cb(null, true);
    } else {
        cb(new Error('Only JPG and PNG files are allowed!'), false);
    }
};

const upload = multer({ storage: storage, fileFilter: fileFilter });

module.exports = upload;
Step 8: Creating an application file
Create a new file in the api project root folder called app.js and add the below code:
// app.js

const express = require('express');
const cors = require('cors');
const path = require("path");
const multerUpload = require('./multerConfig');


function createApp() {
    const app = express();

    app.use(cors());
    app.use(express.urlencoded({ extended: true }));
    app.use('/uploads', express.static(path.join(__dirname, 'uploads')));
    app.use(express.json());
    app.post('/add', multerUpload.single('file'), async (req, res) => {
        res.json({ title: "File uploaded successfully" })
    });

    return app;
}

module.exports = createApp;
Step 9: Create a Node server file
Inside the api folder, create a final node server file called server.js and add the below code.
// server.js

const createApp = require('./app');
const PORT = 4000;

async function startServer() {
    const app = createApp();
    app.listen(PORT, () => {
        console.log(`Server is running on Port: ${PORT}`);
    });
}

startServer();
Now, we can use the .env file to protect the PORT variable, but for this example, I won’t do that. Remember that it is recommended to use a .env file for sensitive information.
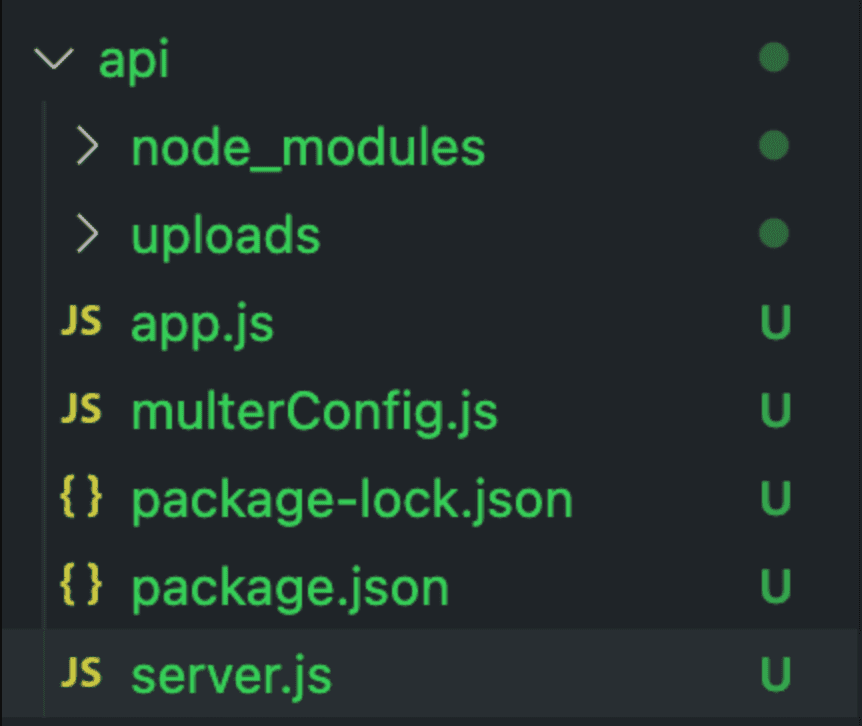
Our final project folder structure for the Node.js backend looks like this:
Step 6: Run the project.
Start both development servers if not started.
- Go inside the upload-app folder and use this command: ng server –open
- Go inside the api folder and use this command: node server
Go to the http://localhost:4200/
Unless you select any file, the upload an image button will remain disabled.
When encountering an error, Multer will delegate the error to Express. Thus, you can display a nice error page using the standard expressway.
To catch errors specifically from Multer, you can call the middleware function yourself. Also, if you’re going to catch only the Multer errors, you can use the MulterError class that is attached to the multer object itself (e.g. err instanceof multer.MulterError).
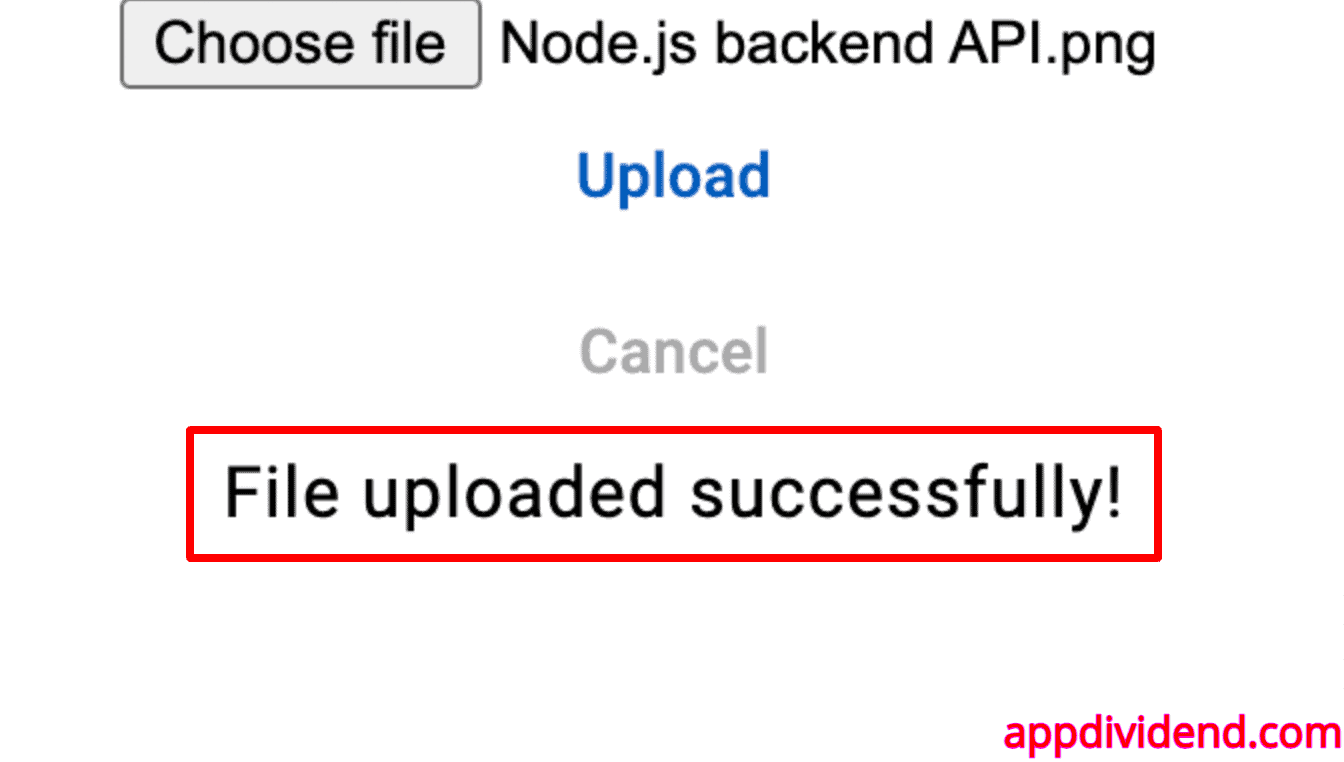
Here is the proper output of our project when we successfully upload an image to the node server:
If you try to upload an image whose format is other than .jpg/.png, you will get an error message like this:
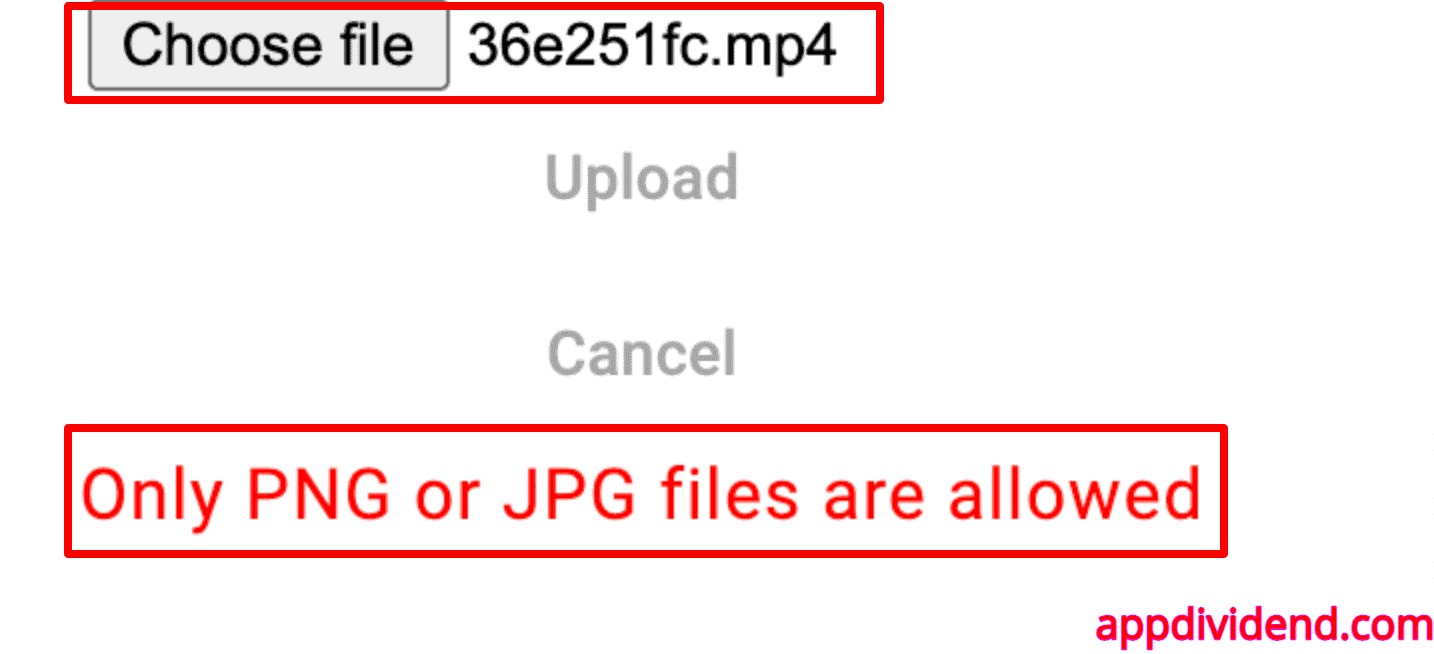
You can see that we try to upload a video, and it returns the validation message saying, “Only PNG or JPG files are allowed.” That means our validation works fine!
Here is the Github Code.

Brian S
Great tutorial. Working perfect.
Krunal Lathiya
Thanks, mate! I updated this tutorial in June 2024, and it works on the latest Angular and Node.js versions, too!
Troy
How to display the images after they are stored
Krunal Lathiya
Set up the Node.js server to serve static files and ensure the images are accessible from a public directory.
Robin Singh
I watched many tutorials but u r the best.
i m trying from last 2 weeks but nothing happens. Thanku for this tutorial.
Can u make a new tutorial on how to show image after save in folder and database
Krunal Lathiya
You can Set up the Node.js server to serve static files and ensure the images are accessible from a public directory to show the images. And you can connect the mongodb database server to store the metadata of that image and fetch the data to client side.
Ganesh
Is this work in a2hosting or Godaddy server? In the local server it is working fine.
Gopi
This is what I am exactly looking for. Got it. Great thanks Krunal.
Krunal Lathiya
Thanks, mate! Keep learning and sharing!
Nize
Thank you so much.
mohan
not working for me .anyone please help me
send me tour code to amohanagarapu@gmail.com
prasanna
carefully follow every command, even it didn’t worked for me in the beginning
jaballi aymen
thkns for that 🙂
but how get link this image uplouder!!
bhawna inaniya
please perform this operation with form data
bhawna inaniya
please send detail about how to add post data with ng2 uploader
Almeida
How can I show the image that was uploaded? To upload an image is easy, but I don`t get how can I fetch it and show it 🙁
Pankaj Makwana
Can you please let me know how to send header with file uploading? I want to send authentication token, and other headers
best iptv
bonjour
great share.
I think the most stable premium iptv servers are those from Fishbone IPTV cloud
I would like to see more posts like this
Thanks
Mohamed Motyim
Thanks a lot this help me
Aditya
Getting 404 error while using same with spring rest api on angular 6
Rozy Mahsun
How to upload multiple files ?
Thanks in advanec
Mladen
UploadCatalogComponent.html:8 ERROR TypeError: Cannot read property ‘uploadAll’ of undefined
Katheeja
has no exported member ‘FileSelectDirective’.Why I get this error?
Katheeja
Thanks a lot, How to do file download from server using angular and node.js.Please share snippet.
Katheeja
Thanks a lot,upload worked but I am unable to download in original file name. Please help.
Nhi
Hi, I have an error: OPTIONS http://localhost:3000/image net:: ERR_CONNECTION_REFUSED
Please help me. Thanks
jeevanandan
I need to send form values also, how can i send?
jk
where is the file stored after uploading
jk
where is the file stored after uploading
Esteban Potes Rua
in the uploads folder
cvvb
where is the upload folder
Esteban Potes Rua
How to use the download of those files?
Shah Maz
I got another issue. after running server.js upload works perfect but I got 404 Err ‘File NOT found’ from another method I already have.
this.httpClnt.get (‘assets/daily.json’); //it works before running server.js but after running httpClient Get json files not working
any idea
Nethravathi
Can any please help me with the code to upload csv and xlsx file in angular 6?
imran
how to upload csv file into mongodb in mean stack angular 7
mounika
It’s not working for me can you please any share code.
sathya
It’s working fine up to UI but it’s not working in services part for me
Ex: in my project i am getting service path http://localhost:3000/api/upload always not found 404 error
Can you please any one help me for this.
rgreerre
updating image how can it be done
yutu
ye i want to know
chaitanya
ng build –prod getting error:
Please consider moving FileSelectDirective in node_modules/ng2-file-upload/file-upload/file-select.directive.d.ts to a higher module that imports AppModule in src/app/app.module.ts and FileUploadModule in node_modules/ng2-file-upload/file-upload/file-upload.module.d.ts. You can also create a new NgModule that exports and includes FileSelectDirective in node_modules/ng2-file-upload/file-upload/file-select.directive.d.ts then import that NgModule in AppModule in src/app/app.module.ts and FileUploadModule in node_modules/ng2-file-upload/file-upload/file-upload.module.d.ts.
Peters Chikezie
Great post. Is there a way to send both and image and other form fields to node server?
Utsah
Can upload video using file upload?
David
Adding ‘FileSelectDirective’ to the declarations in app.module.ts produces loads of errors for me.