
Here is the step-by-step guide to creating a crud application in Laravel 5.6:
Step 1: Configure Laravel 5.6 Project
Install the brand new Laravel Project by typing the following command.
composer create-project --prefer-dist laravel/laravel passportappointmentsystem
Step 2: Set up a MySQL database in .env file.
Configure the database in the .env file.
DB_CONNECTION=mysql
DB_HOST=127.0.0.1
DB_PORT=3306
DB_DATABASE=passportsystem
DB_USERNAME=root
DB_PASSWORD=
I have set up local database credentials.
Migrate two tables provided by Laravel 5.6. Switch to your terminal and hit the following command.
php artisan migrate
It will build two tables in your database.
- users
- password_resets
Step 3: Construct a model, migration file, and controller for our Passports table.
Type the following command in your terminal.
php artisan make:model Passport -m
It will create two files.
- Passport.php model.
- create_passports_table migration file.
We need to create a Schema for the passports table.
So navigate to Laravel >> database >> migrations >> create_passports_table.
// create_passports_table
public function up()
{
        Schema::create('passports', function (Blueprint $table) {
            $table->increments('id');
            $table->string('name');
            $table->integer('date');
            $table->string('email')->unique();
            $table->integer('number');
            $table->string('office');
            $table->string('filename');
            $table->timestamps();
        });
}
Migrate the table by the following command.
php artisan migrate
In the database, you can see the passports table.
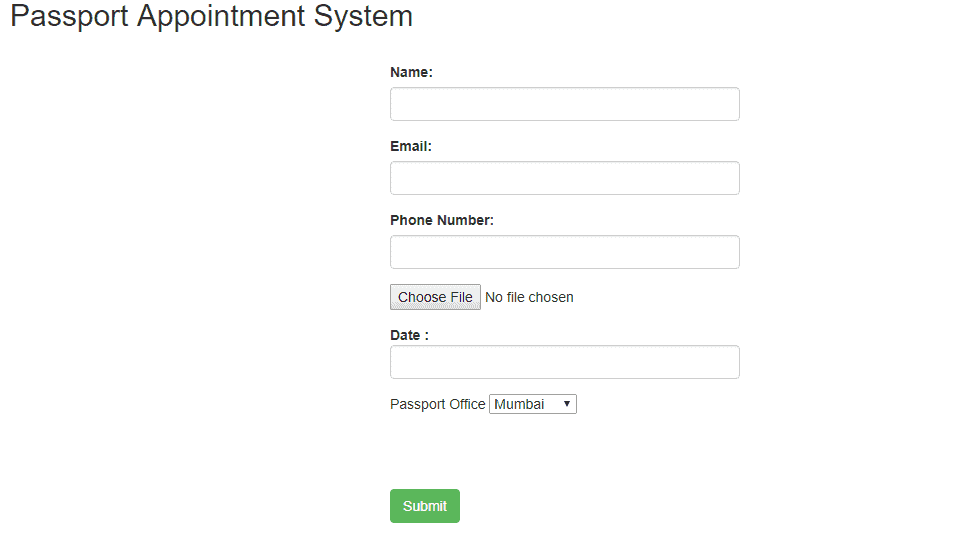
Step 4: Build a view file to add the information to the database.
Create a file in the resources >> views >> create.blade.php and put the following code in it.
<!-- create.blade.php -->

<!DOCTYPE html>
<html>
  <head>
    <meta charset="utf-8">
    <title>Laravel 5.6 CRUD Tutorial With Example  </title>
    <link rel="stylesheet" href="{{asset('css/app.css')}}">
    <link href="https://maxcdn.bootstrapcdn.com/bootstrap/3.3.6/css/bootstrap.min.css" rel="stylesheet">
    <link href="https://cdnjs.cloudflare.com/ajax/libs/bootstrap-datepicker/1.5.0/css/bootstrap-datepicker.css" rel="stylesheet">
    <script src="http://ajax.googleapis.com/ajax/libs/jquery/1.9.1/jquery.js"></script>
    <script src="https://maxcdn.bootstrapcdn.com/bootstrap/3.3.6/js/bootstrap.min.js"></script>
    <script src="https://cdnjs.cloudflare.com/ajax/libs/bootstrap-datepicker/1.5.0/js/bootstrap-datepicker.js"></script>
  </head>
  <body>
    <div class="container">
      <h2>Passport Appointment System</h2><br/>
      <form method="post" action="{{url('passports')}}" enctype="multipart/form-data">
        @csrf
        <div class="row">
          <div class="col-md-4"></div>
          <div class="form-group col-md-4">
            <label for="Name">Name:</label>
            <input type="text" class="form-control" name="name">
          </div>
        </div>
        <div class="row">
          <div class="col-md-4"></div>
            <div class="form-group col-md-4">
              <label for="Email">Email:</label>
              <input type="text" class="form-control" name="email">
            </div>
          </div>
        <div class="row">
          <div class="col-md-4"></div>
            <div class="form-group col-md-4">
              <label for="Number">Phone Number:</label>
              <input type="text" class="form-control" name="number">
            </div>
          </div>
        <div class="row">
          <div class="col-md-4"></div>
          <div class="form-group col-md-4">
            <input type="file" name="filename">
         </div>
        </div>
        <div class="row">
          <div class="col-md-4"></div>
          <div class="form-group col-md-4">
            <strong>Date : </strong>
            <input class="date form-control"  type="text" id="datepicker" name="date">
         </div>
        </div>
         <div class="row">
          <div class="col-md-4"></div>
            <div class="form-group col-md-4">
                <lable>Passport Office</lable>
                <select name="office">
                  <option value="Mumbai">Mumbai</option>
                  <option value="Chennai">Chennai</option>
                  <option value="Delhi">Delhi</option>
                  <option value="Bangalore">Bangalore</option>
                </select>
            </div>
        </div>
        <div class="row">
          <div class="col-md-4"></div>
          <div class="form-group col-md-4" style="margin-top:60px">
            <button type="submit" class="btn btn-success">Submit</button>
          </div>
        </div>
      </form>
    </div>
    <script type="text/javascript">
        $('#datepicker').datepicker({
            autoclose: true,
            format: 'dd-mm-yyyy'
         });
    </script>
  </body>
</html>
Step 5: Create one controller and route
php artisan make:controller PassportController --resource
It will create one controller file called PassportController.php, and It has all the CRUD Functions; we need to inquire.
We register one route in routes >> web.php file. So let us do it.
// web.php

Route::resource('passports','PassportController');
Turn to your terminal and type the next command.
php artisan route:list
The next step is to go to the PassportController.php file and add code to the create() function.
// PassportController.php

   /**
    * Show the form for creating a new resource.
    *
    * @return \Illuminate\Http\Response
    */
   public function create()
   {
       return view('create');
   }
After that, we need to begin the Laravel Development server. So in the terminal, follow the following command.
php artisan serve
Move to the browser and hit this URL: http://localhost:8000/passports/create
Step 6: Save Data into Database.
We require coding the store function in sequence to store the data in the database.
// PassportController.php

/**
     * Store a newly created resource in storage.
     *
     * @param  \Illuminate\Http\Request  $request
     * @return \Illuminate\Http\Response
     */
public function store(Request $request)
{
        if($request->hasfile('filename'))
         {
            $file = $request->file('filename');
            $name=time().$file->getClientOriginalName();
            $file->move(public_path().'/images/', $name);
         }
        $passport= new \App\Passport;
        $passport->name=$request->get('name');
        $passport->email=$request->get('email');
        $passport->number=$request->get('number');
        $date=date_create($request->get('date'));
        $format = date_format($date,"Y-m-d");
        $passport->date = strtotime($format);
        $passport->office=$request->get('office');
        $passport->filename=$name;
        $passport->save();

        return redirect('passports')->with('success', 'Information has been added');
}
Step 7: Make an index page to list the Information.
For that front, we need to forward the data to index.blade.php. So, in the PassportController.php file, we need to write the code to retrieve the data and return it to the index view.
// PassportController.php

public function index()
    {
        $passports=\App\Passport::all();
        return view('index',compact('passports'));
    }
In resources >> views folder, create an individual blade file called index.blade.php file and place the subsequent code in it.
<!-- index.blade.php -->

<!DOCTYPE html>
<html>
  <head>
    <meta charset="utf-8">
    <title>Index Page</title>
    <link rel="stylesheet" href="{{asset('css/app.css')}}">
  </head>
  <body>
    <div class="container">
    <br />
    @if (\Session::has('success'))
      <div class="alert alert-success">
        <p>{{ \Session::get('success') }}</p>
      </div><br />
     @endif
    <table class="table table-striped">
    <thead>
      <tr>
        <th>ID</th>
        <th>Name</th>
        <th>Date</th>
        <th>Email</th>
        <th>Phone Number</th>
        <th>Passport Office</th>
        <th colspan="2">Action</th>
      </tr>
    </thead>
    <tbody>

      @foreach($passports as $passport)
      @php
        $date=date('Y-m-d', $passport['date']);
        @endphp
      <tr>
        <td>{{$passport['id']}}</td>
        <td>{{$passport['name']}}</td>
        <td>{{$date}}</td>
        <td>{{$passport['email']}}</td>
        <td>{{$passport['number']}}</td>
        <td>{{$passport['office']}}</td>

        <td><a href="{{action('PassportController@edit', $passport['id'])}}" class="btn btn-warning">Edit</a></td>
        <td>
          <form action="{{action('PassportController@destroy', $passport['id'])}}" method="post">
            @csrf
            <input name="_method" type="hidden" value="DELETE">
            <button class="btn btn-danger" type="submit">Delete</button>
          </form>
        </td>
      </tr>
      @endforeach
    </tbody>
  </table>
  </div>
  </body>
</html>
When you type the URL: http://localhost:8000/passports

Step 8: Build an edit view for updating the Information.
Our step will be to join the edit function in the PassportController.php file and set the following code in it.
// PassportController.php

 /**
     * Show the form for editing the specified resource.
     *
     * @param  int  $id
     * @return \Illuminate\Http\Response
     */
public function edit($id)
{
        $passport = \App\Passport::find($id);
        return view('edit',compact('passport','id'));
}
Now, create an edit.blade.php file inside resources >> views folder.
<!-- edit.blade.php -->

<!DOCTYPE html>
<html>
  <head>
    <meta charset="utf-8">
    <title>Laravel 5.6 CRUD Tutorial With Example </title>
    <link rel="stylesheet" href="{{asset('css/app.css')}}">
  </head>
  <body>
    <div class="container">
      <h2>Edit A Form</h2><br  />
        <form method="post" action="{{action('PassportController@update', $id)}}">
        @csrf
        <input name="_method" type="hidden" value="PATCH">
        <div class="row">
          <div class="col-md-4"></div>
          <div class="form-group col-md-4">
            <label for="name">Name:</label>
            <input type="text" class="form-control" name="name" value="{{$passport->name}}">
          </div>
        </div>
        <div class="row">
          <div class="col-md-4"></div>
            <div class="form-group col-md-4">
              <label for="email">Email</label>
              <input type="text" class="form-control" name="email" value="{{$passport->email}}">
            </div>
          </div>
        <div class="row">
          <div class="col-md-4"></div>
            <div class="form-group col-md-4">
              <label for="number">Phone Number:</label>
              <input type="text" class="form-control" name="number" value="{{$passport->number}}">
            </div>
          </div>
        <div class="row">
          <div class="col-md-4"></div>
            <div class="form-group col-md-4" style="margin-left:38px">
                <lable>Passport Office</lable>
                <select name="office">
                  <option value="Mumbai"  @if($passport->office=="Mumbai") selected @endif>Mumbai</option>
                  <option value="Chennai"  @if($passport->office=="Chennai") selected @endif>Chennai</option>
                  <option value="Delhi" @if($passport->office=="Delhi") selected @endif>Delhi</option>
                  <option value="Bangalore" @if($passport->office=="Bangalore") selected @endif>Bangalore</option>
                </select>
            </div>
        </div>
        <div class="row">
          <div class="col-md-4"></div>
          <div class="form-group col-md-4" style="margin-top:60px">
            <button type="submit" class="btn btn-success" style="margin-left:38px">Update</button>
          </div>
        </div>
      </form>
    </div>
  </body>
</html>
The next step would be to code the update function. I have not updated the following fields.
- Date
- Image
If you are taking this tutorial, this task is for you to complete. I was hoping you could complete this update module yourself.
// PassportCpntroller.php

/**
     * Update the specified resource in storage.
     *
     * @param  \Illuminate\Http\Request  $request
     * @param  int  $id
     * @return \Illuminate\Http\Response
     */
    public function update(Request $request, $id)
    {
        $passport= \App\Passport::find($id);
        $passport->name=$request->get('name');
        $passport->email=$request->get('email');
        $passport->number=$request->get('number');
        $passport->office=$request->get('office');
        $passport->save();
        return redirect('passports');
    }
Step 9: Remove the Information
// PassportController.php
/**
     * Remove the specified resource from storage.
     *
     * @param  int  $id
     * @return \Illuminate\Http\Response
     */
public function destroy($id)
{
        $passport = \App\Passport::find($id);
        $passport->delete();
        return redirect('passports')->with('success','Information has been  deleted');
}
That’s it!

NoobCoder
Hey, thanks for the tutorial, i really appreciated it. I’m new to php and laravel, I followed your tutorial but get caught in some error, it said this : Class ‘App\Http\Controllers\Passport’ not found, is the Passport model doesn’t need to be edited ? thanks.
Krunal
You need to include the model like use AppPassport; inside Controller file And yes you need to create the model.
Brian
How is that one done???
A
put
use App\Passport;
in
class PassportController extends Controller
thats all
Passport.php can be empty
Riyaz
Thanks A.
I know it was the just small error, but I am just new in Laravel.
Kamran
i am stuck in this problem can anyone plz elaborate
Fian
me too.. stuck in this problem.
already put App\Passport; inside Controller Passport
and “Class ‘App\Http\Controllers\Passport’ not found”
Krunal
Actually, you need to put AppPassport; at the starting of the file, not inside any function, but nevermind, I have updated this tutorial.
sikandar
please insert image and date code. And update image and date code in laravel 5.7 please update these code which are missing in this tutorial.
i’m waiting your response .
thanks
Jane Swift
This worked for me – allows user to select a date
Required Date:
Noe
Hallo thanks for the tutorial. When I was in the step 5 and type php artisan serve, in cmd said: 127.0.0.1:50456 Invalid request (Unexpected EOF) and when I type URL: http://localhost:8000/passports/create, browser said : Sorry, the page you are looking for could not be found. Would you tell me where I am miss and how I solve the problem, Thanks
tizi
created an authentication with email notification laravel tutorial
rodney villareal
This is so helpful. Thanks
Do you have sample registration form with login form sir?
Bruno
How could i make the index page the home page? I’m trying but i could’n figure it out a good way to pass the passports agument with the page
Felix Labayen
Hi Krunal,
Thanks for your tutorial.
It is working and I learn a lot.
By the way, regarding storing uploaded images, you can do it in one line of code
like this:
$file = $request->file(‘filename’)->store(‘myTestStorage’);
Then on saving to database:
$passport->filename = $file;
The file will be stored in yourapp/storage/app/myTestStorage
Luiz
Hello Krunal. Congratulations for your iniative. I couldn´t pass through step 3.
After add the “Schema::create(‘passports’, fun…”, i got an error when i tried the command “php artisan migrate”, cause we had used this command once before with other tables. How do we proceed? Thanks.
Luiz
Problem solved.
hiren
Hello there
i am new in laravel i getting this “TokenMismatchException” error while update and delete operation
can you please help me
JP
Will only create CRUD in Step 5 (PassportController) when you add the –resource command like so:
php artisan make:controller PassportController –resource
Krunal
Yes, it will help us to build CRUD operations easily. It will create some boilerplate for us to do CRUD.
Ramadan
Fam I love u I was stuck on editing my table for a long time till I came across this tutorial… You are blessed
Leirax
Hey your tutorias was good but i got some error TokenMismatchException
Krunal
please include @csrf inside your forms.
Surekha
Hi, I am following your tutorial. And at step 3 it couldn’t create a file Passport.php, only creates create_passports_table.
Also it creates file name with prefix of current date and some number e.g.
2018_05_14_145850_create_passports_table.php
How can I create filename with only letters e.g create_passports_table.php
Thanks
Hasan
Could you please guide me the date and image section also in edit.balde.php?
Tyra
Hi, I am following your tutorial. In Step 5: Create one controller and route i don’t understand clearly.
Firstly, I already create one controller file called PassportController.php, it there compulsary to add “–resource” after type in terminal command php artisan make:controller PassportController???
Secondly, register one route in routes >> web.php file. where mus i put the web.php file? in what folder ?
Krunal
No that is not compulsory to create additional resource flag. It is just useful when we deal with CRUD operations. By means of creating a route is inside the web.php file, you need to define one route. There is already a web.php file. We just need to add different routes.
Tyra
i have error TokenMismatchException in VerifyCsrfToken.php line 67:
how to include @csrf? can u show to me? im new in laravel. pleaseeeee!!!!!!!
Krunal
Just write @csrf inside Form tag and you are good to go.
Aondongu
This is a cool and informative application. However, I’m getting this issue when I try to load the index view:
Undefined variable: passports (View: C:\xampp\htdocs\passport\resources\views\index.blade.php)
Is anyone else having this issue?
Siva
That means ,your controller is not able to pass the variable to view.
Checkout this index function:
$passports=\App\Passport::all();
return view(‘index’,compact(‘passports’));
and the foreach loop:
@foreach($passports as $passport)
aondongu tivzenda
thank you
aom
Hello, thanks for this tutorial.
But in step 6 I got the error: “Undefined variable: name”
And this line is marked: “$passport->filename=$name;”
What could I did wrong?
Krunal
You need to define the $name before your statement. If your request contain that variable then write $request->get(‘name’);
aom
Thank you 🙂
Luckie
When i create a data i get this in the index page
The page has expired due to inactivity.
Please refresh and try again.
Krunal
I guess, CSRF token will be the issue. In this form tag just write @csrf and it will resolve it.
mohamed
i want to use back-end for this what i should do ? also add user registration and login
i’m new to laravel
Mitrajyoti
Yes, this is my question too. I had been a CI developer where I used a different CI module for back end coding.
Chameer
Thanks…Good work
Mitrajyoti
Hello Krunal, thanks for for this nice and brief tutorial. You are also a good teacher here. Can you tell me what should I do for my tables having different type of relations (one to many / many to one / many to many) and need to use joining among them ? Thanks in advance.
Sam
Realy its very useful tutorial…..
Can you please add LIVE DEMO, its will useful for new users like me.
Hope you will do…
Thank you Mr.Krunal
Ismael
Hi. Tks for this tutorial.
It’s very useful.
Alex
Hi. Thanks for this tutorial.
You can use:
php artisan make:controller PassportController –resource –model=Passport
In this case, you can use $passport without using $request:
//PassportController.php
/**
* Show the form for editing the specified resource.
*
* @param AppPassport $passport
* @return IlluminateHttpResponse
*/
public function edit(Passport $passport)
{
return view(‘edit’,compact(‘passport’));
}
And in blade:
Edit
https://laravel.com/docs/5.6/controllers#resource-controllers
sharad
i got the error when i submit details after insertion,error is The page has expired due to inactivity.
Please refresh and try again.,why i am getting this ,all code is right
sharad
i got the error in this that is The page has expired due to inactivity.
Please refresh and try again. and values are not insert into database table
Anto
The page has a CSRF TOKEN .. Replace it with
{{ csrf_field() }}
This will remove the error
Benjamin Chukwudi
hello, thanks for this wonderful tutorial,
pls how can i control the input forms to view, this may be off topic, bt i need to implement this feature, am building a form with many input like 18, and i want to be able to control the number of fields to show, by just ticking the ones to show, then, when i open the form create page i will see only the selected fields to display
Sugaraa
Thanks man
Harshita
great..! really helpful
KB
Hi, Thanks for the blog it was really useful i am stuck with edit functionality getting error variable passport not declare. Can you share the possible solution, Thanks in Advance
webuzy
Thank you.
Two points please.
1. Make a downloadable for newbies.
2. In the downloadable include the last two views for update and destroy.
Fully appreciate.
Krunal
I have put the link of Github in most of article, so you can checkout the code on there.
Septian Adi Putra
Thanks
akash sharma
when i am submitting form i am getting screen loads of errors even i have mentioned model also in above.
errors like these
in VerifyCsrfToken.php line 68
at VerifyCsrfToken->handle(object(Request), object(Closure))
in Pipeline.php line 148
at Pipeline->Illuminate\Pipeline\{closure}(object(Request))
in Pipeline.php line 53
at Pipeline->Illuminate\Routing\{closure}(object(Request))
in ShareErrorsFromSession.php line 49
at ShareErrorsFromSession->handle(object(Request), object(Closure))
in Pipeline.php line 148
at Pipeline->Illuminate\Pipeline\{closure}(object(Request))
in Pipeline.php line 53
at Pipeline->Illuminate\Routing\{closure}(object(Request))
in StartSession.php line 64
at StartSession->handle(object(Request), object(Closure))
in Pipeline.php line 148
dainit
Hello I have all the flow of crud in this tutorial but where is the model section code
Joshua Partogi
Thanks for this tutorial. I wonder why this is not available in Laravel online docs.
Esmatullah
How to refresh after three second
Praveen
require(/opt/lampp/htdocs/mine/passportappointmentsystem/vendor/autoload.php): failed to open stream: No such file or directory in /opt/lampp/htdocs/mine/passportappointmentsystem/artisan on line 18
hanna
BadMethodCallException
Method Illuminate\Database\Eloquent\Collection::delete does not exist.
Ajay
thank for this tutorials.
Putu Nikayana
thank you for this post, very helpful
guilherme henrique
Good night, I’m running the following code
public function store(Request $request)
{
if($request->hasfile(‘filename’))
{
$file = $request->file(‘filename’);
$name=time().$file->getClientOriginalName();
$file->move(public_path().’/images/’, $name);
}
$passport= new \App\Passport;
$passport->name=$request->get(‘name’);
$passport->email=$request->get(’email’);
$passport->number=$request->get(‘number’);
$date=date_create($request->get(‘date’));
$format = date_format($date,”Y-m-d”);
$passport->date = strtotime($format);
$passport->office=$request->get(‘office’);
$passport->filename=$name;
$passport->save();
return redirect(‘passports’)->with(‘success’, ‘Information has been added’);
}
is returning invalid variable
what would be the solution?
Cristhian
I have open http://localhost:8000/passports/ but I get “Class ‘App\Passport’ not found” error.