
A progress bar provides visual feedback to users for their actions, like (navigating to different pages) that have been registered and content loading.
Many SPAs perform asynchronous operations (e.g., fetching data from APIs) when navigating between routes.
A progressbar adds a dynamic UI element that helps improve the application’s user experience.
There are lots of packages for adding a routing progress bar in Vue.js. For this tutorial, we will use the nprogress library. It is straightforward to use and integrate into any Vue.js application.
Here is the step-by-step guide:
Step 1: Create a new Vue.js project
You can create a new Vue.js project using this command:
npm create vite@latest routing-progress -- --template vue
The above command will create a new project called the “routing-progress” folder:
Go inside the project folder and install the dependencies:
cd routing-progress
Install the dependencies:
npm install
Install the Bootstrap 5 for styling using this command:
npm install bootstrap
All new project folders and files will be under the “src” folder.
Step 2: Create components
Inside the “src” folder, create a new folder called “components”, and inside that folder, create two new files:
- Home.vue
- About.vue
Write the below code inside the Home.vue file:
<template>
    <div class="container mt-5">
        <div class="row justify-content-center">
            <div class="col-md-8">
                <h1 class="mb-3">Welcome to Our Vue App!</h1>
                <p class="lead">
                    This is the home page of our simple Vue application.
                </p>
            </div>
        </div>
    </div>
</template>

<script>
export default {
    name: 'Home'
};
</script>

<style scoped>
/* Additional custom styling if needed */
</style>
This is a simple Bootstrap 5 styling with some basic informational text.
Add the below code inside the About.vue file:
<template>
    <div class="about">
        <h1>About Us</h1>
        <p>This is the about page of our Vue application.</p>
    </div>
</template>

<script>
export default {
    name: 'About',
    data() {
        return {
            // Data properties specific to the About page can go here
        };
    },
    methods: {
        // Any methods this component needs can go here
    }
};
</script>

<style scoped>
.about {
    max-width: 800px;
    margin: auto;
    padding: 20px;
    text-align: center;
}

.about h1 {
    color: #2c3e50;
}

.about p {
    font-size: 16px;
    line-height: 1.6;
    color: #34495e;
}
</style>
Step 3: Configure routing
The routing module does not come with the default Vue.js installation. To create a routing functionality, we need to install the Routing package using the below command:
npm install vue-router --save
Create a new file called router.js inside the src folder and add the below code in it:
import { createRouter, createWebHistory } from 'vue-router';

import Home from './components/Home.vue';
import About from './components/About.vue';

const router = createRouter({
    history: createWebHistory(),
    routes: [
        {
            path: '/',
            name: 'home',
            component: Home
        },
        {
            path: '/about',
            name: 'about',
            component: About
        }
    ]
});

export default router;
The routes object has an array of objects where you can define path, name, and component.
The createRouter() and createWebHistory() functions provide a robust way to handle client-side routing in Vue applications.
Step 4: Render components based on routing
We defined routing for our application inside the router.js file, but we must display the components based on their URLs.
To display the content based on the URL, we can use the <router-view /> component.
Write the below code inside the App.vue file:
<template>
  <div id="app">
    <nav class="navbar navbar-expand-lg navbar-light bg-light">
      <div class="container-fluid">
        <a class="navbar-brand" href="#">VueApp</a>
        <button class="navbar-toggler" type="button" data-bs-toggle="collapse" data-bs-target="#navbarNav"
          aria-controls="navbarNav" aria-expanded="false" aria-label="Toggle navigation">
          <span class="navbar-toggler-icon"></span>
        </button>
        <div class="collapse navbar-collapse" id="navbarNav">
          <ul class="navbar-nav">
            <li class="nav-item">
              <router-link to="/" class="nav-link" aria-current="page">Home</router-link>
            </li>
            <li class="nav-item">
              <router-link to="/about" class="nav-link">About</router-link>
            </li>
          </ul>
        </div>
      </div>
    </nav>
    <router-view />
  </div>
</template>
In this file, we added a basic navigation bar and <router-view /> component to display various pages based on the URL.
Step 5: Import router.js in main.js file
The last thing is to integrate the router.js file into our Vue application.
In other words, we need to register the routing to our vue application so that it recognizes every route and displays the proper component based on the routes.
Add the below code inside the src/main.js file:
import { createApp } from 'vue';
import App from './App.vue';
import router from './router';

import 'bootstrap/dist/css/bootstrap.min.css';

const app = createApp(App);
app.use(router);
app.mount('#app');
Step 6: Install the NProgress library
The NProgress is a third-party library; you need to install that library to show a progress bar.
npm install nprogress
Step 7: Integrate the NProgress library to route
Import the NProgress module and nprogress.css file to the router.js.
In Vue Router, the router.beforeResolve() and router.afterEach() methods are navigation guards that allow you to execute custom code at specific stages of the navigation process. These guards are helpful for handling tasks such as authentication checks, loading indicators, and analytics.
Modify the src/router.js code with the below code:
import { createRouter, createWebHistory } from 'vue-router';

import Home from './components/Home.vue';
import About from './components/About.vue';

import NProgress from 'nprogress';
import 'nprogress/nprogress.css';

const router = createRouter({
    history: createWebHistory(),
    routes: [
        {
            path: '/',
            name: 'home',
            component: Home
        },
        {
            path: '/about',
            name: 'about',
            component: About
        }
    ]
});

router.beforeResolve((to, from, next) => {
    if (to.name) {
        NProgress.start();
    }
    next();
});

router.afterEach(() => {
    NProgress.done();
});

export default router;
Save this file and start the Vite development server using this command:
npm run dev
You will see the output below gif:
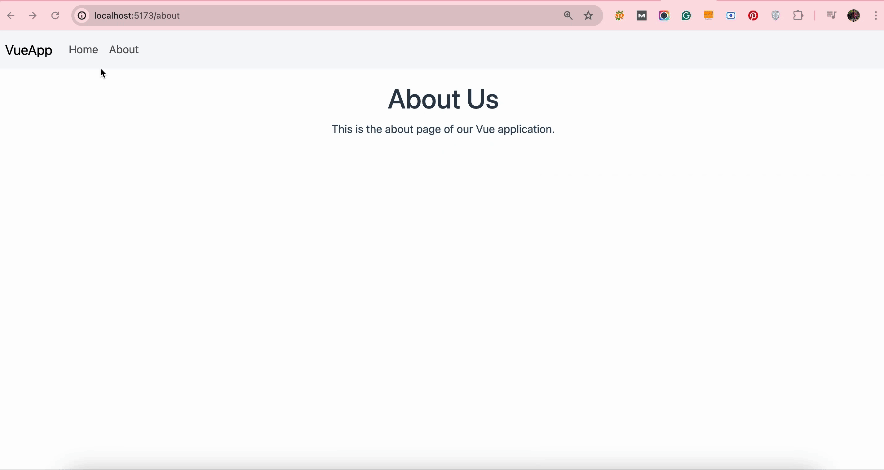
In the above output, when we navigate to different route pages, we see a blue progress indicator.
The progress indicator suggests that some type of process is in action, and it is done when we navigate to an intentional page. That’s all!

ffs
Wow. Skip right to the end of the article if you don’t want all the unrelated bullshit. Do you really think that if someone is reading this tutorial they need to be shown how to install Vue and then Bootstrap? Logic is hard amiright?
Krunal
My articles are not only about the pros. It is also for beginners. IF you don’t like then skip those steps. Do not argue with me, friend.
Seba
Great article, and it´s great that you point to begginers too, that´s why some knows how to teach, and some others knows how to complain.
Manav Misra
Agreed that you should cater to beginners and explan all the steps. ??You _could_ also incorporate at TLDR to jump to bottom or something.
Ajay Marathe
Yeah, you are right krunal, there are lot of beginners like me, who need your article keep writing…thanks 🙂
Brandon
Thanks this was helpful. Running into a “className of null” error after switching the NProgress parent and then changing routes . If you ever configure the NProgress selector to another element and you do not reset it back to the “body” it will throw this error – (adding NProgress.configure({ parent: ‘body’}); after the .done will sort this ) – I think it is because the container is destroyed after using the configure method.
Dylan Baxter
Thank you for this tutorial! I appreciated seeing your setup process because there is equal or more effort put into configuration and build process as effort put into development of the application itself. Seeing your method of bootstrapping an application was valuable to me.
I wanted to also mention that the Vue-Router version I am running in my app does not provide the “name” property on the “to” parameter in the beforeResolve method. Maybe I just didn’t name my routes or something has changed, but I worked around by checking for “to.path” instead.
Cheers!
jan
for better user experience I sugest to add this code on “…-leave-active”
.moveInUp-leave-active{
position: absolute;
margin: 0 auto;
display: block;
left: 0;
right: 0;
z-index: -1;
animation: moveInUp 1s ease-in;
}
Menuka
good one. thanks a lot