
Creating authentication using social accounts is very popular now-a-days.
We have already seen Login with LinkedIn and Login with Twitter in Laravel.
In this article, we will use the OAuth 2.0 Authentication system to log in to our Laravel app through Google accounts.
Here is the step-by-step guide:
Step 1: Installing Laravel 11
You can use the below command to install the new Laravel project:
composer create-project --prefer-dist laravel/laravel googlelogin
Go inside the project folder:
cd googlelogin
Step 2: Configure the database
For this tutorial, I am using MySQL Database.
To connect our Laravel application to MySQL Database, you need to modify the .env file.
DB_CONNECTION=mysql
DB_HOST=127.0.0.1
DB_PORT=8889
DB_DATABASE=googlelogin
DB_USERNAME=root
DB_PASSWORD=root
Step 3: Install Jetstream
Jetstream implements your application’s login, registration, email verification, two-factor authentication, session management, API via Laravel Sanctum, and optional team management features.
To install Jetstream in Laravel, use the below command:
composer require laravel/jetstream
After installing, you need to publish Jetstream’s assets.
php artisan jetstream:install livewire
It will install some libraries and create tables and some configurations.
Step 4: Install the socialite package
The Socialite is an exceptional package for creating a Social OAuth 2.0 Authentication in Laravel.
Install the package using the below command:
composer require laravel/socialite
Step 5: Setup Developer Application on Google Console
To create a new Google developer application, go to this URL: https://console.cloud.google.com/projectcreate
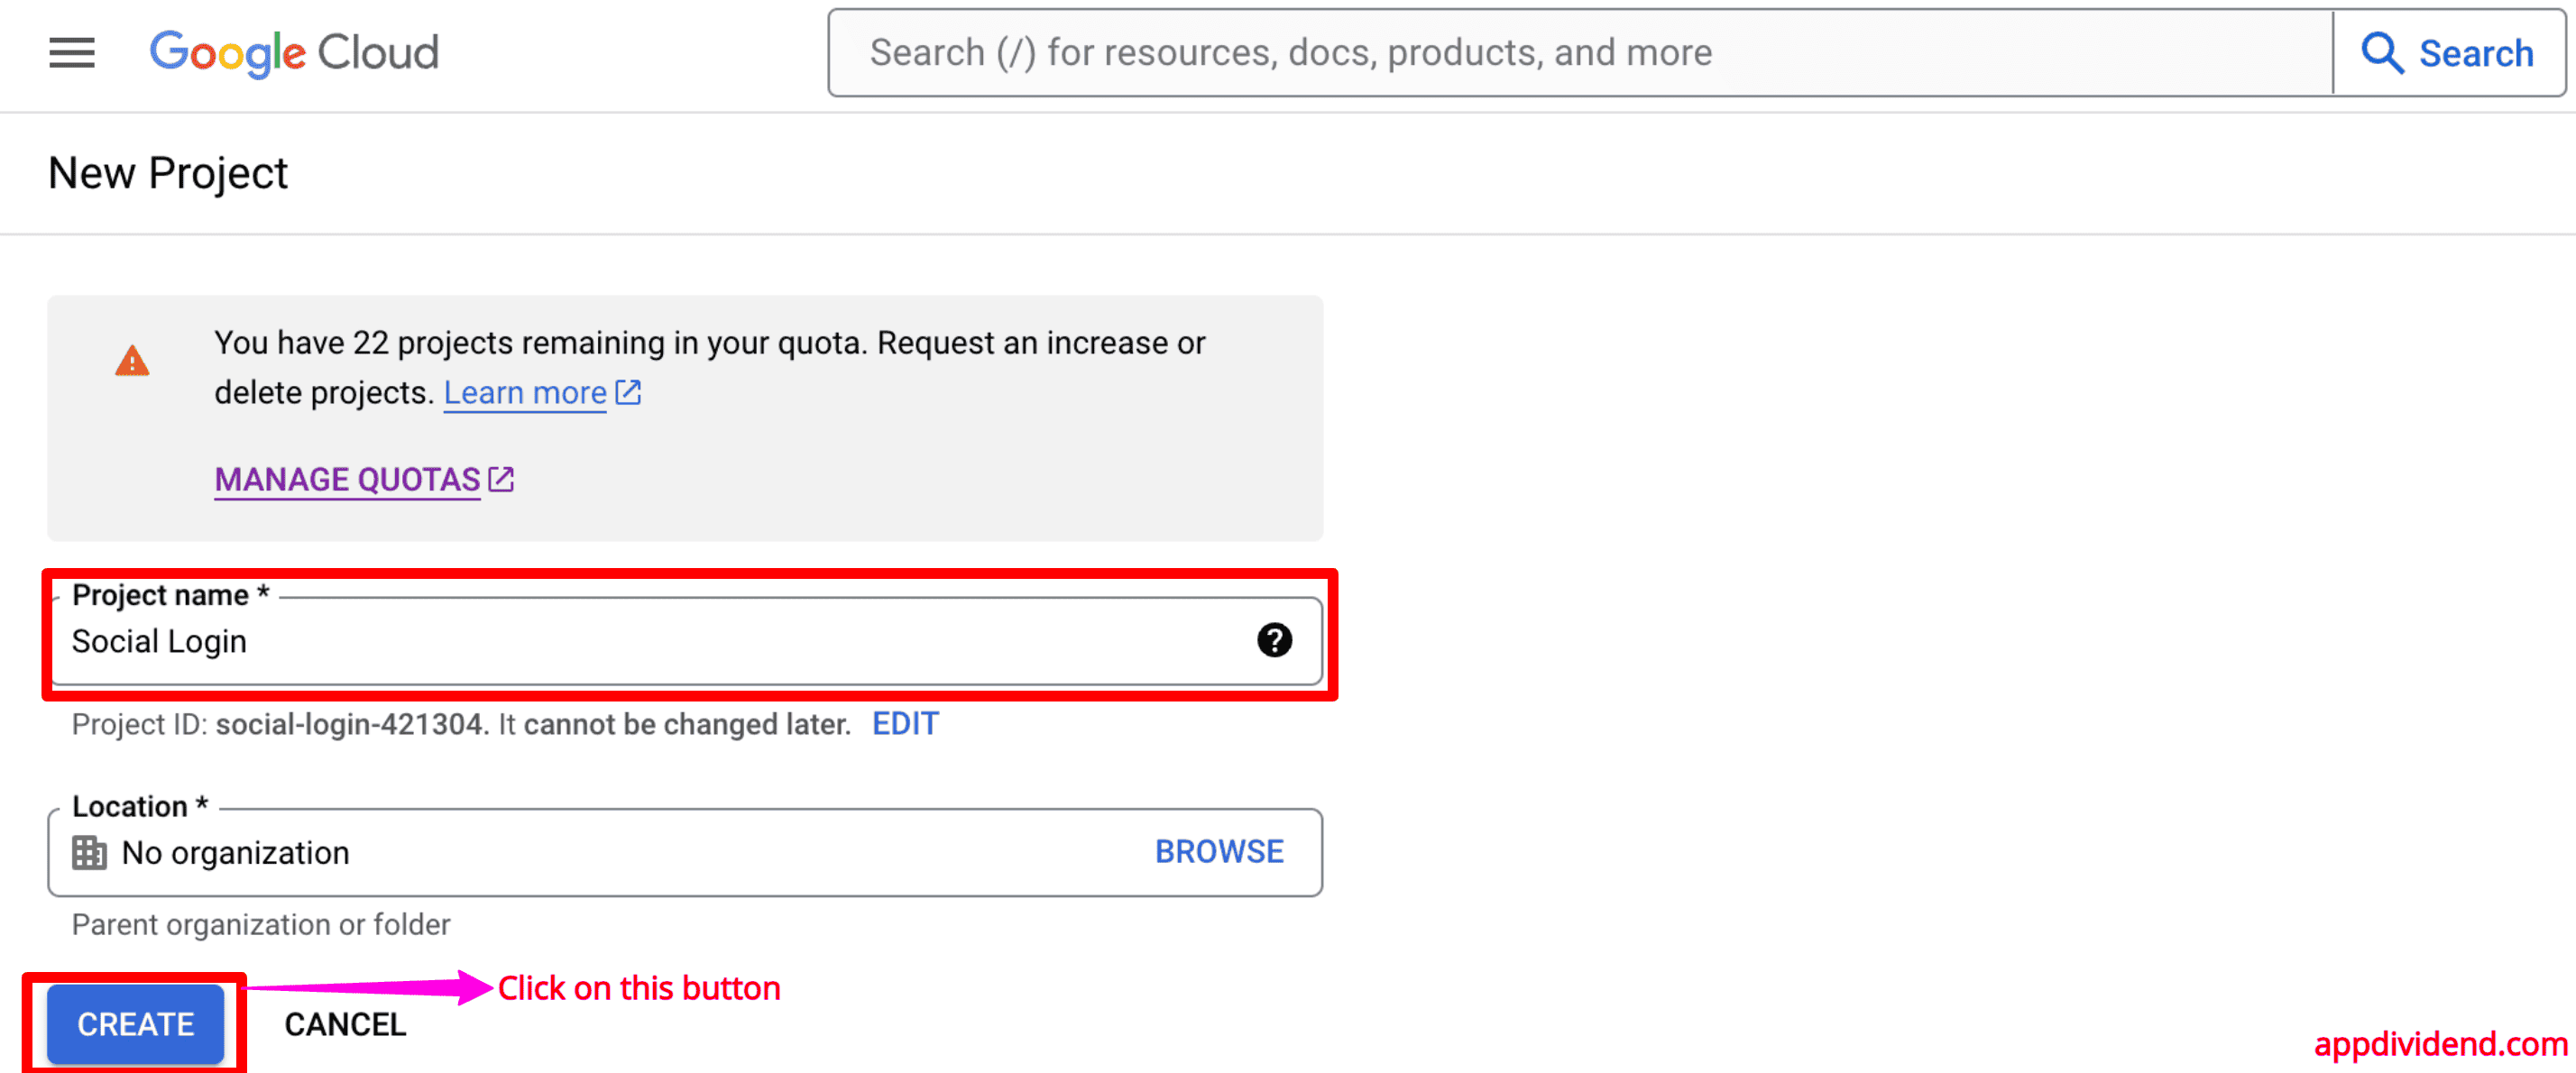
After creating a project, you will be redirected to this page:

Here, on the “OAuth consent screen”, select the “External” radio button, and click on “CREATE”, as shown in the above image.
After clicking the “CREATE” button, you will have to create an application like this image:
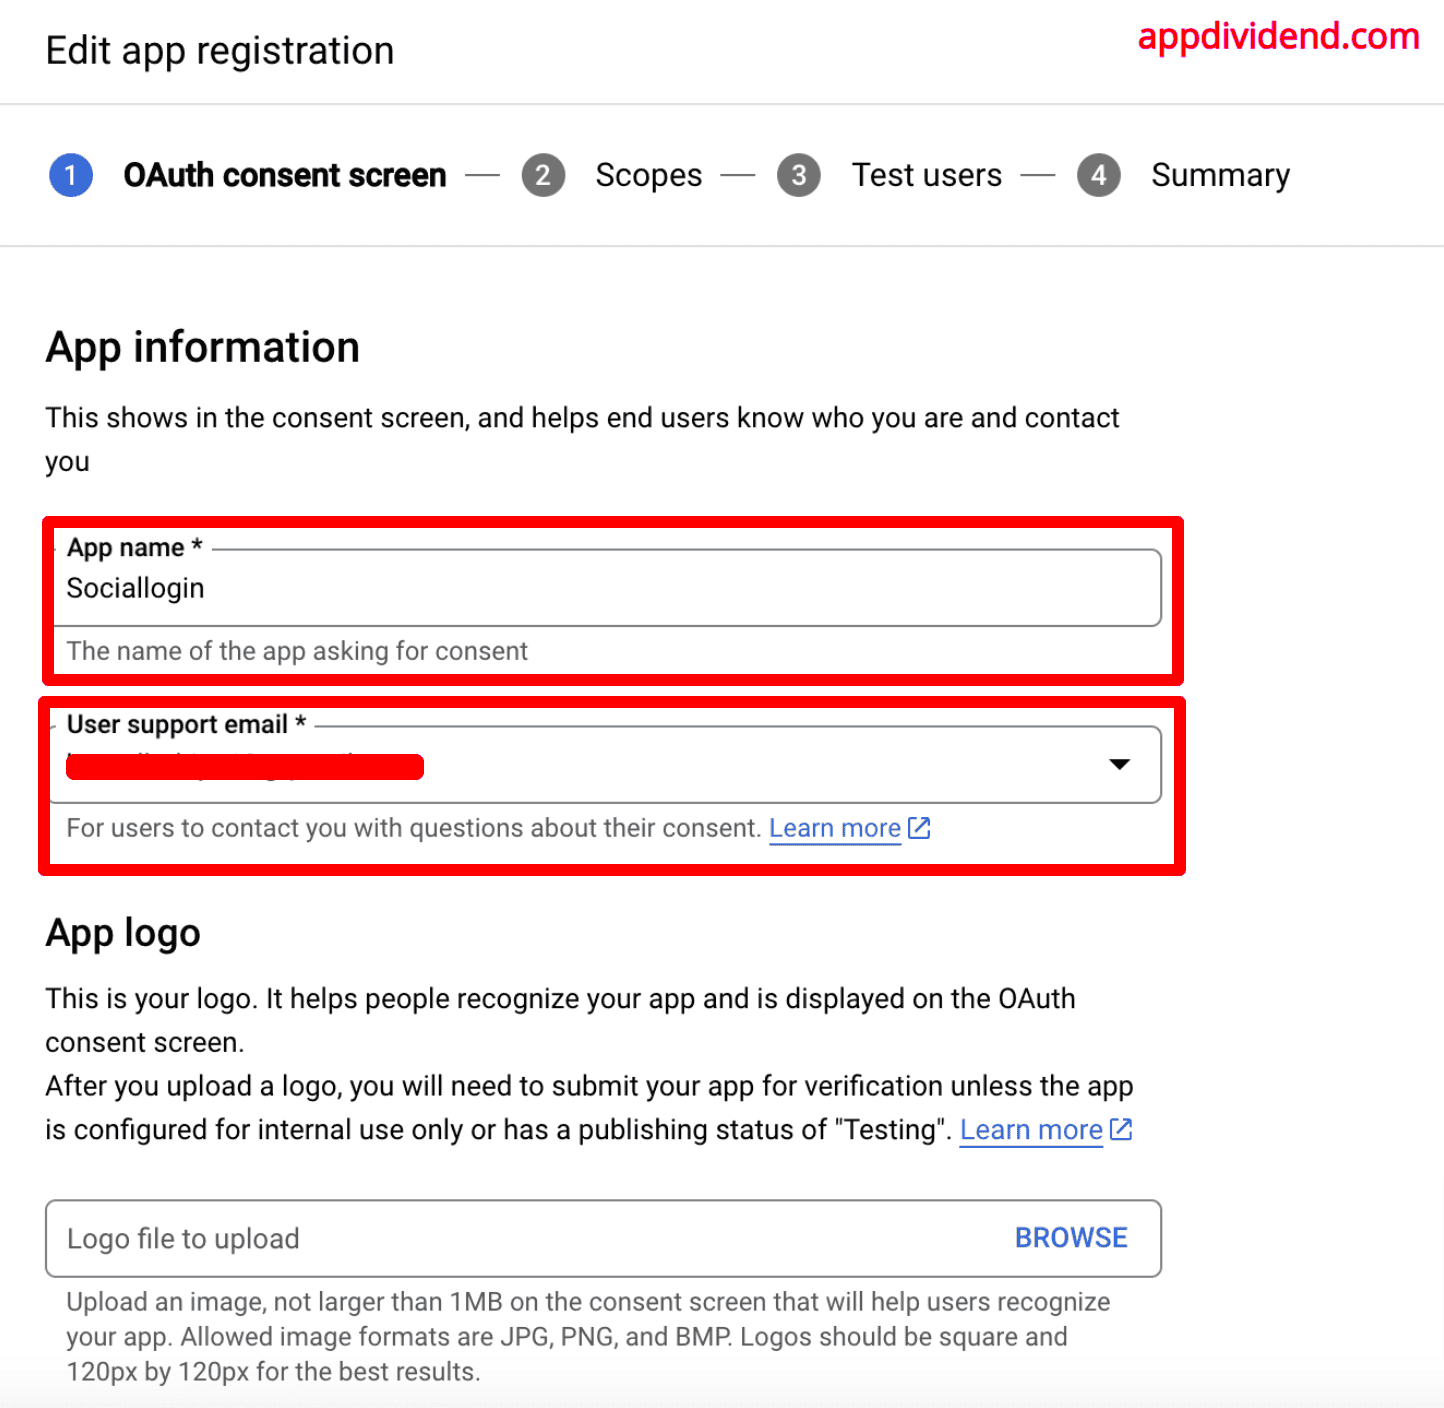
You must fill in the App name and User support email fields here.
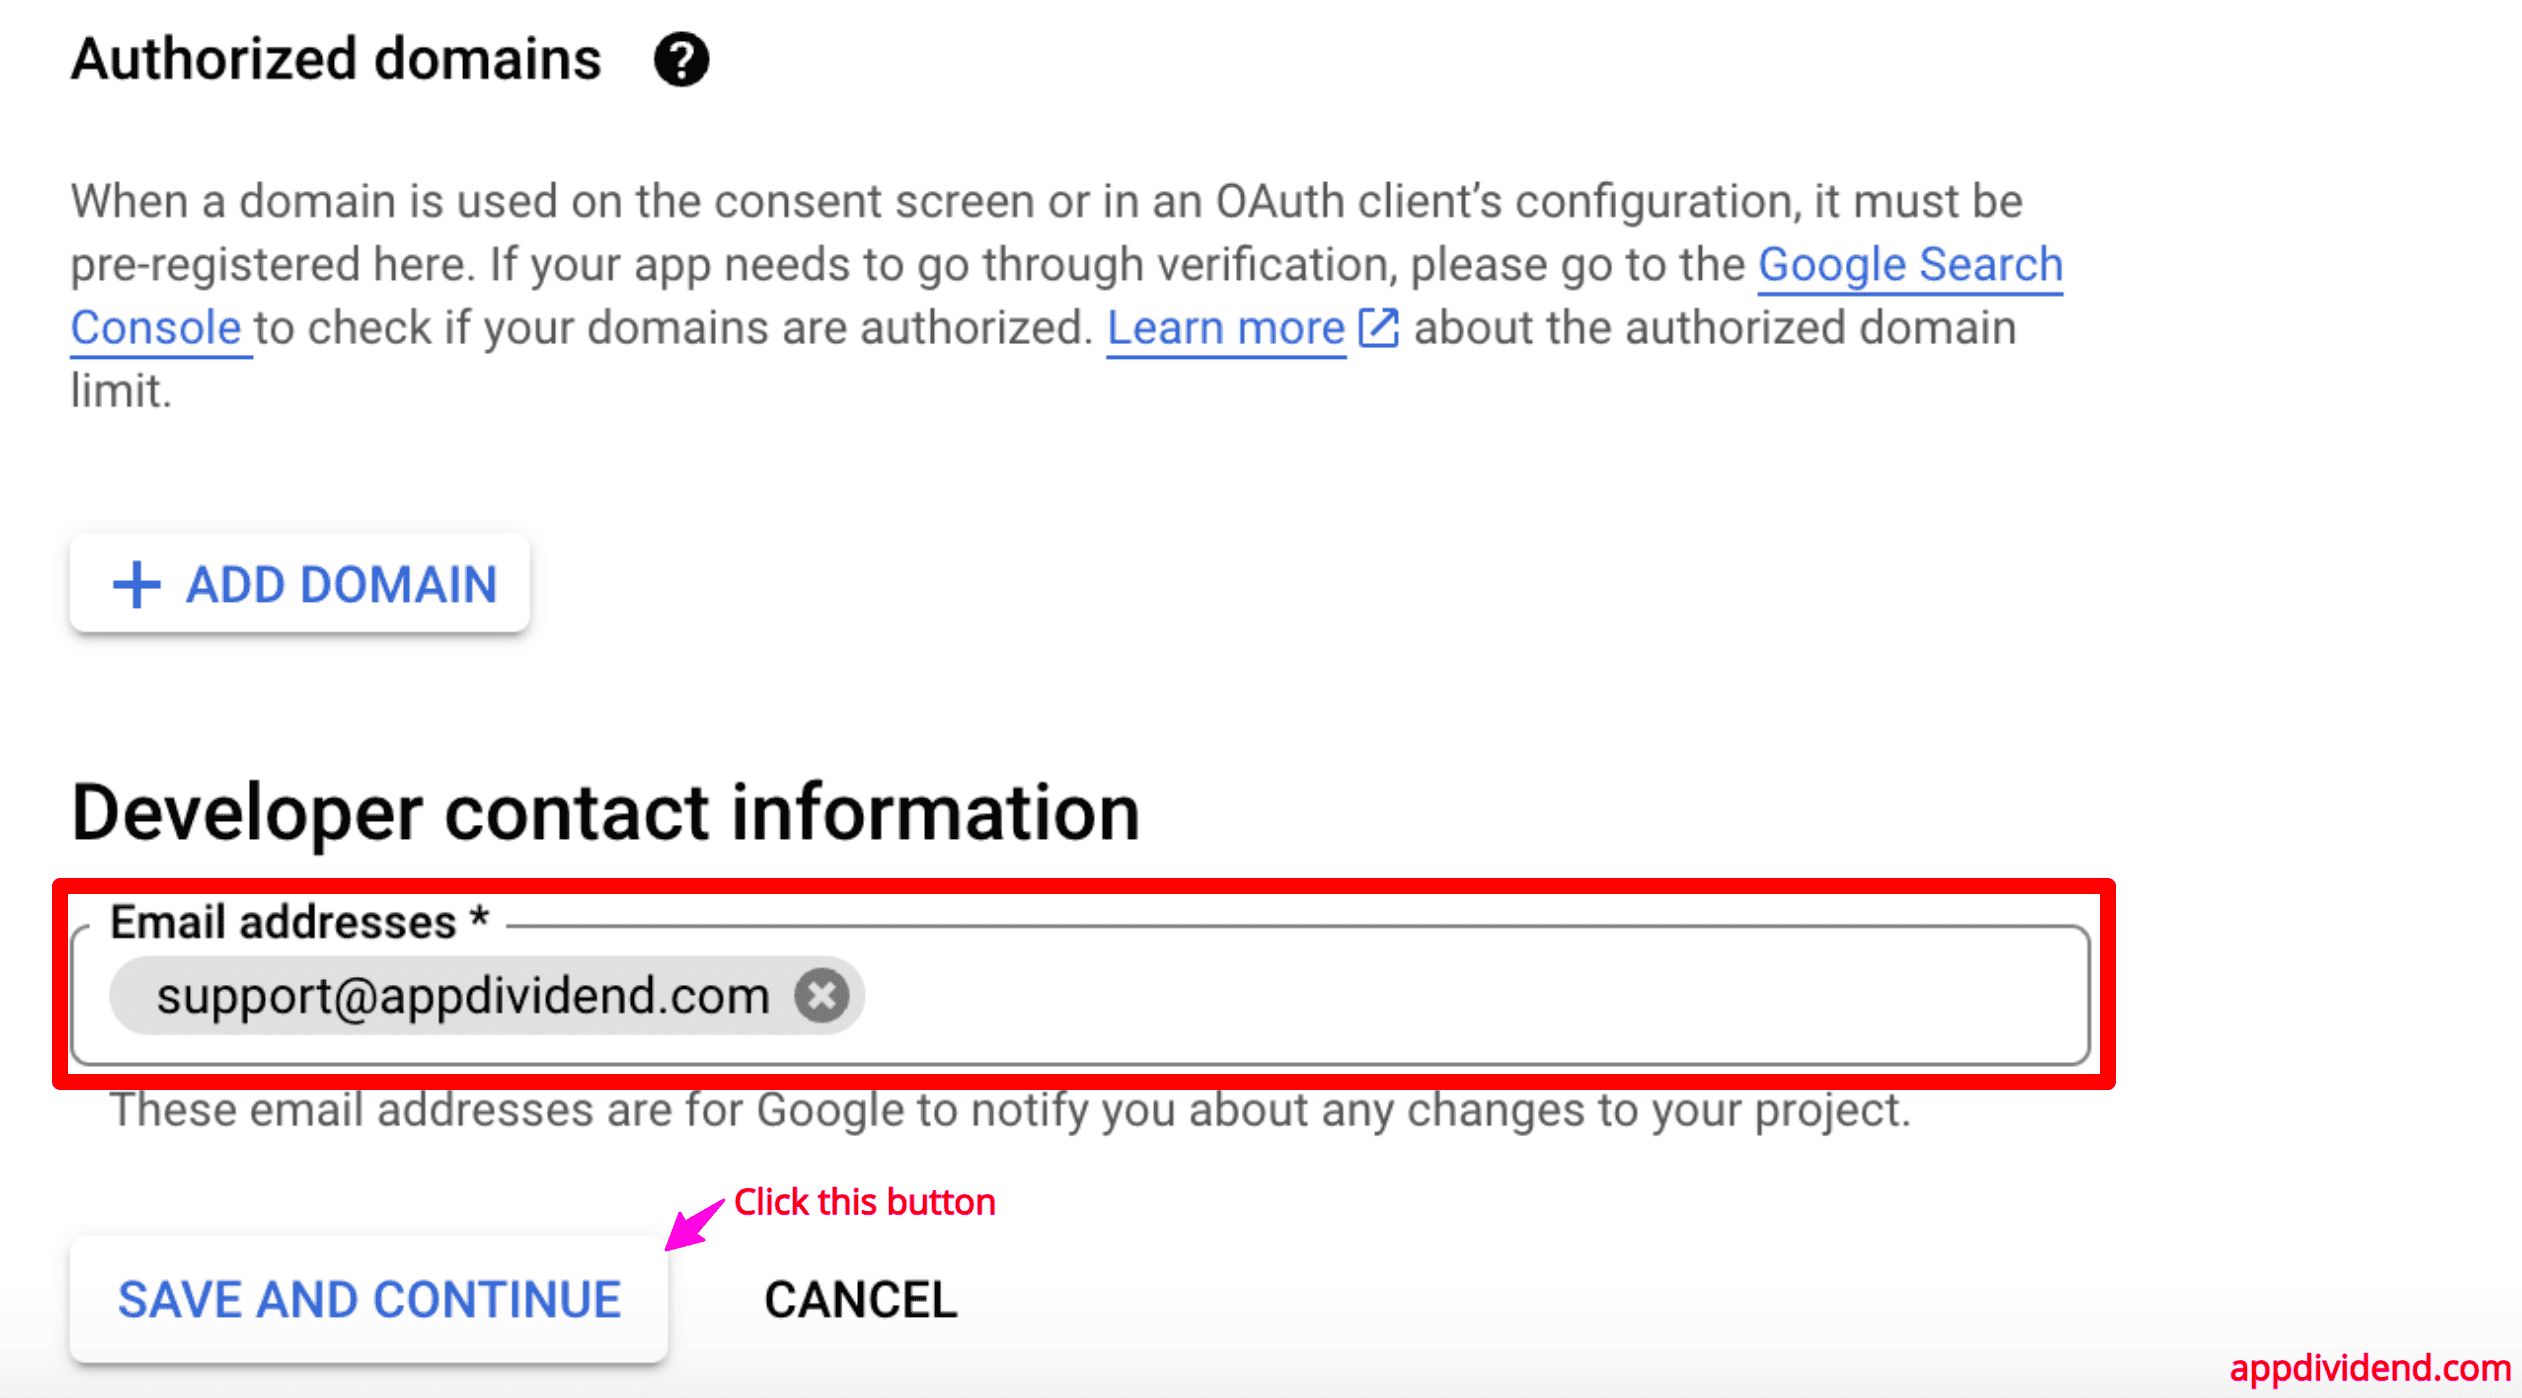
Now, if you scroll down the page, you will see the Developer contact information and provide your email id there like this:
The next step is “Scopes,” to which you can add the scopes based on your requirements.

Now, you will get the “Test Users” section, which is optional.
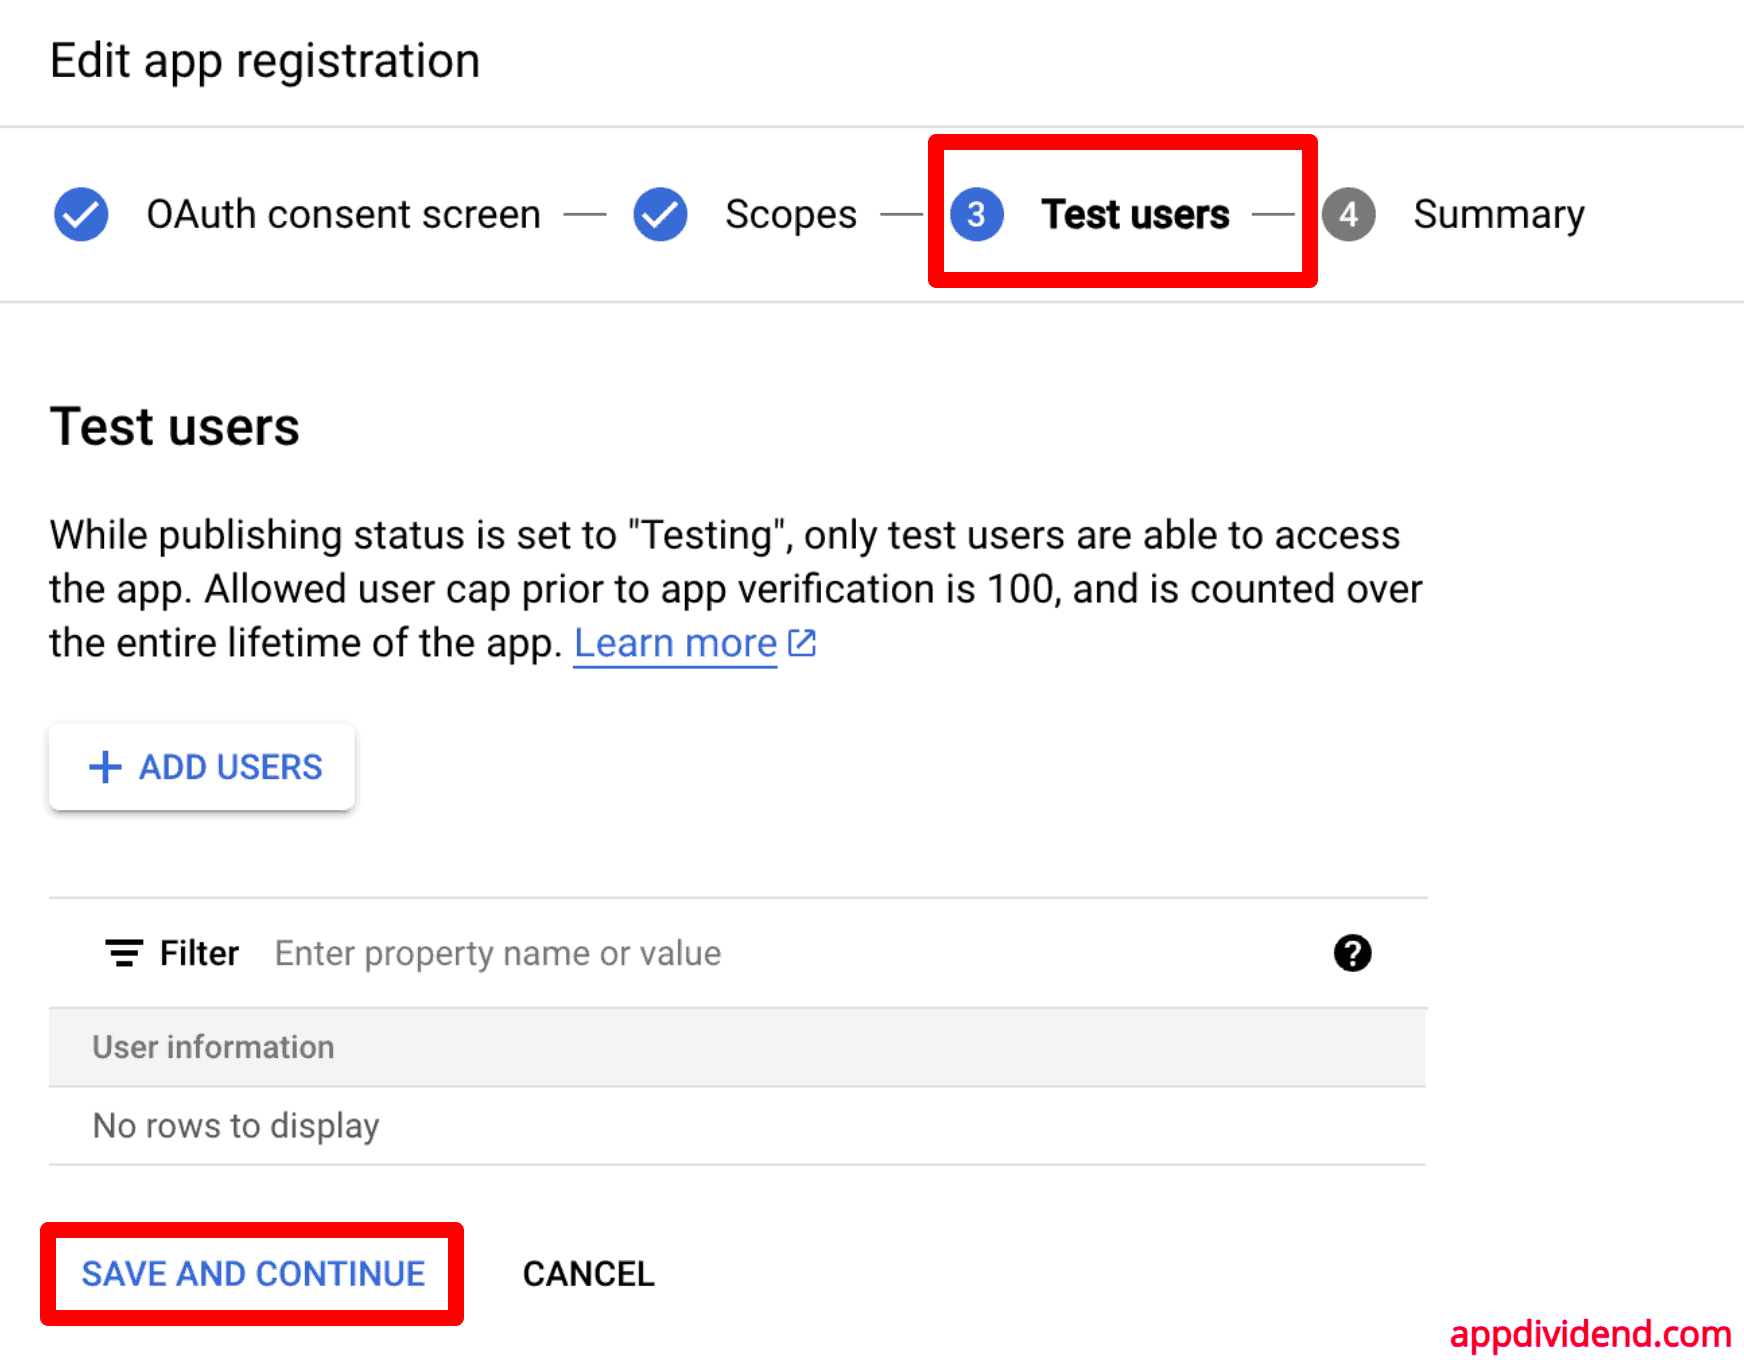
Now, please return to the dashboard because our application is set up.
Go to the credentials page by clicking on this link: https://console.cloud.google.com/apis/credentials
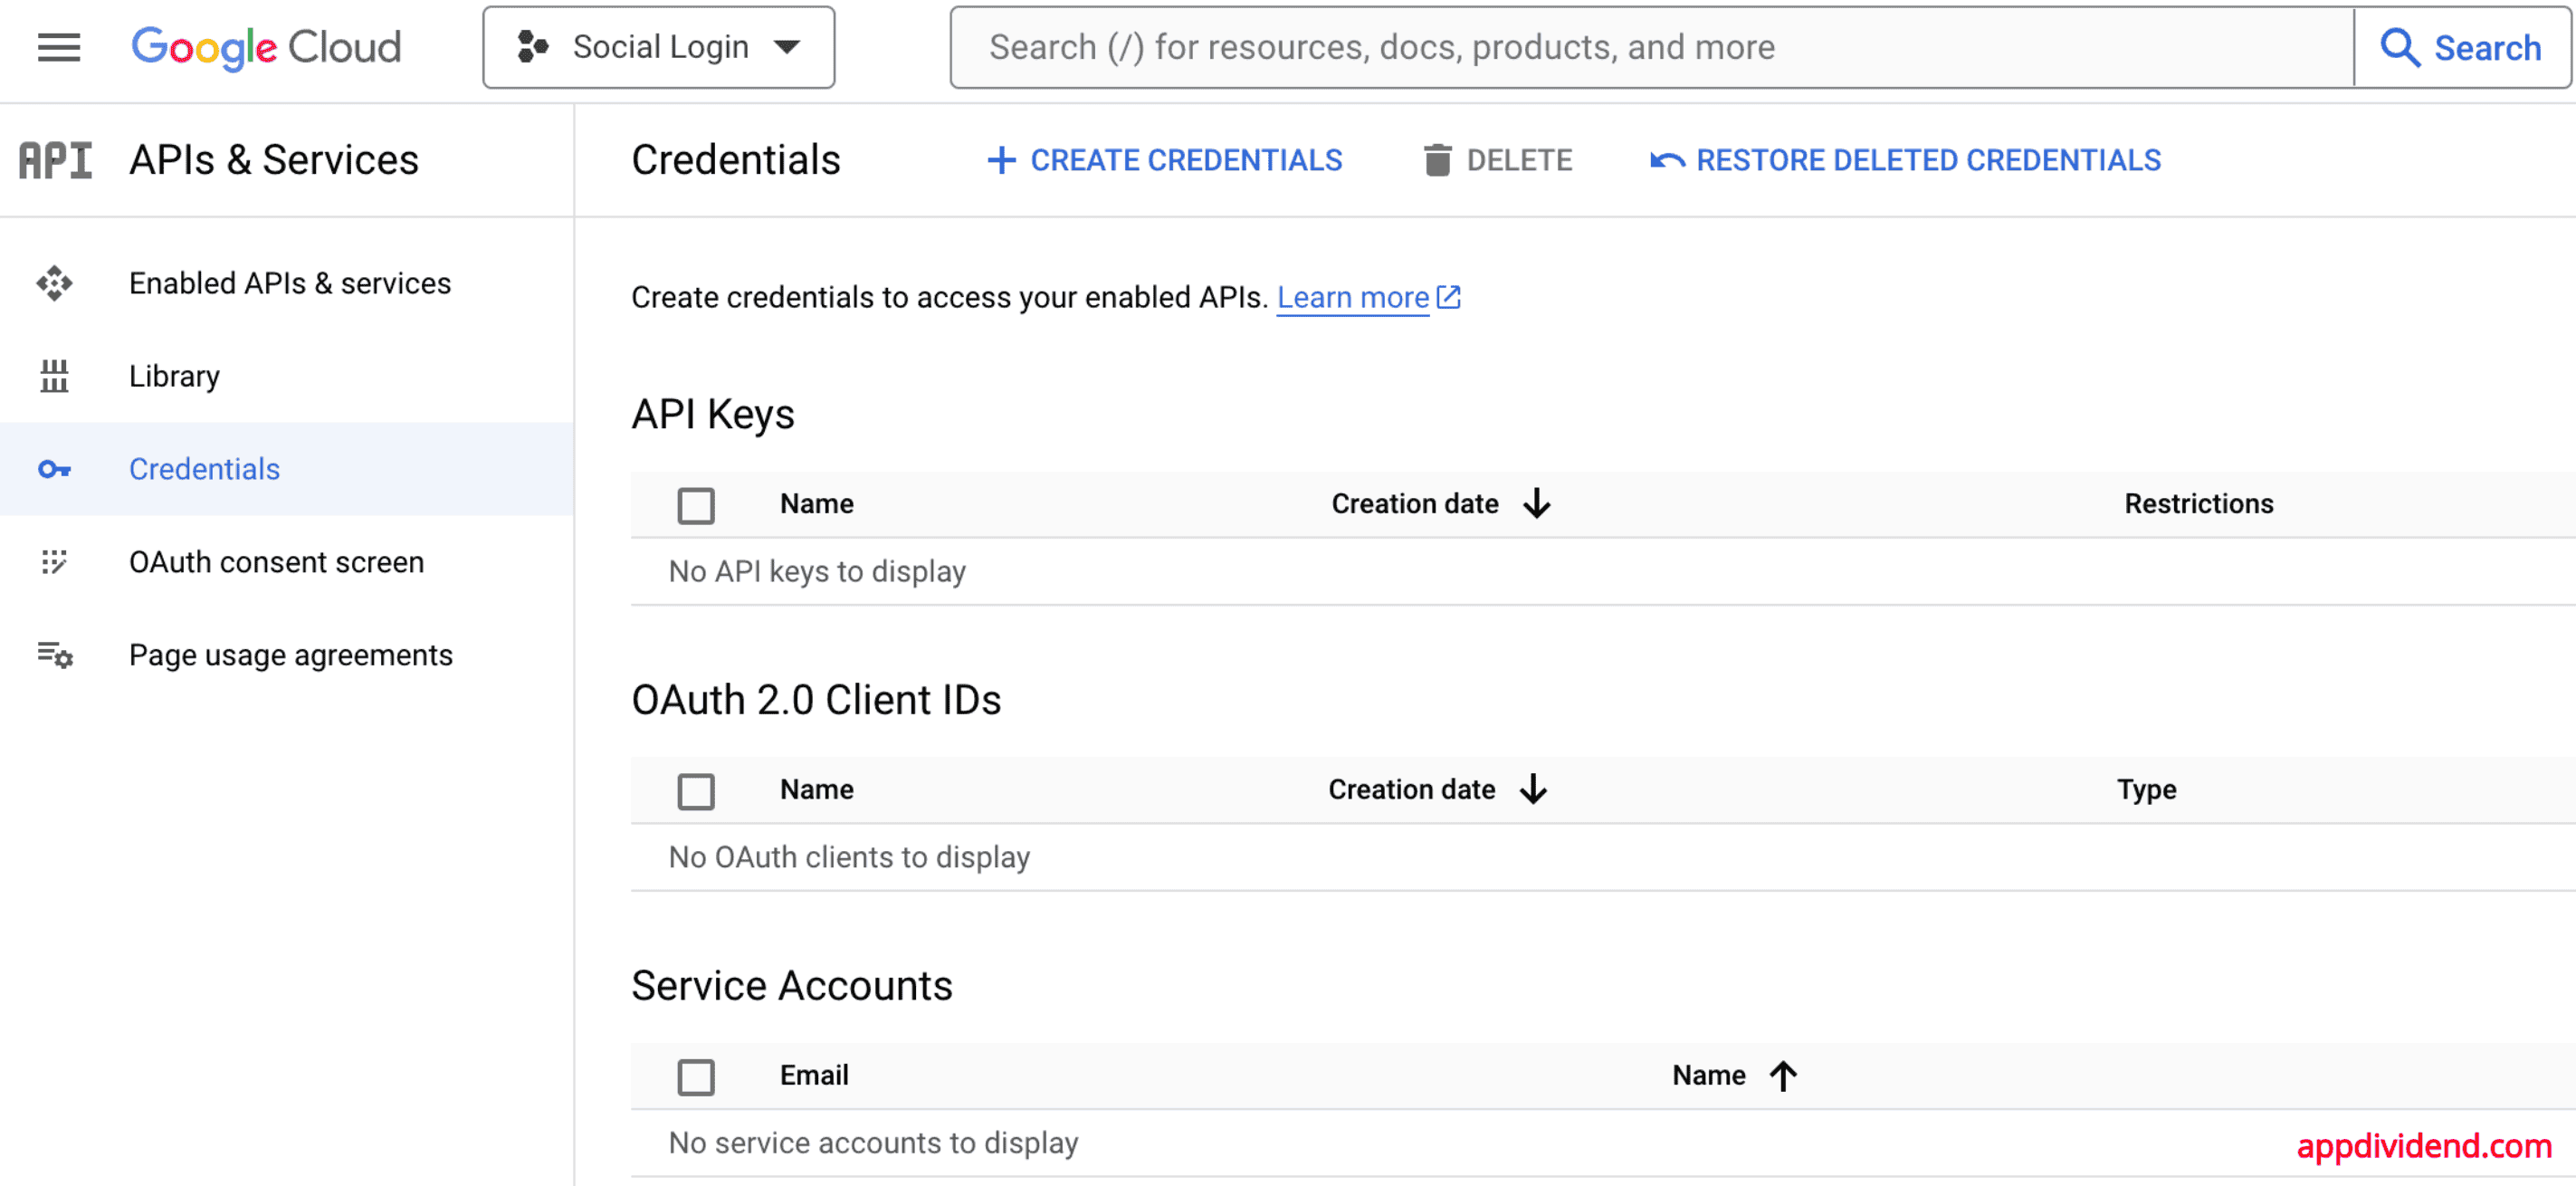
Click on “CREATE CREDENTIALS” then click on “OAuth clientID” in a popup as shown in the below image:

Let’s create an OAuth client ID like this:
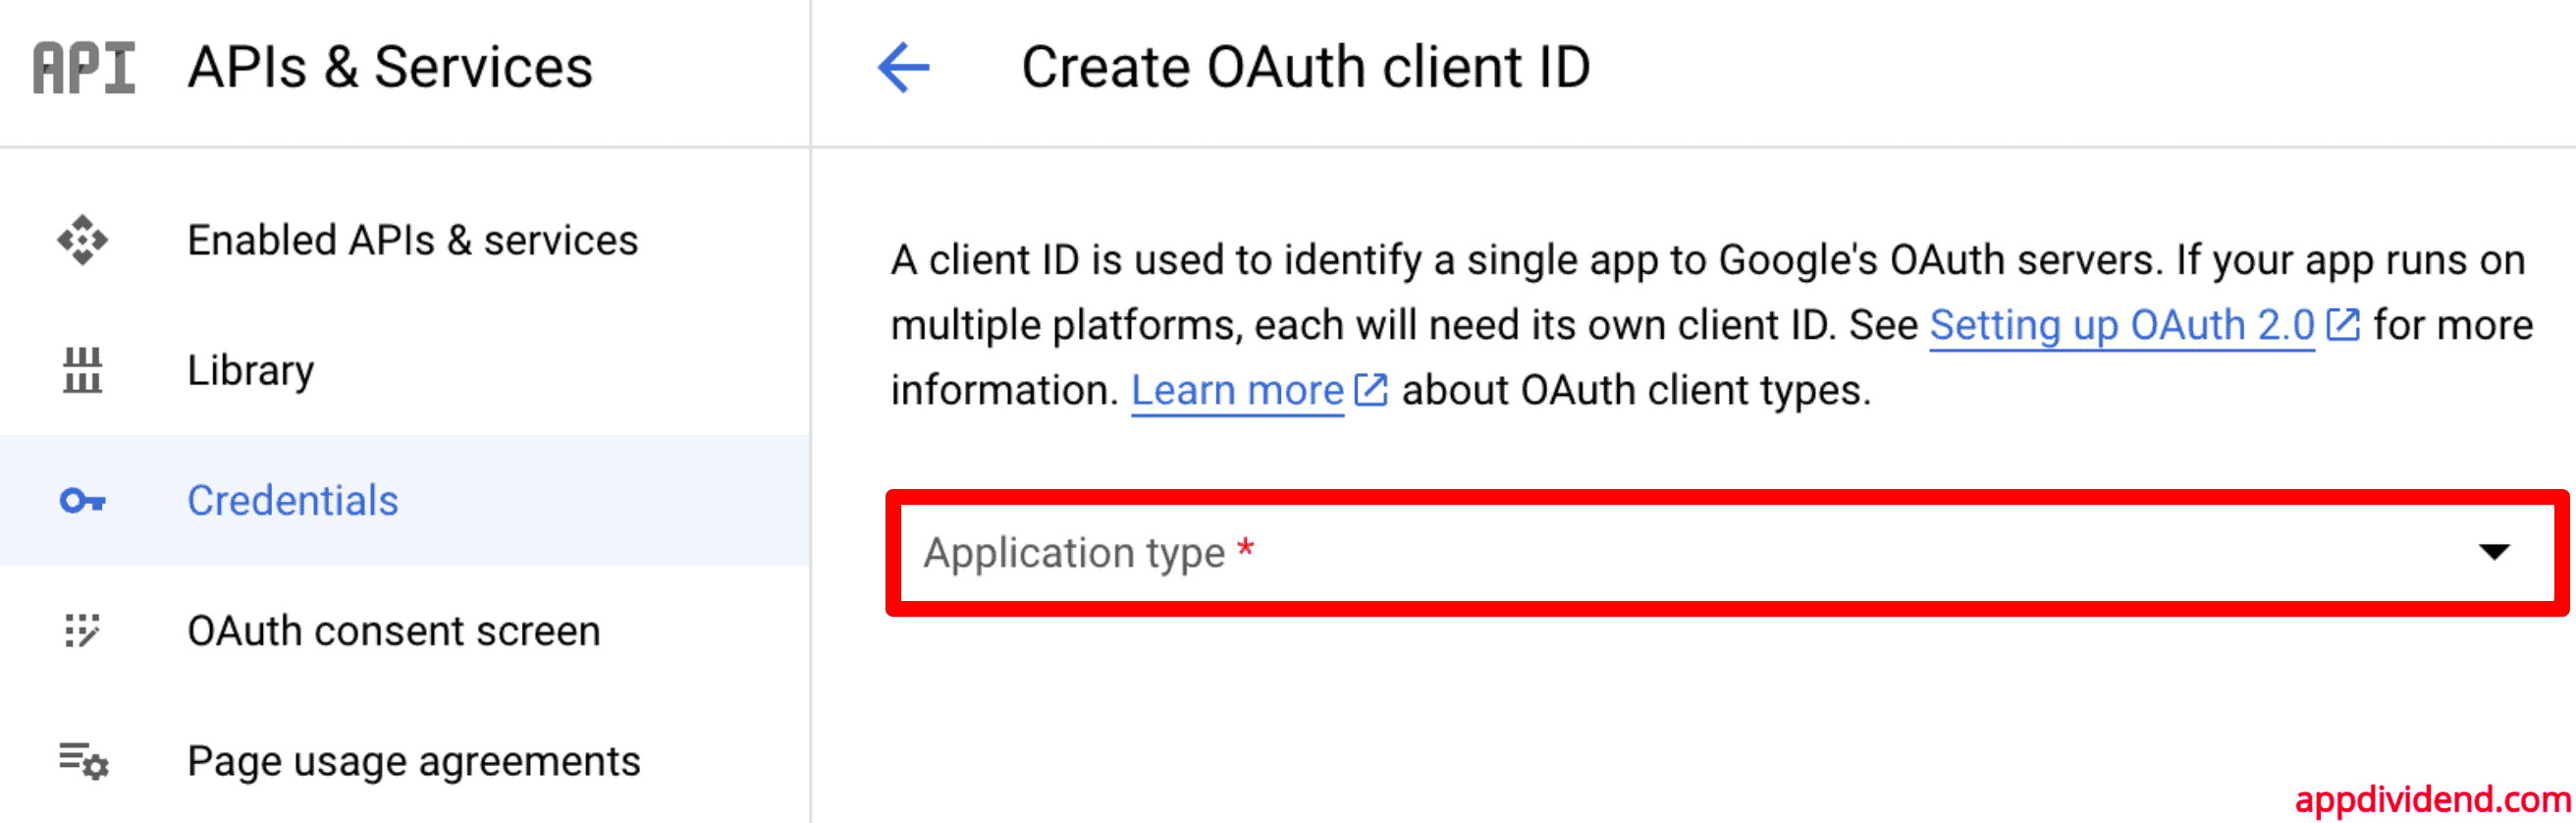
In the next step, create an application type:
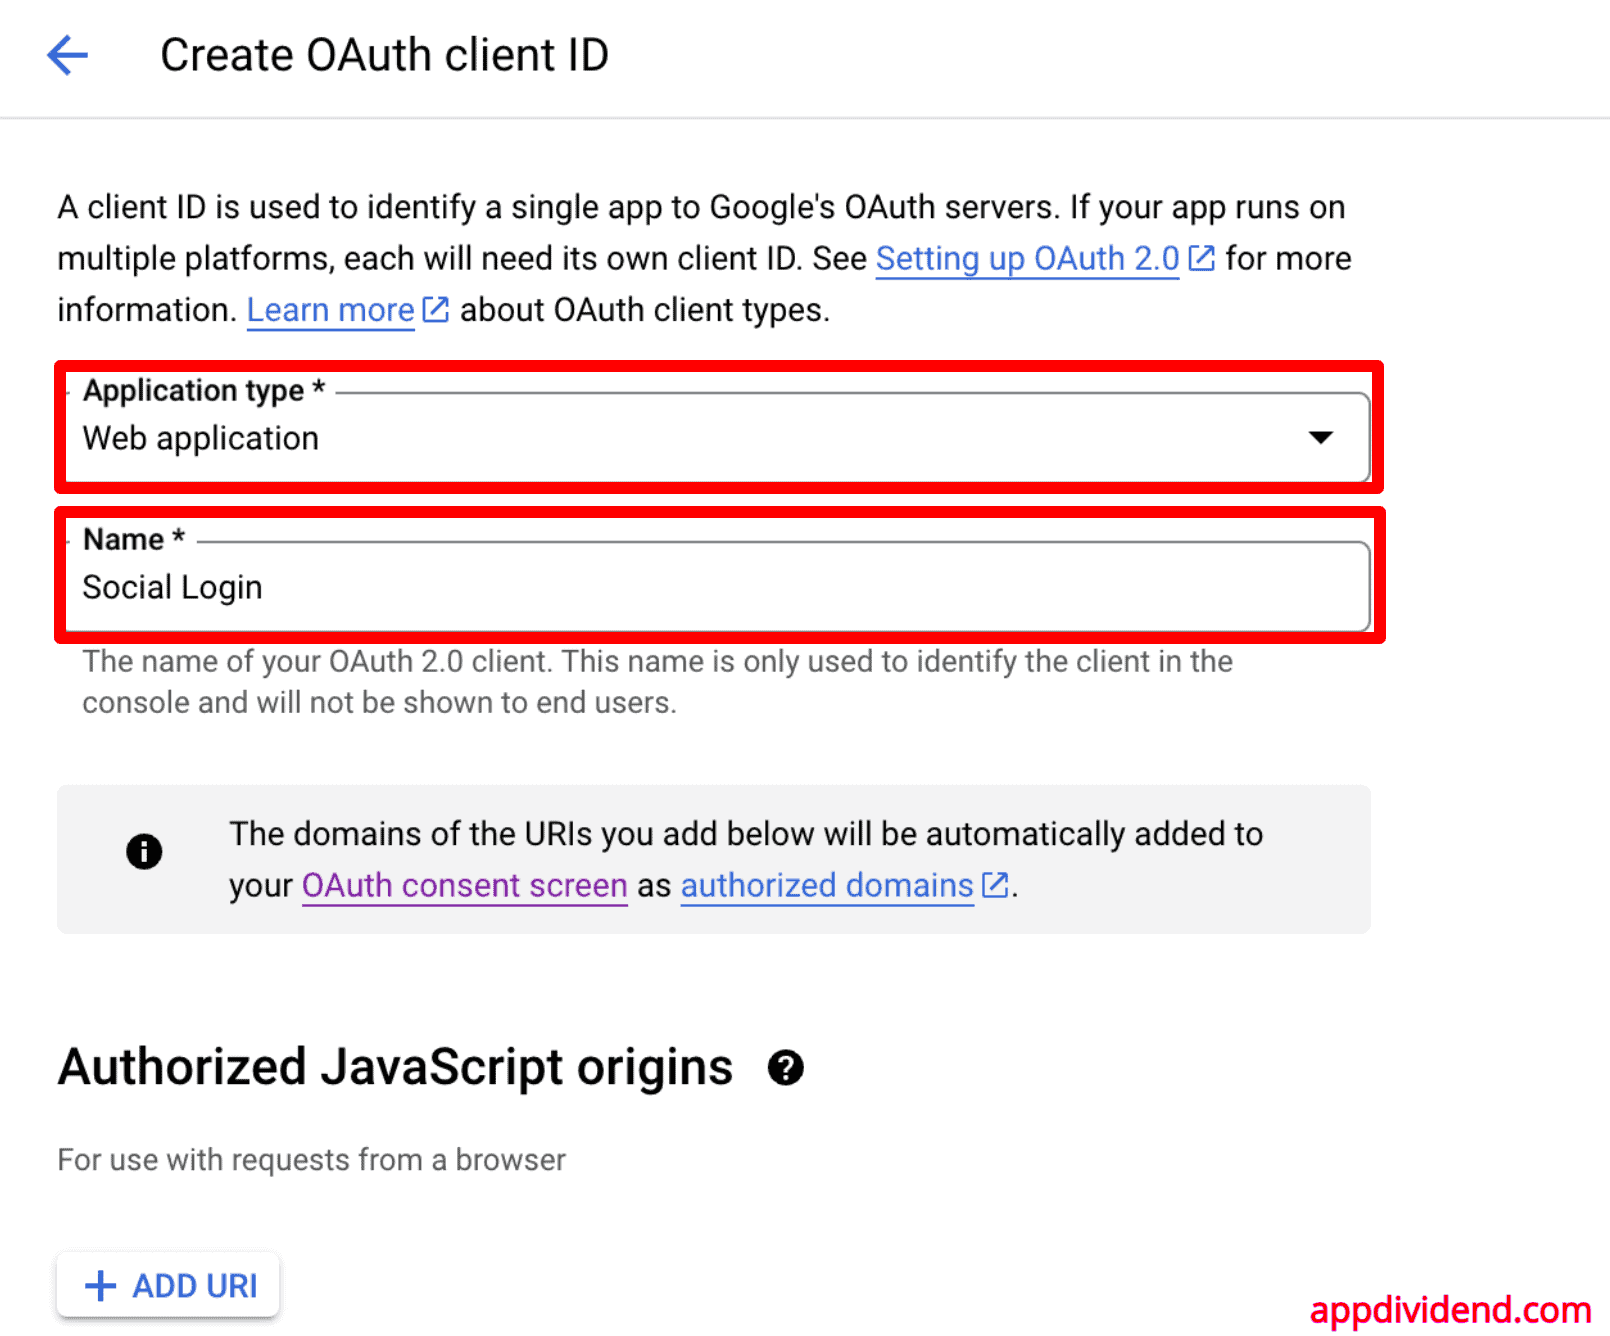
Here, you must select “Web Application” as the application type and name the app of your choice.
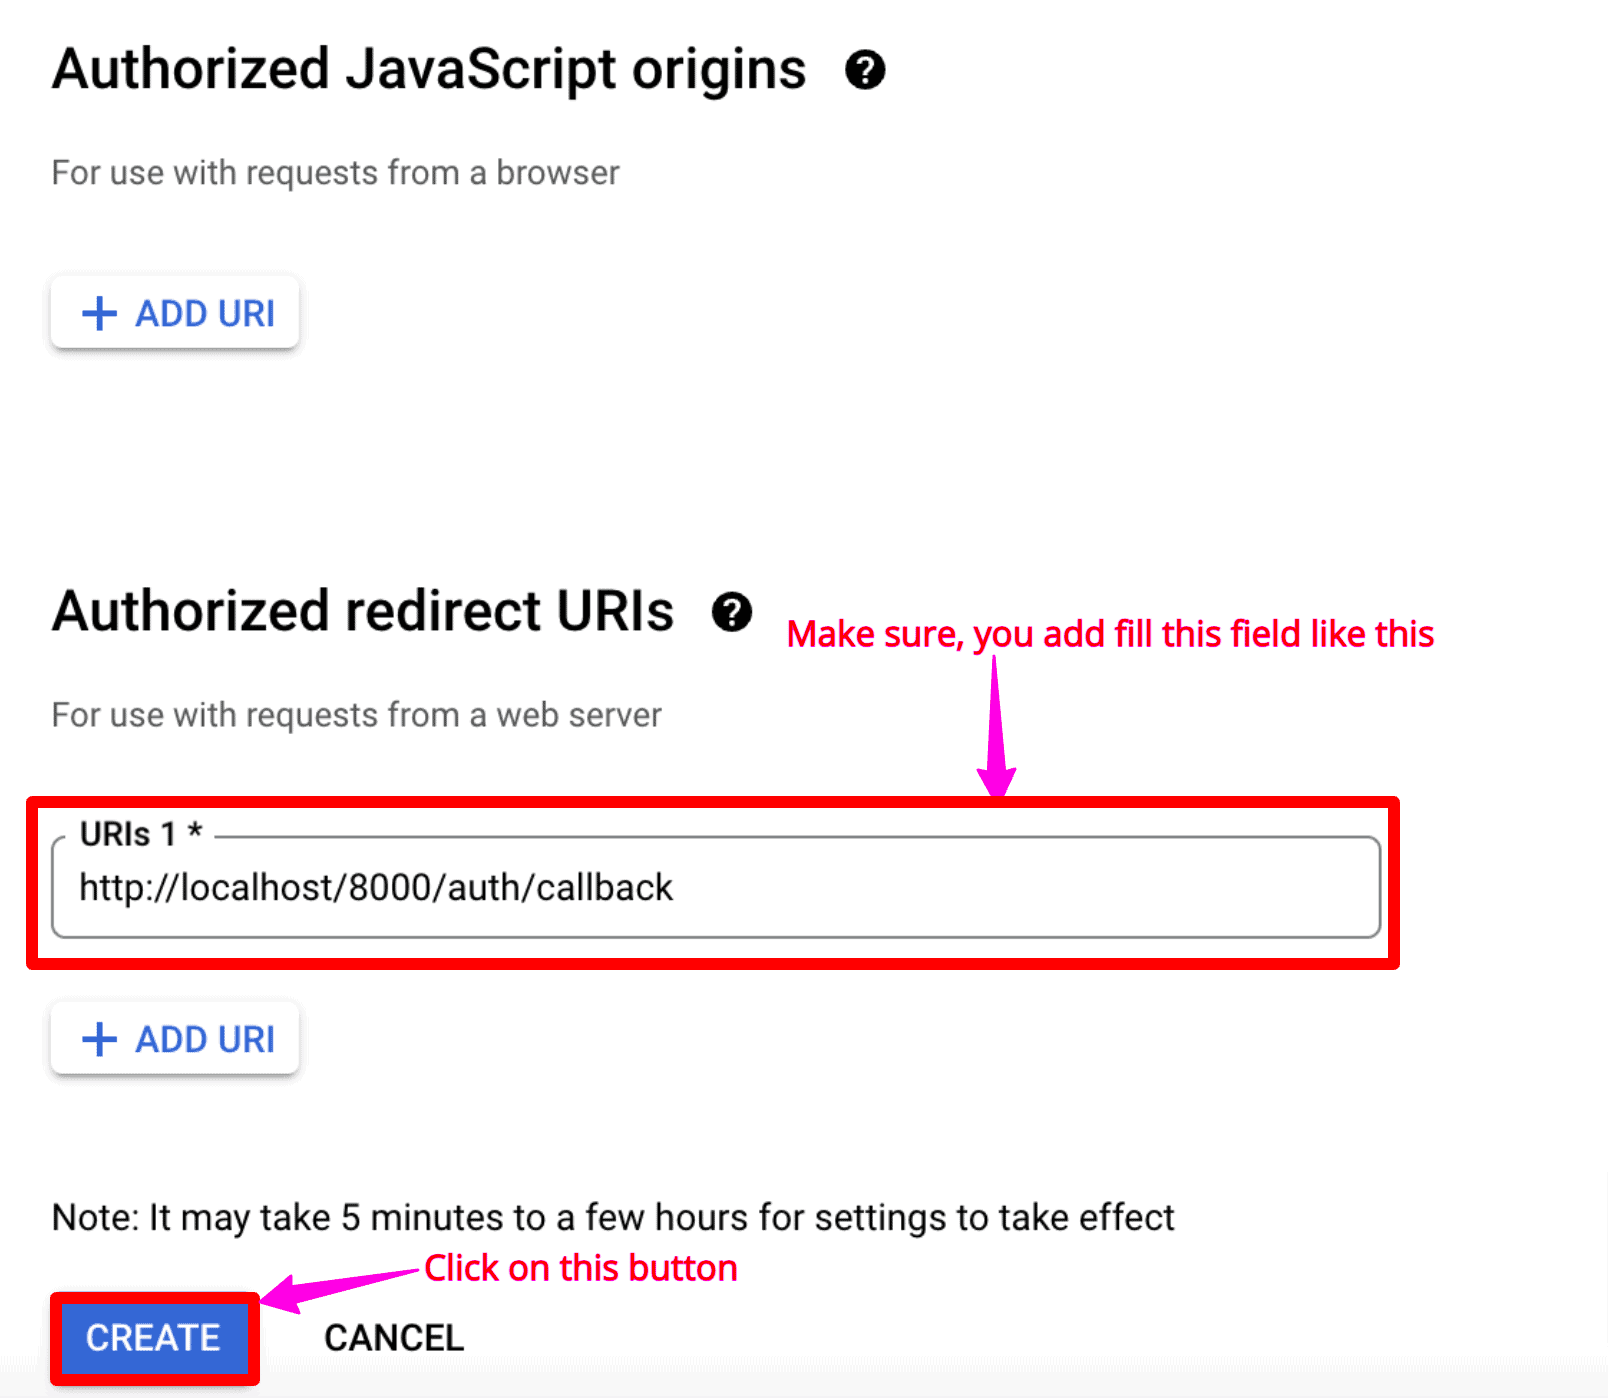
If you scroll down this page, you will see the Authorized Redirect URIs section. Fill the Redirect URI of your application like this: http://localhost:8000/auth/callback
Now, you will see the actual CLIENT ID and CLIENT SECRET like this:

Now copy “Client ID” and “Client Secret” and paste it into the .env file like this:
GOOGLE_CLIENT_ID=[your_id]
GOOGLE_CLIENT_SECRET=[your_key]
REDIRECT_URI=http://localhost:8000/auth/callback
Now, open the config/services.php file and add the below configurations:
'google' => [
        'client_id' => env('GOOGLE_CLIENT_ID'),
        'client_secret' => env('GOOGLE_CLIENT_SECRET'),
        'redirect' => env('REDIRECT_URI'),
],
Step 6: Modify the users table
We must modify the existing users table in the database by adding a “google_id” column.
php artisan make:migration add_google_id_to_users
Add the column like this:
<?php

use Illuminate\Database\Migrations\Migration;
use Illuminate\Database\Schema\Blueprint;
use Illuminate\Support\Facades\Schema;

return new class extends Migration
{
    /**
     * Run the migrations.
     */
    public function up(): void
    {
        Schema::table('users', function (Blueprint $table) {
            $table->string('google_id')->after('remember_token')->nullable()->unique();
        });
    }

    /**
     * Reverse the migrations.
     */
    public function down(): void
    {
        Schema::table('users', function (Blueprint $table) {
            $table->dropColumn('google_id');
        });
    }
};
Run this migration to add a column to the users table:
php artisan migrate
Step 7: Add a google_id to the User.model file
In the User.php model file, you must add google_id to the $fillable property.
<?php

namespace App\Models;

// use Illuminate\Contracts\Auth\MustVerifyEmail;
use Illuminate\Database\Eloquent\Factories\HasFactory;
use Illuminate\Foundation\Auth\User as Authenticatable;
use Illuminate\Notifications\Notifiable;
use Laravel\Fortify\TwoFactorAuthenticatable;
use Laravel\Jetstream\HasProfilePhoto;
use Laravel\Sanctum\HasApiTokens;

class User extends Authenticatable
{
    use HasApiTokens;
    use HasFactory;
    use HasProfilePhoto;
    use Notifiable;
    use TwoFactorAuthenticatable;

    /**
     * The attributes that are mass assignable.
     *
     * @var array<int, string>
     */
    protected $fillable = [
        'name',
        'email',
        'password',
        'google_id'
    ];

    /**
     * The attributes that should be hidden for serialization.
     *
     * @var array<int, string>
     */
    protected $hidden = [
        'password',
        'remember_token',
        'two_factor_recovery_codes',
        'two_factor_secret',
    ];

    /**
     * The accessors to append to the model's array form.
     *
     * @var array<int, string>
     */
    protected $appends = [
        'profile_photo_url',
    ];

    /**
     * Get the attributes that should be cast.
     *
     * @return array<string, string>
     */
    protected function casts(): array
    {
        return [
            'email_verified_at' => 'datetime',
            'password' => 'hashed',
        ];
    }
}
Step 8: Create a GoogleController
To create a controller, use this command:
php artisan make:controller GoogleController
This GoogleController.php will have two basic functions:
- redirectToGoogle(): This will redirect to the Google app for authentication.
- handleGoogleCallback(): This will call back to our app after successful authentication.
Here is the complete code for GoogleController.php file:
<?php

namespace App\Http\Controllers;

use App\Models\User;
use Illuminate\Http\RedirectResponse;
use Illuminate\Support\Facades\Auth;
use Illuminate\Support\Facades\Hash;
use Illuminate\Support\Str;
use Laravel\Socialite\Facades\Socialite;
use Throwable;

class GoogleController extends Controller
{
    /**
     * Redirect to Google for authentication.
     *
     * @return RedirectResponse
     */
    public function redirectToGoogle(): RedirectResponse
    {
        return Socialite::driver('google')->redirect();
    }

    /**
     * Handle Google authentication callback.
     *
     * @return RedirectResponse
     */
    public function handleGoogleCallback(): RedirectResponse
    {
        try {
            $googleUser = Socialite::driver('google')->user();
        } catch (Throwable $e) {
            return redirect()->route('login')->with('error', 'Google authentication failed.');
        }
        // Retrieve user from the database by google_id or create a new user
        $user = User::firstOrCreate(
            ['google_id' => $googleUser->id],
            [
                'name' => $googleUser->name,
                'email' => $googleUser->email,
                'password' => Hash::make(Str::random(16))
            ]
        );

        // Login the user
        Auth::login($user, true); // Remember the user

        return redirect()->intended('dashboard');
    }
}
Basically, in this code, first, we redirect a user to the Google application, where they enter their email and password.
After it verifies, it returns a callback, which is our callback URI. From then on, we will save the username, email, and password and log the user into our application.
Step 9: Register the routes
Add the below code inside the routes/web.php file:
<?php

use Illuminate\Support\Facades\Route;
use App\Http\Controllers\GoogleController;


Route::get('/', function () {
    return view('welcome');
});

Route::middleware([
    'auth:sanctum',
    config('jetstream.auth_session'),
    'verified',
])->group(function () {
    Route::get('/dashboard', function () {
        return view('dashboard');
    })->name('dashboard');
});

Route::controller(GoogleController::class)->group(function () {
    Route::get('auth/redirect', 'redirectToGoogle')->name('auth.google');
    Route::get('auth/callback', 'handleGoogleCallback');
});
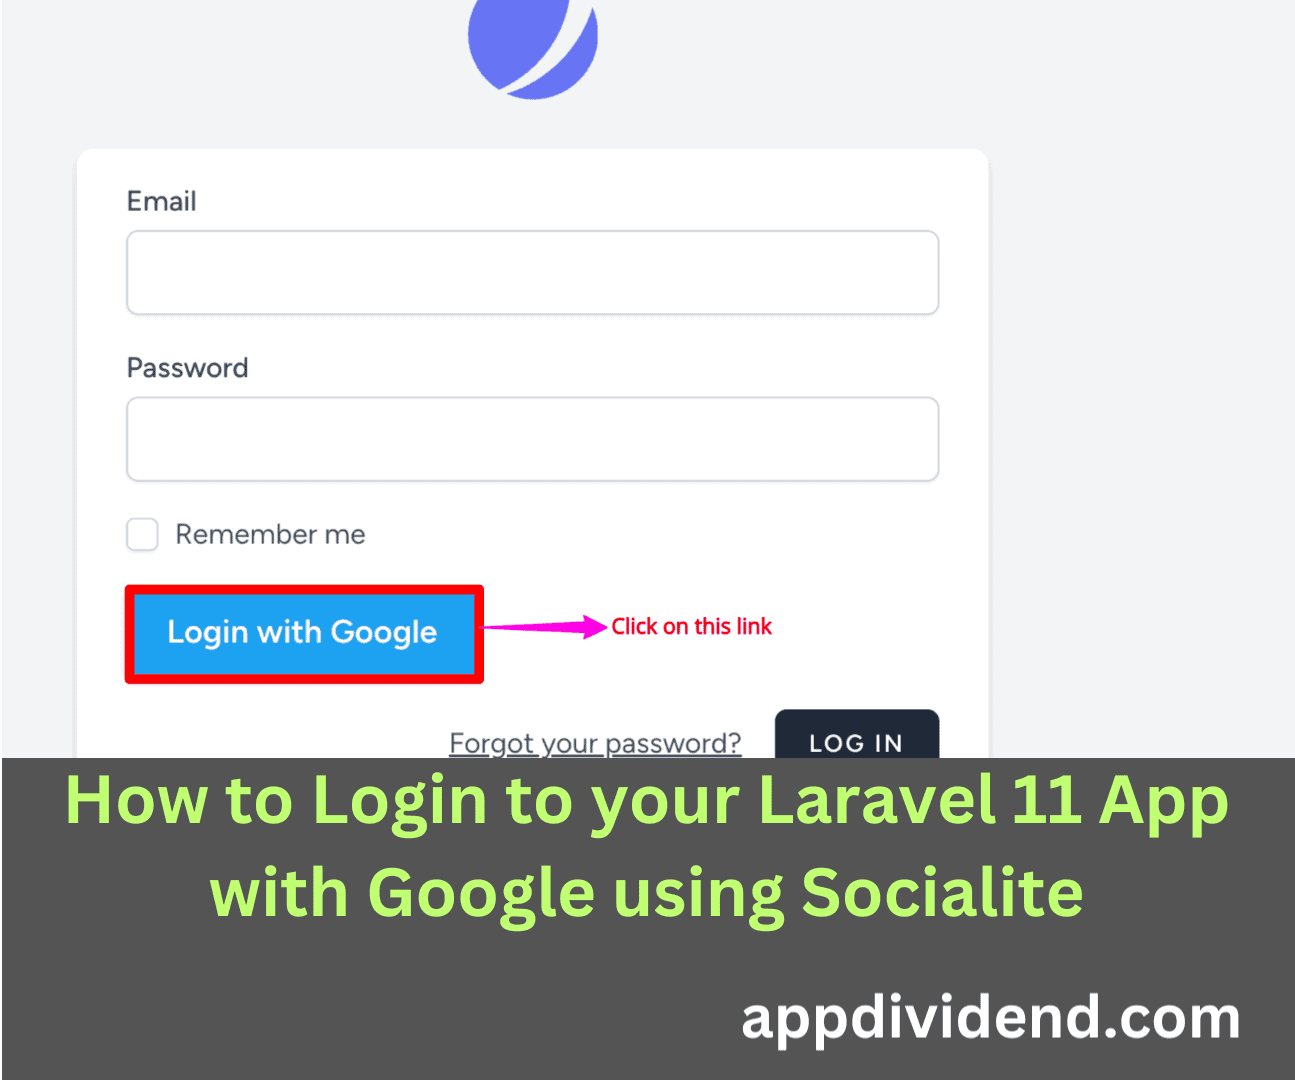
Step 10: Add the login link to the login.blade.php file
Add the following code inside resources/views/auth/login.blade.php file.
<x-guest-layout>
    <x-authentication-card>
        <x-slot name="logo">
            <x-authentication-card-logo />
        </x-slot>

        <x-validation-errors class="mb-4" />

        @session('status')
            <div class="mb-4 font-medium text-sm text-green-600">
                {{ $value }}
            </div>
        @endsession

        <form method="POST" action="{{ route('login') }}">
            @csrf

            <div>
                <x-label for="email" value="{{ __('Email') }}" />
                <x-input id="email" class="block mt-1 w-full" type="email" name="email" :value="old('email')" required autofocus autocomplete="username" />
            </div>

            <div class="mt-4">
                <x-label for="password" value="{{ __('Password') }}" />
                <x-input id="password" class="block mt-1 w-full" type="password" name="password" required autocomplete="current-password" />
            </div>

            <div class="block mt-4">
                <label for="remember_me" class="flex items-center">
                    <x-checkbox id="remember_me" name="remember" />
                    <span class="ms-2 text-sm text-gray-600">{{ __('Remember me') }}</span>
                </label>
            </div>
            <div class="flex mt-4 justify-between">
                <a href="{{ route('auth.google') }}" style="padding: 10px 20px; background-color: #1DA1F2; color: white; text-decoration: none; border-radius: 5px; font-weight: bold; box-shadow: 0 2px 4px rgba(0,0,0,0.2); transition: background-color 0.3s ease;">
                    Login with Google
                </a>
            </div>

            <div class="flex items-center justify-end mt-4">
                @if (Route::has('password.request'))
                    <a class="underline text-sm text-gray-600 hover:text-gray-900 rounded-md focus:outline-none focus:ring-2 focus:ring-offset-2 focus:ring-indigo-500" href="{{ route('password.request') }}">
                        {{ __('Forgot your password?') }}
                    </a>
                @endif

                <x-button class="ms-4">
                    {{ __('Log in') }}
                </x-button>
            </div>
        </form>
    </x-authentication-card>
</x-guest-layout>
Save this file and now go to this URL: http://localhost:8000/login
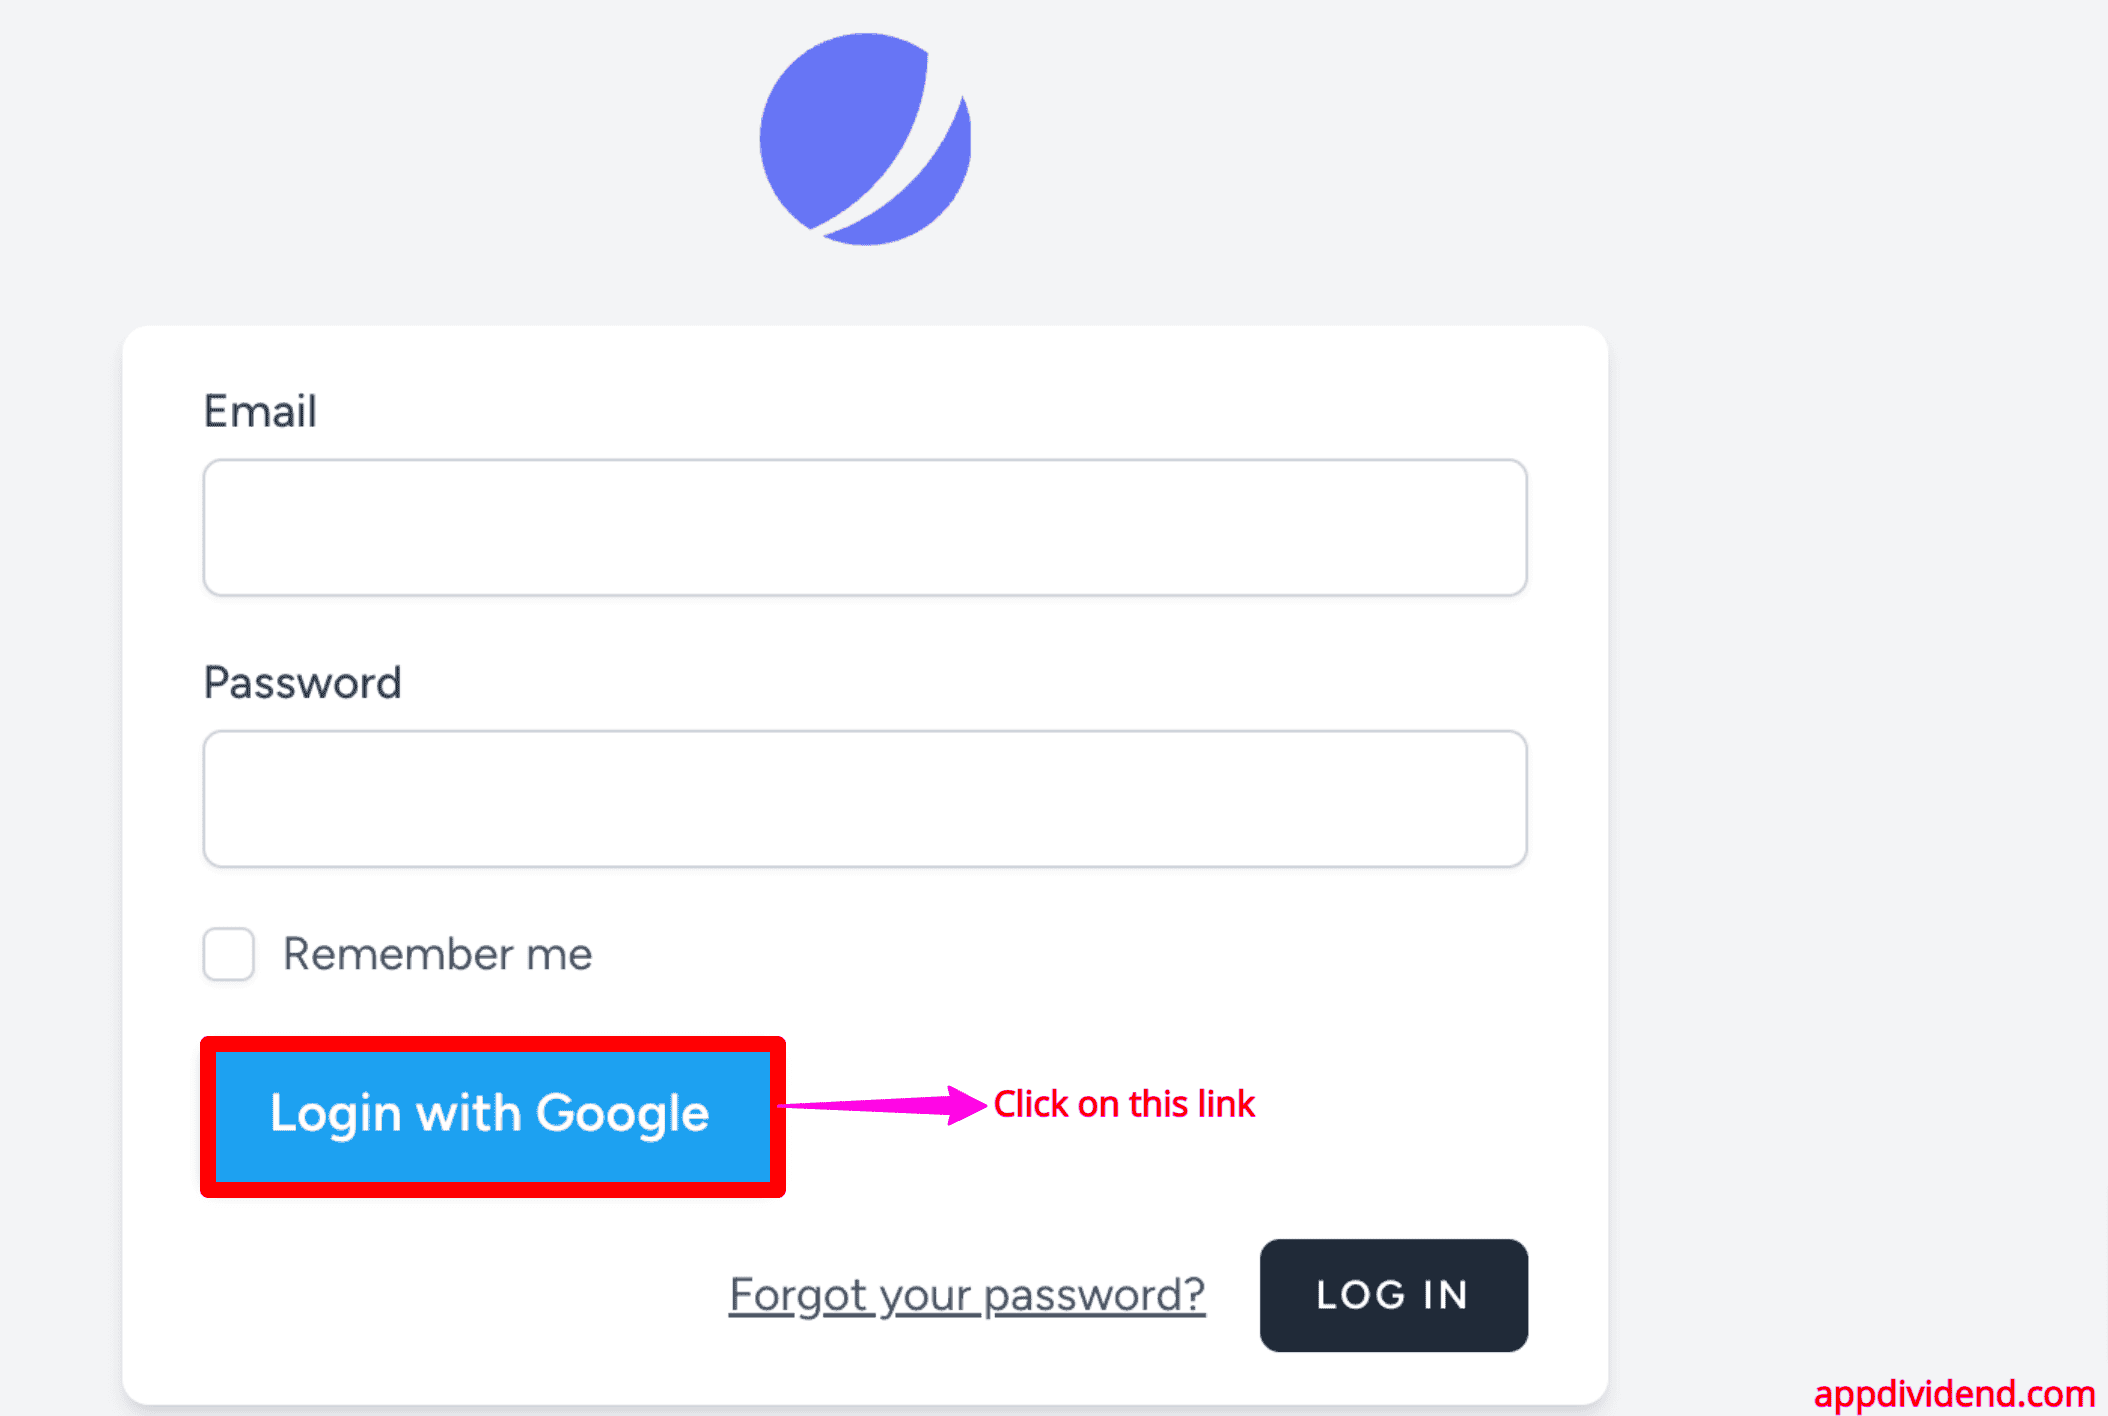
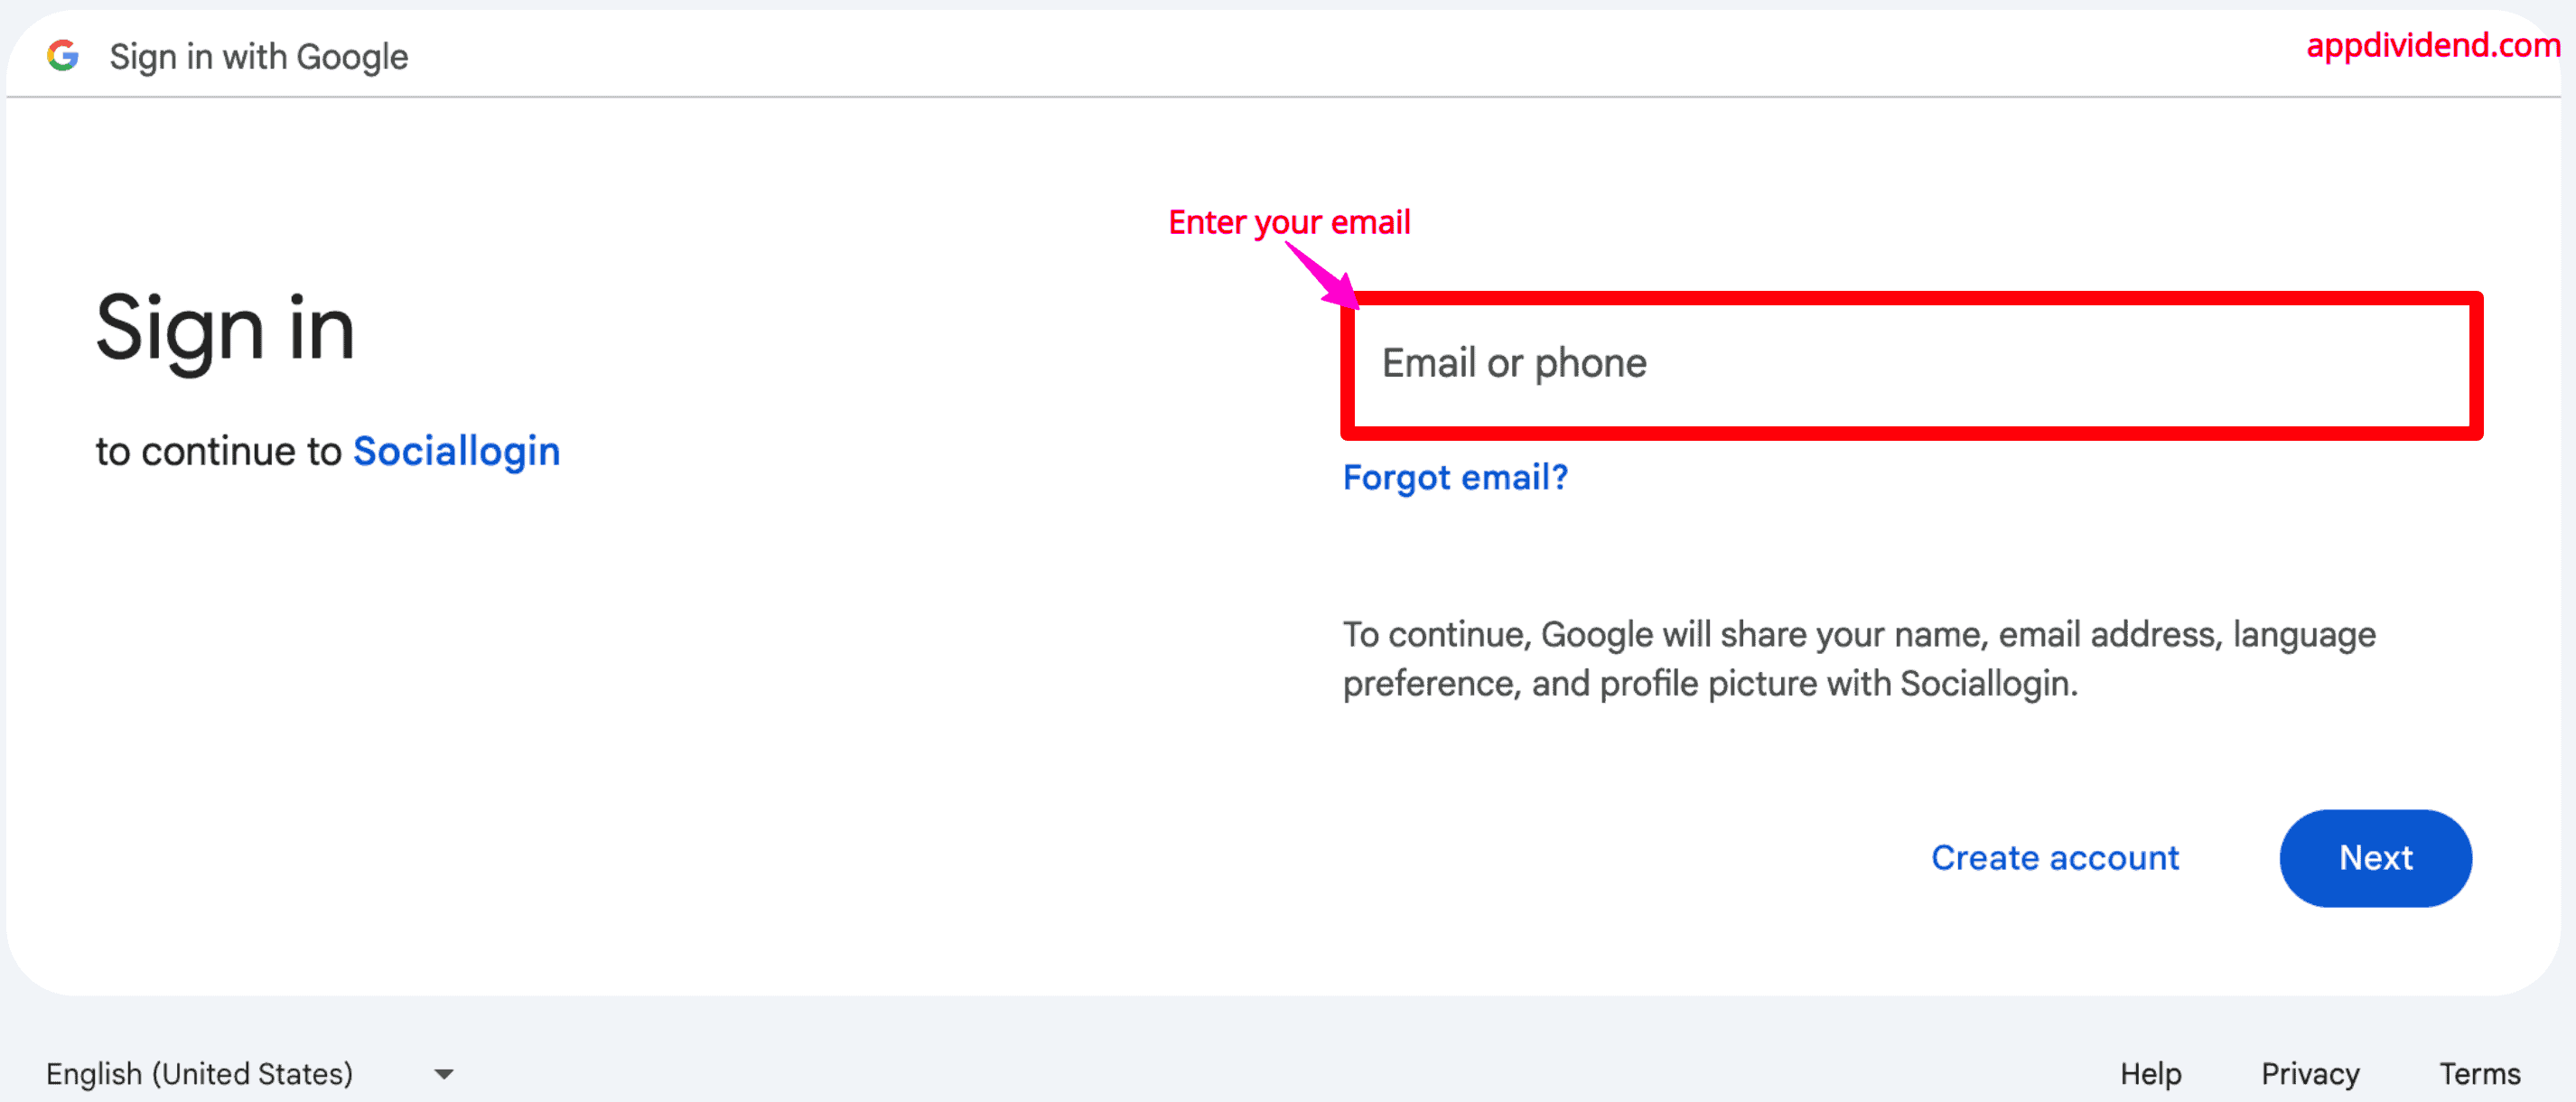
If you click on “Login with Google”, you will be redirected to the Google login page like this:
If you provide the email and password correctly, you will be redirected to the http://localhost:8000/dashboard page.

Here is the complete code on Github.
That’s it for this tutorial.
