
Firebase Realtime Database is a cloud-hosted database provided by Google. The data stored in Firebase is JSON and synchronized to every connected client in real time.
Laravel is a popular PHP Framework for creating small, medium, or large-scale web applications.
To use Laravel with Firebase, use the “kreait/laravel-firebase” package.
Step 1: Install Laravel Project
composer create-project --prefer-dist laravel/laravel laravelfirebase
Go inside the project folder:
cd laravelfirebase
Install the laravel/ui package to use Bootstrap CSS.
composer require laravel/ui
Let’s add the Bootstrap scaffolding using laravel/ui:
php artisan ui bootstrap
Bootstrap icons package does not, by default, come with Bootstrap 5. You need to install it separately.
Install the bootstrap-icons package using this command:
npm i bootstrap-icons --save
Import this bootstrap-icons.css file inside resources >> js >> app.js file.
import './bootstrap';

import 'bootstrap-icons/font/bootstrap-icons.css';
Go to the terminal, install the vite and other development packages, and start the vite development server:
npm install

npm run dev
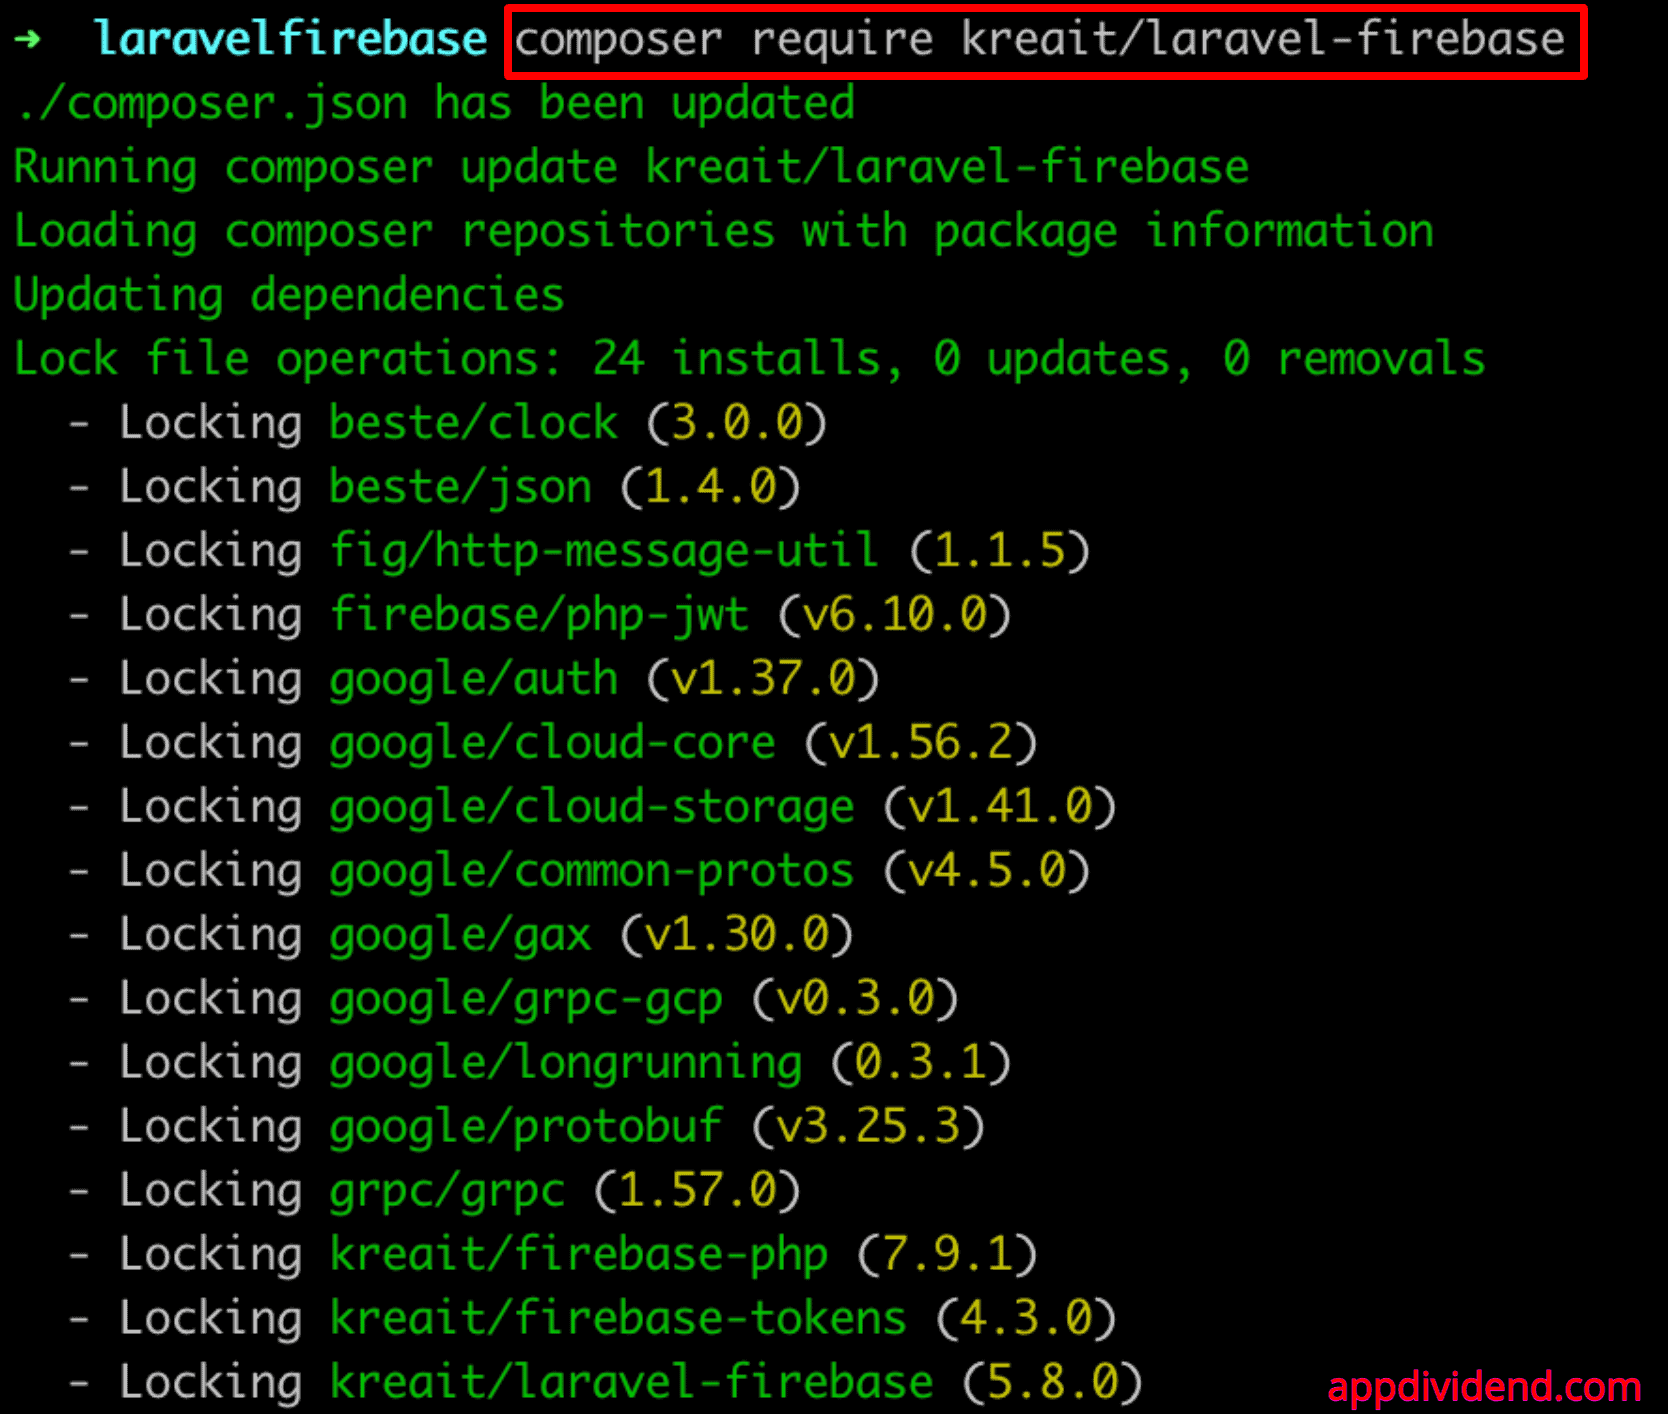
Step 2: Install laravel-firebase package
Open your terminal and enter the following command.
composer require kreait/laravel-firebase
If you experience an error during installation regarding the platform requirements, you can add the—ignore-platform-reqs flag to install the package, ignoring the underlying platform requirements.
composer require kreait/laravel-firebase --ignore-platform-reqs
Add a ServiceProvider inside bootstrap >> providers.php file:
<?php

// providers.php

return [
    App\Providers\AppServiceProvider::class,
    Kreait\Laravel\Firebase\ServiceProvider::class,
];
Step 3: Setup Firebase
Let’s begin with signing up for a Gmail account. But first, Open Google Firebase Console by clicking on this link Google Firebase Console. Looks like the image below.
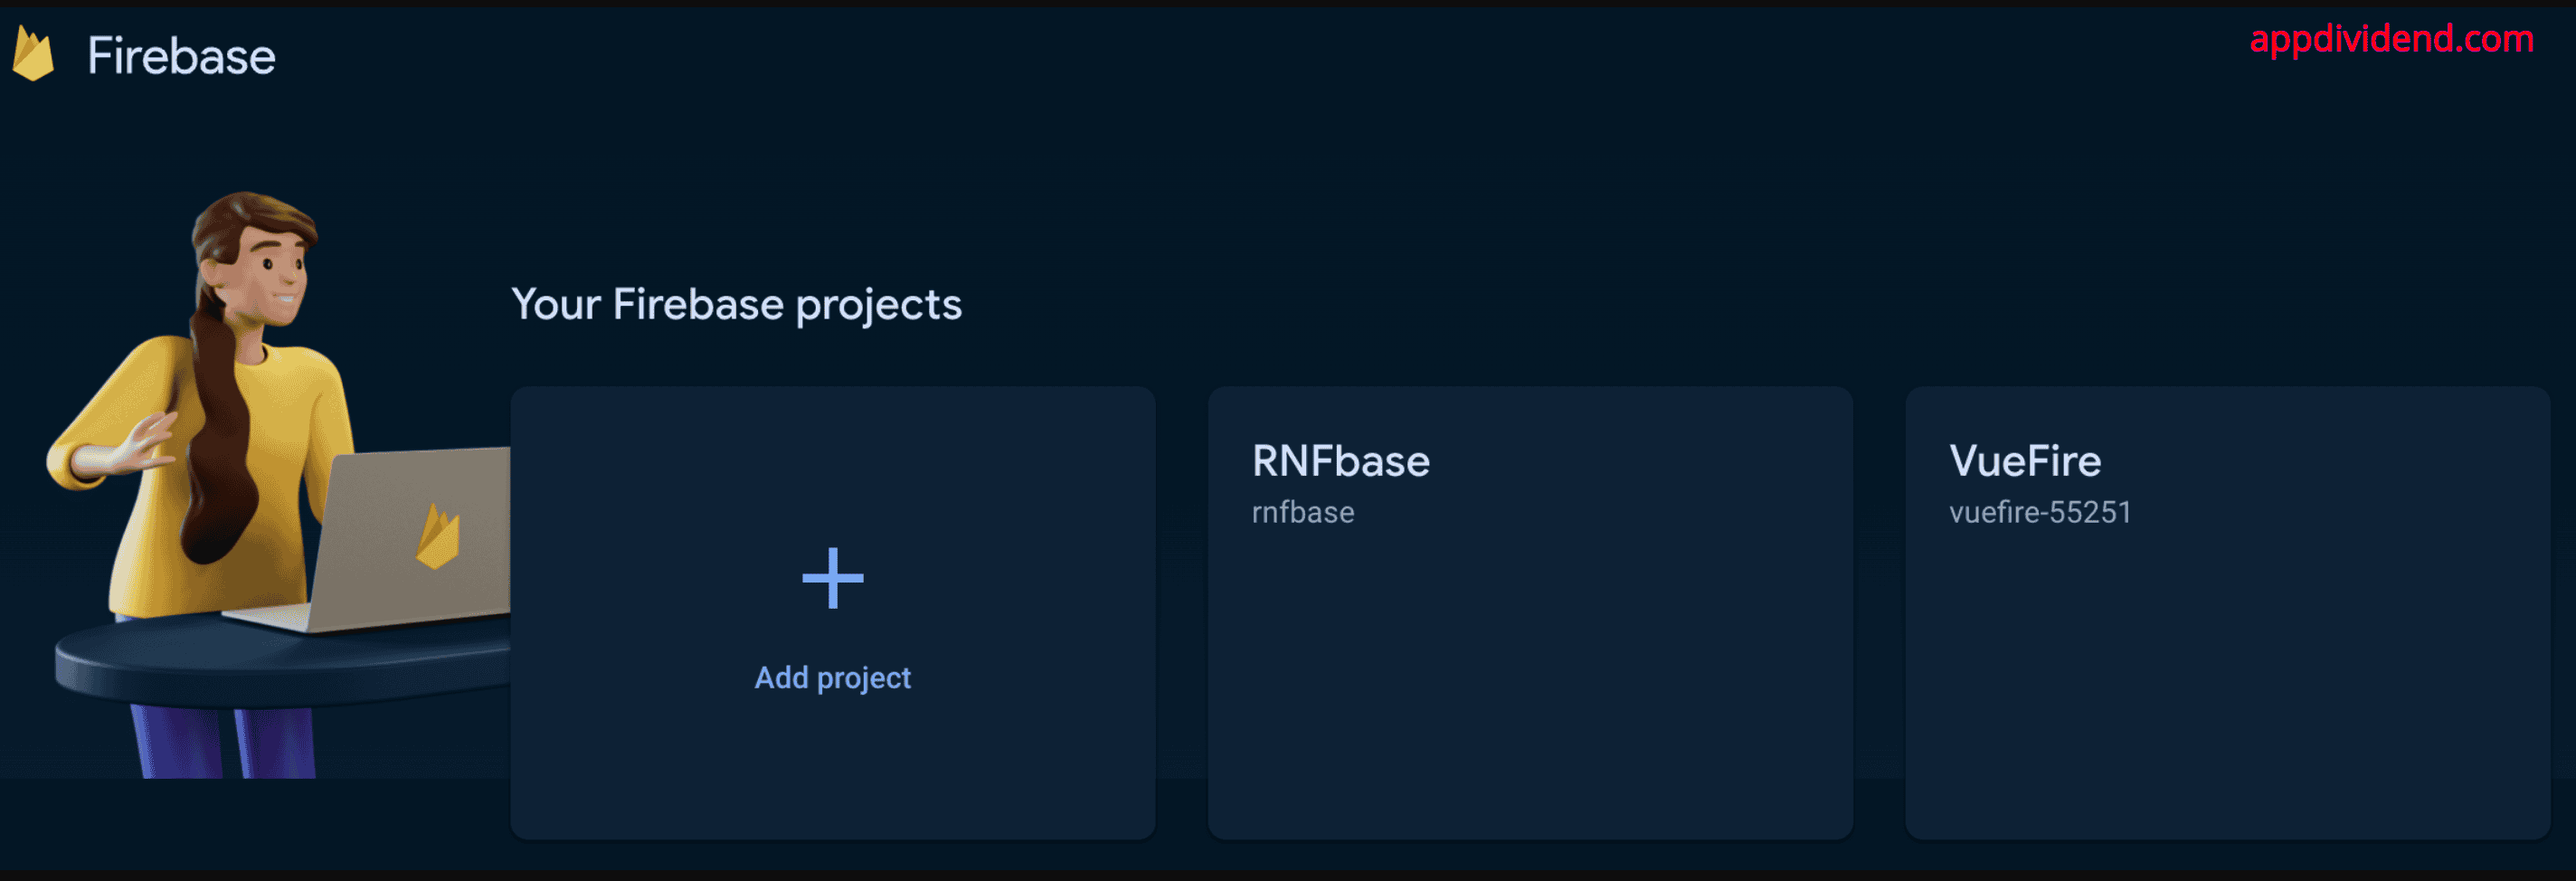
Press the Add project button here to create a new Firebase project.
In the next window, build a database project and provide information, including the project name. When finished, click the Create Project button.
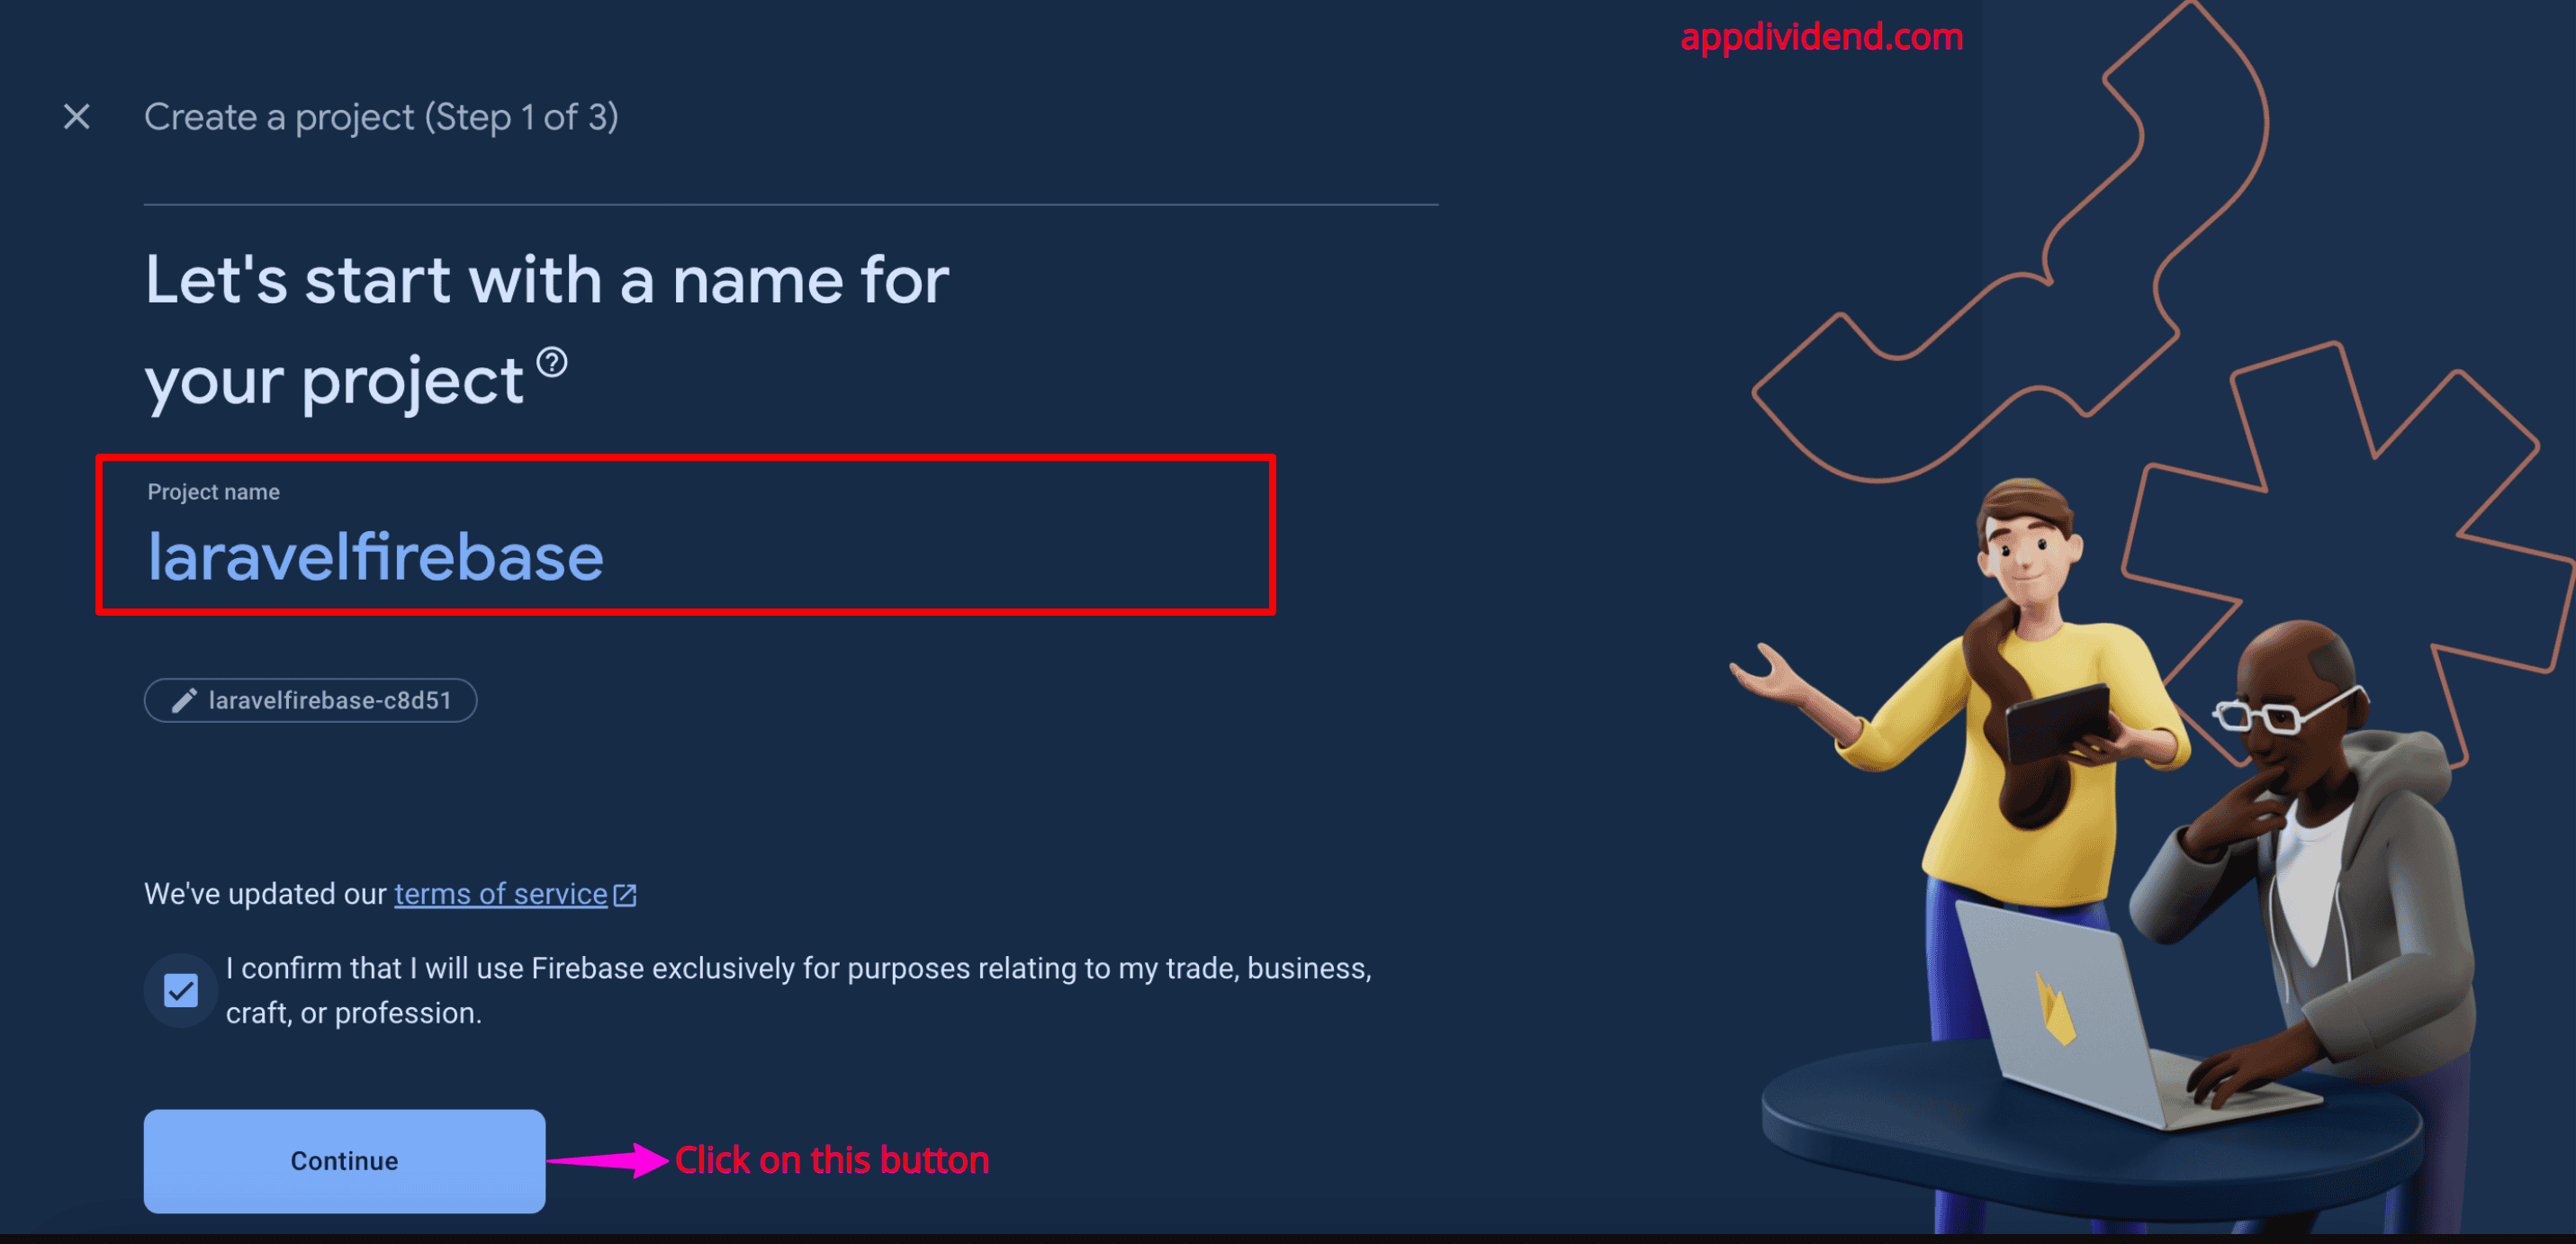
Wait for the project to be created, and then continue.
You will be automatically switched to the Firebase Dashboard.
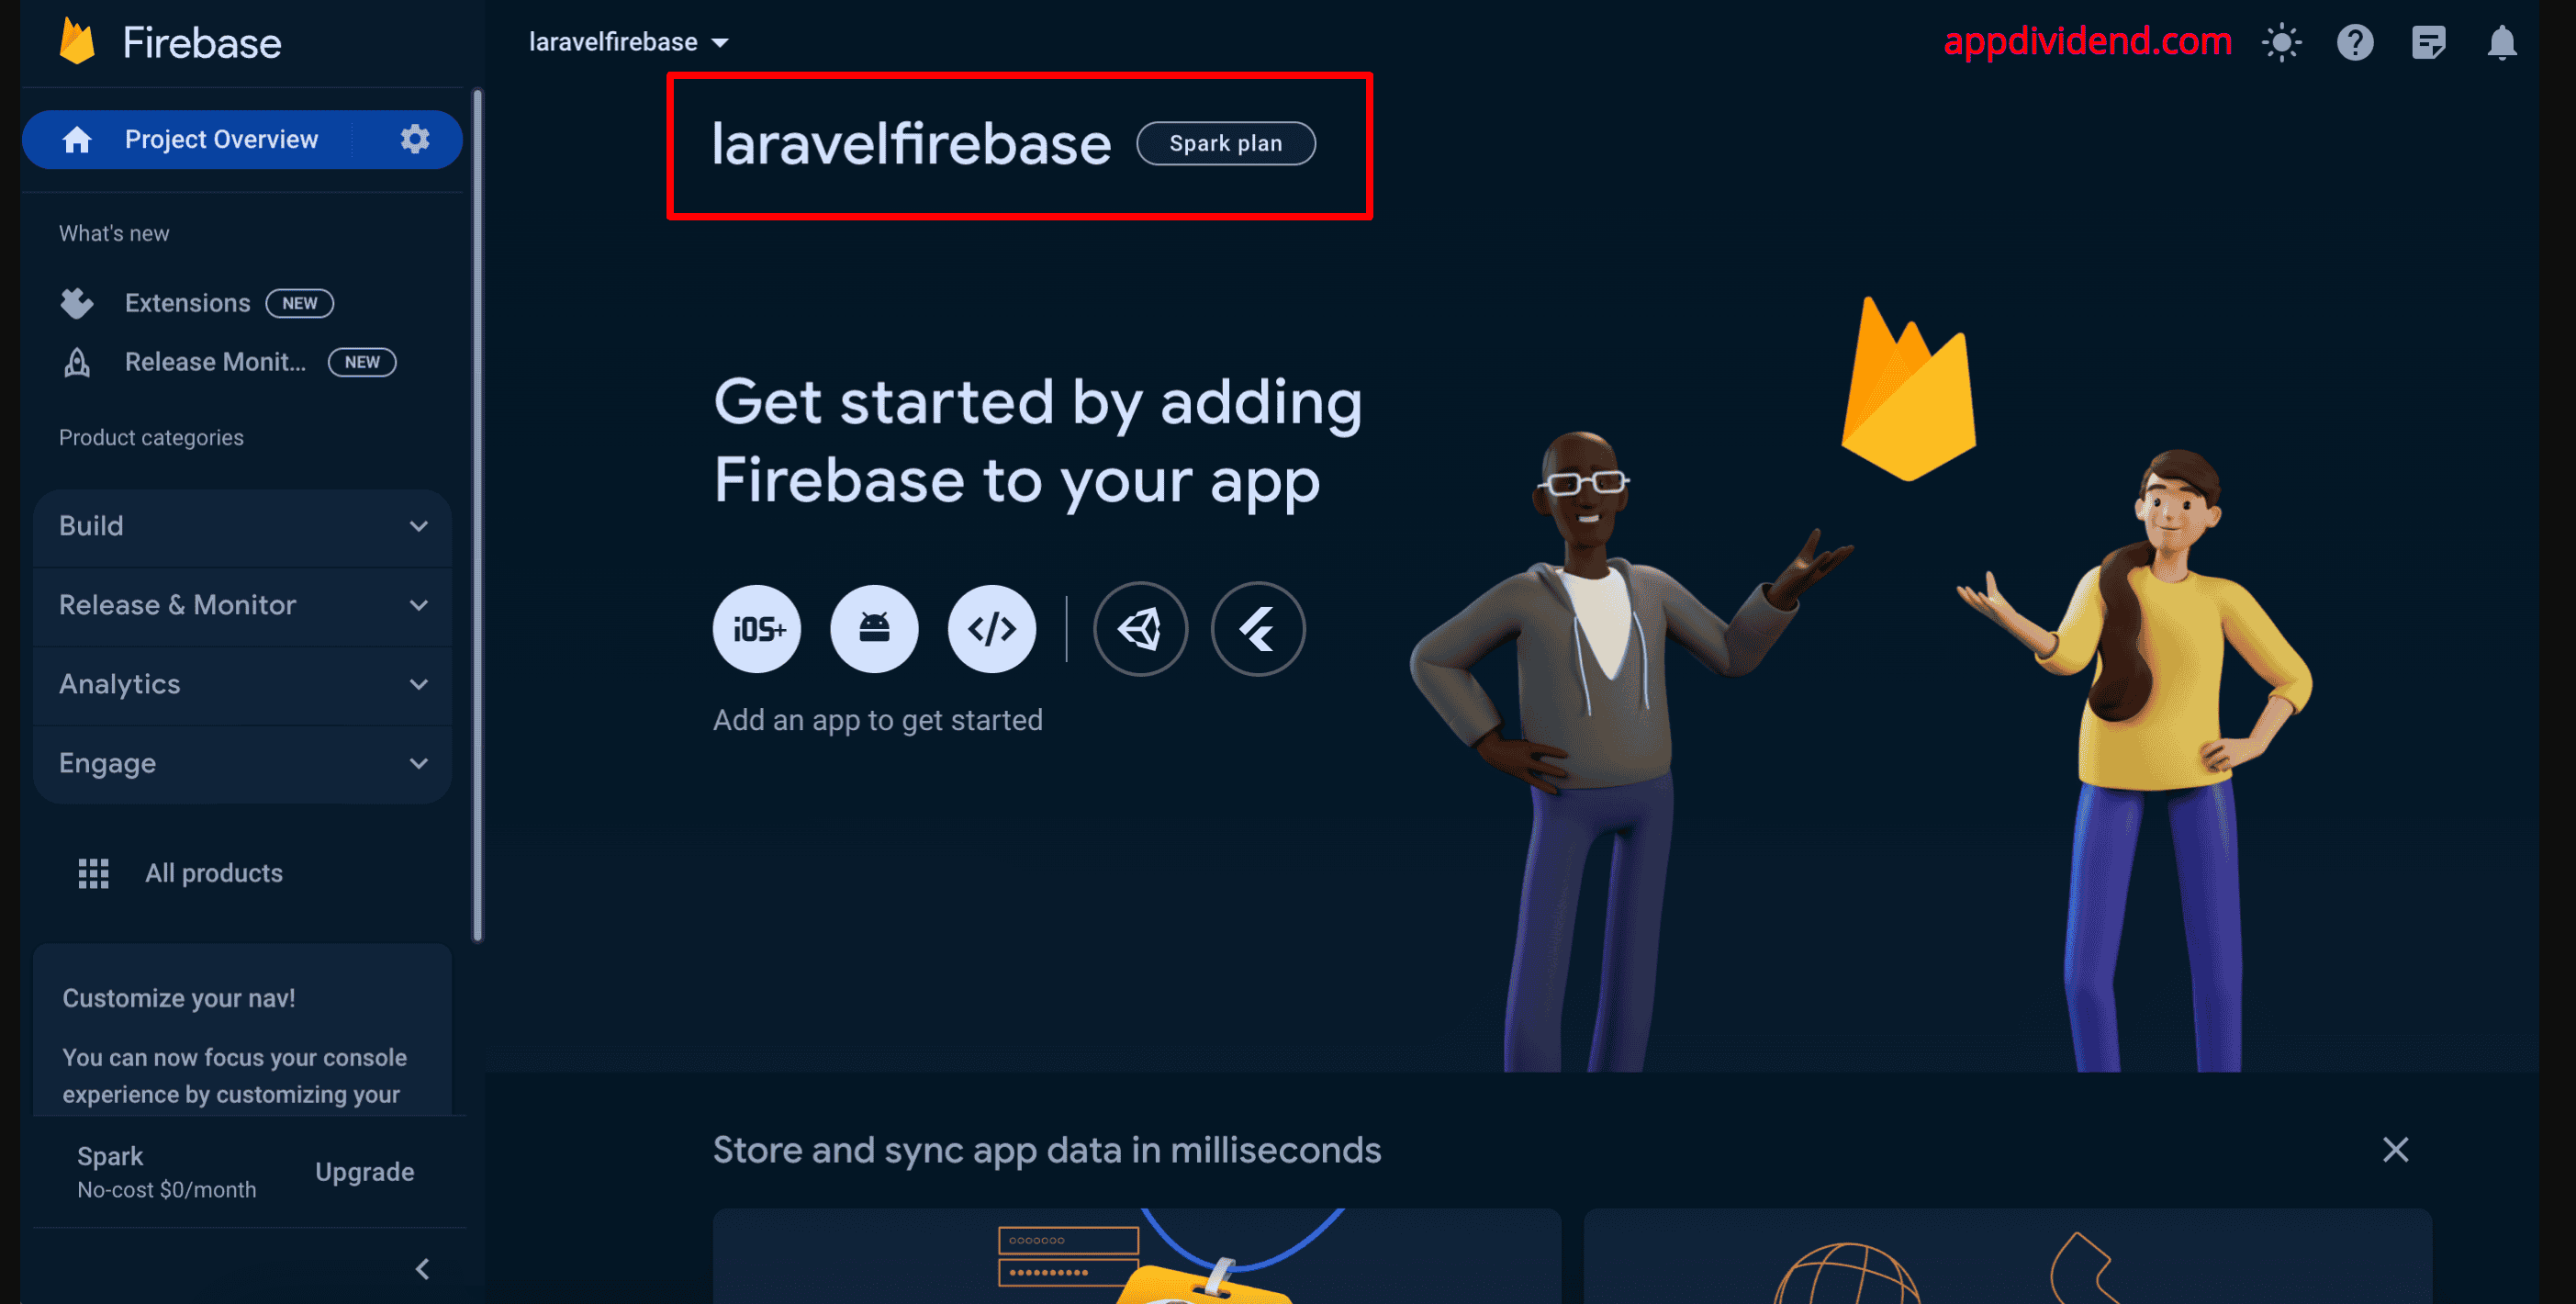
Now, go to the left-hand navigation bar, click on the “build” item, and then click on the Realtime database, and it will open a Window like this:
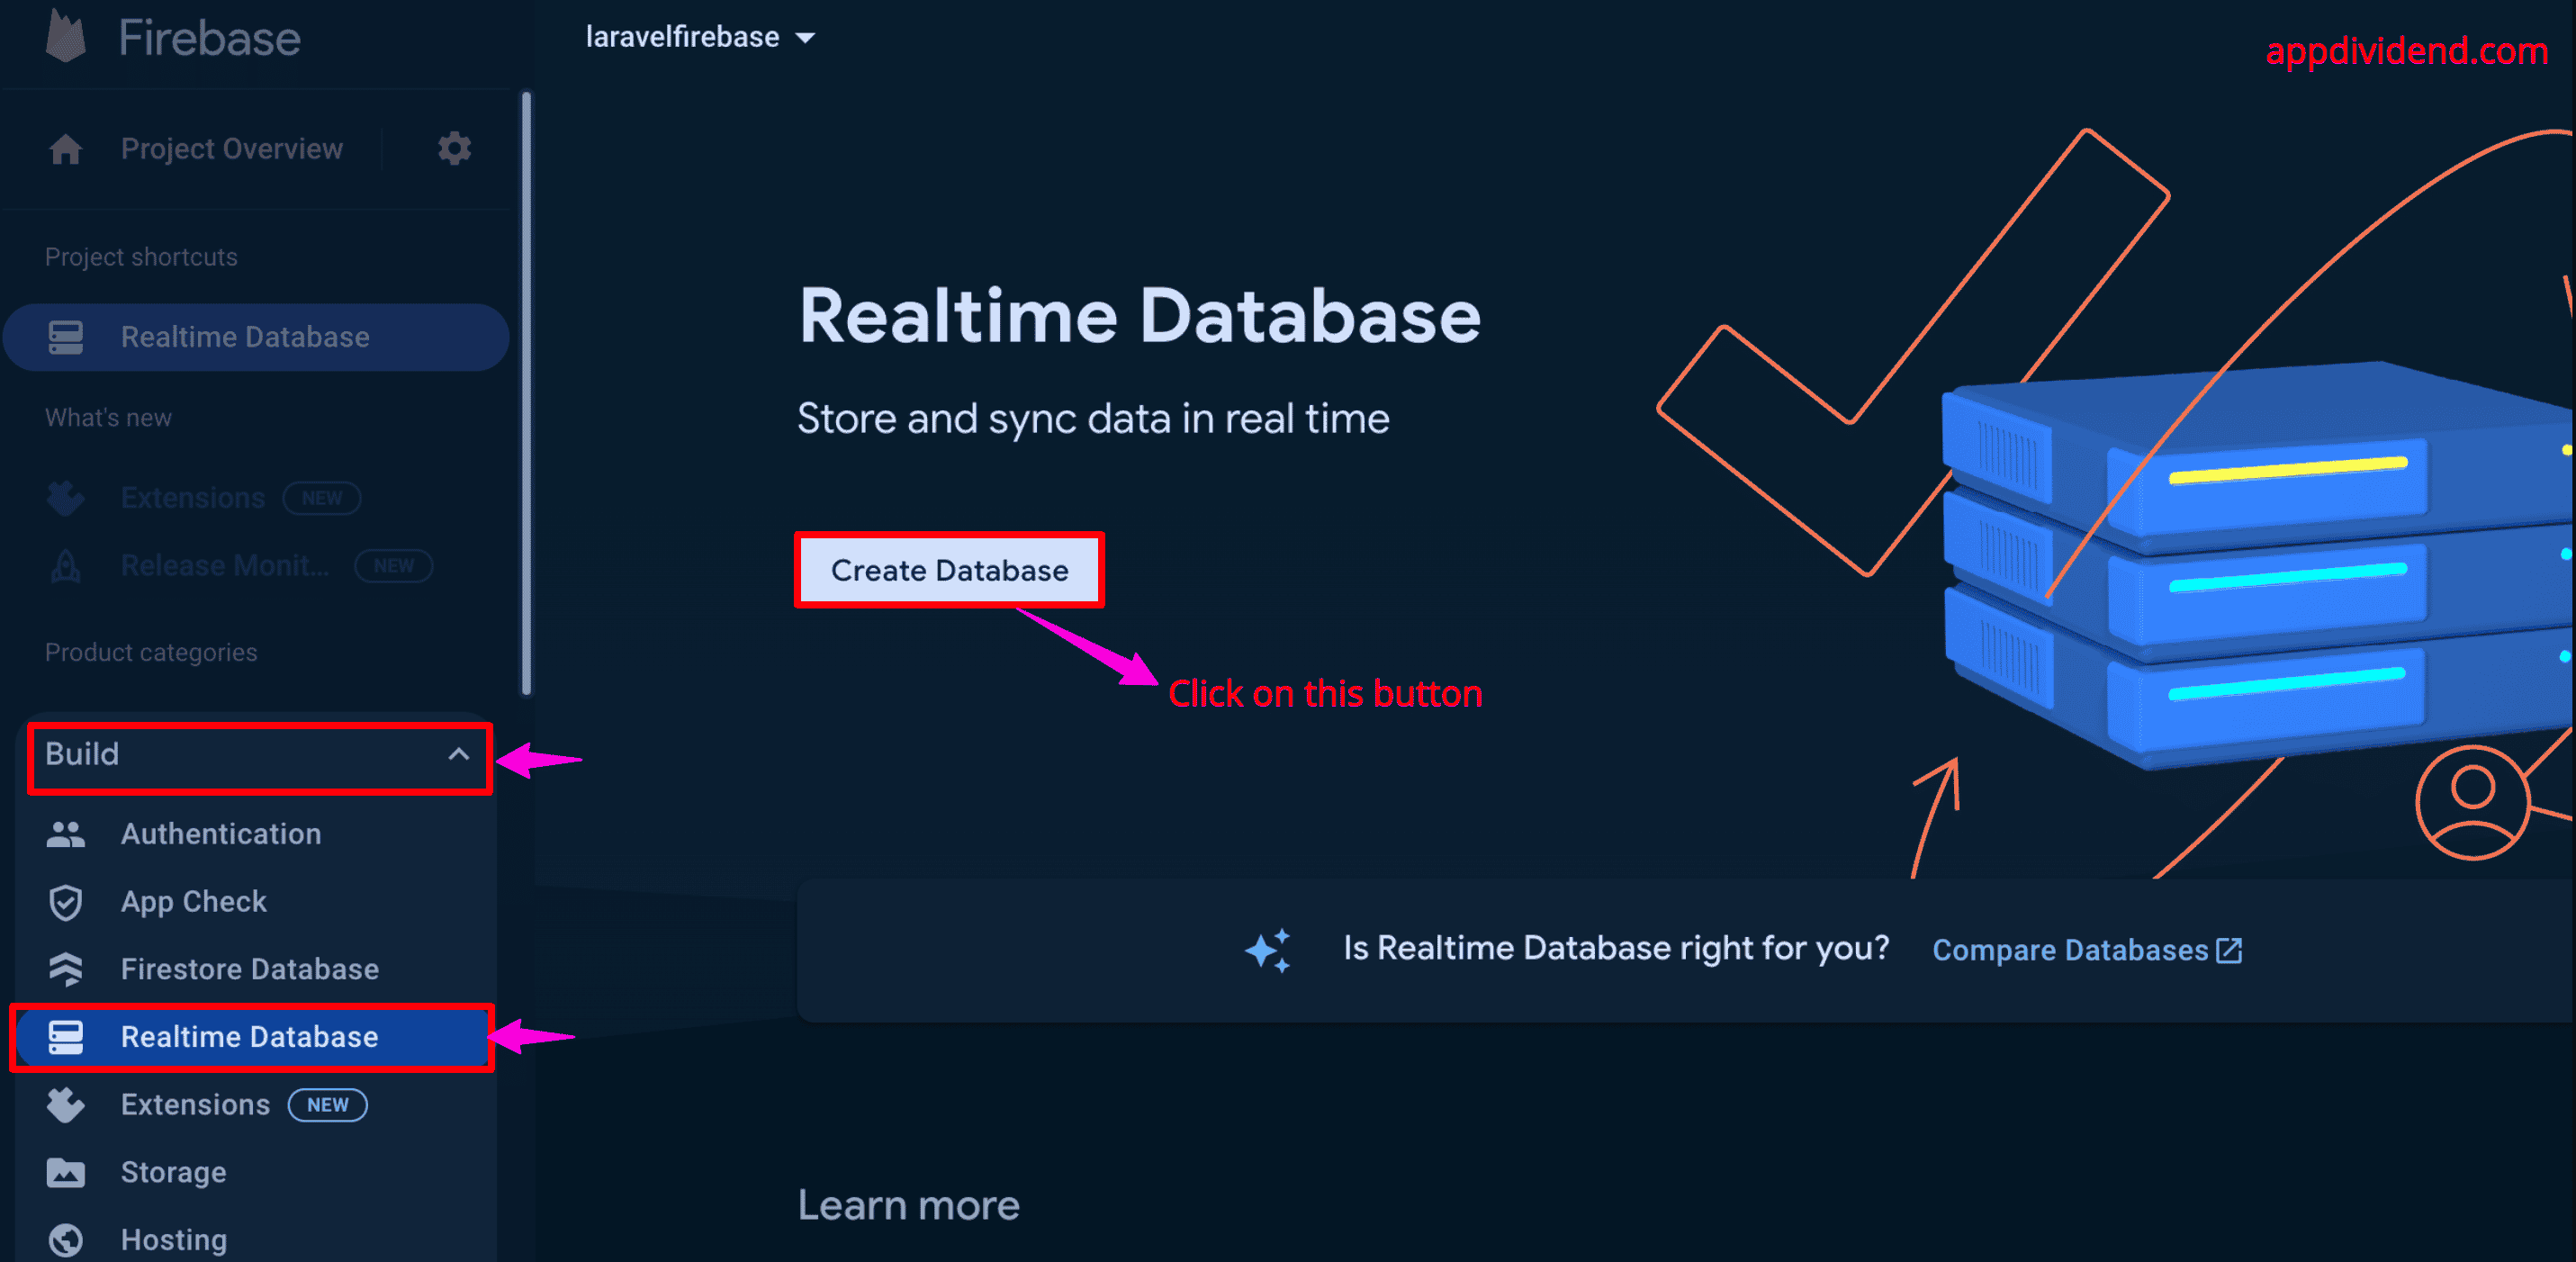
After clicking on the “Create Database” button, as shown in the above figure, you will see something like this:
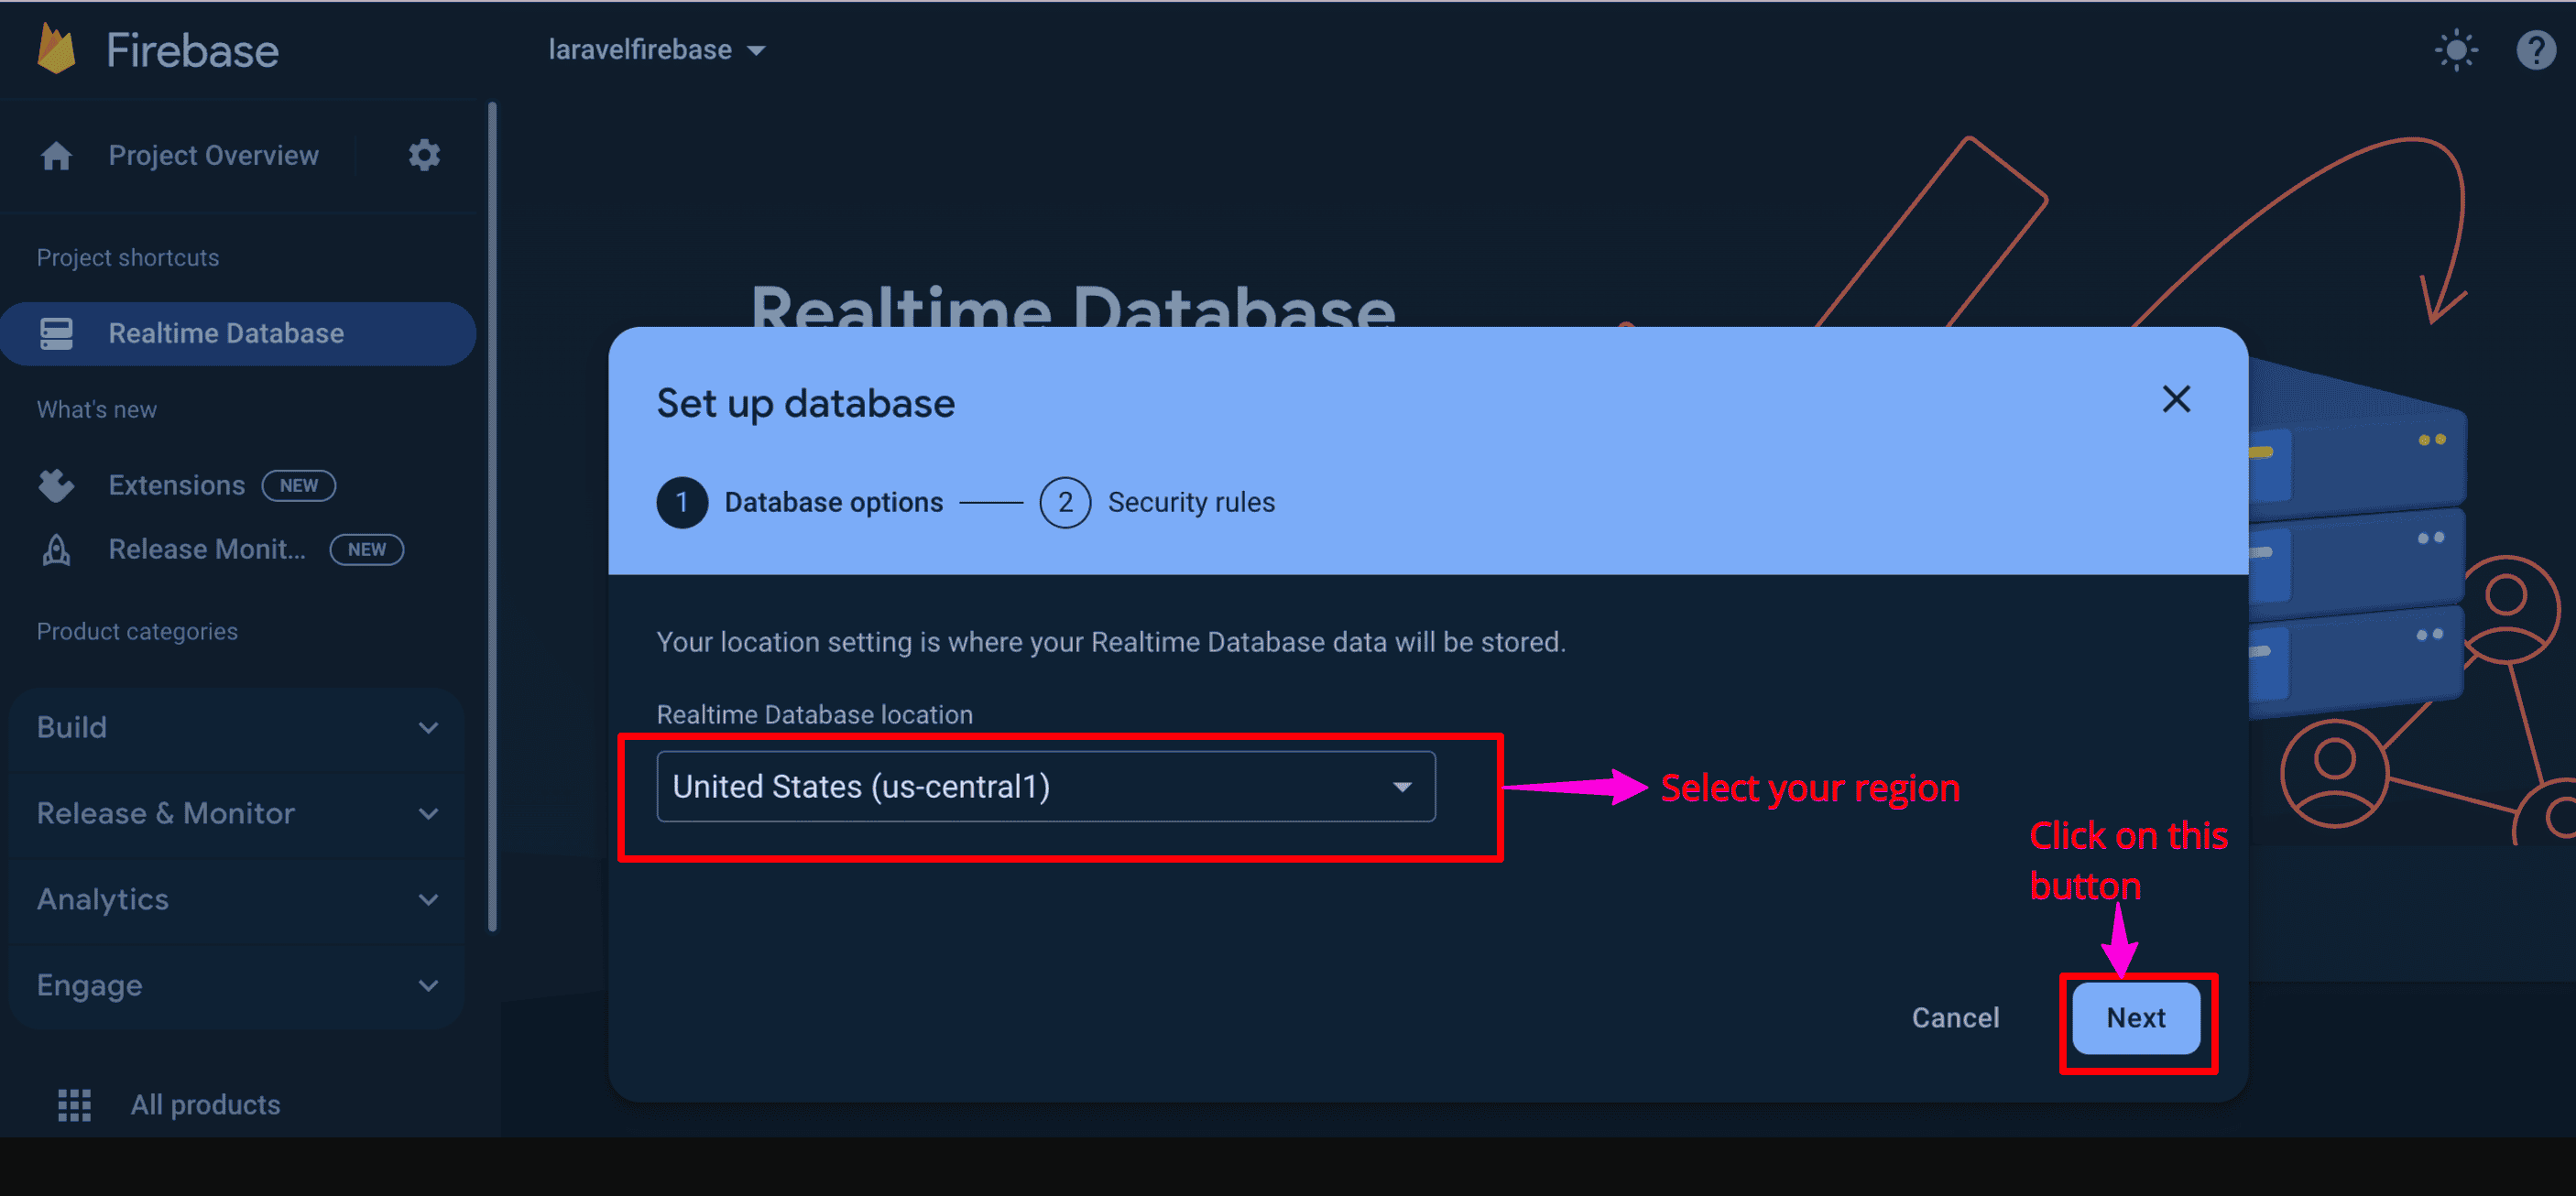
Let’s set up security rules in the next step like this:
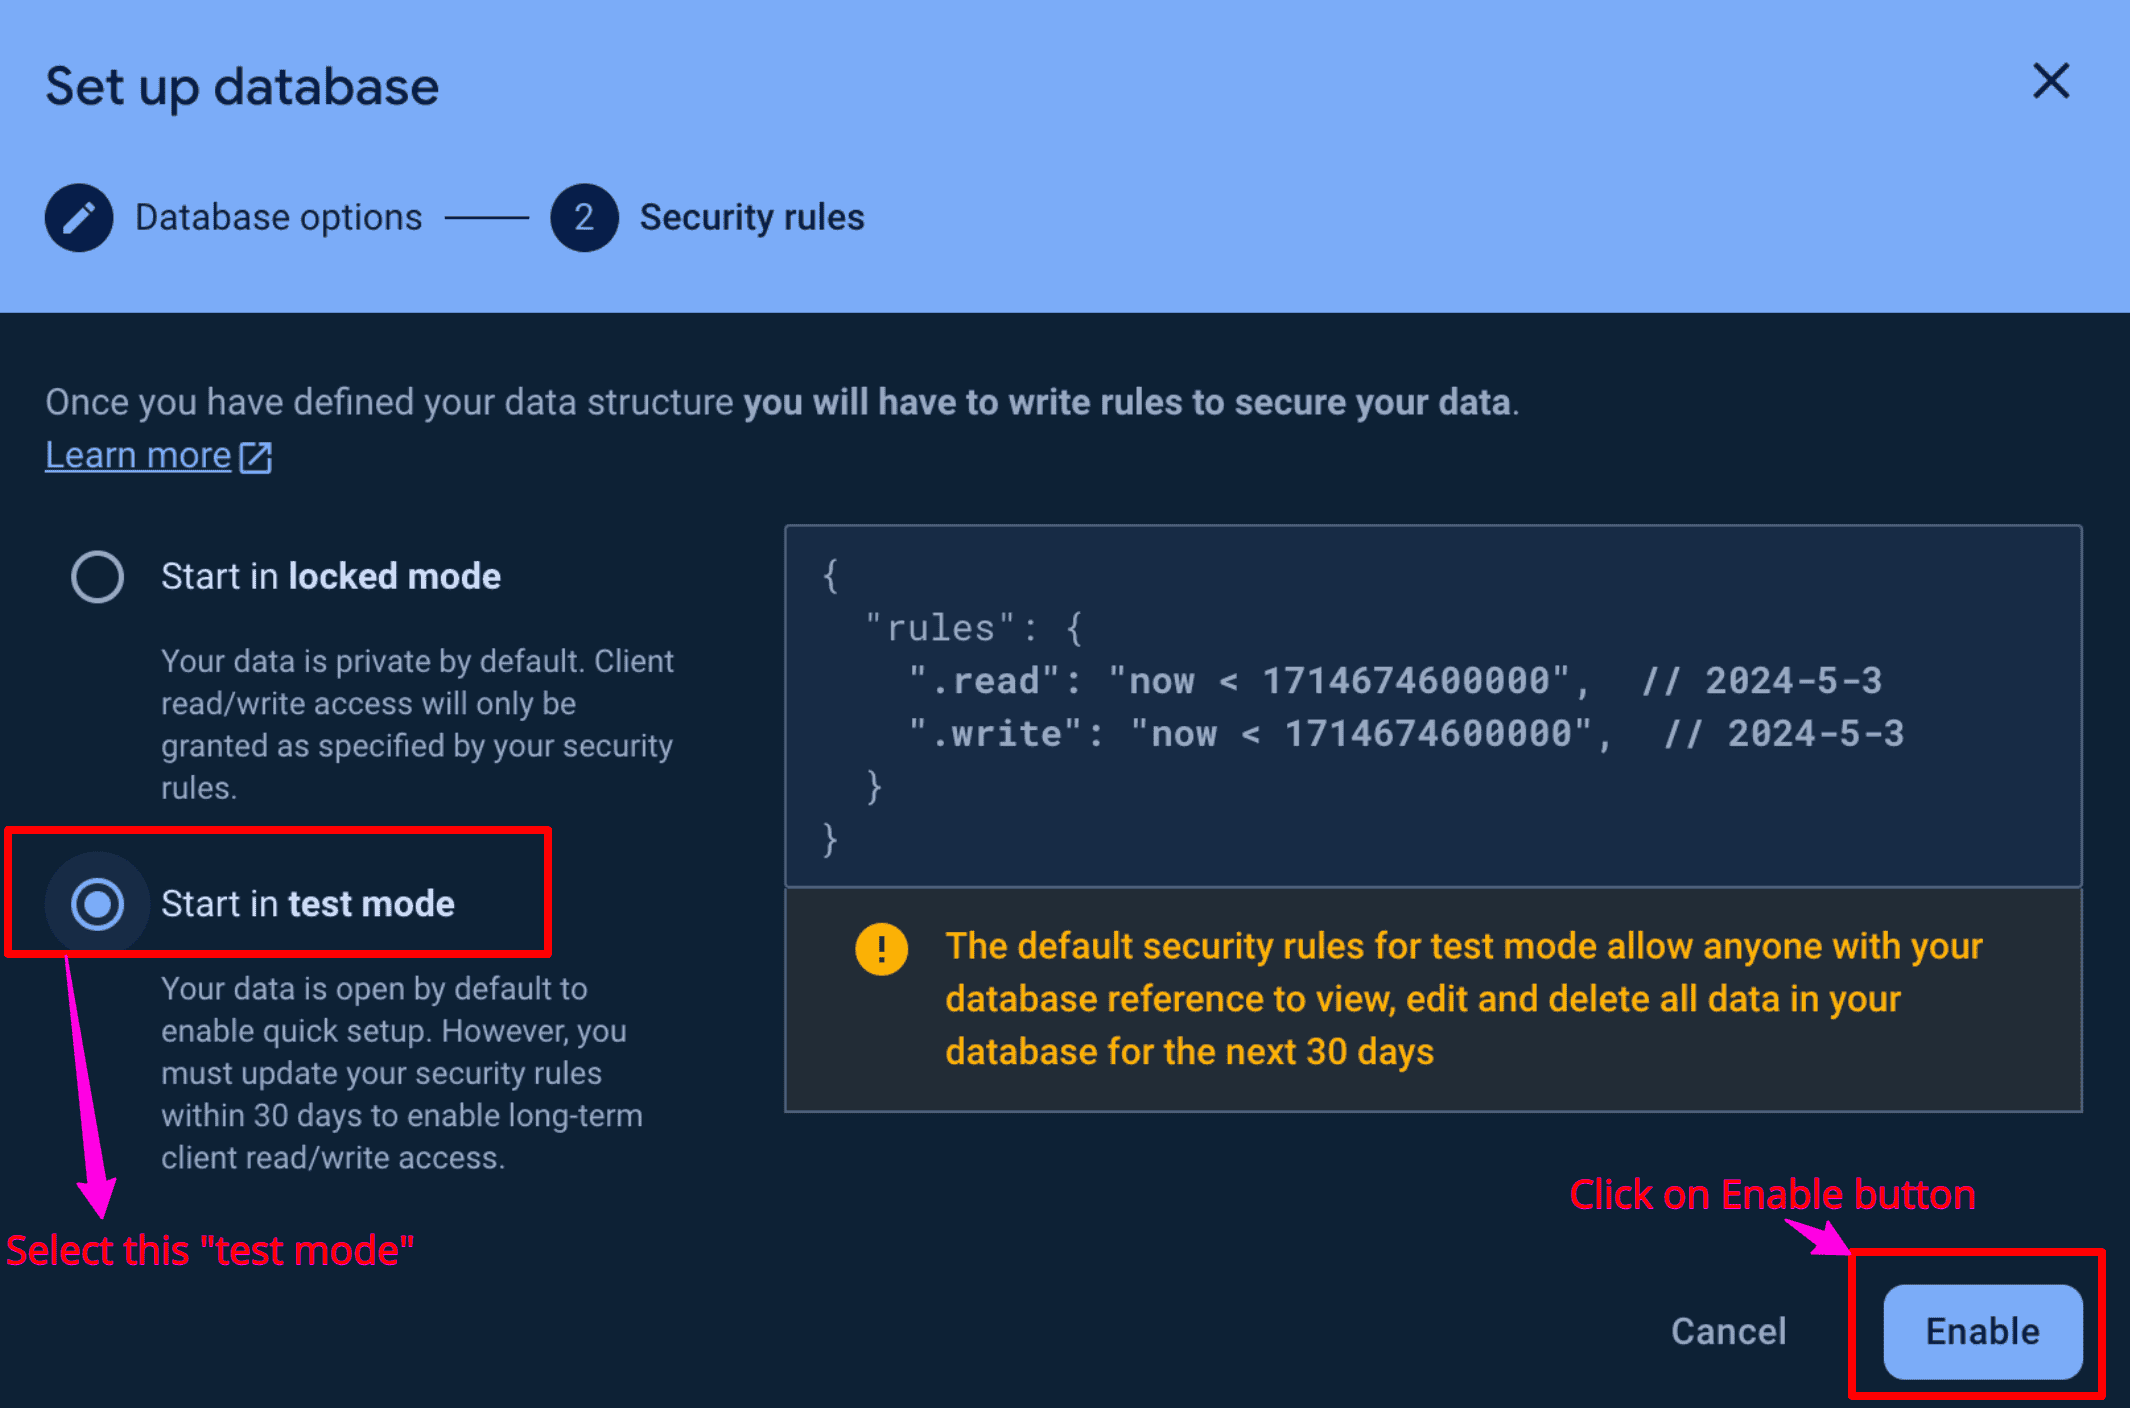
Here, we set the rules to edit, update, view, and delete the database for 30 days.
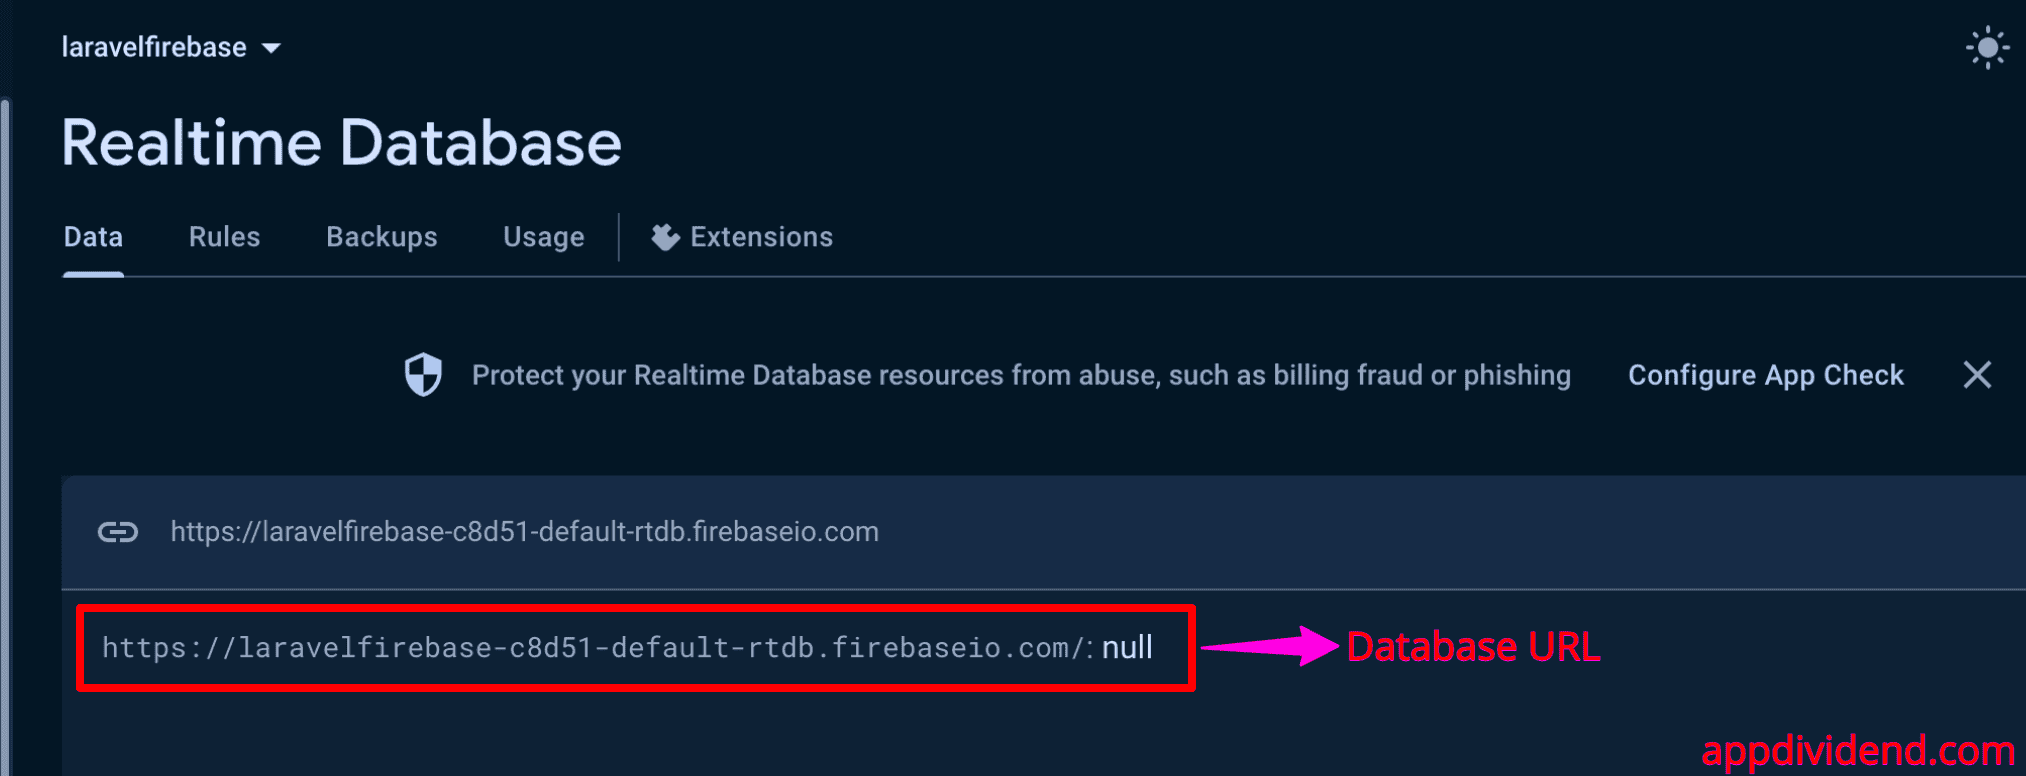
Now, we have created a realtime database whose connection URL looks like this:
Step 4: Generate API Key
We need an access key and database URL to connect our Laravel application to this Firebase project.
We already got the database URL in the above step, and we just need to
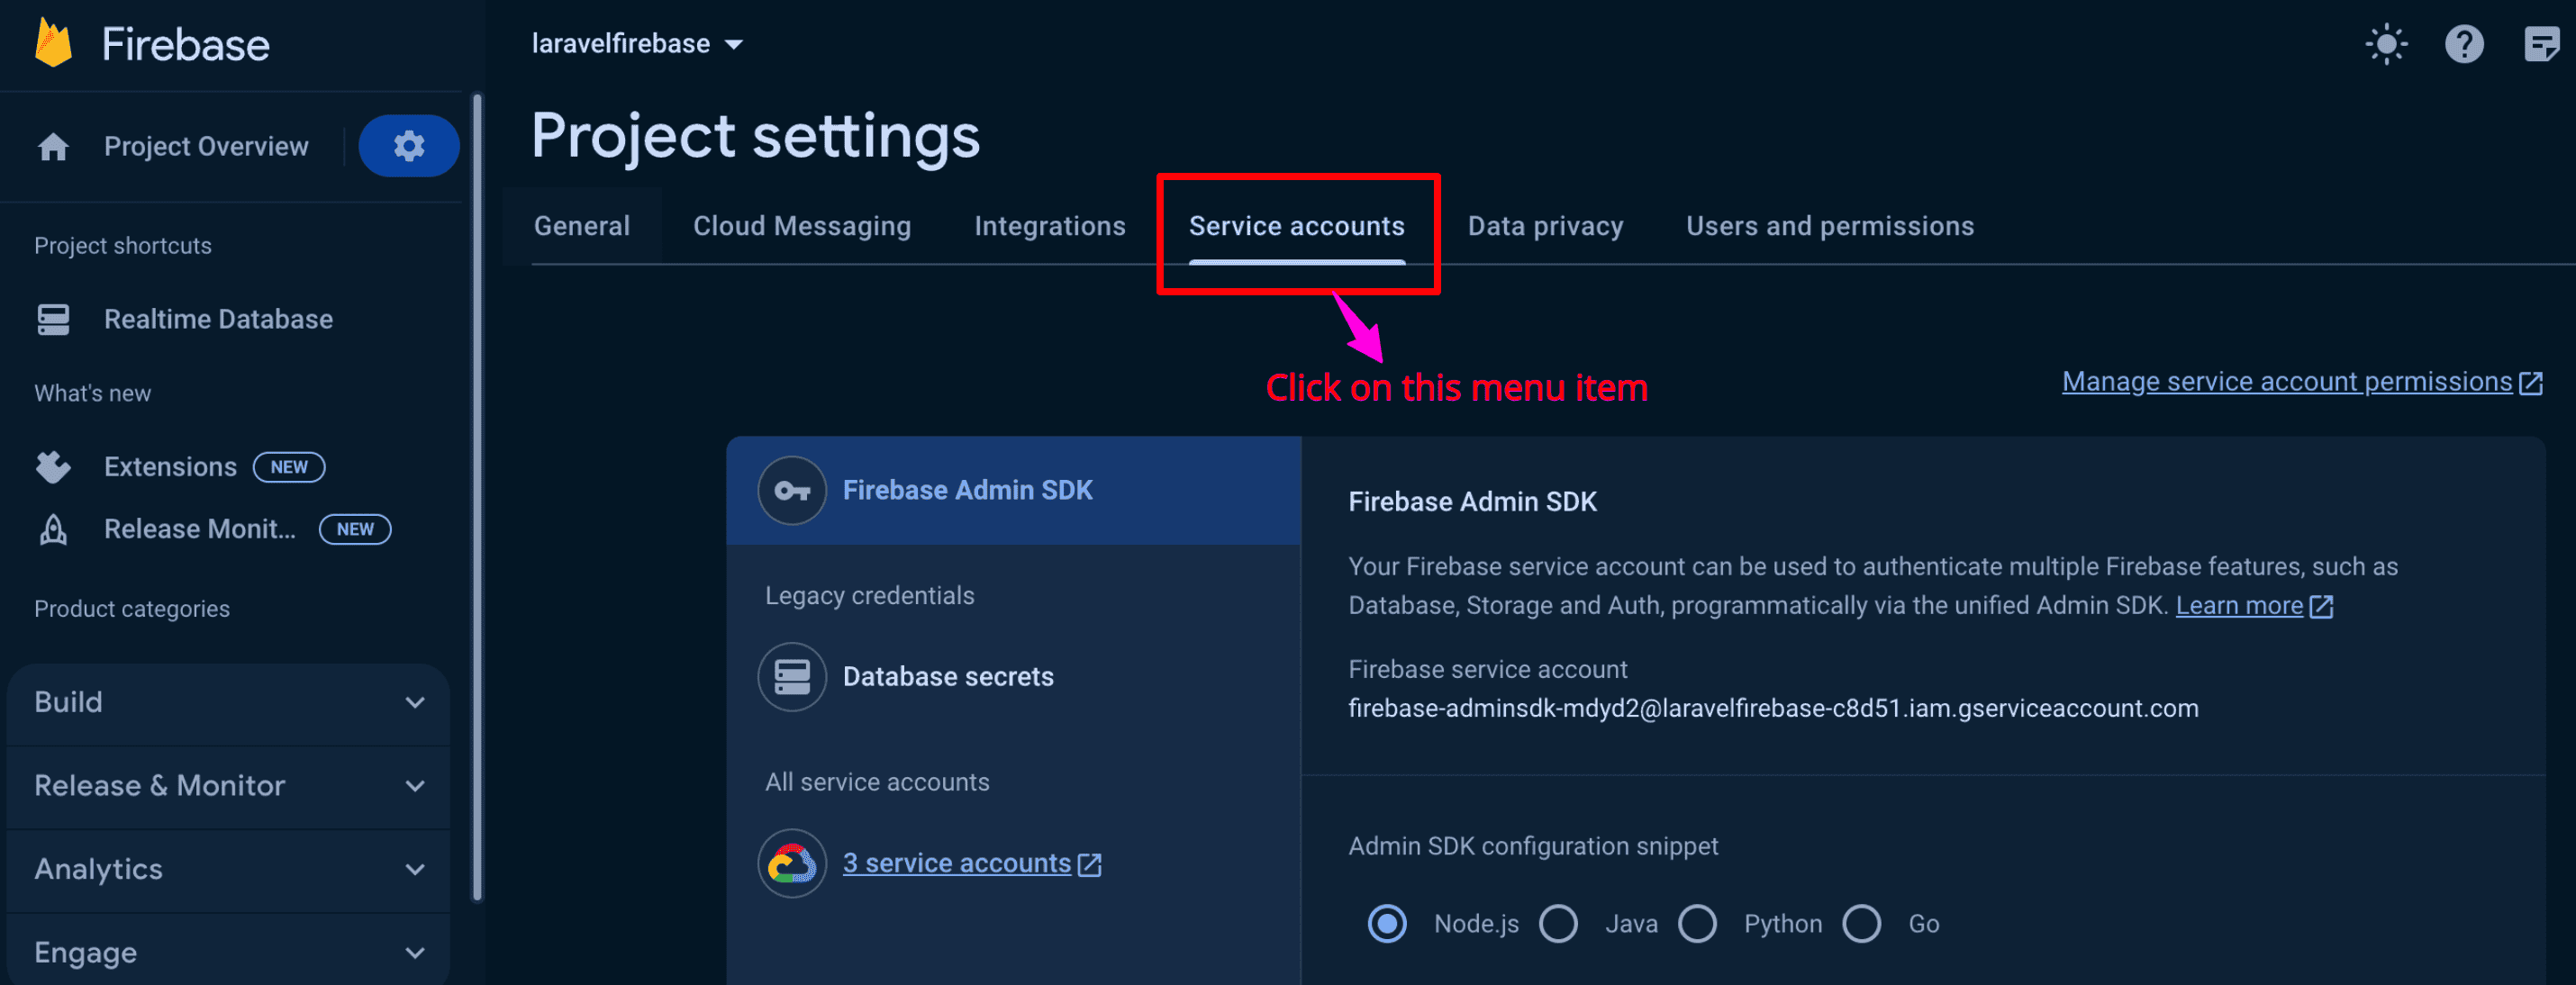
Select the Project Overview >> Project Settings as shown in the below figure

Now, click on the Service Accounts menu item like this:
Scroll down to this page, and you will see a button like this:
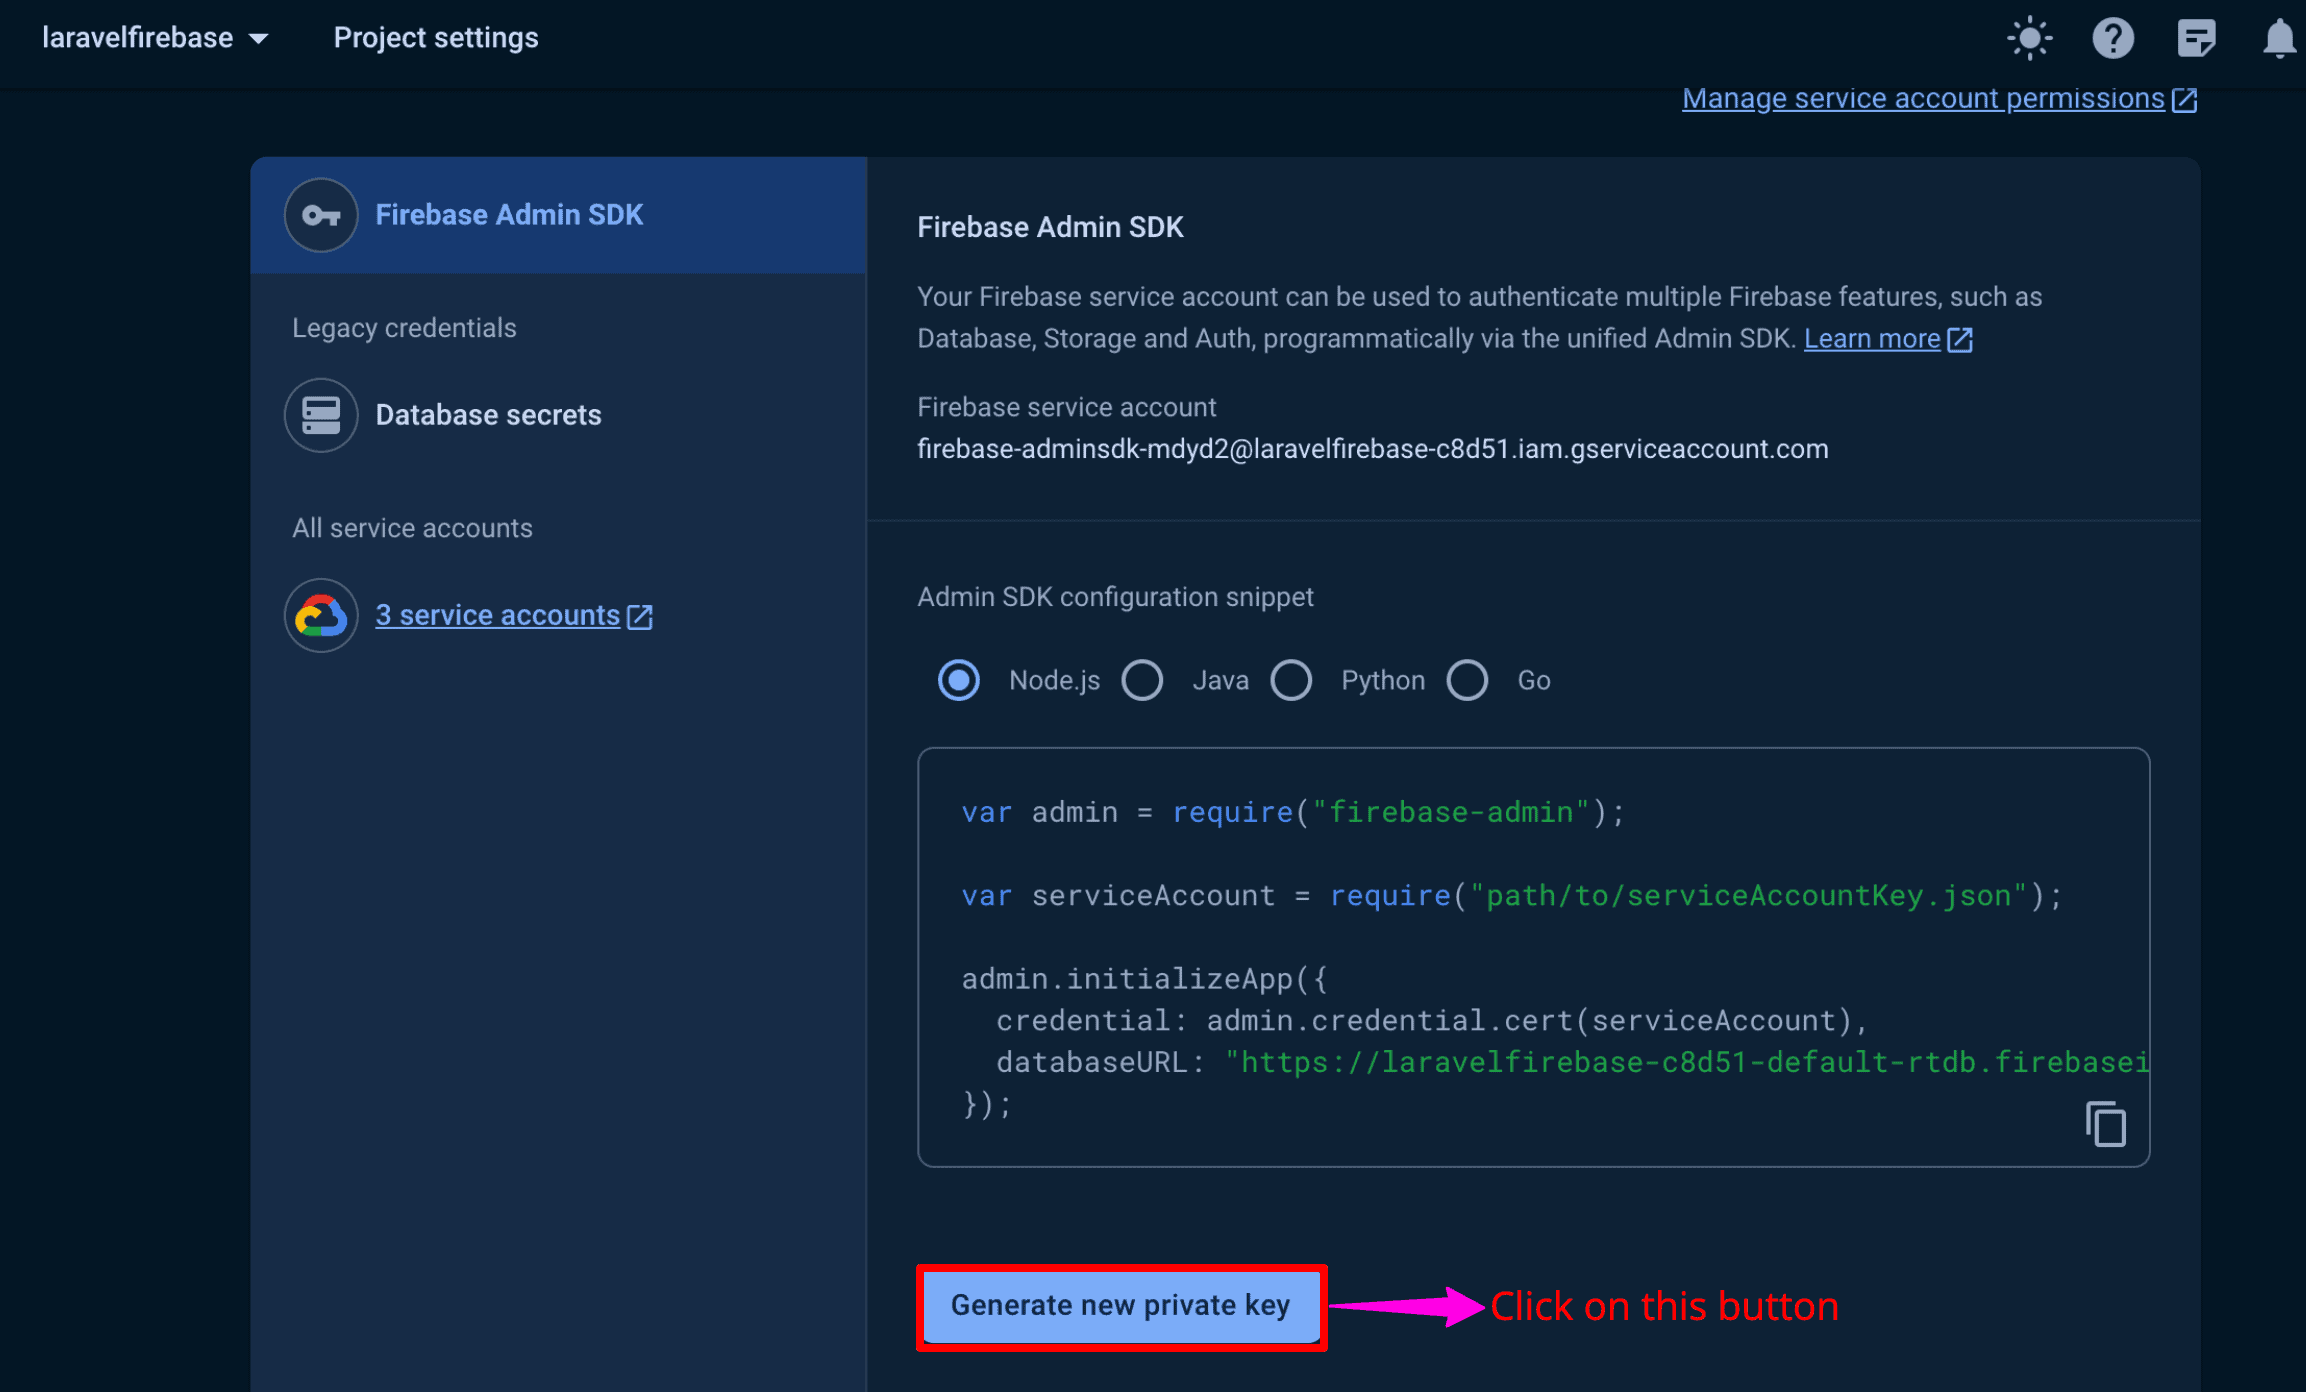
Clicking the “Generate new private key” button will download the JSON file containing the project’s credentials.
Once the file is downloaded, we can rename the JSON configuration file and add it to the root of our Laravel application.
We must first publish the default Firebase configurations with the package to use our project credentials. We use the following command:
php artisan vendor:publish --provider="Kreait\Laravel\Firebase\ServiceProvider" --tag=config
This command creates a config/firebase.php file that contains all the Firebase configurations needed to connect to our Firebase project.
We then need to specify the environmental variables in the .env file.
We can now add Firebase credentials(json file) and Firebase URL to the .env file.
FIREBASE_CREDENTIALS=/config.json

FIREBASE_DATABASE_URL=<your database url>
We can create an authentication here, but we will not do it for this tutorial because our primary focus is CRUD applications.
Step 5: Create a Firebase Service file
Let’s create a service class that will help us connect our Laravel application to the Firebase console.
Create a new folder called Services inside the app folder, go inside that folder, and create a new file called FirebaseService.php. So our file path becomes this: app >> Services >> FirebaseService.php
Add the below code inside the FirebaseService.php file:
<?php

namespace App\Services;

use Kreait\Firebase\Factory;

class FirebaseService
{
    public static function connect()
    {
        $firebase = (new Factory)
            ->withServiceAccount(base_path(env('FIREBASE_CREDENTIALS')))
            ->withDatabaseUri(env("FIREBASE_DATABASE_URL"));

        return $firebase->createDatabase();
    }
}
Step 6: Create a Controller
php artisan make:controller FirebaseController
It will create one controller file called FirebaseController.php.
Add the following code to the FirebaseController.php file.
<?php

namespace App\Http\Controllers;
use Illuminate\Http\Request;

class FirebaseController extends Controller
{
    private $database;

    public function __construct()
    {
       $this->database = \App\Services\FirebaseService::connect();
    }
    /**
     * Display a listing of the resource.
     */
    public function index()
    {

    }

    /**
     * Show the form for creating a new resource.
     */
    public function create(Request $request)
    {

    }

    /**
     * Store a newly created resource in storage.
     */
    public function store(Request $request)
    {

    }

    /**
     * Show the form for editing the specified resource.
     */
    public function edit(string $id)
    {

    }

    /**
     * Update the specified resource in storage.
     */
    public function update(Request $request, string $id)
    {

    }

    /**
     * Remove the specified resource from storage.
     */
    public function destroy(Request $request, string $id)
    {

    }
}
We initialized a new class member variable, named $database, that provides the connection to the Firebase database. We will add code for different functions based on different functionalities later!
Step 7: Register the routes
Open the routes >> web.php file and add the below code.
<?php

use App\Http\Controllers\FirebaseController;
use Illuminate\Support\Facades\Route;

Route::get('/product/create', [FirebaseController::class, 'create']);
Route::post('/product/store', [FirebaseController::class, 'store']);

Route::get('/products', [FirebaseController::class, 'index']);

Route::get('/product/edit/{id}', [FirebaseController::class, 'edit']);
Route::patch('/product/update/{id}', [FirebaseController::class, 'update']);

Route::delete('/product/delete/{id}', [FirebaseController::class, 'destroy']);
Step 8: Create views for our project
Create a new “layout.blade.php” file inside the resources >> views folder.
<!DOCTYPE html>
<html lang="en">
<head>
  <meta charset="UTF-8">
  <meta name="viewport" content="width=device-width, initial-scale=1.0">
  <meta http-equiv="X-UA-Compatible" content="ie=edge">
  <title>Laravel Firebase</title>
  <!-- Custom CSS -->
  @vite(['resources/sass/app.scss', 'resources/js/app.js'])
</head>
<body>

  <!-- Main Navigation -->
  <nav class="navbar navbar-expand-lg navbar-dark bg-dark">
    <div class="container">
      <a class="navbar-brand" href="/products">Laravel Firebase</a>
      <button class="navbar-toggler" type="button" data-bs-toggle="collapse" data-bs-target="#navbarNav" aria-controls="navbarNav" aria-expanded="false" aria-label="Toggle navigation">
        <span class="navbar-toggler-icon"></span>
      </button>
    </div>
  </nav>

  <!-- Page Content -->
  <div class="container py-4">
      @yield('content')
  </div>
</body>
</html>
This is the basic template view file which we will inherit in other blade views.
Inside the views folder, create three new views:
- create.blade.php: For displaying a form to create a product detail
- edit.blade.php: Edit the form to update the product detail
- index.blade.php: Product listing page
Here is the code for the create.blade.php file:
@extends('layout')

@section('content')
<div class="container my-5">
    <div class="card shadow-lg">
        <div class="card-header bg-primary text-white">
            <h3 class="card-title">Add New Product</h3>
        </div>
        <div class="card-body p-4">
            <form method="post" action="{{ url('/product/store') }}" class="needs-validation">
                @csrf
                <!-- Product Name Field -->
                <div class="mb-4">
                    <label for="name" class="form-label"><i class="bi bi-box-seam me-2"></i>Product Name</label>
                    <input type="text" class="form-control form-control-lg" name="name" id="name" placeholder="Enter Product Name" required>
                    <div class="invalid-feedback">Please enter the product name.</div>
                </div>

                <!-- Product Description Field -->
                <div class="mb-4">
                    <label for="description" class="form-label"><i class="bi bi-textarea-resize me-2"></i>Product Description</label>
                    <textarea class="form-control form-control-lg" name="description" id="description" rows="4" placeholder="Enter Product Description" required></textarea>
                    <div class="invalid-feedback">Please enter a product description.</div>
                </div>

                <!-- Product Price Field -->
                <div class="mb-4">
                    <label for="price" class="form-label"><i class="bi bi-currency-dollar me-2"></i>Product Price</label>
                    <input type="text" class="form-control form-control-lg" name="price" id="price" placeholder="Enter Product Price" required>
                    <div class="invalid-feedback">Please enter the product price.</div>
                </div>

                <!-- Submit Button -->
                <div class="text-center">
                    <button type="submit" class="btn btn-lg btn-primary">Submit</button>
                </div>
            </form>
        </div>
    </div>
</div>
@endsection
Here is the edit.blade.php file:
@extends('layout')

@section('content')
<div class="container my-5">
    <div class="card shadow-lg">
        <div class="card-header bg-primary text-white">
            <h3 class="card-title">Updating Product Detail</h3>
        </div>
        <div class="card-body p-4">
            <form method="post" action="{{ url('/product/update', $id) }}" class="needs-validation">
                @csrf
                @method('PATCH')

                <!-- Product Name Field -->
                <div class="mb-4">
                    <label for="name" class="form-label"><i class="bi bi-box-seam me-2"></i>Product Name</label>
                    <input type="text" class="form-control form-control-lg" name="name" id="name" placeholder="Enter Product Name" value="{{ $product['name'] }}" required>
                    <div class="invalid-feedback">Please enter the product name.</div>
                </div>

                <!-- Product Description Field -->
                <div class="mb-4">
                    <label for="description" class="form-label"><i class="bi bi-textarea-resize me-2"></i>Product Description</label>
                    <textarea class="form-control form-control-lg" name="description" id="description" rows="4" placeholder="Enter Product Description" required>{{ $product['description'] }}</textarea>
                    <div class="invalid-feedback">Please enter a product description.</div>
                </div>

                <!-- Product Price Field -->
                <div class="mb-4">
                    <label for="price" class="form-label"><i class="bi bi-currency-dollar me-2"></i>Product Price</label>
                    <input type="text" class="form-control form-control-lg" name="price" id="price" placeholder="Enter Product Price" value="{{ $product['price'] }}" required>
                    <div class="invalid-feedback">Please enter the product price.</div>
                </div>

                <!-- Submit Button -->
                <div class="text-center">
                    <button type="submit" class="btn btn-lg btn-primary">Update Product</button>
                </div>
            </form>
        </div>
    </div>
</div>
@endsection
Here is the index.blade.php file:
@extends('layout')

@section('content')
<div class="container my-4">
  <div class="d-flex justify-content-between align-items-center mb-3">
    <h2>Product List</h2>
    <a href="{{ url('product/create') }}" class="btn btn-success"><i class="bi bi-plus"></i> Add Product</a>
  </div>
    @if(session()->get('success'))
        <div class="alert alert-success alert-dismissible fade show" role="alert">
            {{ session()->get('success') }}
             <button type="button" class="btn-close" data-bs-dismiss="alert" aria-label="Close"></button>
        </div>
    @endif
  <table class="table table-bordered table-hover">
    <thead class="table-dark">
      <tr>
        <th scope="col">ID</th>
        <th scope="col">Product Name</th>
        <th scope="col">Product Description</th>
        <th scope="col">Product Price</th>
        <th scope="col" colspan="2">Actions</th>
      </tr>
    </thead>
    <tbody>
      @foreach($products as $product => $game)
      <tr>
        <td>{{ $game['id'] }}</td>
        <td>{{ $game['name'] }}</td>
        <td>{{ $game['description'] }}</td>
        <td>${{ $game['price'] }}</td>
        <td>
          <a href="{{ url('product/edit', $game['id']) }}" class="btn btn-primary"> <i class="bi bi-pencil-square"></i> Edit</a>
        </td>
        <td>
            <button class="btn btn-danger" type="submit" data-bs-toggle="modal" data-bs-target="#deleteConfirmModal"><i class="bi bi-trash"></i> Delete</button>
        </td>
      </tr>
      @endforeach
    </tbody>
  </table>
</div>
<!-- Delete Confirmation Modal -->
<div class="modal fade" id="deleteConfirmModal" tabindex="-1" aria-labelledby="deleteConfirmModalLabel" aria-hidden="true">
    <div class="modal-dialog">
        <div class="modal-content">
            <div class="modal-header">
                <h5 class="modal-title" id="deleteConfirmModalLabel">Confirm Delete</h5>
                <button type="button" class="btn-close" data-bs-dismiss="modal" aria-label="Close"></button>
            </div>
            <div class="modal-body">
                Are you sure you want to delete this item?
            </div>
            <div class="modal-footer">
                <button type="button" class="btn btn-secondary" data-bs-dismiss="modal">Cancel</button>
                <form action="{{ url('product/delete', $game['id']) }}" method="post">
                    @csrf
                    @method('DELETE')
                    <button type="submit" class="btn btn-danger">Delete</button>
                </form>
            </div>
        </div>
    </div>
</div>
@endsection
So, we created three blade files for three different views.
Step 9: Complete the CRUD functionalities
We created all the views for our project. Now, we need to store the data in the database, update it, and delete it from the Firebase Realtime database.
Update the FirebaseController.php file with the below code:
<?php

namespace App\Http\Controllers;

use Illuminate\Http\Request;

class FirebaseController extends Controller
{
    private $database;

    public function __construct()
    {
        $this->database = \App\Services\FirebaseService::connect();
    }
    /**
     * Display a listing of the resource.
     */
    public function index()
    {
        $products = $this->database->getReference('test/products')->getValue();

        return view('index', compact('products'));
    }

    /**
     * Show the form for creating a new resource.
     */
    public function create(Request $request)
    {
        return view('create');
    }

    /**
     * Store a newly created resource in storage.
     */
    public function store(Request $request)
    {
        $id = uniqid();
        $this->database
            ->getReference('test/products/' . $id)
            ->set([
                'id' => $id,
                'name' => $request['name'],
                'description' => $request['description'],
                'price' => $request['price'],
            ]);

        return redirect('/products')->with('success', 'Product has been successfully added');
    }

    /**
     * Display the specified resource.
     */
    public function show(string $id)
    {
        //
    }

    /**
     * Show the form for editing the specified resource.
     */
    public function edit(string $id)
    {
        try {
            // Fetch data from Firebase for a specific blog post
            $product = $this->database
                ->getReference('test/products/' . $id)
                ->getValue();

            // Check if the blog post exists
            if ($product) {
                return view('edit', compact('product', 'id'));
            } else {
                return response()->json(['message' => 'Product does not found'], 404);
            }
        } catch (\Exception $e) {
            // Handle any exceptions
            return response()->json(['message' => 'Error fetching Product: ' . $e->getMessage()], 500);
        }
    }

    /**
     * Update the specified resource in storage.
     */
    public function update(Request $request, string $id)
    {
        $this->database->getReference('test/products/' . $id)
            ->update([
                'name' => $request['name'],
                'description' => $request['description'],
                'price' => $request['price']
            ]);

        return redirect('/products')->with('success', 'Product has been successfully updated');
    }

    /**
     * Remove the specified resource from storage.
     */
    public function destroy(Request $request, string $id)
    {
        $this->database
            ->getReference('test/products/' . $id)
            ->remove();

        return redirect('/products')->with('success', 'Product has been successfully deleted');
    }
}
Firebase, by default, does not create a unique ID, so we will use the uniqid() function to create a unique ID for each record.
Make sure to start the Laravel development Server using this command:
php artisan serve
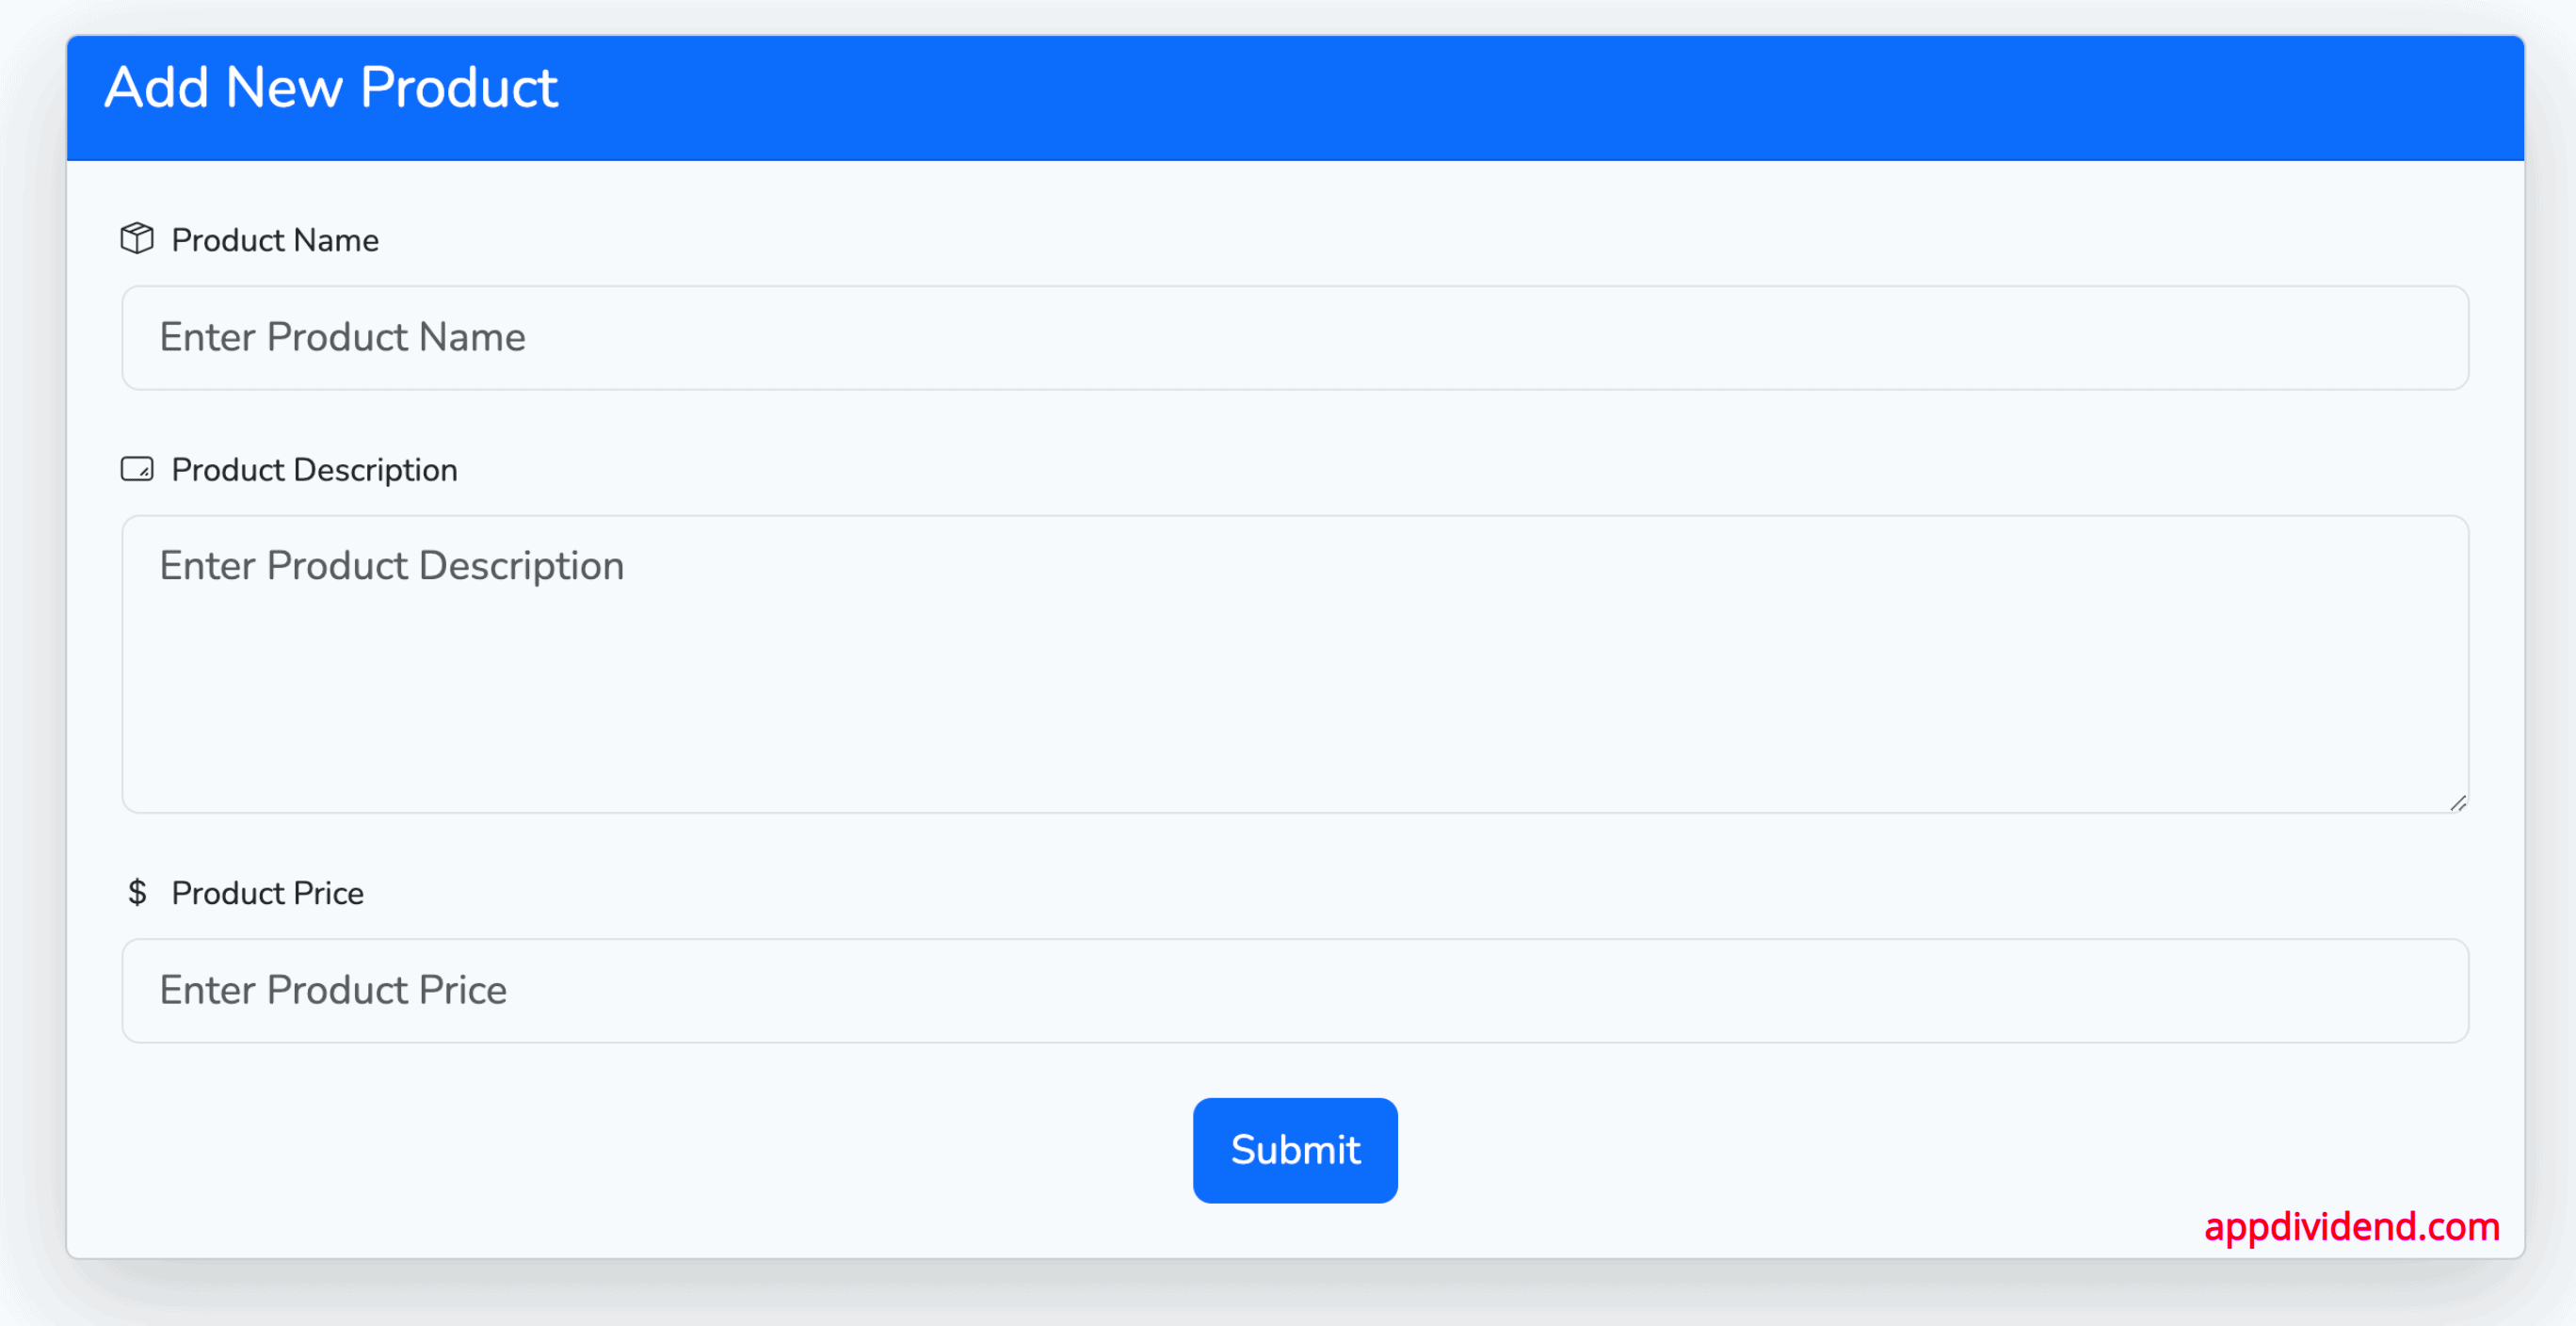
Inside the create() function, we are returning the create view.
To access this view, visit this URL: http://localhost:8000/product/create
The form looks like below image:
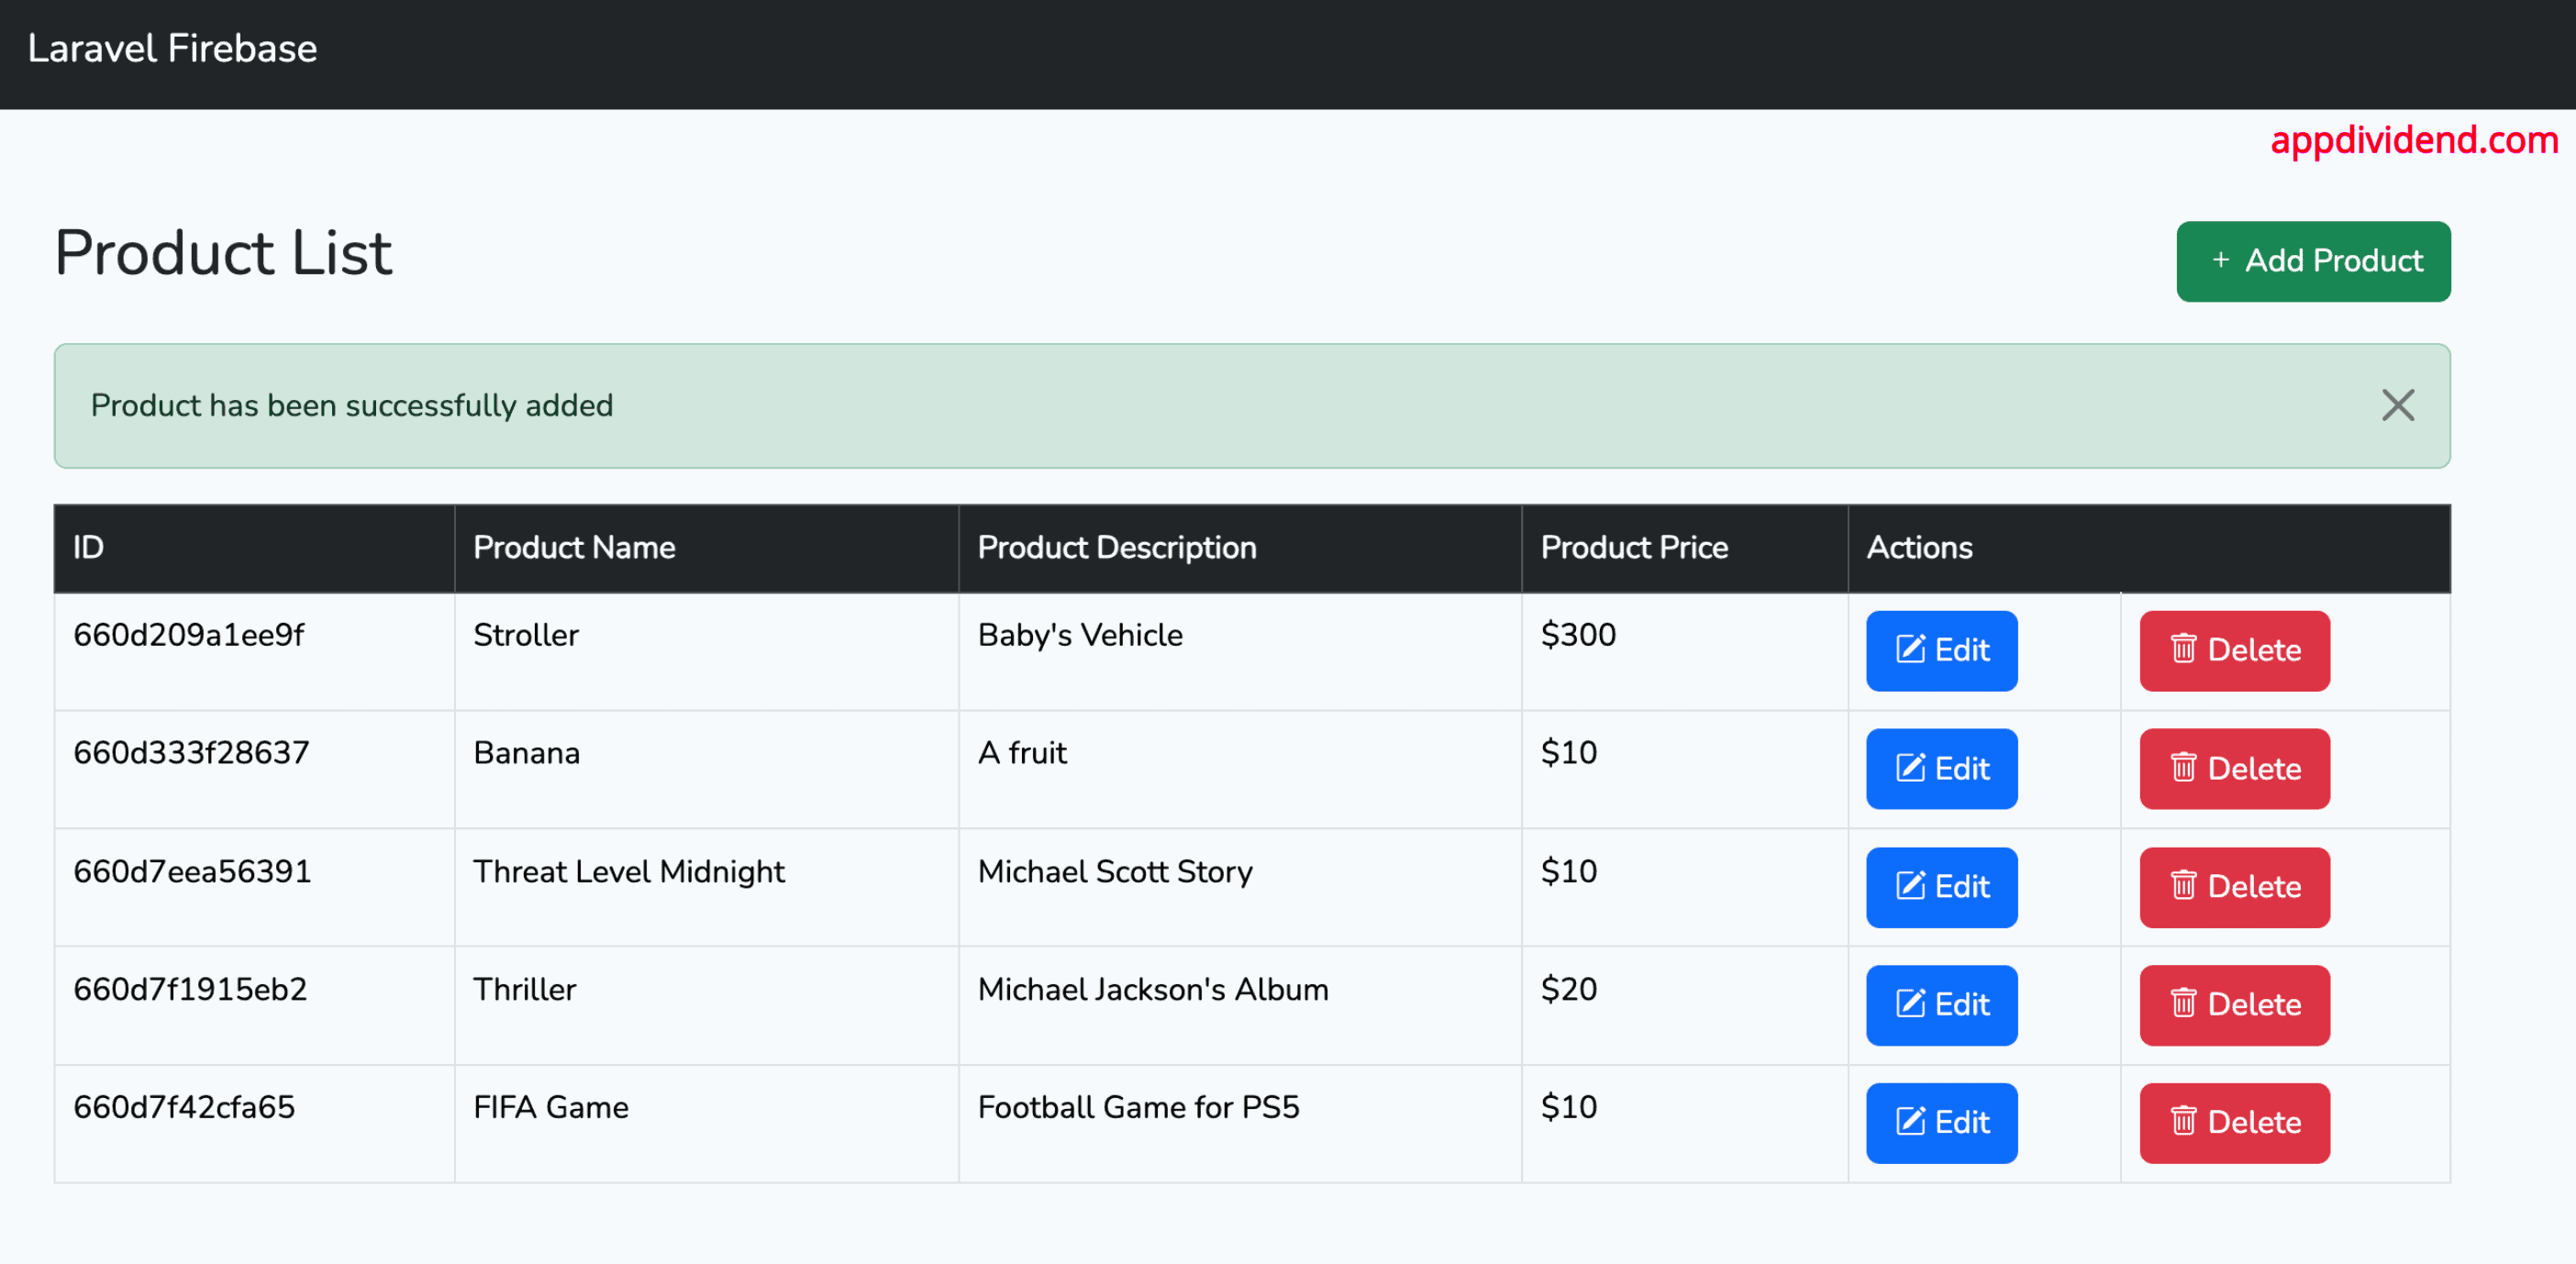
If you configure your Firebase Database correctly and fill out the form, then it will save the data into Firebase.
I added five products and redirected back to the “http://localhost:8000/products” page:
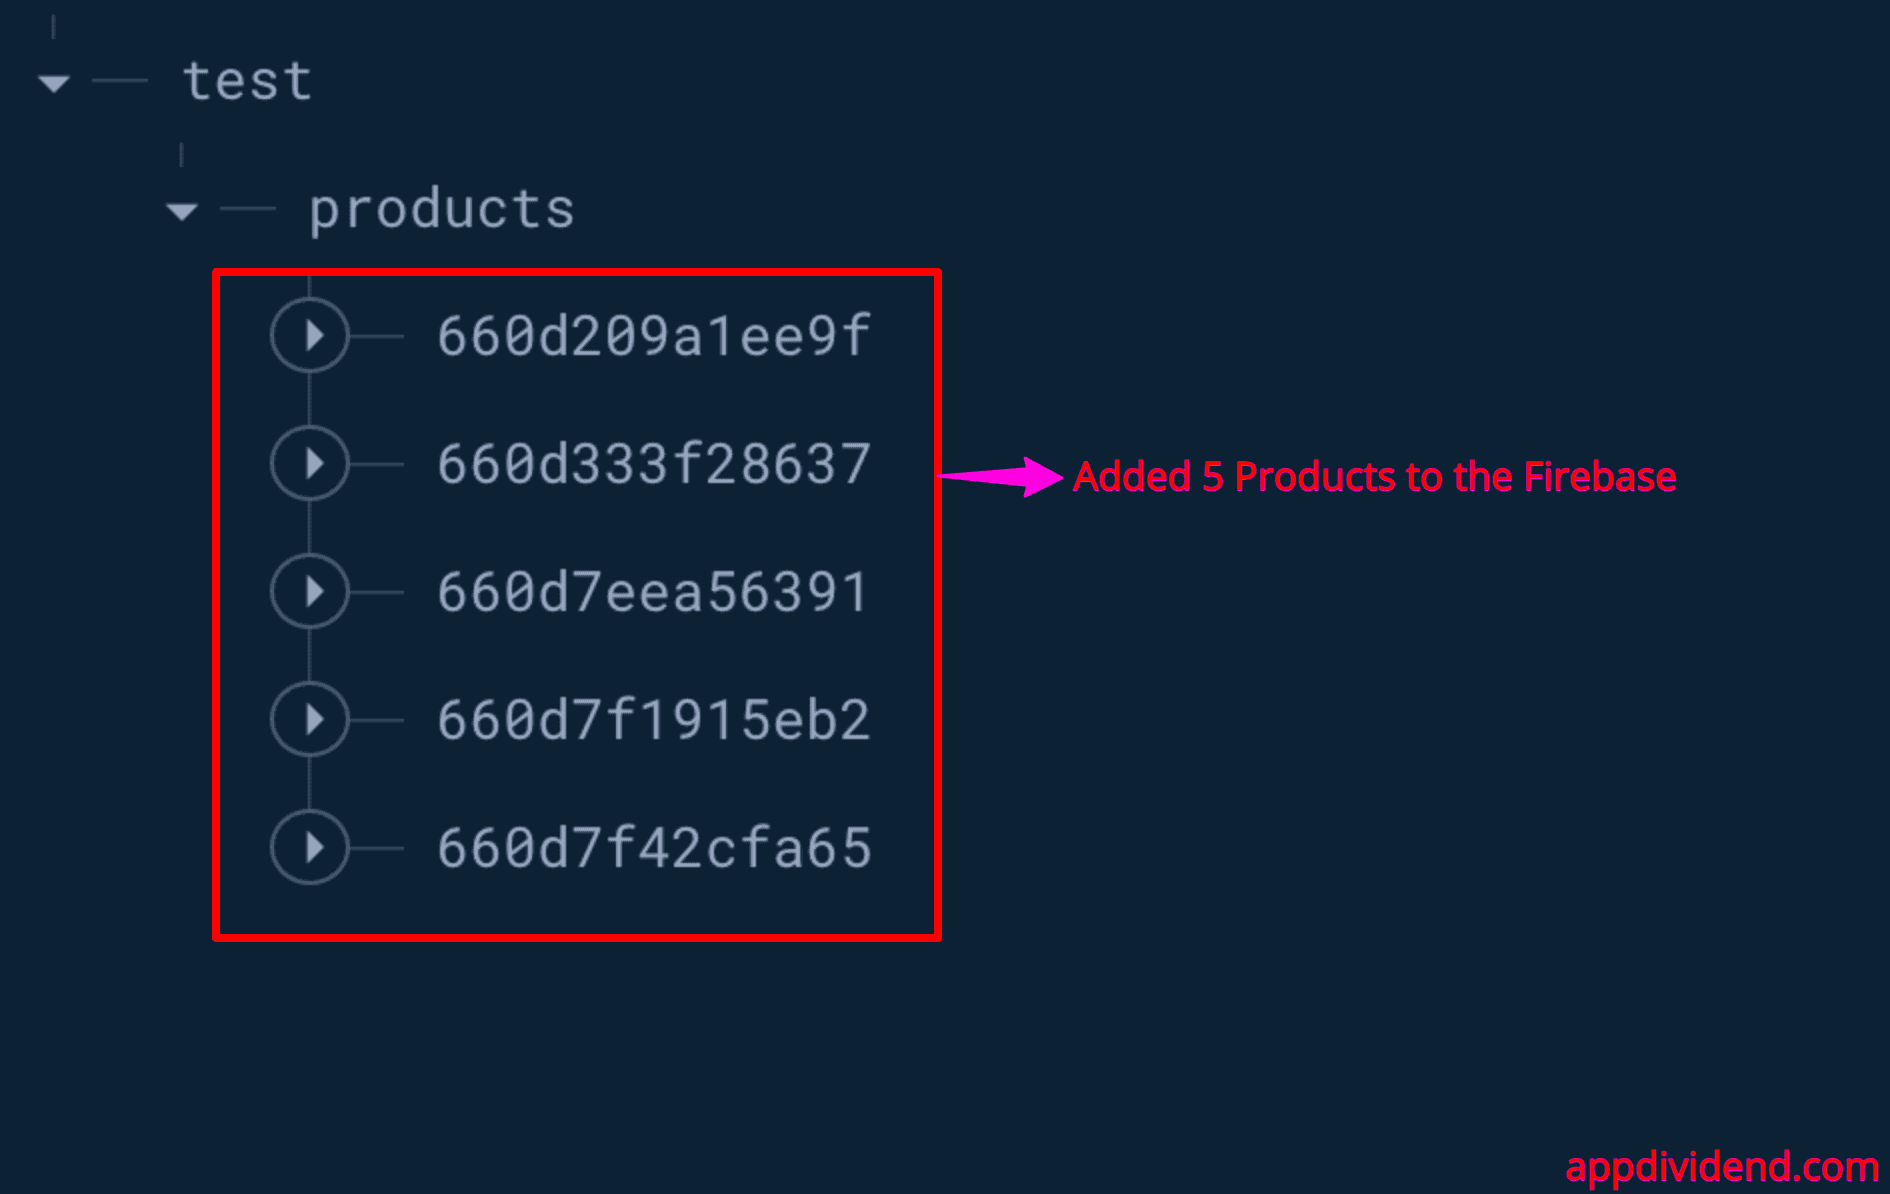
Let’s check out the Firebase and see the data:
Now, head to this URL: http://localhost:8000/products
Press the Edit button on any record, and you will see a view like this:
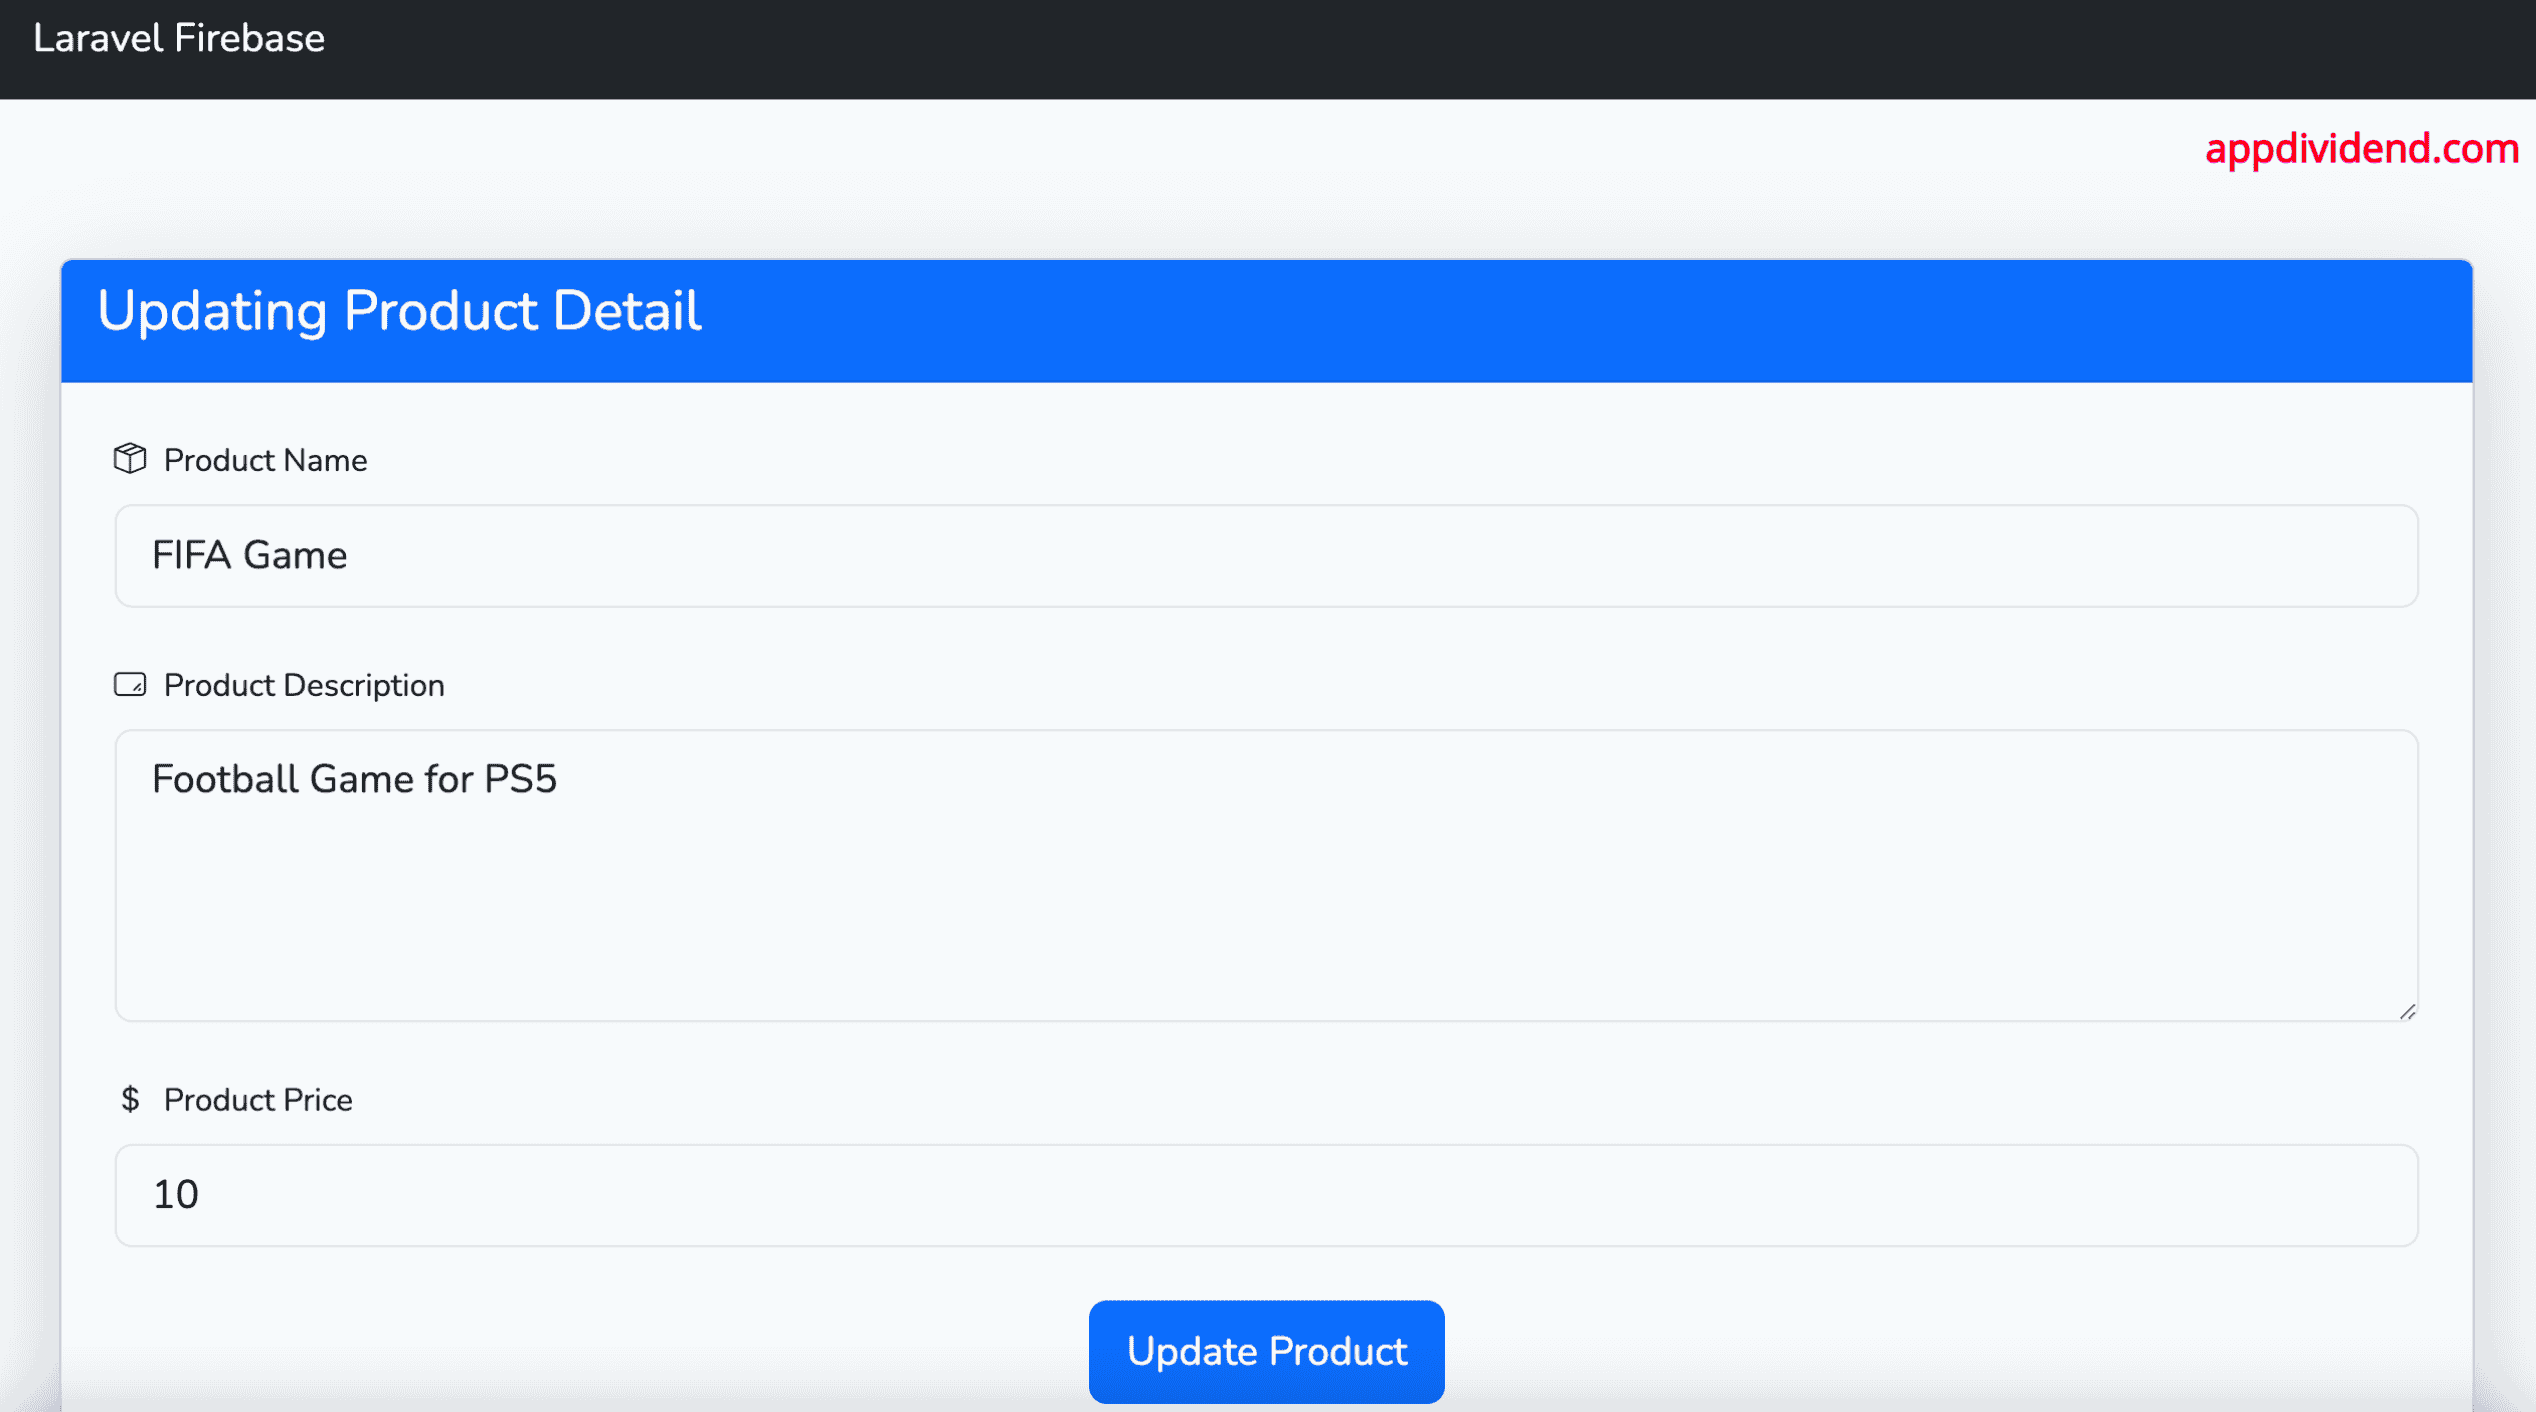
From here, you can update the product details, and you will see the listing page with updated products.
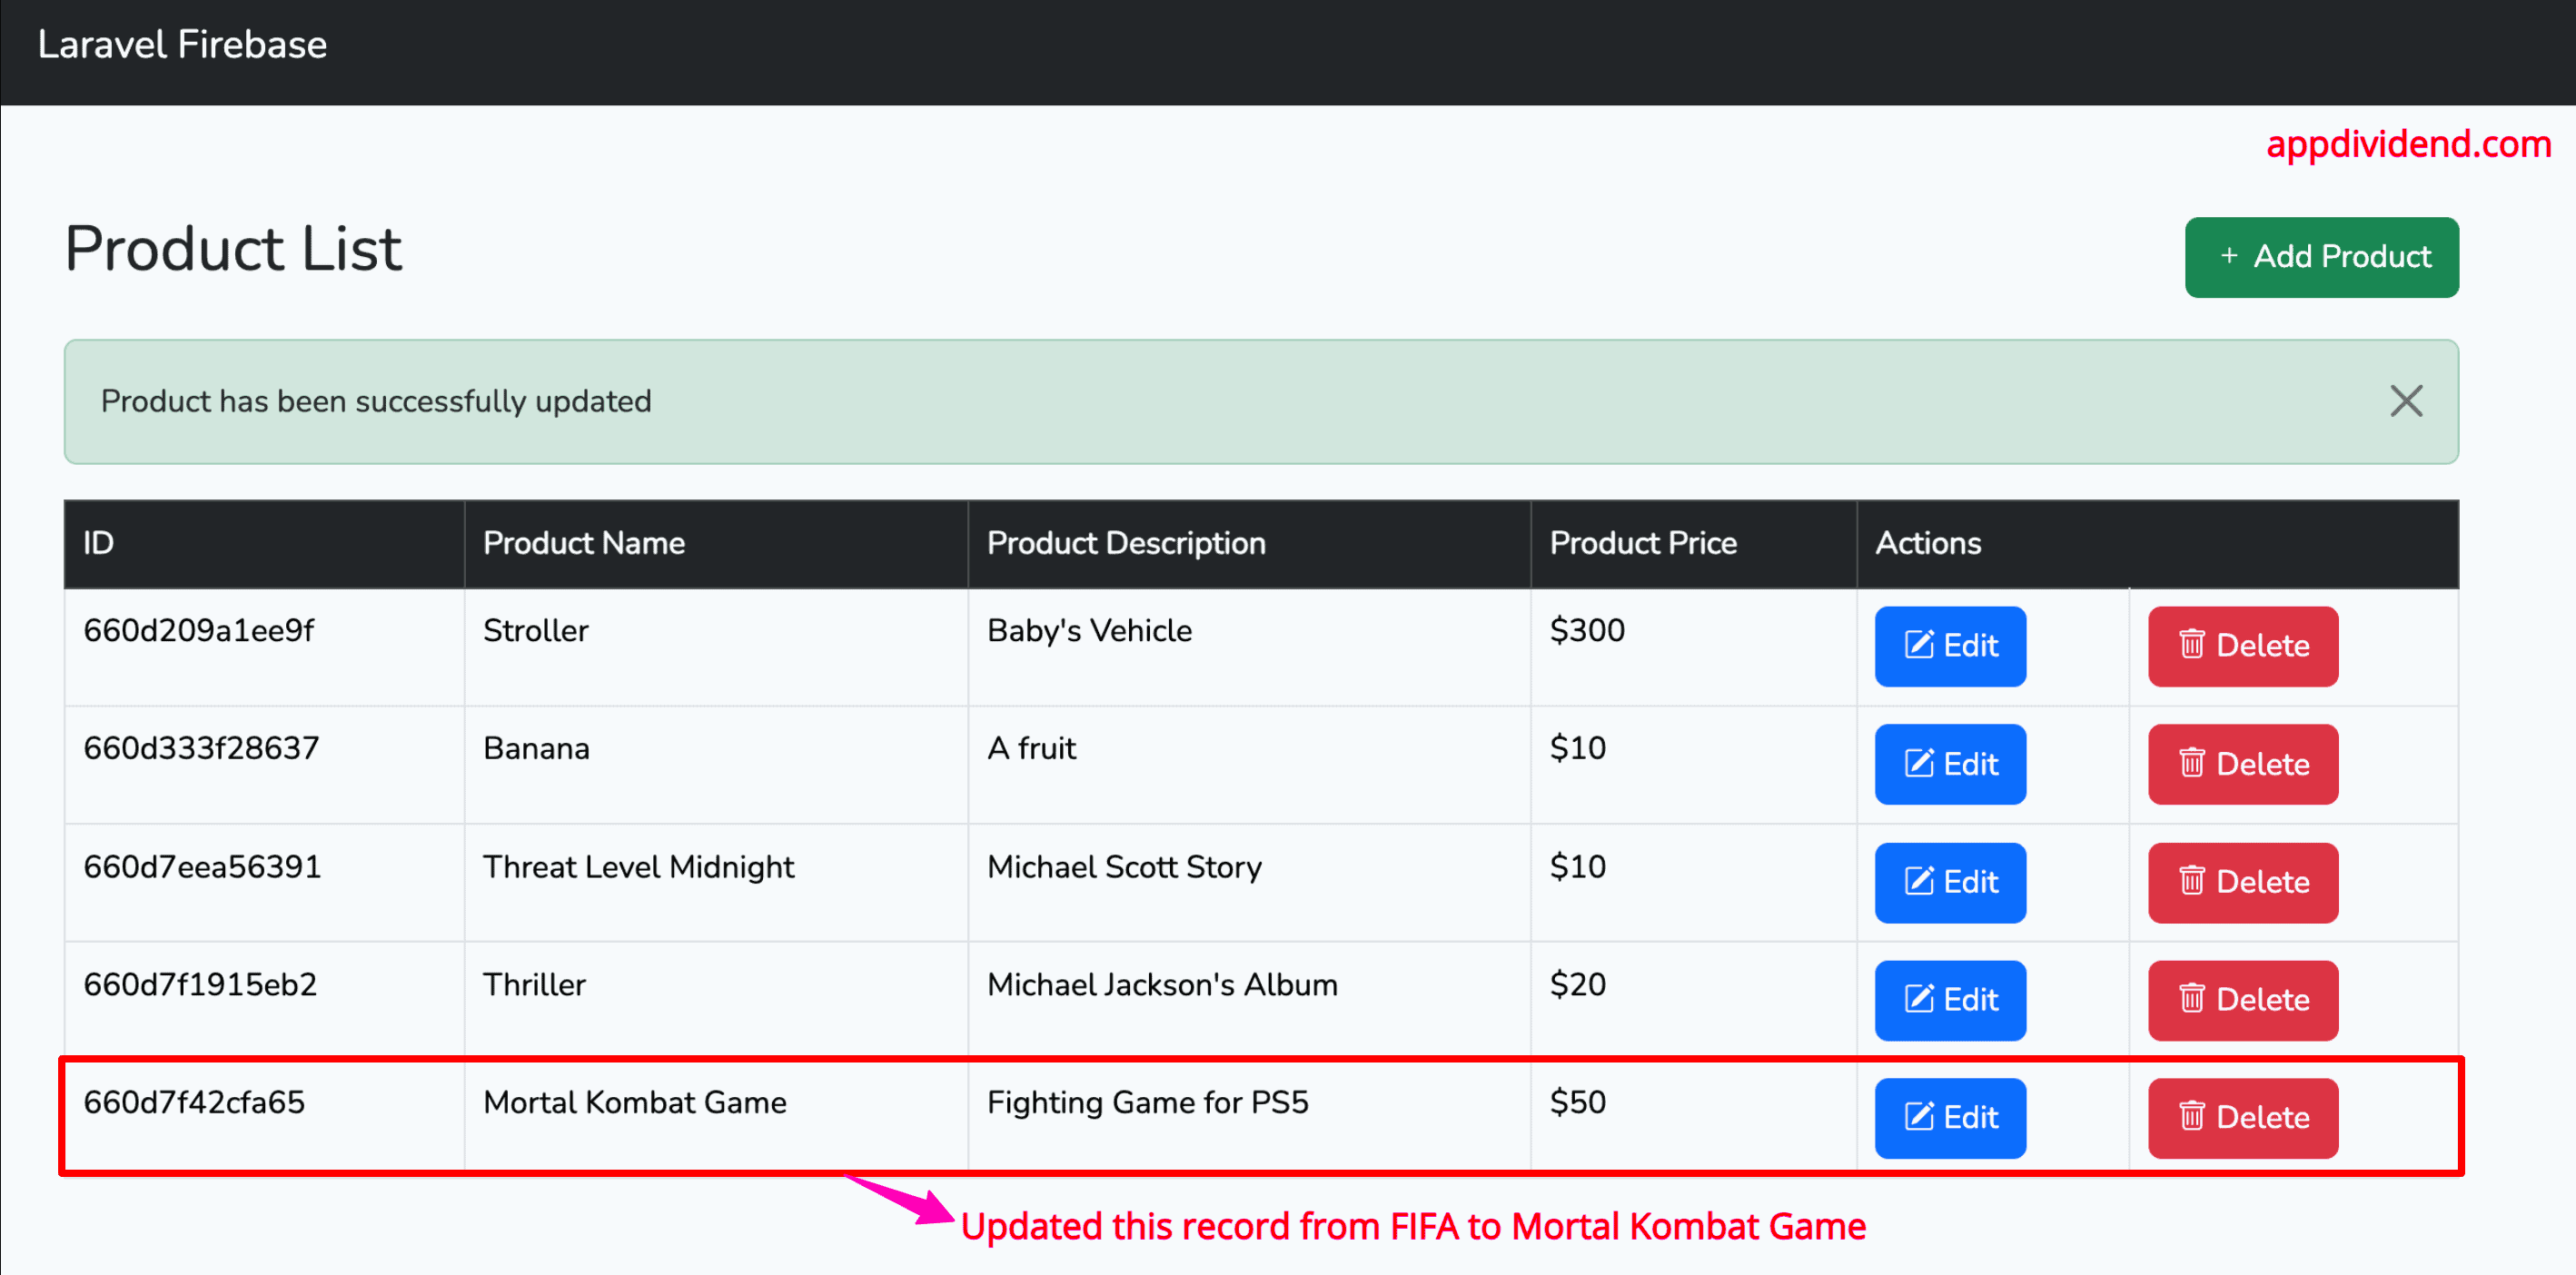
The only remaining functionality is to remove the product from the database.
Let’s try to delete the 5th product, and you will be prompted for confirmation like this:
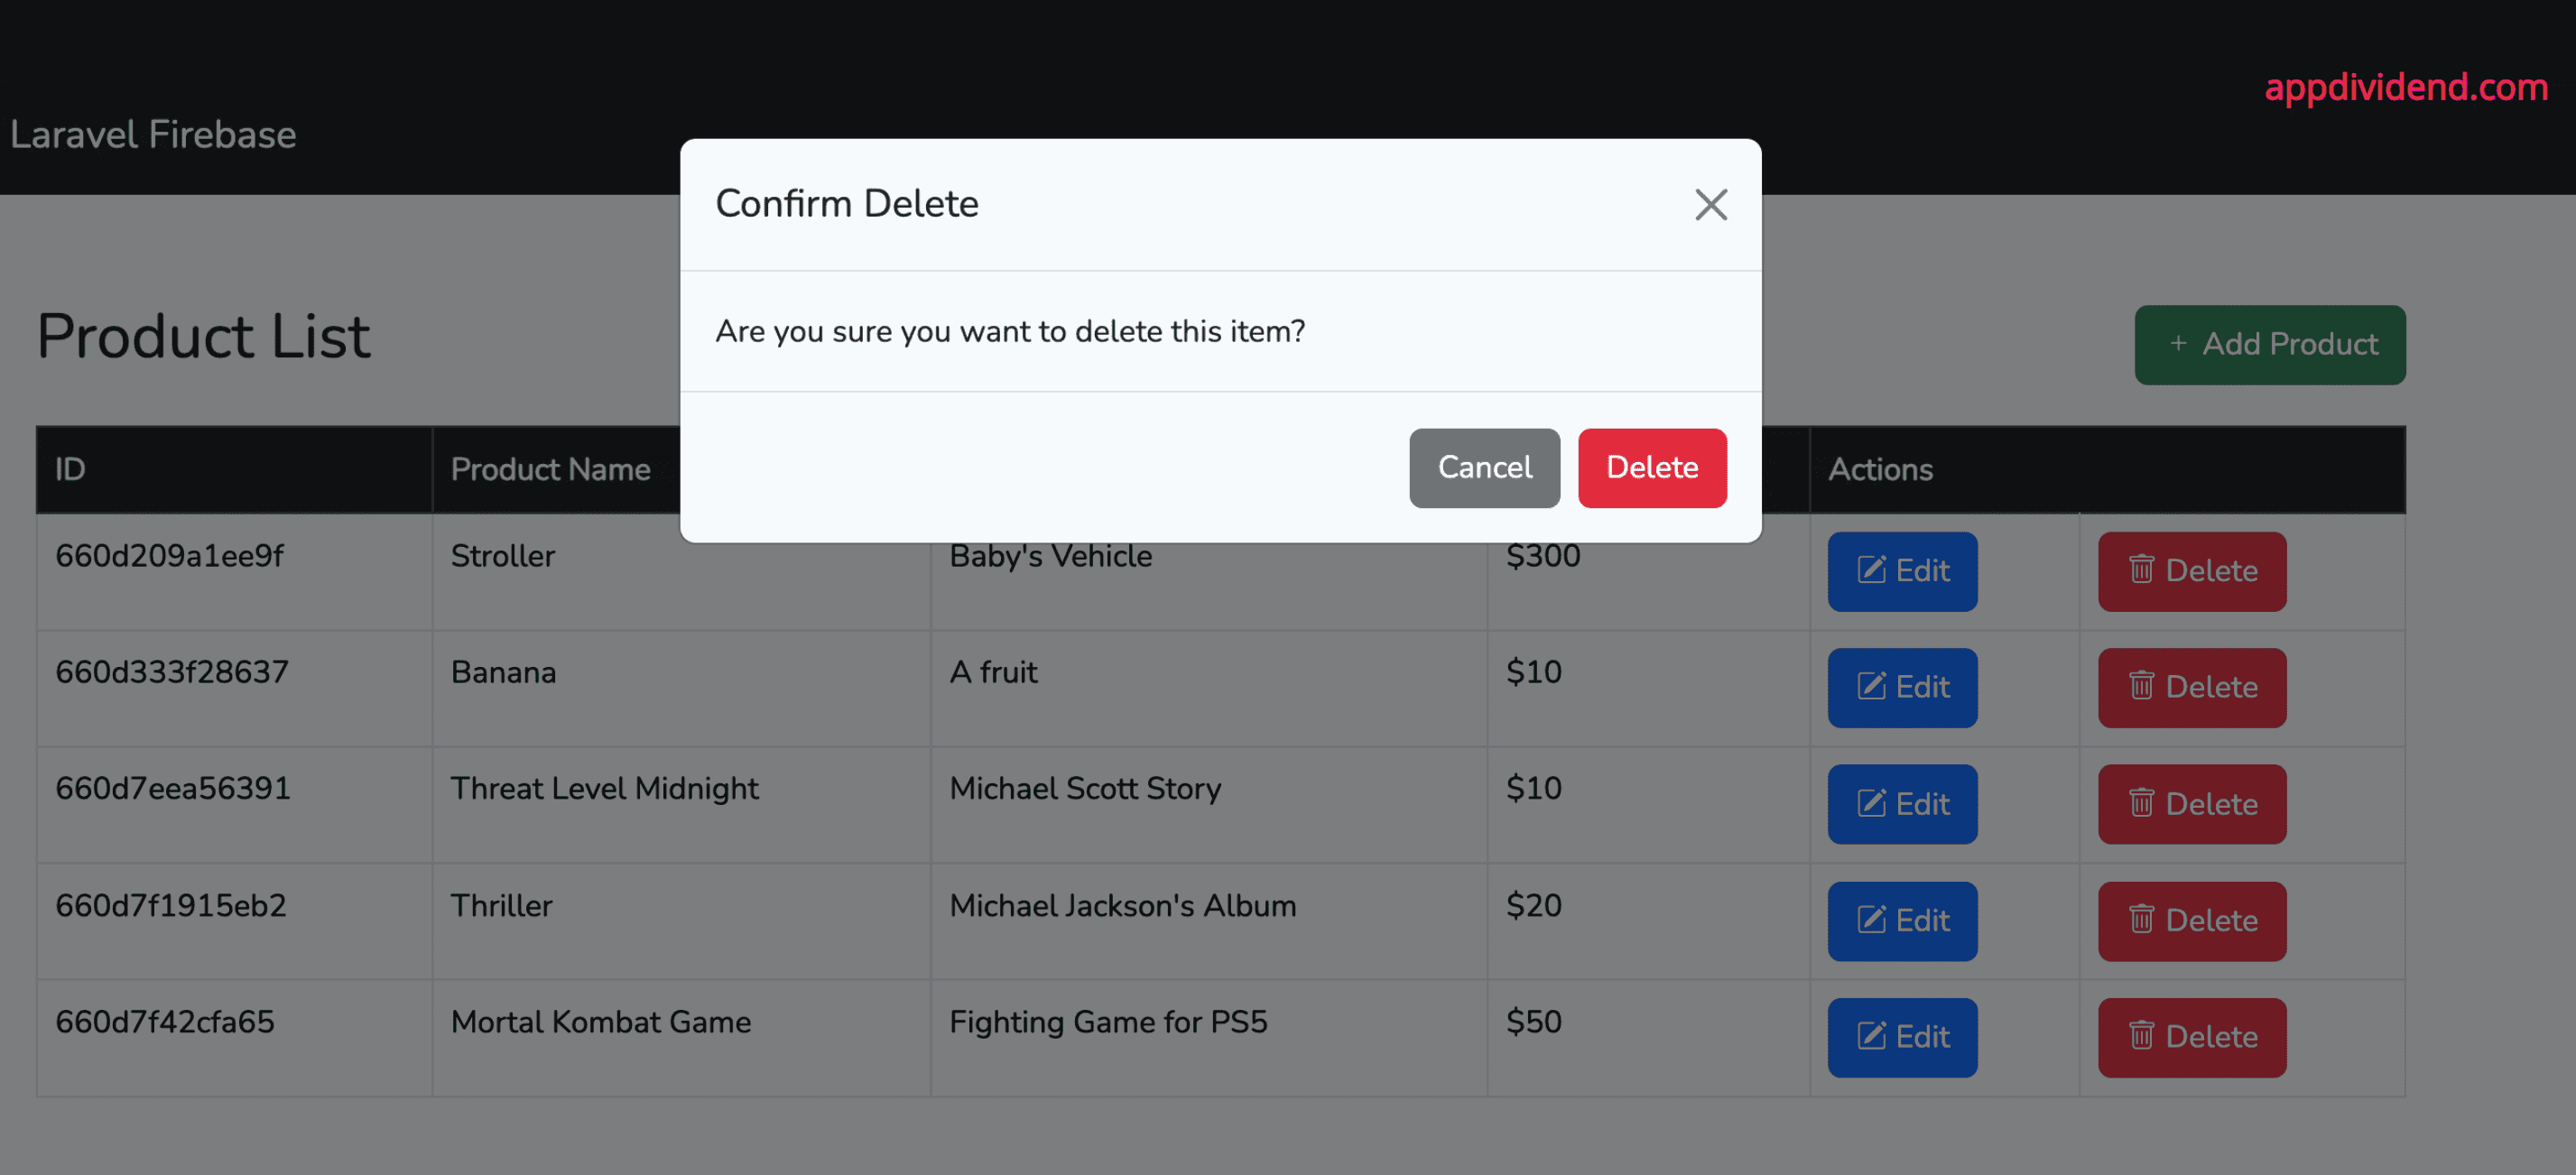
If you press the Delete button then it will remove the record.

That’s it! Now, we have a full-fledged CRUD application using Firebase and Laravel 11.

Nsagha Kingsly
please can u give the structure of your config file
Krunal
It is just a simple private key that will be your main firebase credentials. I cannot share it on public!
sodaa
I have follow instruction but i have an error
“syntax error, unexpected ‘$serviceAccount’ (T_VARIABLE), expecting function (T_FUNCTION) or const (T_CONST)”
in line :
$serviceAccount = ServiceAccount::fromJsonFile(__DIR__.’/laravelfirebase-9d875-firebase-adminsdk-wltre-a1b8486a6c.json’);
Krunal
Make sure, your path is correct!
Umair
Thanks alot bro you made my day
Krunal
Thanks mate! I love that this tutorial is helpful for the absolute beginners!
yash
hi i follow your step but i am facing an error cURL error 60: SSL certificate problem: unable to get local issuer certificate. i find the solutions it to set its path in php.ini i had try this but it was not working for me
Krunal
Make sure that you have installed all the base extensions!
yash
hi i follow your step but i am facing an error cURL error 60: SSL certificate problem: unable to get local issuer certificate. i find the solutions it to set its path in php.ini i had try this but it was not working for me
yash soni
hi i follow your step but i am facing an error cURL error 60: SSL certificate problem: unable to get local issuer certificate. i find the solutions it to set its path in php.ini i had try this but it was not working for me
Krunal
Checkout your PHP Configurations!
Gooner
Hey can you implement the complete crud functionality
Krunal
Yes, I have updated this article and implemented the complete CRUD functionality!
Mustafa Abdujalil
thanks my bro
Aman
hi bro , thanks for this tutorial . can you pls make tutorial for cloud firestore and laravel
Krunal
I will try my best to create one!
kami
how to update row??
Krunal
I updated this article. Please checkout all the CRUD functionality with Laravel 11.
SITTI MUNIRAH
THANKS!!!!
Sodik
I followed the tutorial but didn’t work for me, I’m using laravel 5.8
Krunal
Now, it will work with Laravel 11!
Anurag Mishra
Call to private method Kreait\Firebase\ServiceAccount::fromJsonFile() from context
I face this issue after implementation
Krunal
I have updated this tutorial with the latest version of Laravel and Firebase.