

When working with a live project, you must create a form that accepts the file as input and uploads it to a secure server so others can access it or use it differently.
So, whether you are working on a restaurant application, an e-commerce platform, an educational portal, or a support system, file uploads can make your webpage alive and interactive and help you resolve your customers’ problems.
Here is the step-by-step guide:
Step 1: Install and configure Laravel
You can install Laravel 11 using the below command:
composer create-project laravel/laravel:^11.0
Go inside the folder.
You need to install the laravel/ui package.
composer require laravel/ui
Now, add the Bootstrap library using laravel/ui:
php artisan ui bootstrap
The final step is to build a CSS and JS File.
Run these commands step by step to your project terminal.
npm install

npm run dev
We are using the Vite bundler to prepare our front-end assets.
Step 2: Connecting Laravel with Database
Open phpmyadmin and create a new Database like this:
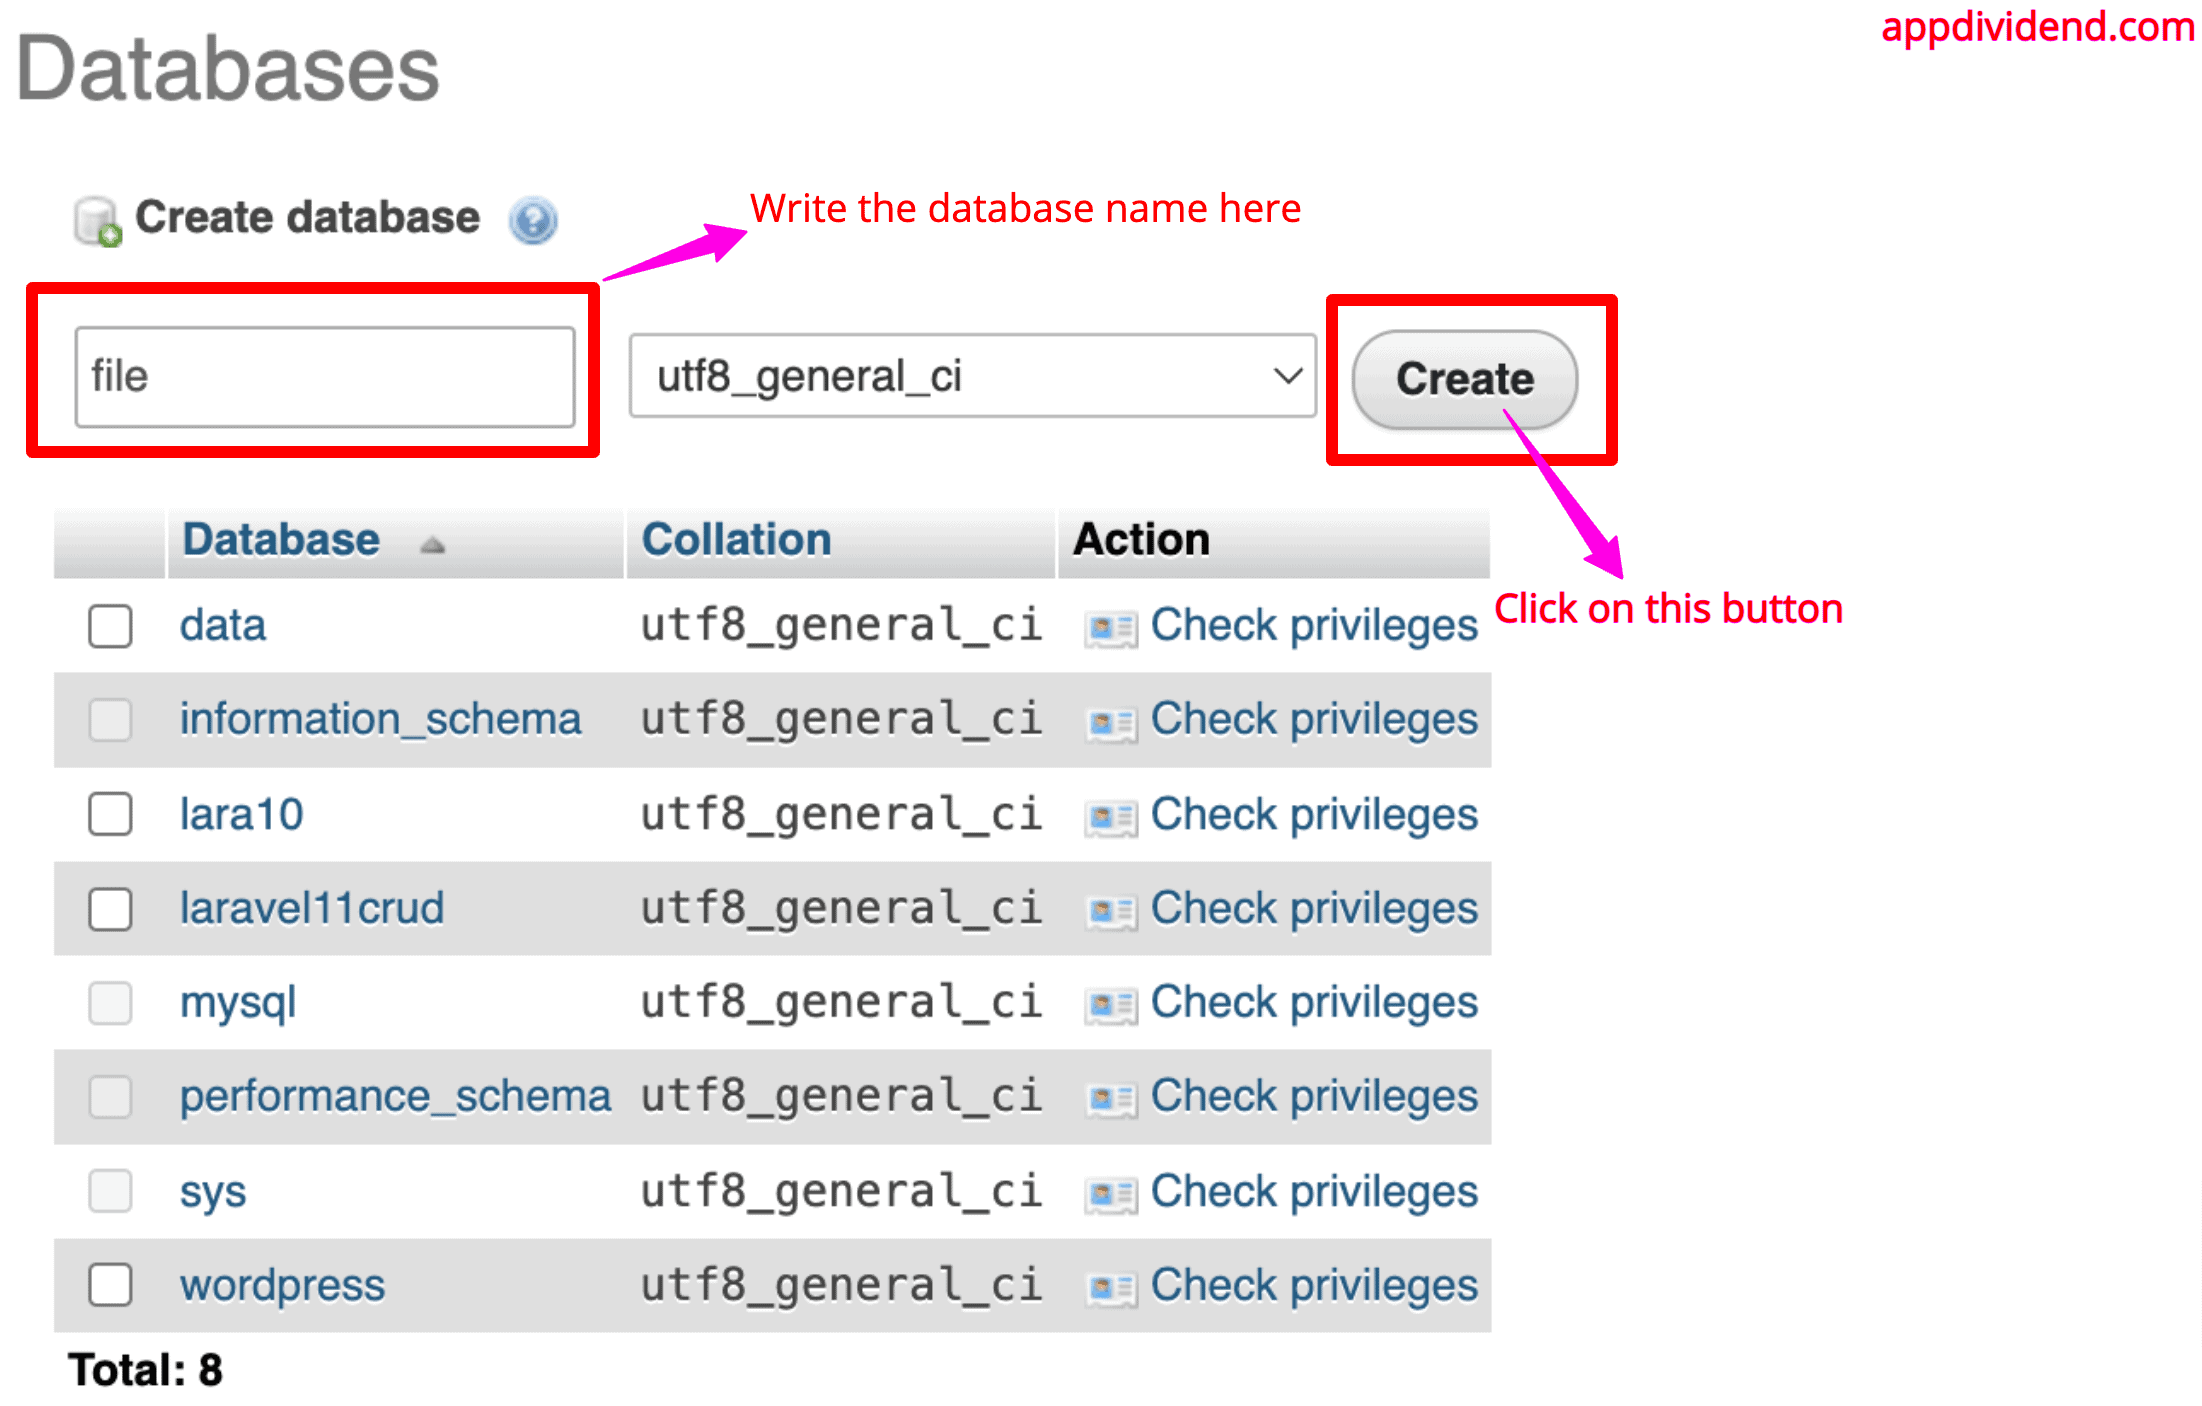
Now, go to the root of the Laravel project, open the .env file, edit these variables, and put your database name, username, and password.
DB_CONNECTION=mysql
DB_HOST=127.0.0.1
DB_PORT=8889
DB_DATABASE=file
DB_USERNAME=root
DB_PASSWORD=root
Since I am using MAMP, these are my credentials, and it is local, so there are no security issues!
Don’t blindly copy these into your system; your phpmyadmin might have a different port, username, and password. So, Google it if you are not sure!
Step 3: Create a new table
Let’s create a migration and model file using this command:
php artisan make:model File -m
It will create a model and migration file.
Now, open the newly created migration file inside the database >> migrations >> create_files_table.php file.
We will add a few columns to store the uploaded file’s data.
public function up(): void
{
        Schema::create('files', function (Blueprint $table) {
            $table->id();
            $table->text('file_name');
            $table->text('original_file_name');
            $table->text('file_path');
            $table->timestamps();
        });
}
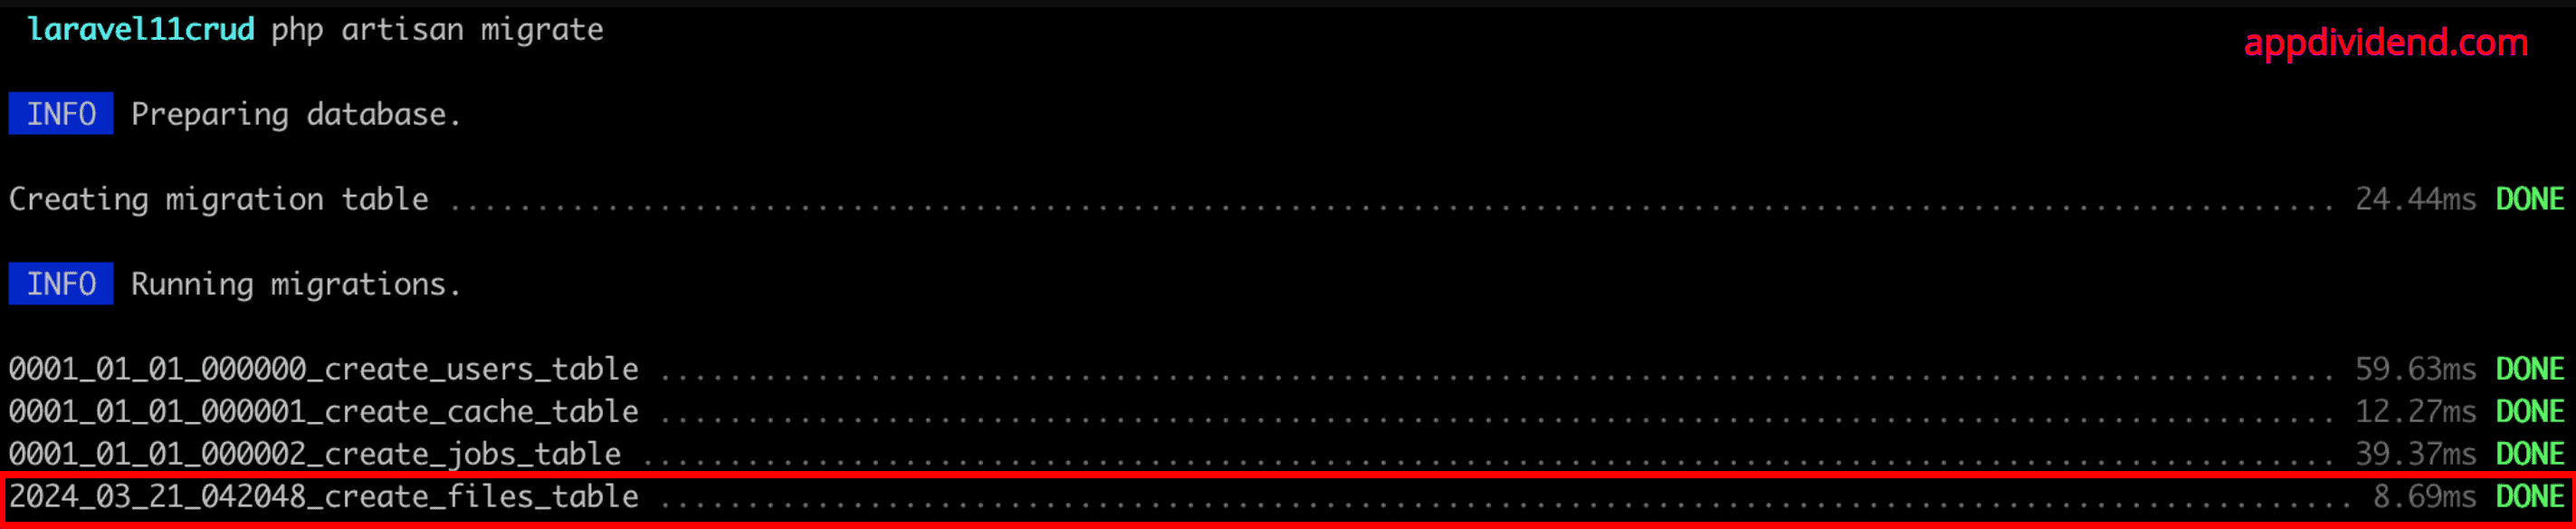
Save this file, go to your terminal or command line, and run this command to create a table in the database:
Step 4: Creating a controller
Let’s create a FileController.php using the below command:
php artisan make:controller FileController
It will create a file called FileController.php inside the app >> Http >> Controllers directory.
This file will have two functions:
- create()
- store()
We will get into these functions later.
Step 5: Register the routes
To register the routes, open the web.php file inside the routes directory.
<?php

use Illuminate\Support\Facades\Route;
use App\Http\Controllers\FileController;


Route::get('uploads/create', [FileController::class, 'create'])->name("uploads.create");
Route::post('uploads/store', [FileController::class, 'store'])->name("uploads.store");
The “uploads/create” route will handle the view file, and the “uploads/store” route will upload a file and save the details in the database.
Let’s write a create() function inside the FileController.php file.
public function create()
{
      return view('upload');
}
Here, we say that if the user navigates to the “uploads/create” route, show the upload.blade.php file.
Step 6: Creating views
Create a master view called layout.blade.php file inside the resources >> views directory.
<!DOCTYPE html>
<html lang="en">
<head>
  <meta charset="UTF-8">
  <meta name="viewport" content="width=device-width, initial-scale=1.0">
  <meta http-equiv="X-UA-Compatible" content="ie=edge">
  <title>Laravel File Upload Tutorial</title>
</head>
<body>
  <div class="container">
    @yield('content')
  </div>
 <!-- Scripts -->
 @vite(['resources/sass/app.scss', 'resources/js/app.js'])
</body>
</html>
You can see that we used the Vite application bundler to inject CSS and JS files.
Now, we can use this view as a template in any view.
Let’s create a new view called “uploade.blade.php” inside the views folder and add the code below.
@extends('layout')

@section('content')
<div class="container mt-5">
    <h2>File Upload</h2>
    @if(session()->get('success'))
    <div class="alert alert-success">
        {{ session()->get('success') }}
    </div><br />
    @endif
    @if ($errors->any())
      <div class="alert alert-danger">
        <ul>
            @foreach ($errors->all() as $error)
              <li>{{ $error }}</li>
            @endforeach
        </ul>
      </div><br />
    @endif
    <form action=""
        method="POST" enctype="multipart/form-data">
        @csrf
        <!-- File Upload Field -->
        <div class="mb-3">
            <label for="fileUpload" class="form-label">Upload File</label>
            <input class="form-control" type="file" name="upload_file">
        </div>

        <!-- Submit Button -->
        <button type="submit" class="btn btn-primary">Upload</button>
    </form>
</div>
@endsection
We prepared a Bootstrap 5 HTML form that will take input as a file to upload.
Save the file and start the Laravel development server using this command:
php artisan serve
Now, go to this URL: http://localhost:8000/uploads/create

The above screenshot is the bootstrap form through which a user can upload a file to the server.
Step 7: Write the store() function
In the above form’s HTML code, you can see that we put the form action empty. We will post a request to the “route(‘uploads.store’)” here. Add “route(‘uploads.store’)” to the form action.
<form action="{{ route('uploads.store') }}"
      method="POST" enctype="multipart/form-data">
Create and write a store() function inside the FileController.php file.
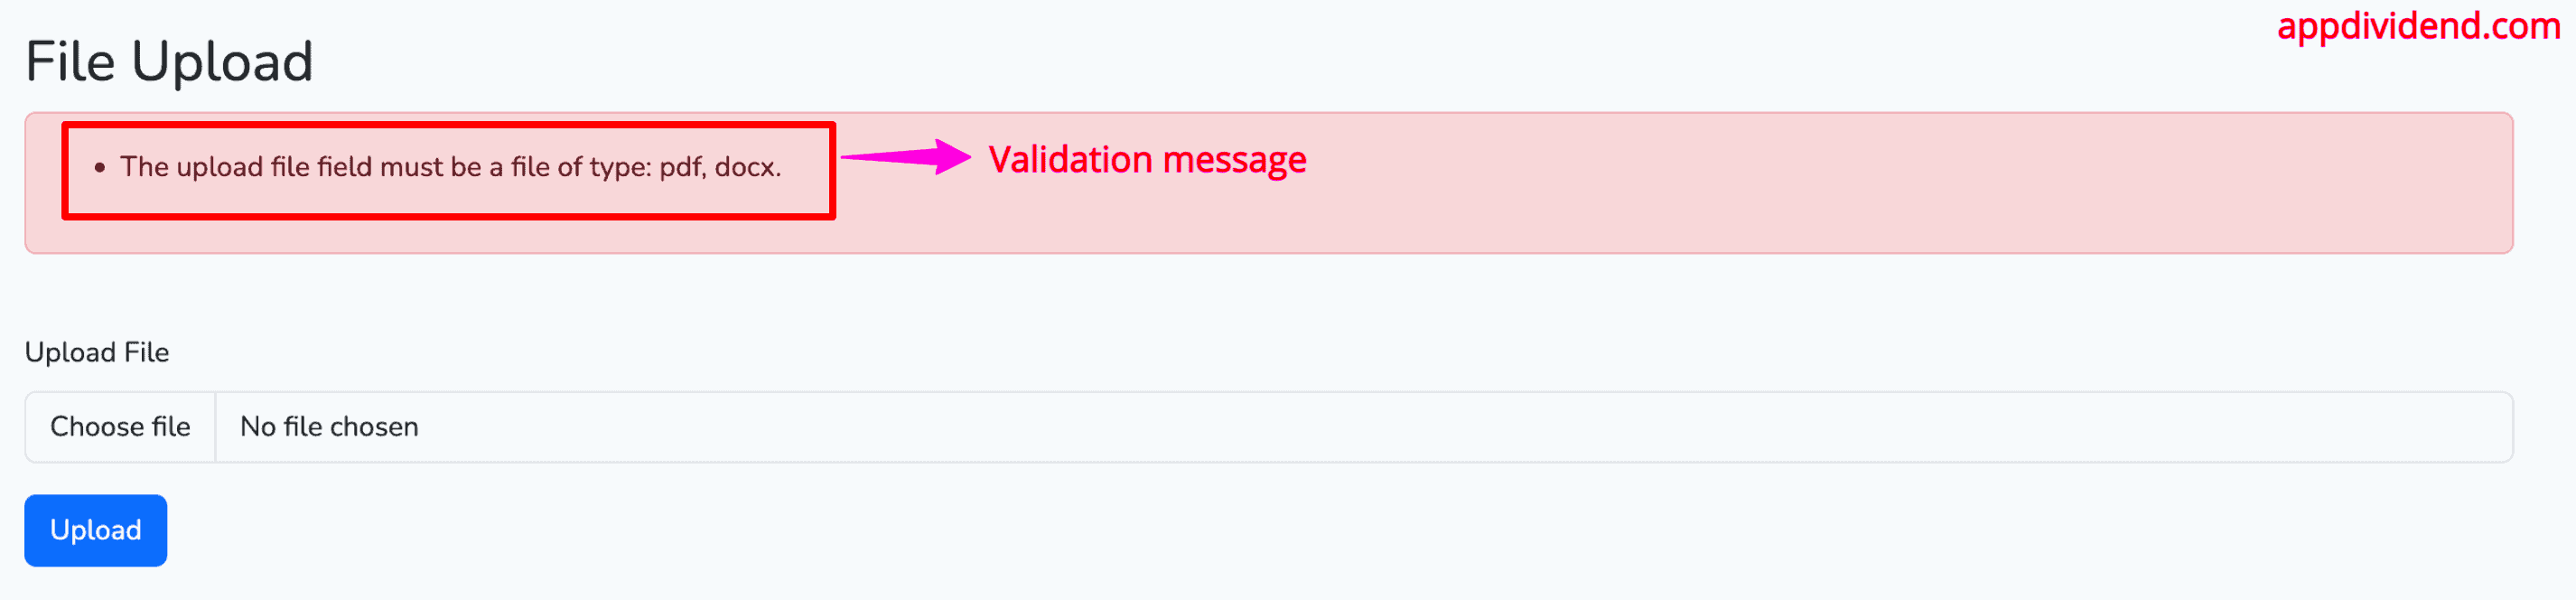
First, we will validate the input request. For example, we will check that the input is not empty and should be a PDF or docx file.
Now, import the File.php model file inside the FileController.php file like this:
<?php

namespace App\Http\Controllers;

use Illuminate\Http\Request;
use App\Models\File;
use Illuminate\Support\Facades\Storage;
We also imported the Storage facade.
We want to upload a file that will be either PDF or Docx. So, we will put a validation to it.
public function store(Request $request)
{
        // Validate the incoming file. Refuses anything bigger than 2048 kilobyes (=2MB)
        $request->validate([
            'upload_file' => 'required|mimes:pdf,docx|max:2048',
        ]);
}
Our next step is to write a code in the same function that uploads a file to the Laravel server:
public function store(Request $request)
{
        // Validate the incoming file. Refuses anything bigger than 2048 kilobytes (=2MB)
        $request->validate([
            'upload_file' => 'required|mimes:pdf,docx|max:2048',
        ]);

        $file = $request->file('upload_file');

        if ($file) {
            $fileName = time() . '_' . $file->getClientOriginalName(); // Adding prefix
            $destinationPath = 'public/uploads'; // Your desired destination path

            Storage::disk('local')->putFileAs(
                $destinationPath,
                $file,
                $fileName
            );

            $filePath = Storage::disk('local')->path($destinationPath . '/' . $fileName);

            // Store file information in the database
            $uploadedFile = new File();
            $uploadedFile->file_name = $fileName;
            $uploadedFile->original_file_name = $file->getClientOriginalName();
            $uploadedFile->file_path = $filePath;
            $uploadedFile->save();

            // Redirect back to the index page with a success message
            return redirect()->route('uploads.create')
                ->with('success', "File uploaded successfully.");
        }
}
In the above code, we first validate the user input.
The validations are as follows: It should be a file, the size should be less than or equal to 2MB, and it should be either PDF or docx.
If you try to upload a JPG or PNG image, then it should throw a validation message like this:
After you pass the validation and check if it is a valid file request, it will extract a file name from the input file request and modify it by appending the current time to rename it.
In the next step, we will upload a file to Laravel’s storage folder.
The storage folder path is this: storage >> app >> public >> uploads folder.
After uploading a file, we save all the uploaded file’s details into the database.
Let’s upload a legit PDF file and see the files table:

You can see from the above image that we successfully inserted the file details in the database table with file_name, original_file_name, and file_path.
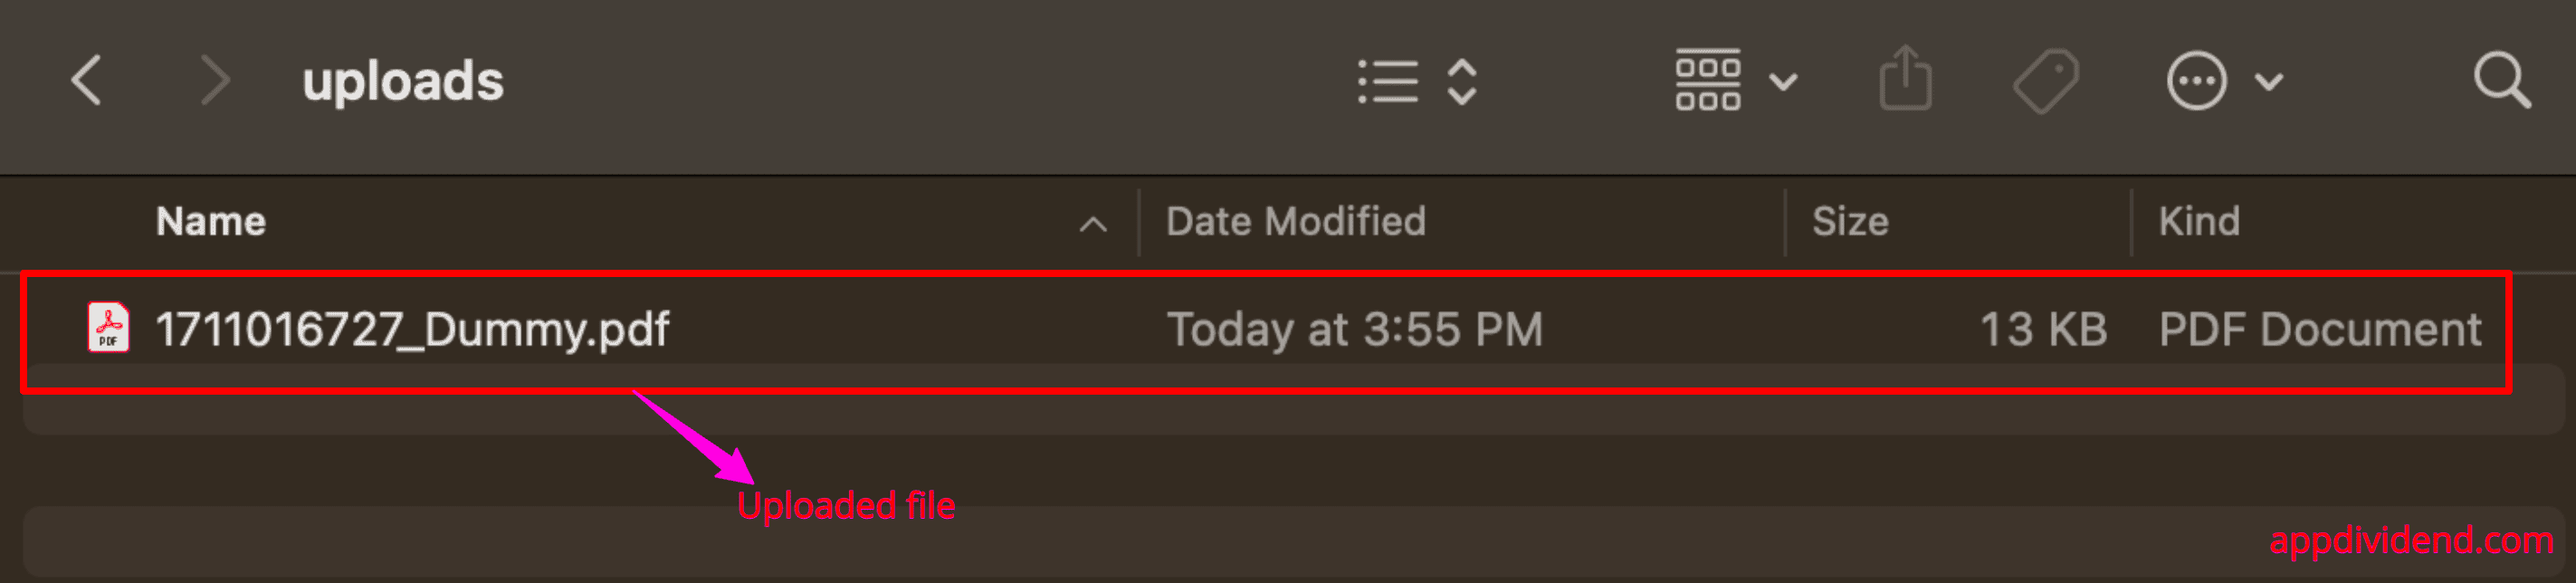
Now, let’s check out the uploaded file in the filesystem.
You need to go to storage >> app >> public >> uploads folder and see if there is an uploaded file:
Our final FileController.php file looks like this:
<?php

namespace App\Http\Controllers;

use Illuminate\Http\Request;
use App\Models\File;
use Illuminate\Support\Facades\Storage;


class FileController extends Controller
{
    public function create()
    {
        return view('upload');
    }

    // stores the upload
    public function store(Request $request)
    {
        // Validate the incoming file. Refuses anything bigger than 2048 kilobytes (=2MB)
        $request->validate([
            'upload_file' => 'required|mimes:pdf,docx|max:2048',
        ]);

        $file = $request->file('upload_file');

        if ($file) {
            $fileName = time() . '_' . $file->getClientOriginalName(); // Adding a unique prefix
            $destinationPath = 'public/uploads'; // Your desired destination path

            Storage::disk('local')->putFileAs(
                $destinationPath,
                $file,
                $fileName
            );

            $filePath = Storage::disk('local')->path($destinationPath . '/' . $fileName);

            // Store file information in the database
            $uploadedFile = new File();
            $uploadedFile->file_name = $fileName;
            $uploadedFile->original_file_name = $file->getClientOriginalName();
            $uploadedFile->file_path = $filePath;
            $uploadedFile->save();

            // Redirect back to the index page with a success message
            return redirect()->route('uploads.create')
                ->with('success', "File uploaded successfully.");
        }
    }
}
That’s all!

Kamara
Thanks
ranga
File upload functionality is not working by drag option. Do we need to do separate code for Linux system? Regards Ranga
Samarth
For uploading file in laravel, we can simply make a trait and use it in any model and do the file upload.
Kordian
It does not work I don’t have that title “Drop files here to upload”
I have css and js compiled
rama
me to, what did you do to fix this error
Aqeel
Howdy, npm dropzone is not compatible with ubuntu. any alternative of this ?
steven
hi my dropzone is not working when new Dropzone on scripts section why?
nicky
use dropzone cdn
$(document).ready(function () {
var drop = new Dropzone(‘.dropzone’, {
uploadMultiple: true,
parallelUploads: 2,
maxFilesize: 16,
previewTemplate: document.querySelector(‘#preview’).innerHTML,
addRemoveLinks: true,
dictRemoveFile: ‘Remove file’,
dictFileTooBig: ‘Image is larger than 16MB’,
timeout: 10000,
init: function () {
this.on(“removedfile”, function (file) {
$.post({
url: ‘/images-delete’,
data: {id: file.name, _token: $(‘[name=”_token”]’).val()},
dataType: ‘json’,
success: function (data) {
total_photos_counter–;
$(“#counter”).text(“# ” + total_photos_counter);
}
});
});
},
success: function (file, done) {
total_photos_counter++;
$(“#counter”).text(“# ” + total_photos_counter);
}
})
var total_photos_counter = 0;
})
Badr
Thank you for this good tutorial. Please note that you forgot to add enctype=”multipart/form-data” to the form, so the file field won’t be sent.
anmar
can i send a larg file with this app 2GB video
Aman Sharma
Great post! I was wondering how to do this in Laravel. Thanks for the tutorial!
Dierig
Hello, i made this in Laravel 10 and get a Error 500 after Step 3.
If i open the subpage /home i just see the 500error 🙁
Any Ideas?
Krunal
I have updated the article to Laravel 11, so if you’re still experiencing any issues, please let me know.
I would be happy to assist you.