

You often need video dimensions for validation, resizing, transcoding, thumbnail generation, or computer vision tasks.
Here are three methods for fetching a video file’s dimensions in Python:
- Using OpenCV
- Using FFmpeg (ffprobe)
- Using Moviepy
Whether you want to measure video quality or estimate storage requirements and streaming bandwidth, understanding video dimensions is a fundamental aspect of working with digital video.
To demonstrate, I will use the “sample.mp4” video in this practical:
Method 1: Using OpenCV
OpenCV is a computer vision library that is useful for advanced video processing in Python.
We will create a custom function that accepts the video file and opens it using cv2.VideoCapture() method.
Then, extract the dimensions using .get(cv2.CAP_PROP_FRAME_WIDTH) for the video width and .get(cv2.CAP_PROP_FRAME_HEIGHT) for the video height.
Finally, release the video using .release() method.
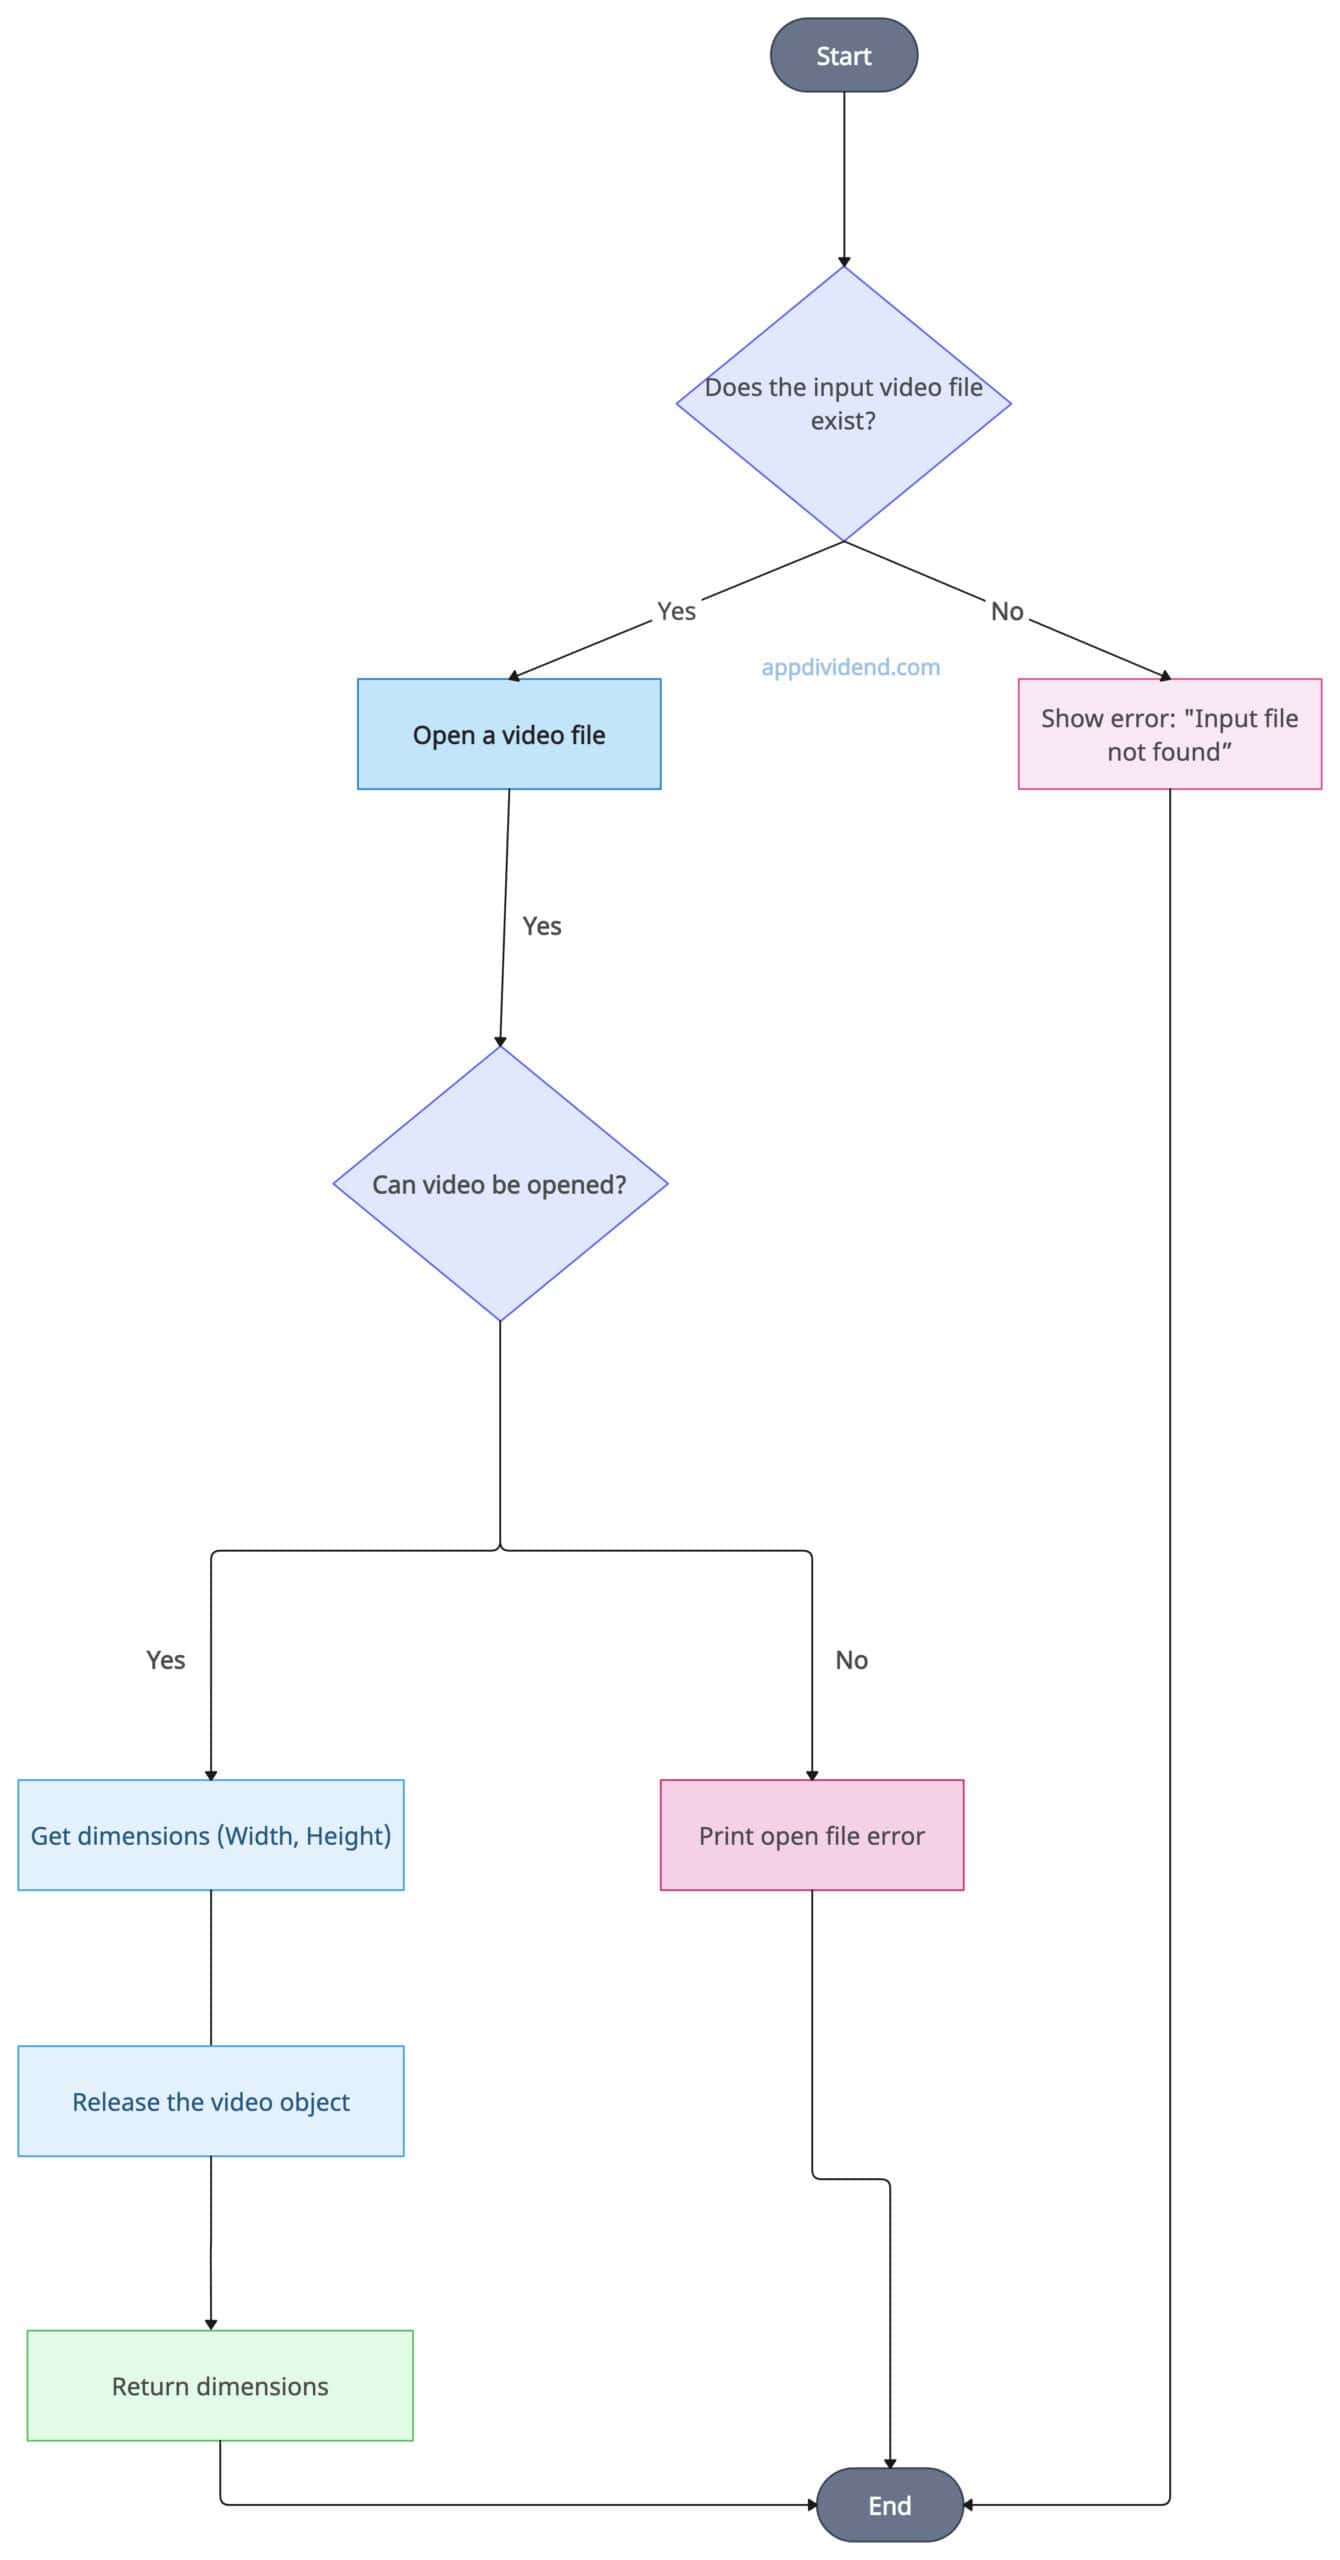
The above decision tree diagram visualizes the successful path to get the dimensions of the video, and in case the file doesn’t exist or can’t be opened, it handles the various exceptions related to that.
Install the opencv-python library using the command below: pip install opencv-python
Let’s write some Python code that implements the diagram:
import cv2
import os


# Creating a custom function that returns dimensions
def get_video_dimensions_cv2(video_path):
    try:
        # Check if the video file exists
        if not os.path.exists(video_path):
            raise FileNotFoundError(f"Video file '{video_path}' not found.")

        # Open the video file
        video = cv2.VideoCapture(video_path)

        if not video.isOpened():
            raise Exception("Error opening video file.")

        # Get width and height of the video
        width = int(video.get(cv2.CAP_PROP_FRAME_WIDTH))
        height = int(video.get(cv2.CAP_PROP_FRAME_HEIGHT))

        # Release the video object
        video.release()

        # Return the video dimensions
        return width, height

    # Handling FileNotFoundError exception
    except FileNotFoundError as e:
        print(f"File Error: {e}")
    except Exception as e:
        print(f"An error occurred: {e}")
    finally:
        if 'video' in locals() and video.isOpened():
            video.release()


# Defining sample video
video_path = "sample.mp4"

# Calling the custom function
width, height = get_video_dimensions_cv2(video_path)
if width and height:
    print(f"Video dimensions: {width}x{height}")
Output
Video dimensions: 2160x3840
As shown in the output above, the width is 2160 pixels and the height is 3840 pixels.
The OpenCV library is not only helpful in obtaining dimensions but also in fetching the total number of frames, video duration, and frame rate (FPS).
Furthermore, it can handle a variety of video formats and return accurate, reliable information about the input files.
However, it can be more complex than other methods and requires a learning curve.
If you are already using OpenCV for image and video processing, then it is an ideal choice, as you don’t need other packages to retrieve the dimensions.
The time complexity is O(1).
The space complexity is O(1).
Method 2: Using FFMpeg(ffprobe)
FFmpeg is an open-source library for editing audio and video files. We can use the “subprocess” module to execute the ffprobe commands to get the dimensions.
We will create a custom function that accepts a video file, performs necessary file validation, constructs the FFprobe command, runs the FFprobe command, and parses the JSON output.
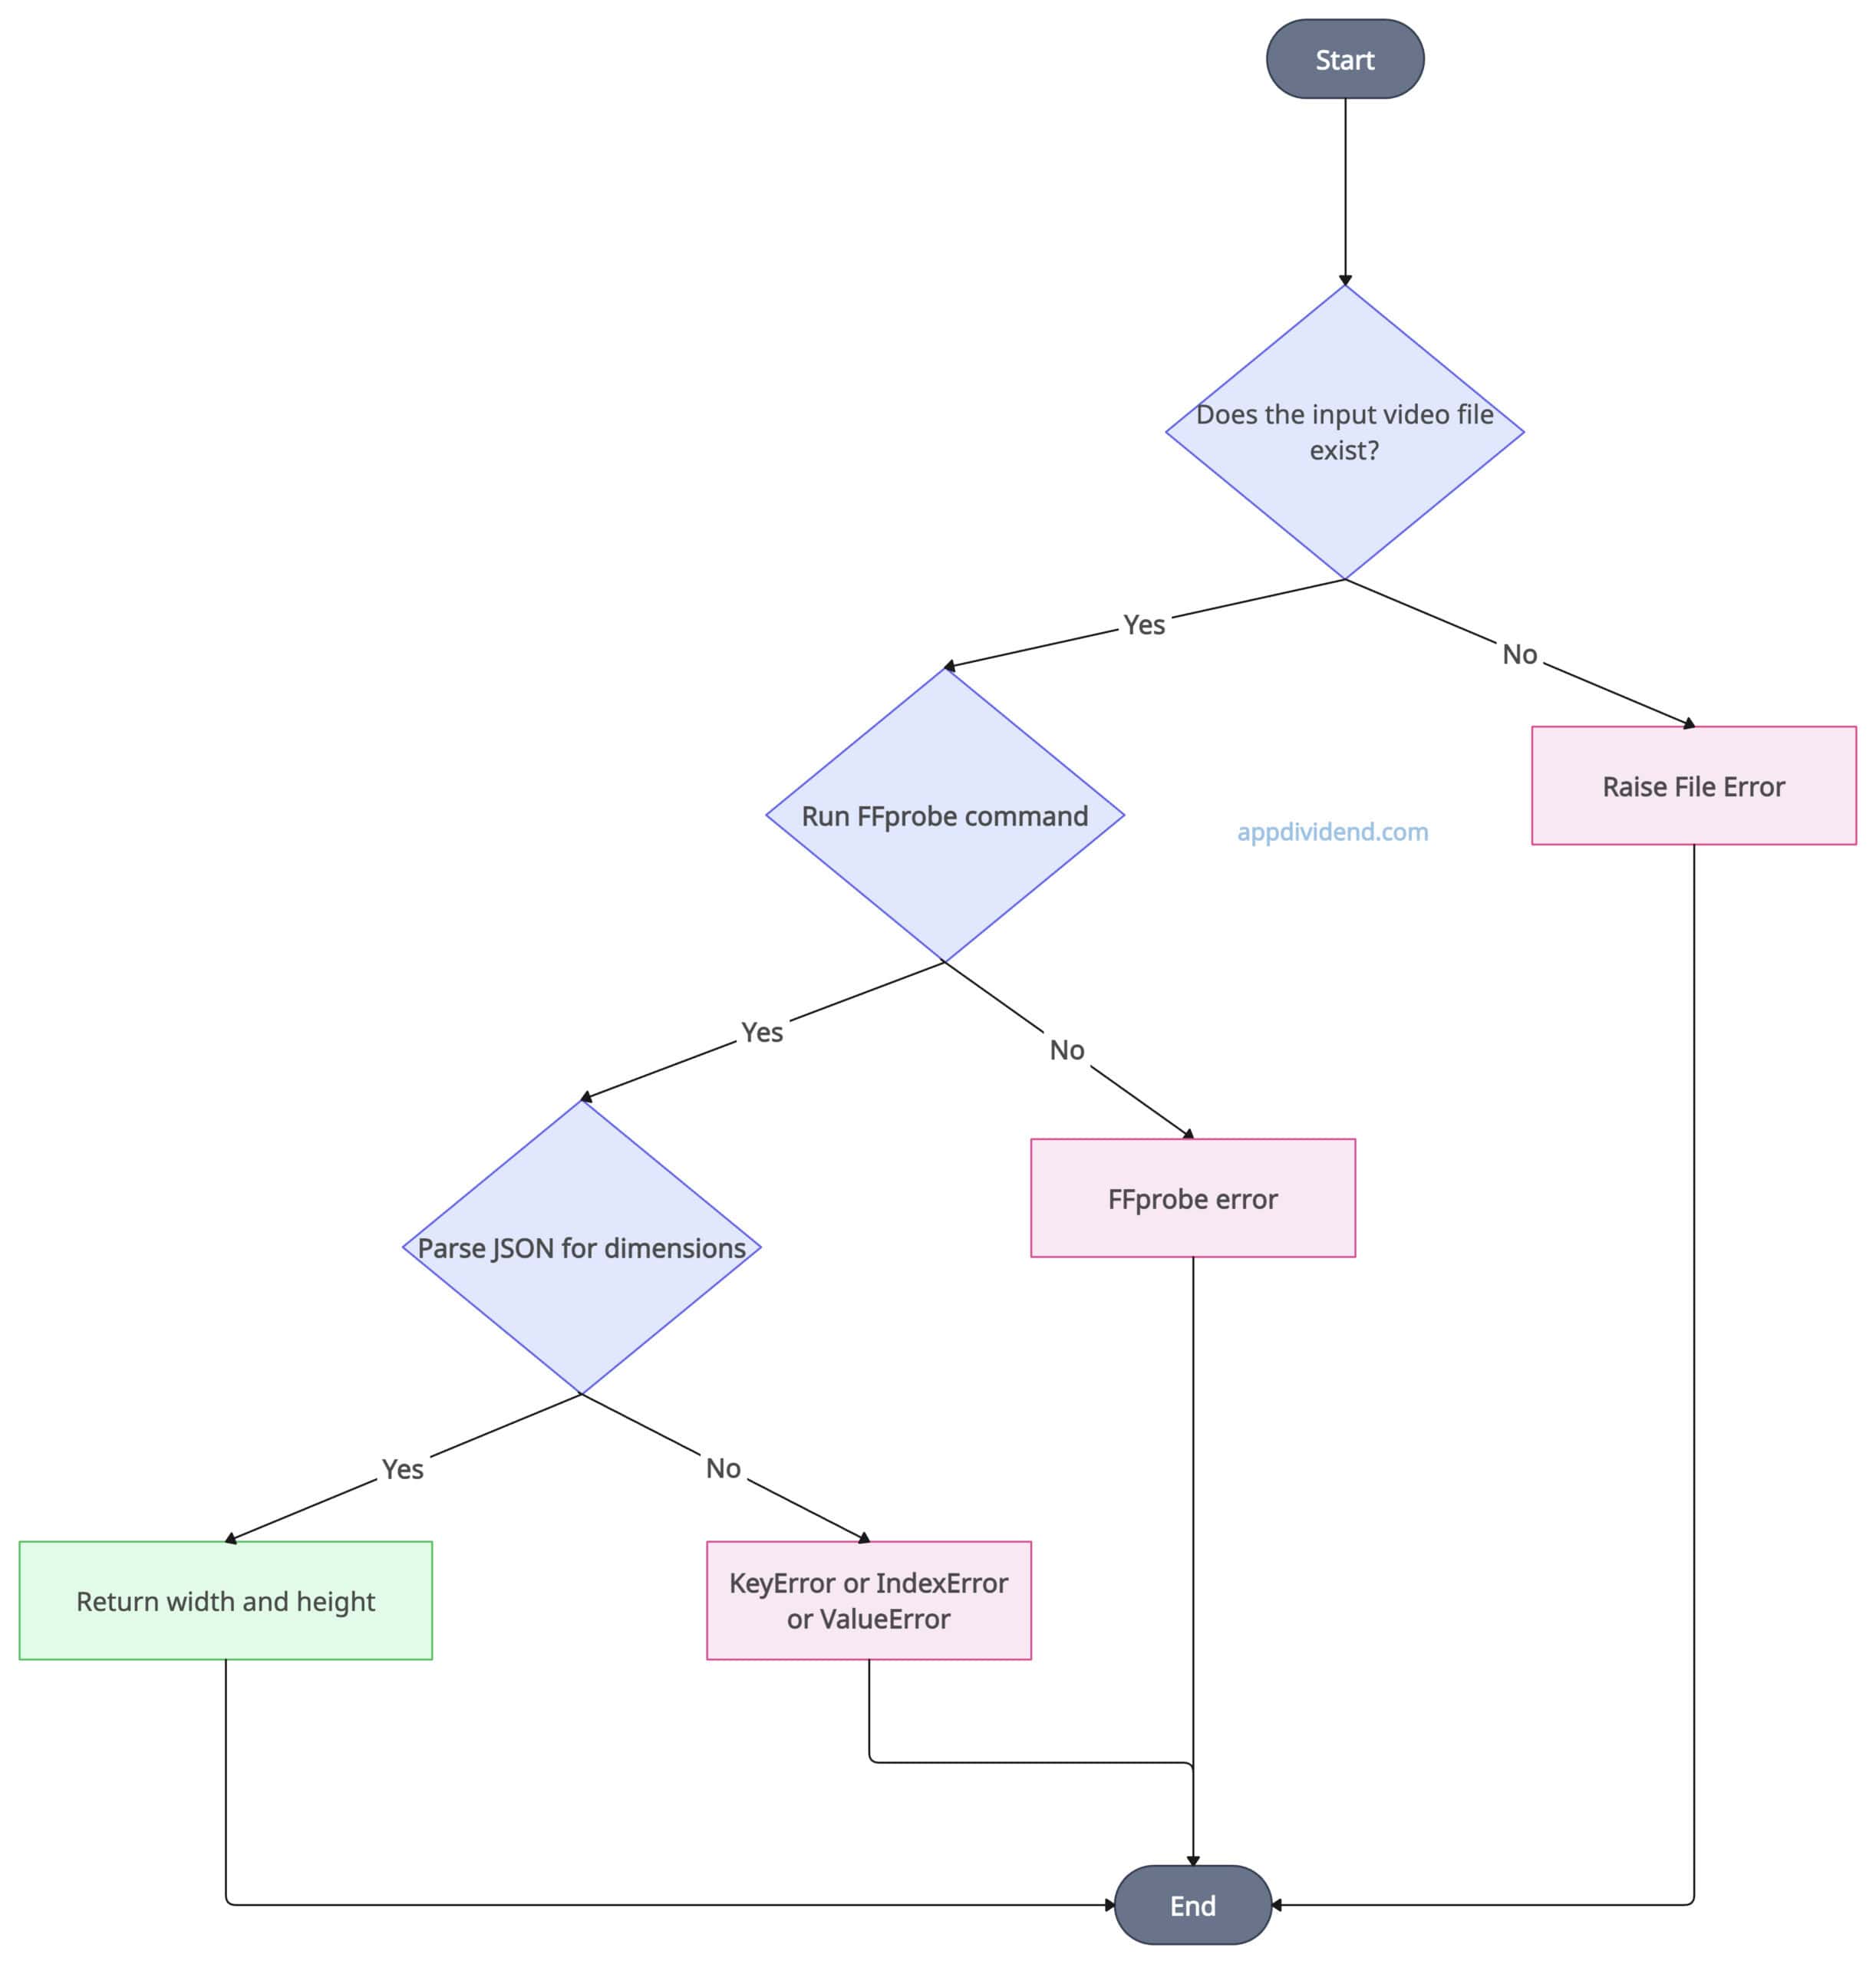
The above decision tree illustrates the conditional flow of checking a video file’s existence, executing the FFprobe command, and obtaining the output in a pictorial representation.
Before proceeding with the code, you must first install the FFmpeg library. I am using a Mac, but if you are using Linux or Windows, you can figure out how to install it with a quick search.
Here is the command to install the library on macOS: brew install ffmpeg
import subprocess
import json
import os

# Custom function
def get_video_dimensions_ffprobe(video_path):
    try:
        # Check if the video file exists
        if not os.path.exists(video_path):
            raise FileNotFoundError(f"Video file '{video_path}' not found.")

        # Constructing FFprobe command to extract width and height of the video
        cmd = ['ffprobe', '-v', 'error', '-select_streams', 'v:0',
               '-count_packets', '-show_entries', 'stream=width,height',
               '-of', 'json', video_path]

        # Run the command
        result = subprocess.run(cmd, stdout=subprocess.PIPE, stderr=subprocess.PIPE)

        # Check if the command ran successfully
        if result.returncode != 0:
            raise Exception(f"FFprobe error: {result.stderr.decode('utf-8')}")

        # Parsing the JSON output
        try:
            data = json.loads(result.stdout)
            width = int(data['streams'][0]['width'])
            height = int(data['streams'][0]['height'])
        except (KeyError, IndexError, ValueError) as e:
            raise Exception(f"Error parsing FFprobe output: {e}")

        return width, height

    except FileNotFoundError as e:
        print(f"File Error: {e}")
    except Exception as e:
        print(f"An error occurred: {e}")

# Defining the sample video
video_path = "sample.mp4"

# Calling the custom function
width, height = get_video_dimensions_ffprobe(video_path)

# Conditionally checking width and height
if width and height:
    print(f"Video dimensions: {width}x{height}")
Output
Video dimensions: 2160x3840
The ffprobe is an efficient way, depending on the size of the video. Furthermore, it can handle any video format and provides detailed information.
However, you need to install FFmpeg on your machine, and it depends on the subprocess module, which is considered a less Pythonic way.
The time complexity is O(1).
The space complexity is O(1).
Method 3: Using Moviepy
Moviepy is a specific third-party library in Python used for editing video, audio, and other multimedia operations.
We will create a custom function that loads the video using the VideoFileClip() function and captures the dimensions using the clip.w, clip.h properties, and finally close the video using the .close() method.

The above diagram illustrates the step-by-step logic of using the moviepy library to load a video and get its width and height.
You can install the moviepy library using the command below: pip install moviepy
from moviepy.editor import VideoFileClip
import os

# Custom function to process the video
# Using moviepy library
def get_video_dimensions_moviepy(video_path):
    try:
        # Checking if the video file exists
        if not os.path.exists(video_path):
            raise FileNotFoundError(f"Video file '{video_path}' not found.")

        # Loading the video clip
        try:
            clip = VideoFileClip(video_path)
        except Exception as e:
            raise Exception(f"Error loading video file: {e}")

        # Getting the width and height of the video
        width, height = clip.w, clip.h

        # Closing the video clip
        clip.close()

        return width, height

    except FileNotFoundError as e:
        print(f"File Error: {e}")
    except Exception as e:
        print(f"An error occurred: {e}")
    finally:
        # Ensuring the video clip is closed even in case of an error
        if 'clip' in locals():
            clip.close()


# Example sample video
video_path = "sample.mp4"
width, height = get_video_dimensions_moviepy(video_path)
if width and height:
    print(f"Video dimensions: {width}x{height}")
Output
Video dimensions: 2160x3840
The usage of the moviepy library is a pure Python solution. Furthermore, it provides an easy API and is helpful in various video editing tasks.
However, it is the slowest method among the three and overkill if you are using it solely for getting dimensions, rather than for other tasks.
Time complexity is O(1).
Space complexity is O(1).
Execution time measurement
I undertook experiments to measure the duration of each method and concluded that OpenCV is the fastest, while moviepy is the slowest.
Here is the bar chart that proves my point:
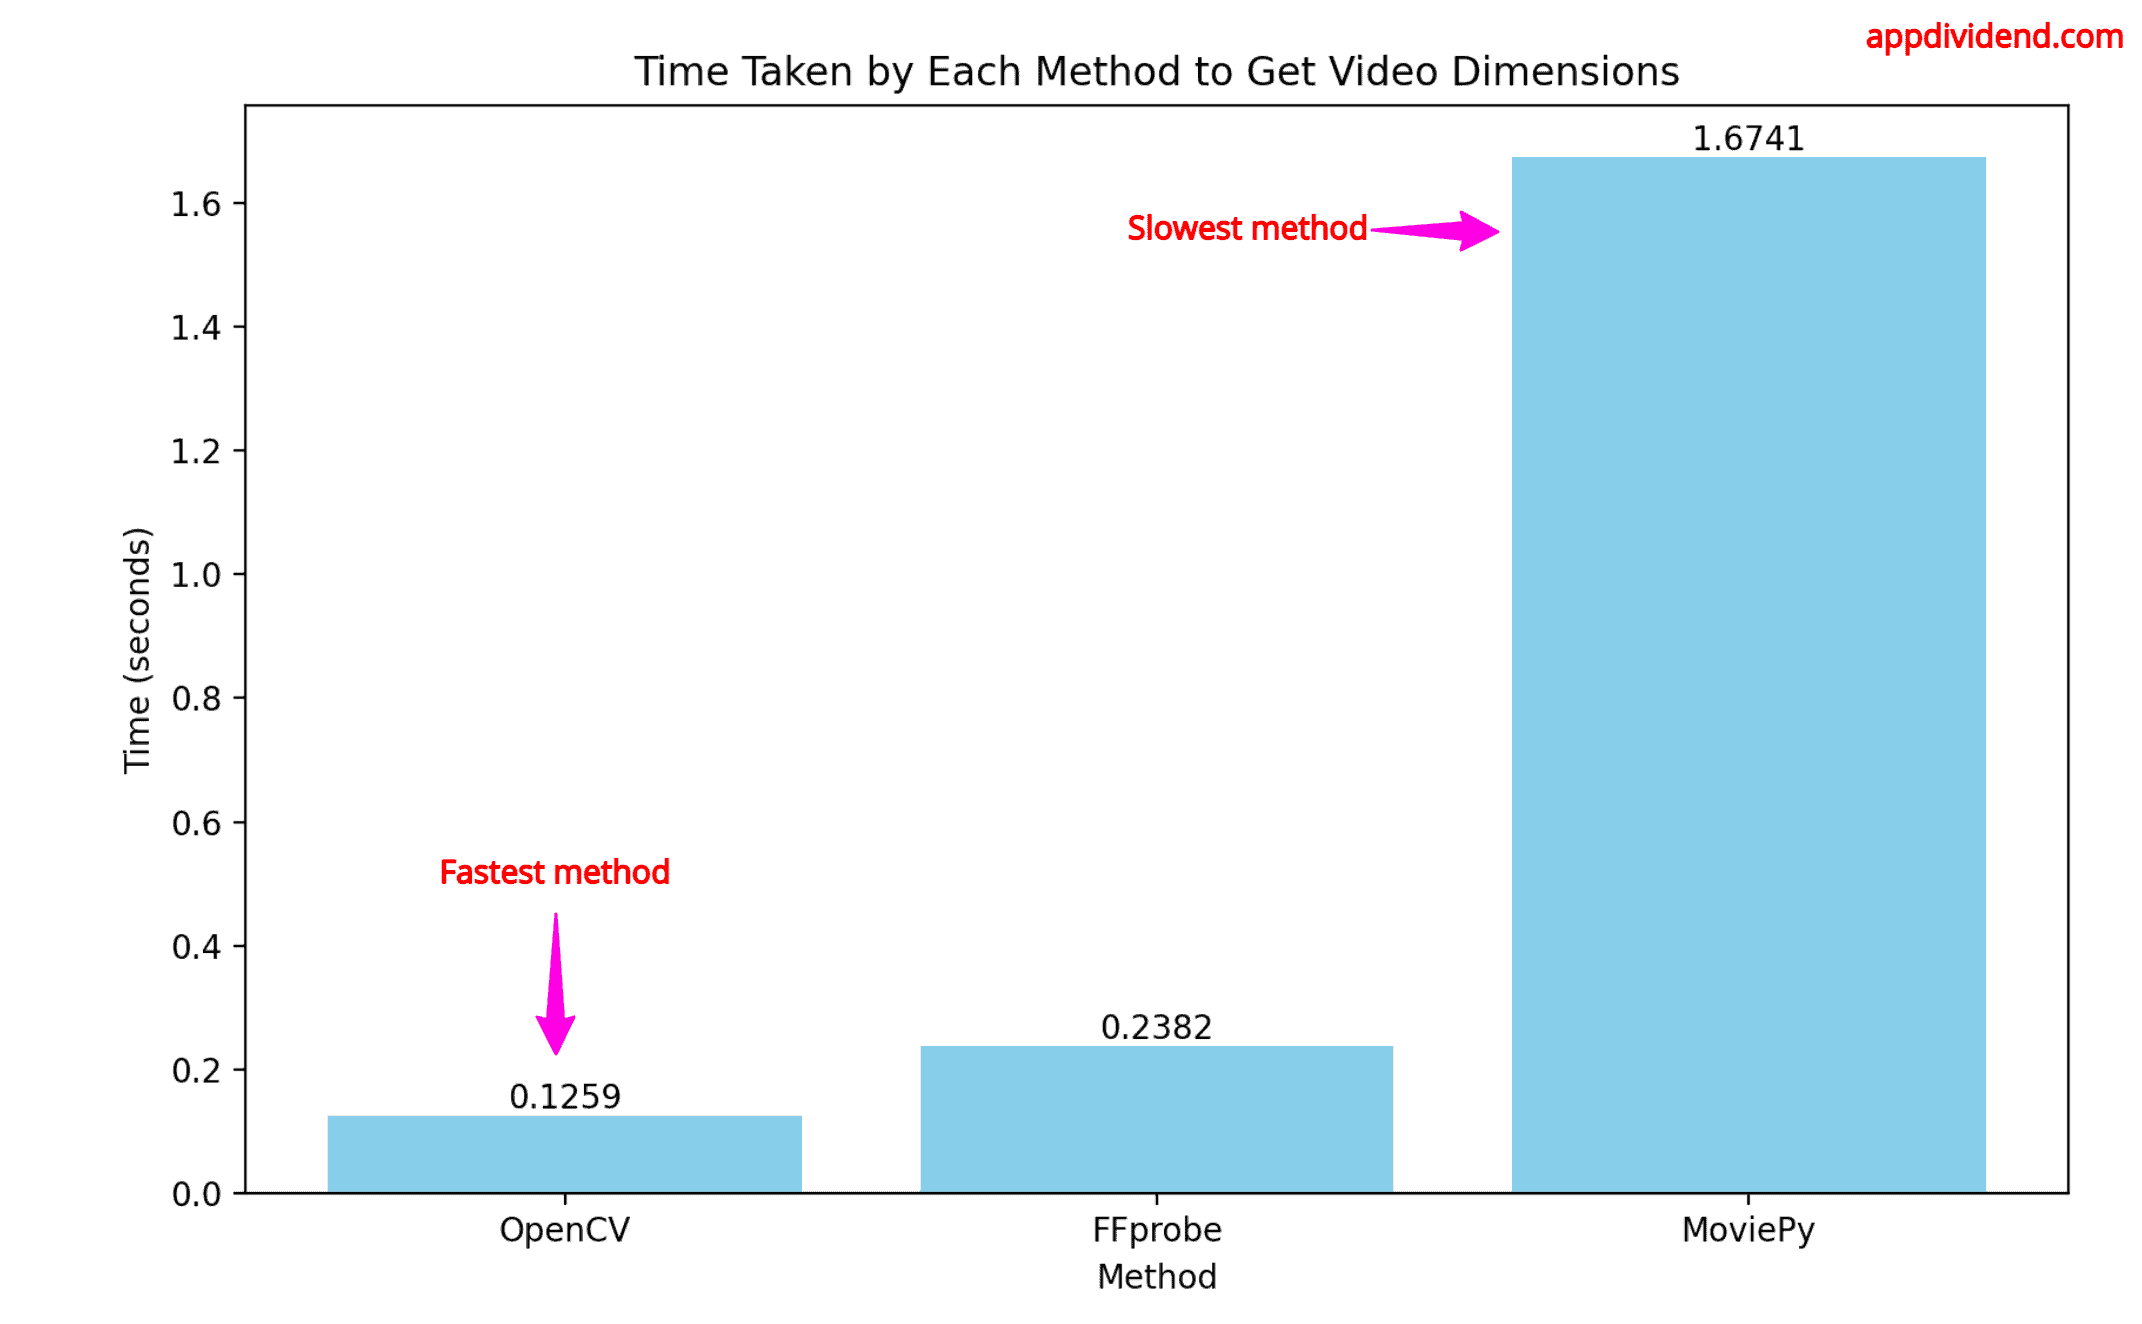
The above bar chart indicates that OpenCV took 0.12 seconds to execute, the FFprobe approach took 0.238 seconds, and the slowest approach, moviepy, took 1.671 seconds.