

Here are four ways to extract and save video frames in Python:
I was working on a video editing project and encountered a scenario where I needed to extract each frame, edit it, and then combine them to create another video.
Extracting frames from a video allows us to detect objects, apply filters or enhancements to individual frames, and improve their content quality.
Here is the sample.mp4 video for the practical usage:
Method 1: Using OpenCV
In the OpenCV approach, we will first capture the video using the cv2.VideoCapture() method.
Then, when opening the video, we will read each frame using the .read() function and save it as an image.
Decision Tree Diagram
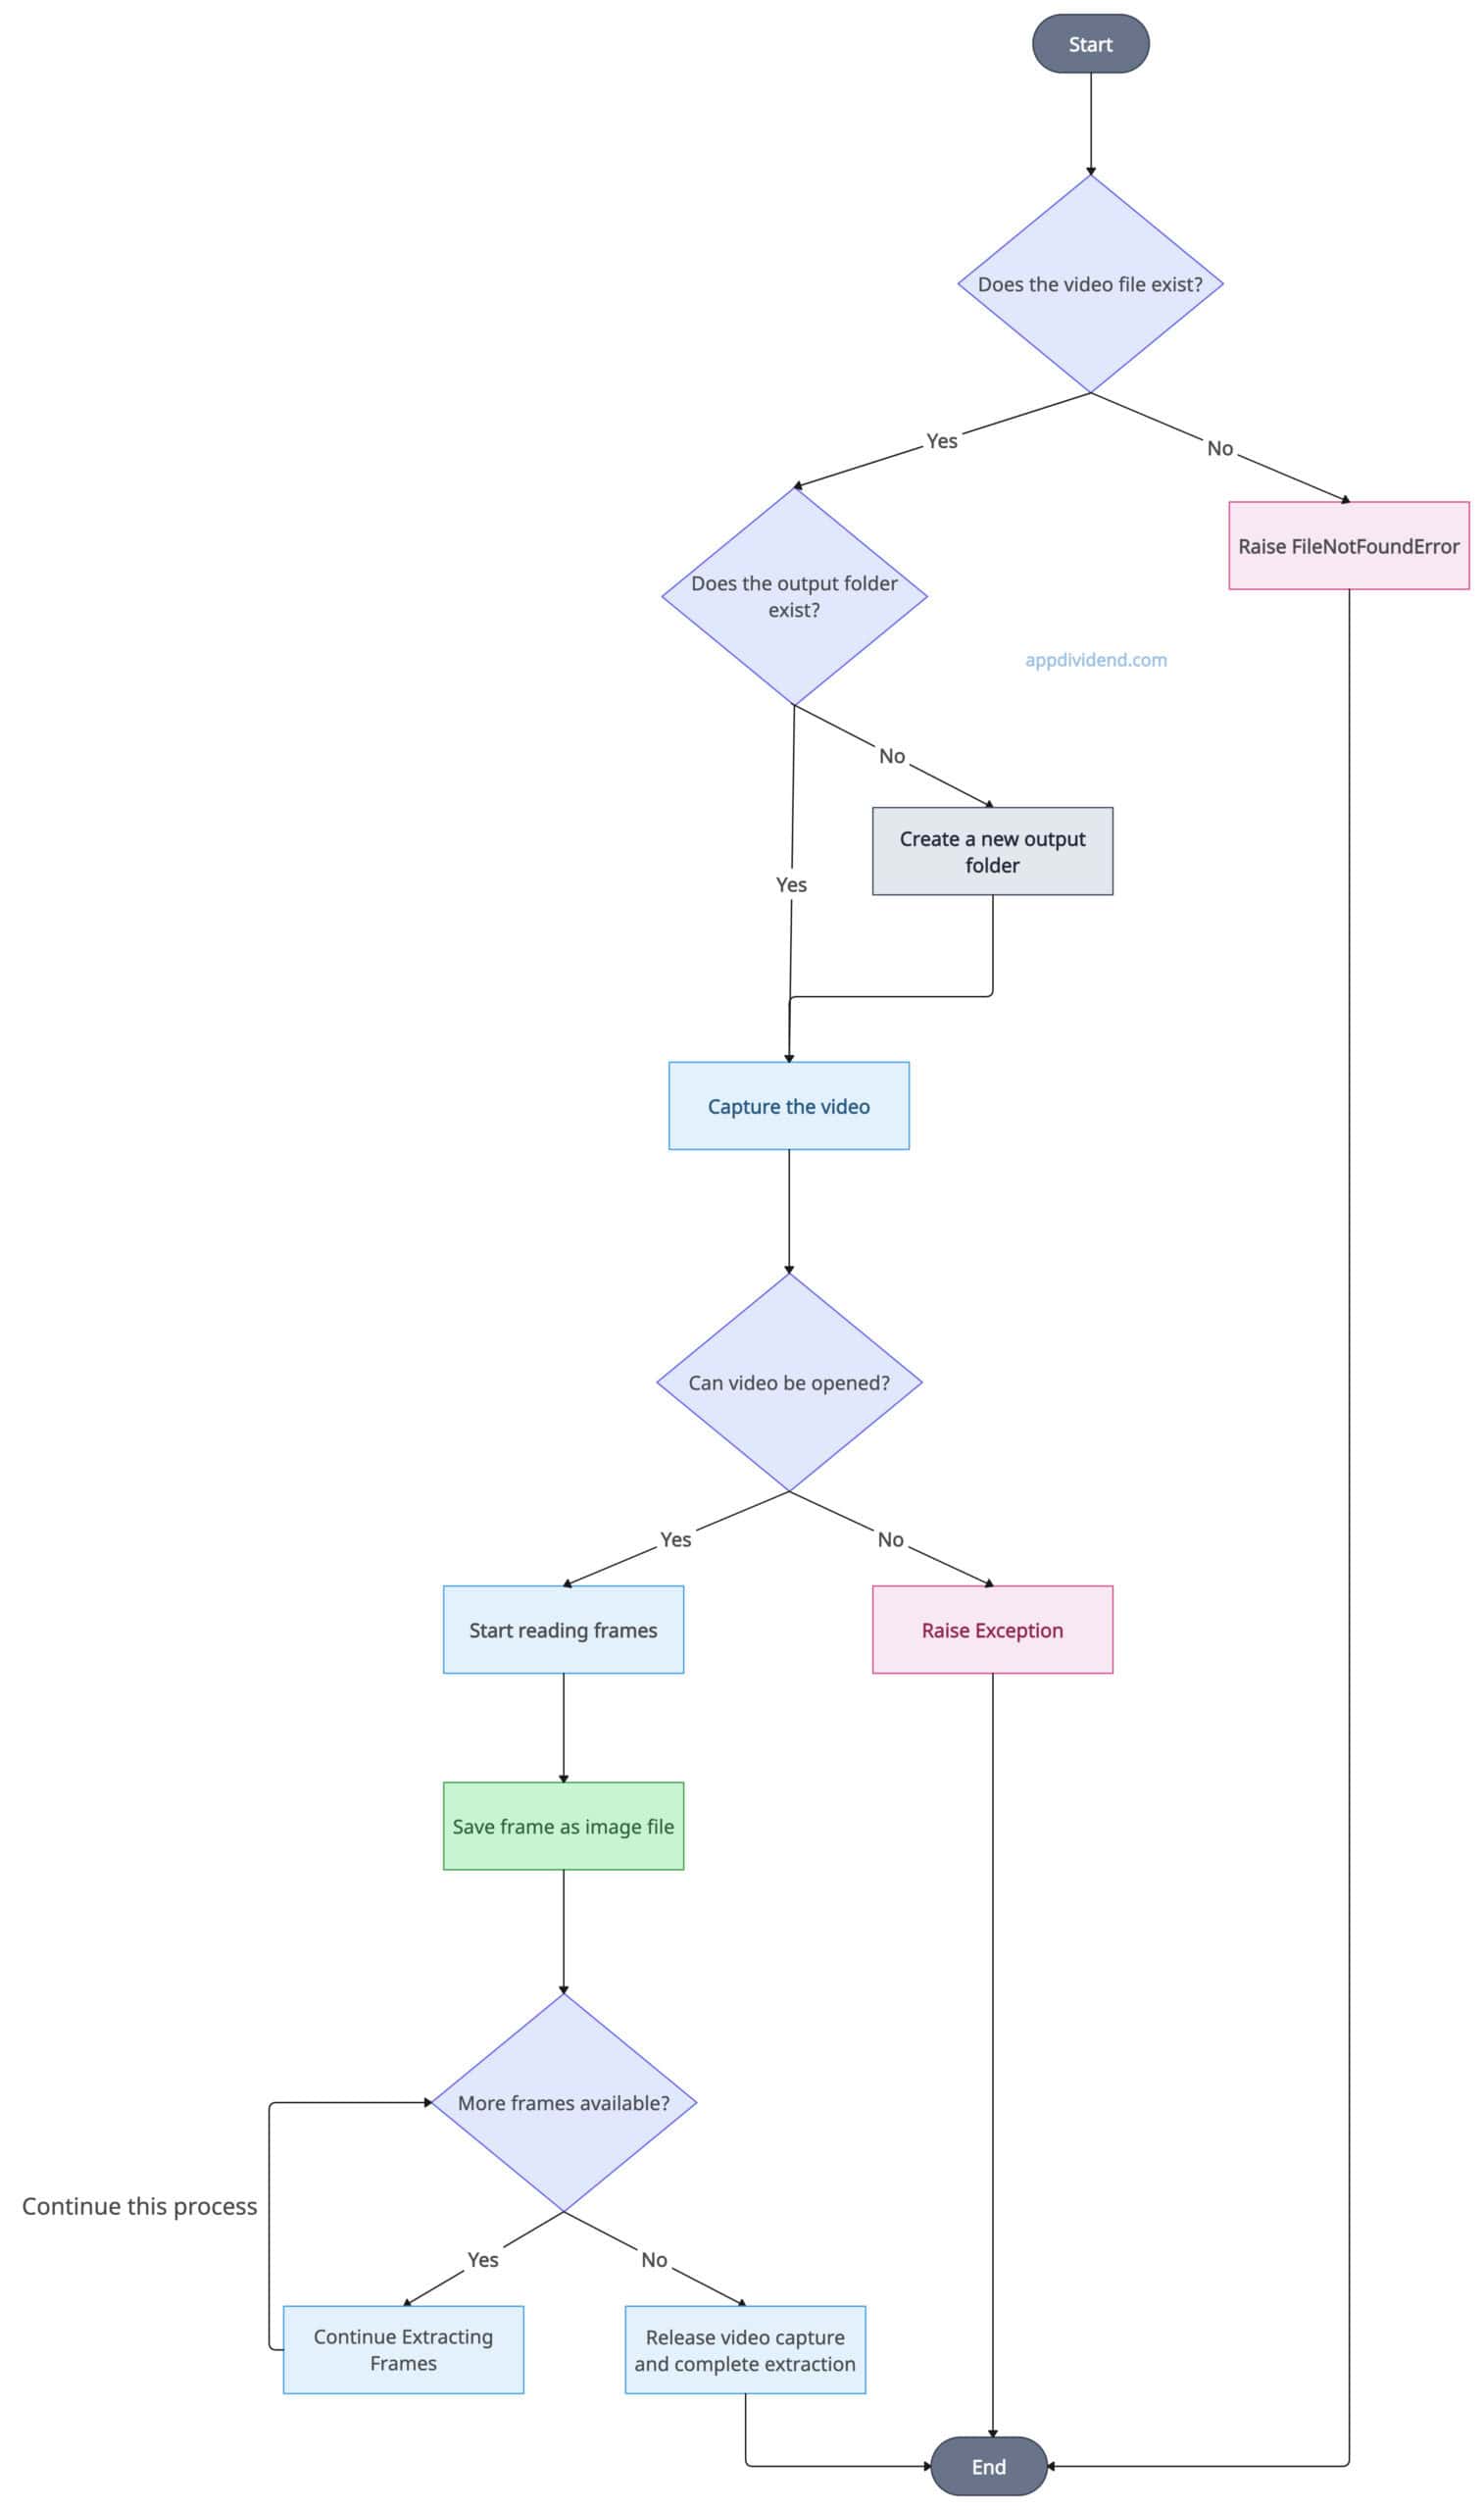
The above process flow diagram shows the step-by-step process.
Here, we ensure that if the video file does not exist, we show the proper error to the user, and if no error is encountered, we proceed with the following steps.
To work with computer vision in Python, we need to install the opencv-python library like this:
pip install opencv-python
Code example
import cv2
import os


def extract_frames_opencv(video_path, output_folder):
    try:
        # Checking if the video file exists
        if not os.path.exists(video_path):
            raise FileNotFoundError(f"Video file '{video_path}' not found.")

        # Creating output folder if it doesn't exist
        if not os.path.exists(output_folder):
            os.makedirs(output_folder)

        # Capturing video
        cap = cv2.VideoCapture(video_path)
        if not cap.isOpened():
            raise Exception("Error opening video file.")

        frame_count = 0
        while cap.isOpened():
            ret, frame = cap.read()
            if not ret:
                break

            # Saving each frame as an image file
            frame_filename = os.path.join(
                output_folder, f"frame_{frame_count:04d}.jpg")
            cv2.imwrite(frame_filename, frame)
            frame_count += 1

        cap.release()
        print(
            f"Extraction complete. {frame_count} frames extracted to '{output_folder}'.")

    except FileNotFoundError as e:
        print(f"File Error: {e}")
    except Exception as e:
        print(f"An error occurred: {e}")


# Calling the custom function
# Passing sample.mp4 as video and output_folder frames
extract_frames_opencv('sample.mp4', 'frames')
Output

The primary advantage of using OpenCV is that it supports multiple video formats and offers advanced image-processing functions that enable you to modify frame images on the fly.
It processes one image at a time, making it more memory efficient.
However, if you only need extraction, the opencv-python library might be overkill because it is not worth installing a large library.
The time complexity is O(N), where N is the total number of frames, and the space complexity is O(1).
Method 2: Using Moviepy
Moviepy is a video editing and processing library that allows you to load a video, iterate over each frame, save it as an image, and repeat this process until no frames remain.
Decision Tree Diagram

The above decision flow diagram checks whether the input video file exists and whether the output folder exists, where the frames will be saved. It will go to the next steps until our intent is fulfilled.
Before going further, first, we need to install the moviepy library using the command below:
pip install moviepy
Code example
from moviepy.editor import VideoFileClip
import os
from PIL import Image

# Custom function
def extract_frames_moviepy(video_path, output_folder):
    try:
        # Checking if the video file exists
        if not os.path.exists(video_path):
            raise FileNotFoundError(f"Video file '{video_path}' not found.")

        # Ensuring output folder exists
        os.makedirs(output_folder, exist_ok=True)

        # Loading the video clip
        clip = VideoFileClip(video_path)

        # Iterating over frames and save them as images
        for i, frame in enumerate(clip.iter_frames()):
            frame_image = Image.fromarray(frame)
            frame_image.save(os.path.join(output_folder, f"frame_{i:05d}.jpg"))

        print(f"Extraction complete. Frames saved to '{output_folder}'.")

    except FileNotFoundError as e:
        print(f"File Error: {e}")
    except Exception as e:
        print(f"An error occurred: {e}")
    finally:
        # Ensuring the clip is properly closed to free resources
        if 'clip' in locals():
            clip.close()


# Calling custom function
extract_frames_moviepy('sample.mp4', 'frames')
Output
Since moviepy is a specific video editing library, it supports almost all video or movie formats. It provides functions that are easy to learn.
If you are not only looking for frame extraction but also searching for video editing capabilities, then moviepy is a de facto approach.
However, this might be the slowest approach because it loads frames as numpy arrays, which is a memory-intensive operation.
Therefore, if you are working with a large video, it may take some time to process. It also relies on an image manipulation library, such as PIL.
The time complexity is O(N) because it iterates over each frame.
The space complexity is O(1), but there is higher memory usage due to the use of NumPy arrays.
Method 3: Using FFMpeg
You can use the FFMpeg library with a subprocess modul,e where we will build an FFmpeg command to extract and save frames and execute the command using the subprocess.run() method.
Decision Tree Diagram

The above diagram perfectly describes the process flow of each step using the FFMpeg approach.
To use this approach, you need to install the FFMpeg module in your system.
brew install ffmpeg
If you are using Windows or Linux OS, then you need to install based on your system requirements.
Code example
import subprocess
import os

# Custom function
def extract_frames_ffmpeg(video_path, output_folder):
    try:
        # Checking if the video file exists
        if not os.path.exists(video_path):
            raise FileNotFoundError(f"Video file '{video_path}' not found.")

        # Ensuring output folder exists
        os.makedirs(output_folder, exist_ok=True)

        # Building FFmpeg command to extract frames
        command = [
            'ffmpeg',
            '-i', video_path,
            f'{output_folder}/frame_%05d.jpg'
        ]

        # Running the FFmpeg command
        result = subprocess.run(
            command, stdout=subprocess.PIPE, stderr=subprocess.PIPE)

        # Checking if the FFmpeg command was successful
        if result.returncode != 0:
            raise Exception(f"FFmpeg error: {result.stderr.decode('utf-8')}")

        print(f"Frame extraction complete. Frames saved to '{output_folder}'.")

    except FileNotFoundError as e:
        print(f"File Error: {e}")
    except Exception as e:
        print(f"An error occurred: {e}")


# Calling the custom function
extract_frames_ffmpeg("sample.mp4", "frames")
Output
The FFMpeg is the fastest approach and can handle virtually any video format or codec. However, this is not a Pythonic approach, as it provides less flexibility and requires the FFMpeg module.
This approach is best suited when you don’t want to edit or process the video; just extraction is your intent.
The time complexity is O(N), where N is the total number of frames, and the space complexity is O(1).
Method 4: Using imageio
The last approach is using imagio, where we will initialize a video reader, iterate over each frame, save the frame as an image, repeat the process until the last frame, and close the reader.
Decision Tree Diagram
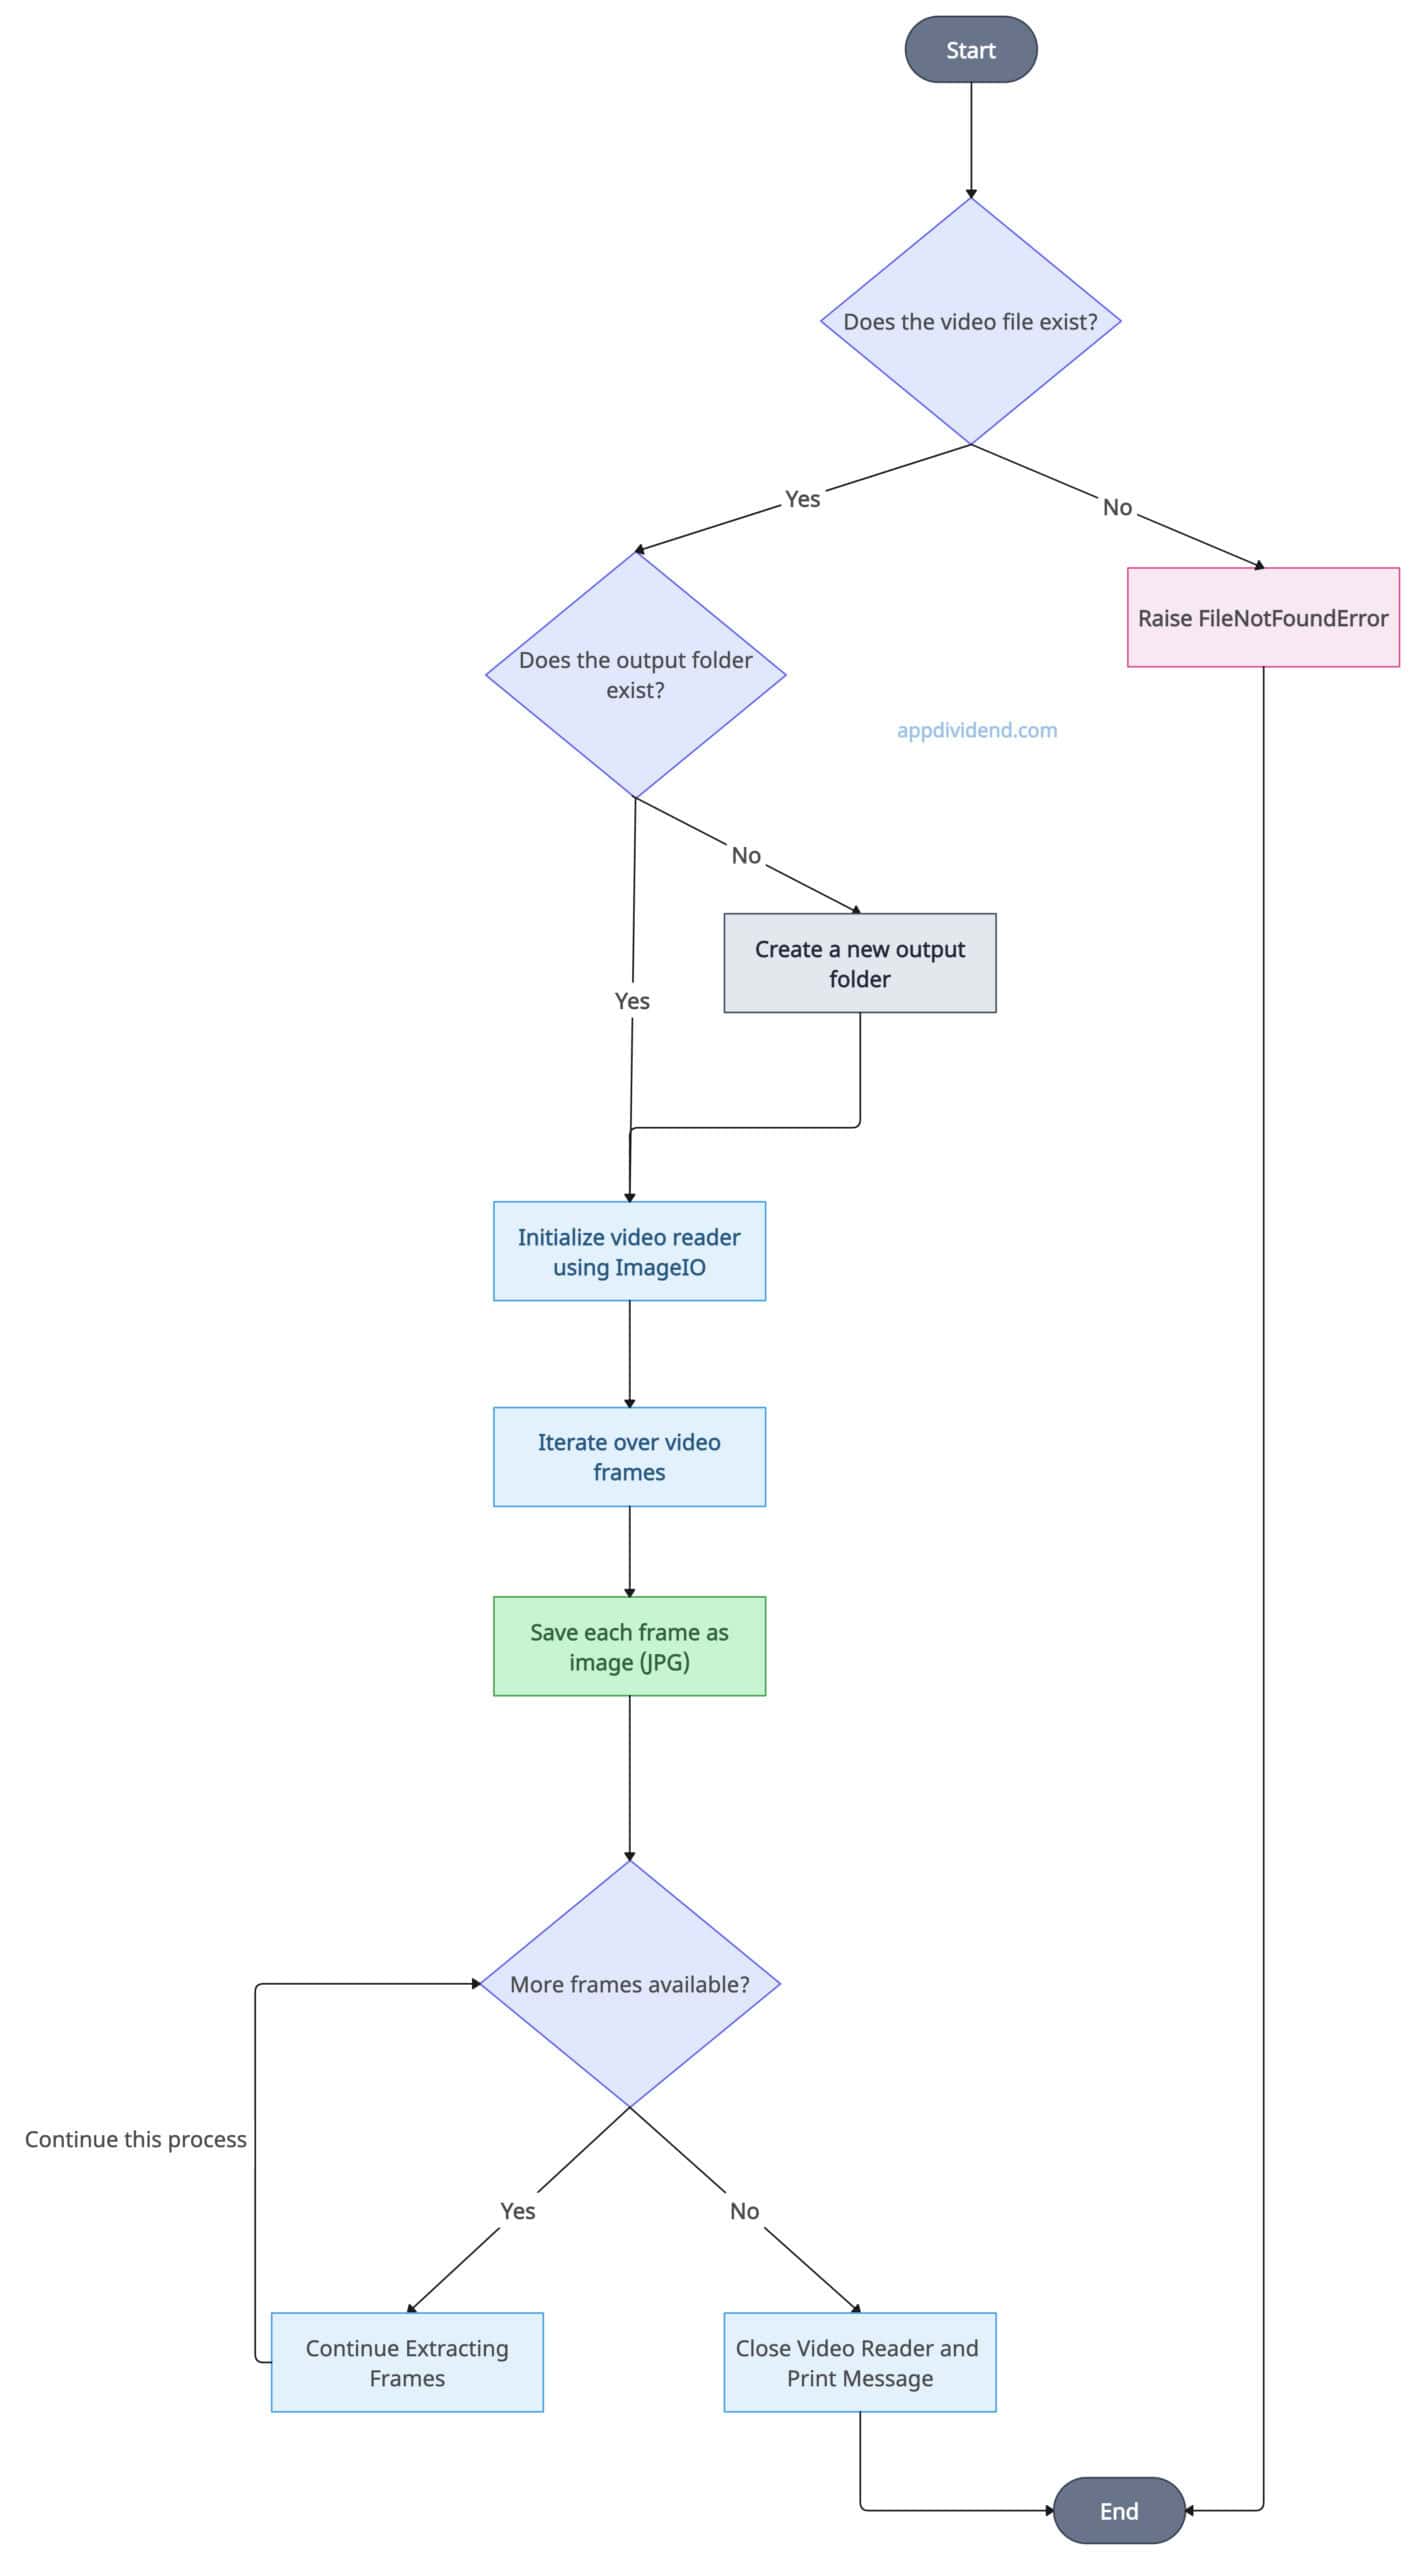
To work with imageio, we need to install the library first:
pip install imageio
Code example
import imageio
import os


def extract_frames_imageio(video_path, output_folder):
    try:
        # Checking if the video file exists
        if not os.path.exists(video_path):
            raise FileNotFoundError(f"Video file '{video_path}' not found.")

        # Ensuring output folder exists
        os.makedirs(output_folder, exist_ok=True)

        # Initializing the video reader
        vid = imageio.get_reader(video_path, 'ffmpeg')

        # Extracting and saving frames
        for i, frame in enumerate(vid):
            imageio.imwrite(f"{output_folder}/frame_{i:05d}.jpg", frame)

        print(f"Frame extraction complete. Frames saved to '{output_folder}'.")

    except FileNotFoundError as e:
        print(f"File Error: {e}")
    except Exception as e:
        print(f"An error occurred: {e}")
    finally:
        # Ensuring the video reader is properly closed
        if 'vid' in locals():
            vid.close()


# Calling the custom function
extract_frames_imageio("sample.mp4", "frames")
Output
This approach is straightforward when you are working with images and videos simultaneously. It can handle a variety of video formats. It relies on FFmpeg for specific formats.
The time complexity is O(N), where N is the number of frames, and the space complexity is O(1).
Time measurement for executing each approach
I ran an experiment to determine the time taken by each method, and I am not surprised to find out which is the fastest and which is the slowest.
Here is the bar chart below explaining this:
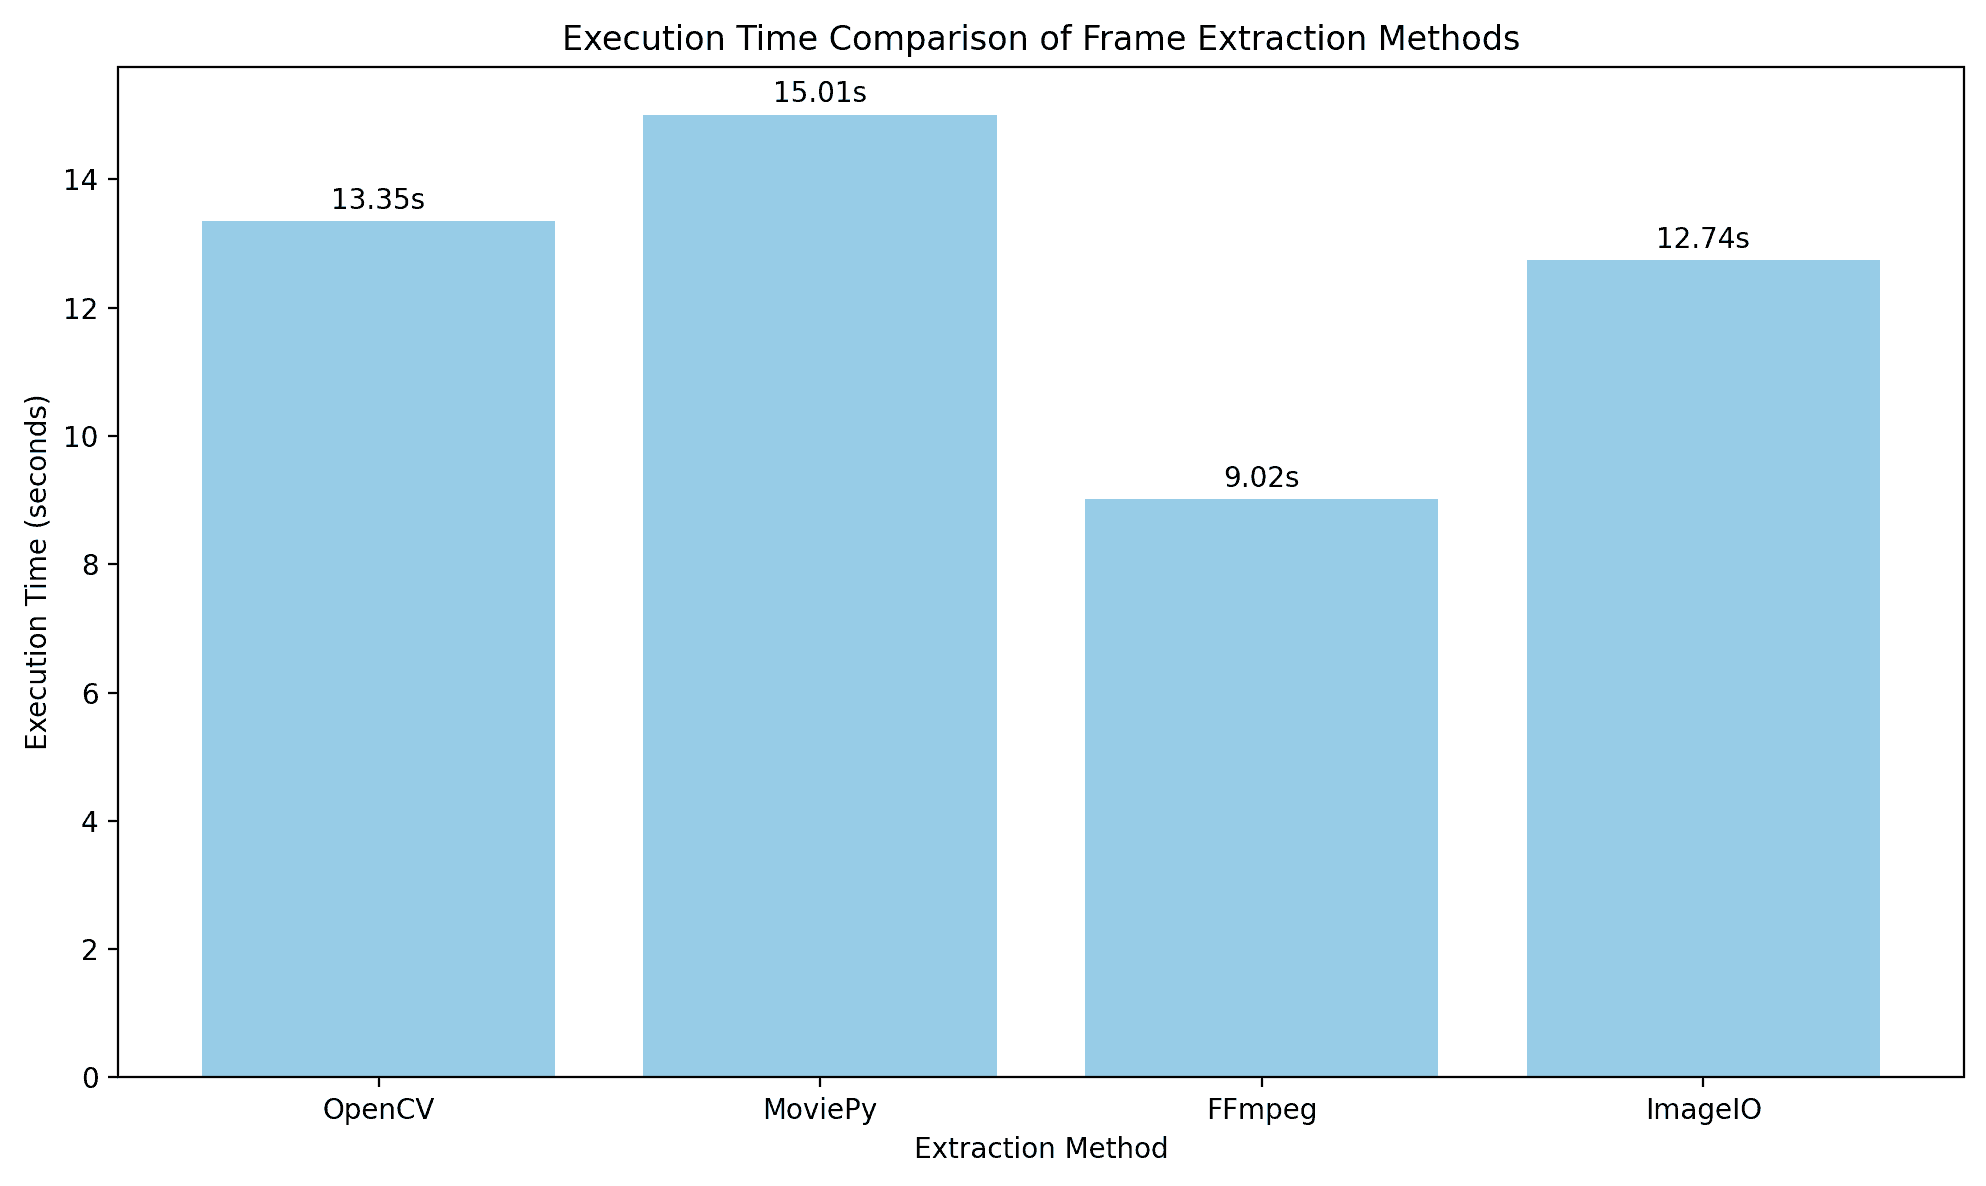
From the above bar chart, you can see that the fastest approach is FFmpeg with 9.02s, and the slowest approach is moviepy with 15.01s.