
To use Elasticsearch in Laravel, use the “Elasticquent” package. Elasticquent makes working with Elasticsearch and Eloquent models easier by mapping them to Elasticsearch types.
You can use the default settings or define how Elasticsearch should index and search your Eloquent models right in the model. The Elasticquent allows you to take an Eloquent model and quickly index and search its contents in Elasticsearch.
Here are the steps to integrate elasticsearch in Laravel:
Step 1: Install Elasticsearch on Mac.
You need this step if you have not previously installed Elasticsearch on the Mac. Otherwise, you can skip this step. Instead, type the following cmd in your terminal to install Elasticsearch via homebrew.
brew install elasticsearchIt will install it and now start the services using the following command.
brew services start elasticsearch Step 2: Set up Laravel and Elasticsearch env.
Install Laravel by the following command.
laravel new elasticlaravelGo into the project folder.
cd elasticlaravelOpen the project in your editor.
code .Configure the database inside the .env file.
Add the following line inside the composer.json file. We are installing the Elasticquent package.
"require": {
        "elasticquent/elasticquent": "dev-master"
},
Type the following command to install the elasticquent package.
composer update
Once you’ve run a composer update command, register the Laravel service provider in your config/app.php file.
// config/app.php

'providers' => [
    ...
    Elasticquent\ElasticquentServiceProvider::class,
],
We also provide a facade for an elasticsearch-php client (connected using our settings); if necessary, add the following to your config/app.php.
// config/app.php

'aliases' => [
    ...
    'Es' => Elasticquent\ElasticquentElasticsearchFacade::class,
],
Elasticsearch Configuration
Type the following Artisan command to publish the configuration file into your config directory for Laravel.
php artisan vendor:publish --provider="Elasticquent\ElasticquentServiceProvider"Now go to the config file at app >> config >> elastiquent.php
We need to add the index name for our application. So let us change from default to articles.
<?php

// elastiquent.php

return array(

    /*
    |--------------------------------------------------------------------------
    | Custom Elasticsearch Client Configuration
    |--------------------------------------------------------------------------
    |
    | This array will be passed to the Elasticsearch client.
    | See configuration options here:
    |
    | http://www.elasticsearch.org/guide/en/elasticsearch/client/php-api/current/_configuration.html
    */

    'config' => [
        'hosts'     => ['localhost:9200'],
        'retries'   => 1,
    ],

    /*
    |--------------------------------------------------------------------------
    | Default Index Name
    |--------------------------------------------------------------------------
    |
    | This is the index name that Elasticquent will use for all
    | Elasticquent models.
    */

    'default_index' => 'articles',

);
Step 3: Create an Article model and migration.
We will search the articles using elasticsearch. For example, to create a model and migration using the following command.
php artisan make:model Article -mAdd the schema code in your <DATETIME>_create_articles_table.php file.
// create_articles_table.php

public function up()
{
   Schema::create('articles', function (Blueprint $table) {
       $table->increments('id');
       $table->string('title');
       $table->text('body');
       $table->string('tags');
       $table->timestamps();
   });
}
Migrate the table using the following command.
php artisan migrateStep 4: Create the dummy data.
Create an ArticleTableSeeder using the following command.
php artisan make:seeder ArticleTableSeederFor generating fake data, we use the Faker library. However, before that, we must add the protected $fillable fields inside the Article.php file to prevent the mass assignment exception.
// Article.php

class Article extends Model
{
    protected $fillable = ['title', 'body', 'tags'];
}
Add the following code inside the ArticleTableSeeder.php file.
<?php

// ArticleTableSeeder.php

use Illuminate\Database\Seeder;
use App\Article;

class ArticleTableSeeder extends Seeder
{
    /**
     * Run the database seeds.
     *
     * @return void
     */
    public function run()
    {
        $faker = Faker\Factory::create();

        for($i=0; $i<50; $i++) {
          Article::create([
            'title' => $faker->sentence(3),
            'body' => $faker->paragraph(6),
            'tags' => join(',', $faker->words(4))
          ]);
        }
    }
}
Add the ArticleTableSeeder class inside the DatabaseSeeder.php file located in the same directory.
<?php

// DatabaseSeeder.php

use Illuminate\Database\Seeder;

class DatabaseSeeder extends Seeder
{
    /**
     * Seed the application's database.
     *
     * @return void
     */
    public function run()
    {
        $this->call(ArticleTableSeeder::class);
    }
}
Now run the seeder and create the fake data using the following command.
php artisan db:seed
Step 5: Set up Elastiquent inside the Article model.
Write the following code inside the Article.php file.
<?php

// Article.php

namespace App;
use Elasticquent\ElasticquentTrait;

use Illuminate\Database\Eloquent\Model;

class Article extends Model
{
    use ElasticquentTrait;

    protected $fillable = ['title', 'body', 'tags'];

    protected $mappingProperties = array(
        'title' => [
          'type' => 'text',
          "analyzer" => "standard",
        ],
        'body' => [
          'type' => 'text',
          "analyzer" => "standard",
        ],
        'tags' => [
          'type' => 'text',
          "analyzer" => "standard",
        ],
      );
}
Write the following code inside the web.php file. Remember, I have written the following code inside the web.php file, but in a real-time scenario, you need to write this inside the controller or any other logical part of your app except the web.php file.
Indexing Documents
To index all the entries in an Eloquent model, use. addAllToIndex:
Article::addAllToIndex();
You can also index a collection of models:
    $articles = Article::where('id', '<', 200)->get();
    $articles->addToIndex();
You can index individual entries as well:
    $articles = Article::find($id);
    $articles->addToIndex();
You can also reindex an entire model:
Article::reindex()
We index the whole model to write the indexing code inside the root route.
<?php

// web.php

use App\Article;

Route::get('/', function () {
    Article::createIndex($shards = null, $replicas = null);

    Article::putMapping($ignoreConflicts = true);

    Article::addAllToIndex();

    return view('welcome');
});
Here, we have created the index. The name of the index is already defined inside the config >> elastiquent.php file.
Then we have put the mapping, defined in the Article.php model, and add that to the indexing.
Go to the browser and hit this URL: http://elasticlaravel.test/
You will get the welcome page, but our data is entirely indexed, and we can verify that by sending the following request using cURL. We can also use the postman, but I am sending the request via the terminal.
curl 'localhost:9200/articles/_mapping?pretty'
We can do a basic search using the following command.
curl 'localhost:9200/articles/articles/_search?q=title:Sed&pretty'Here, our search term for the title is Sed. So it will fetch the records that have Sed term. We can see the prettified results inside a terminal.

Step 6: Search using Laravel eloquent methods.
We have used cURL to search the data. Now, we will use the Elastiquent method to search the data. So let us create another route inside the web.php file and add the following code.
<?php

// Article.php

use App\Article;

Route::get('/', function () {
    Article::createIndex($shards = null, $replicas = null);

    Article::putMapping($ignoreConflicts = true);

    Article::addAllToIndex();

    return view('welcome');
});

Route::get('/search', function() {

    $articles = Article::searchByQuery(['match' => ['title' => 'Sed']]);

    return $articles;
});
I have passed the ‘Sed’ hardcoded, but it will be our search term typed inside the search box in a real-time application. Now, switch to this URL: http://elasticlaravel.test/search. You can see the JSON response like this.
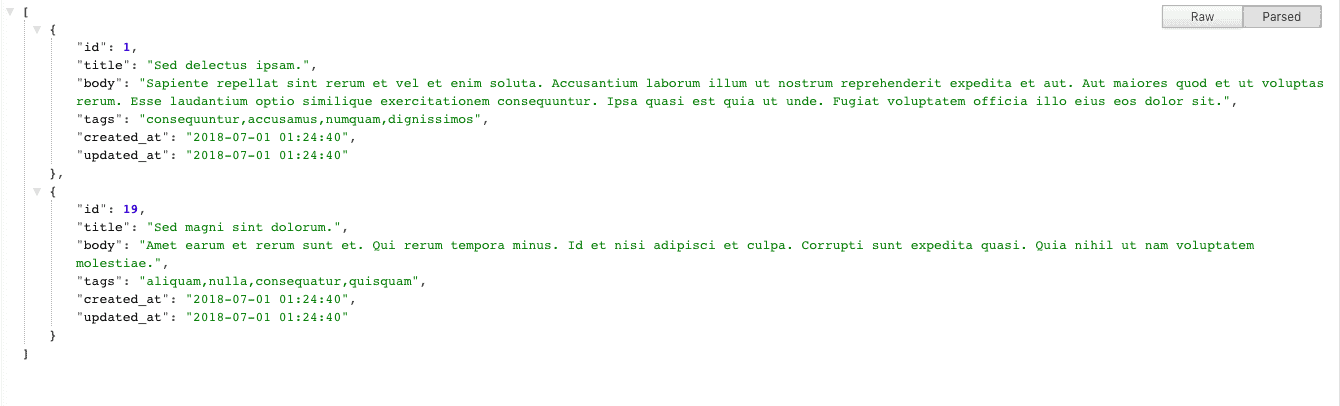
You might get different data because it is randomly generated. So first, check the database, pick the term, and then pass it to the search engine. It will return something like this: We have successfully indexed the data and fetched the data from the elasticsearch engine.
In this example, we have searched for the title, and you can also go for the body and tags.
$articles = Article::searchByQuery(['match' => ['body' => 'eligendi']]);

return $articles;
You can do the same for the tags as well.
Search collections
We can get the total hits to count using the following code.
$articles = Article::searchByQuery(['match' => ['title' => 'Heleium']]);

 return $articles->totalHits();
Access the shards array:
$articles->shards();
Access the max score:
$articles->maxScore();
Access the timed-out boolean property:
$articles->timedOut();
Access the taken property:
$articles->took();
Access search aggregations – See Aggregations for details:
$articles->getAggregations();
Chunking results from Elastiquent.
You can use the chunk() function to get the results in chunks.
$articles = Article::searchByQuery(['match' => ['title' => 'Similique']]);

return $articles->chunk(2);
That’s it for this tutorial.
Related posts

Amit K Sharma
Why default_index required and what is the use of it, as I am confused little.
Inna Tarasyan
Thanks, Great job
Gabriel Lacerda
For the beginners, this is the best tutorial in my opinion
jeff
Thanks, @Krunal for such amazing tutorials. I’ve been following this website and I can undoubtedly say its been helpful to me.
I’m trying to work on a website with multi-search form, where a user is prompted/can search multiple columns, I’ll really appreciate if you make a tutorial on that. Thank you.
E.g. User can search say a real estate website, location + cost
jeff ngugi
Thanks, @Krunal for such amazing tutorials. I’ve been following this website and I can undoubtedly say its been helpful to me.
I’m trying to work on a website with multi-search form, where a user is prompted/can search multiple columns, I’ll really appreciate if you make a tutorial on that. Thank you.
E.g. User can search say a real estate website, location + cost.
Vivek
It’s really awesome. Need one more help How can we search with multiple fields. In this example we can match only one field i.e.
$articles = Article::searchByQuery([‘match’ => [‘title’ => ‘Test’]]); but i want to match title as well as body and tag. How can i set route Or any other idea ? Please suggest.
Mosam
It is very useful for beginner.
vikram
HI ,i am getting below error.
“message”: “No alive nodes found in your cluster”,
“exception”: “Elasticsearch\Common\Exceptions\NoNodesAvailableException
Issac
Hello Vikram, could you resolve this problem?
Othmane
Thx very good tutorial, but the query
Article::search(‘Quis’);
Is giving me nothing :s
srikanth kudikala
Can we do search on relationships
Vahid
Hi, I can’t use this tutorial for two or three models, how use for several models?!
I want to run: Video::addAllToIndex();, Article::addAllToIndex();, Course::addAllToIndex(); and ..
Max Kale
{“error”:{“root_cause”:[{“type”:”mapper_parsing_exception”,”reason”:”Root mapping definition has unsupported parameters: [articles : {_source={enabled=true}, properties={title={analyzer=standard, type=text}, body={analyzer=standard, type=text}, tags={analyzer=standard, type=text}}}]”}],”type”:”mapper_parsing_exception”,”reason”:”Failed to parse mapping [_doc]: Root mapping definition has unsupported parameters: [articles : {_source={enabled=true}, properties={title={analyzer=standard, type=text}, body={analyzer=standard, type=text}, tags={analyzer=standard, type=text}}}]”,”caused_by”:{“type”:”mapper_parsing_exception”,”reason”:”Root mapping definition has unsupported parameters: [articles : {_source={enabled=true}, properties={title={analyzer=standard, type=text}, body={analyzer=standard, type=text}, tags={analyzer=standard, type=text}}}]”}},”status”:400}
Max Kale
Hi i have getting these error
{“error”:{“root_cause”:[{“type”:”mapper_parsing_exception”,”reason”:”Root mapping definition has unsupported parameters: [articles : {_source={enabled=true}, properties={title={analyzer=standard, type=text}, body={analyzer=standard, type=text}, tags={analyzer=standard, type=text}}}]”}],”type”:”mapper_parsing_exception”,”reason”:”Failed to parse mapping [_doc]: Root mapping definition has unsupported parameters: [articles : {_source={enabled=true}, properties={title={analyzer=standard, type=text}, body={analyzer=standard, type=text}, tags={analyzer=standard, type=text}}}]”,”caused_by”:{“type”:”mapper_parsing_exception”,”reason”:”Root mapping definition has unsupported parameters: [articles : {_source={enabled=true}, properties={title={analyzer=standard, type=text}, body={analyzer=standard, type=text}, tags={analyzer=standard, type=text}}}]”}},”status”:400}
Mithilesh Kumar Jha
I am getting this error
Using Laravel version : 5.8.3
Elastic – 7
{“error”:{“root_cause”:[{“type”:”mapper_parsing_exception”,”reason”:”Root mapping definition has unsupported parameters: [articles : {_source={enabled=true}, properties={title={analyzer=standard, type=text}, body={analyzer=standard, type=text}, tags={analyzer=standard, type=text}}}]”}],”type”:”mapper_parsing_exception”,”reason”:”Failed to parse mapping [_doc]: Root mapping definition has unsupported parameters: [articles : {_source={enabled=true}, properties={title={analyzer=standard, type=text}, body={analyzer=standard, type=text}, tags={analyzer=standard, type=text}}}]”,”caused_by”:{“type”:”mapper_parsing_exception”,”reason”:”Root mapping definition has unsupported parameters: [articles : {_source={enabled=true}, properties={title={analyzer=standard, type=text}, body={analyzer=standard, type=text}, tags={analyzer=standard, type=text}}}]”}},”status”:400}
Mithilesh Kumar Jha
Getting same error what Max Kales says
dorskie
same error using laravel version 5.7 and elasticsearch version 7.5.1
egot
Everything is very open with a precise description of the challenges.
It was truly informative. Your site is very useful.
Many thanks for sharing!
cloude
I get this error:
Elasticsearch\Common\Exceptions\NoNodesAvailableException
No alive nodes found in your cluster
how can I fix it? thanks!