
To connect the React Native app to Laravel, use the “fetch()” API.
React Native application works on the front end, and Laravel API works on the back end.
To bridge the gap, we use the “fetch()” function to send a network request from the React Native application to Laravel’s API server, get the response, and show that response in the app.
Here is the step-by-step guide:
Step 1: Install the React Native app
Hit the following command on the terminal.
sudo npm install -g react-native-cliGo to the directory where you need to generate the project.
react-native init RNLaravel

cd RNLaravel
Now, run the project by typing the following command.
react-native run-iosAfter some compilation, the react package manager will be opened on the terminal, and the iOS device will be opened with a screen like the one below.

Step 2: Create the required directories.
At the root of the project, make one directory called src. In that directory, create three folders.
- screens
- components
- services
The screens folder contains the screens we need to display to the User. In our case, we will create two screens.
The components folder contains the mobile components we will use to display the data from the API.
The services folder contains network files. It is the files in which we will write the code to make a request to the server and get the response from the server.
Step 3: Create two screens
Inside the src >> screens folder, create the following files.
- Home.js
- Coin.js
Home.js is the pure React Native class.
// Home.js

import React, { Component } from 'react';
import { View, Text } from 'react-native';

export class Home extends Component {
  render() {
    return (
      <View>
        <Text>Home Screen</Text>
      </View>
    )
  }
}

export default Home;
The same goes for the Coin.js file.
// Coin.js

import React, { Component } from 'react';
import { View, Text } from 'react-native';

export class Coin extends Component {
  render() {
    return (
      <View>
        <Text>Coin Screen</Text>
      </View>
    )
  }
}

export default Coin;
Step 4: Integrate React Native Navigation
We must install the React Navigation library to transition the app from one screen to another.
yarn add react-navigation
Now, after installing, go to the App.js file. We will use StackNavigator to transit from one screen to another. It is routing for our application.
// App.js

import React, { Component } from 'react';
import {
  Platform,
  StyleSheet,
  Text,
  View
} from 'react-native';
import { StackNavigator } from 'react-navigation';
import Home from './src/screens/Home';
import Coin from './src/screens/Coin';

const AppNavigator = StackNavigator({
  HomeScreen: { screen: Home },
  CoinScreen: { screen: Coin }
});

export default class App extends Component {
  render() {
    return (
      <AppNavigator />
    );
  }
}
We have included the screen here and passed it into the StackNavigator function, which will handle the transition of our screens.
Step 5: Create Laravel Backend API
Install Laravel 5.6 with the following command.
composer create-project laravel/laravel --prefer-dist RNativeLaravelAfter installing Laravel, configure the .env file. Enter your database credentials.
I am using MAMP, so mine is the following. If you are using XAMPP, your password should be empty; if you are AMPPS, your password should be MySQL.
Of course, I have already created the database using phpMyAdmin.
DB_CONNECTION=mysql
DB_HOST=127.0.0.1
DB_PORT=8889
DB_DATABASE=reactnative
DB_USERNAME=root
DB_PASSWORD=root
We are merely building an application in which we need to send the data to the client in JSON format; in our case, it’s react native.
We are sending the crypto coins JSON object containing main fields like coin name and price. So, let us create the migration, model, and controller file for our Laravel application.
Create the migration, model, and controller file.
Go to your Laravel root and hit the following command.
php artisan make:model Coin -mIt will create both Migration and Model files.
In the migration file, add the following code.
// create_coins_table

   /**
     * Run the migrations.
     *
     * @return void
     */
    public function up()
    {
        Schema::create('coins', function (Blueprint $table) {
            $table->increments('id');
            $table->string('name');
            $table->integer('price');
            $table->timestamps();
        });
    }
Type the following command to migrate this schema into the database. So, three tables will be created.
php artisan migrateNow, create the controller file using the following command.
php artisan make:controller CoinControllerCode the index function inside that file.
// CoinController.php

<?php

namespace App\Http\Controllers;

use Illuminate\Http\Request;
use App\Coin;

class CoinController extends Controller
{
    public function index()
    {
        $coins = Coin::all();

        return response()->json($coins);
    }
}
The above code fetches all the data as a collection and returns an array of coins as a json response.
Right now, we do not have any coins in the database.
So, for this example, we need to fill it out manually because we are not writing any screen that can store the details of the coins.
You need to fill that out manually. Later in this blog, I will write a complete CRUD application.

I inserted only two values, as this is a basic showcase tutorial.
We have already written the code to fetch this data from the database and return it as a JSON response.
Write the routes in the api.php file.
Go to the routes >> api.php file and add the following route.
// web.php

Route::get('coins', 'CoinController@index');
Start the Laravel development server with the following command.
php artisan serve
It will open the server at port 8000.
You can access our Laravel API at this route: http://localhost:8000/api/coins.
Step 6: Use the fetch API of React Native to send the network request.
We need to display the coin data on the Coin screen. We have created a folder called services. So, we will create a file called FetchCoins.js in that folder.
Write the following code in it.
// FetchCoins.js

const URI = 'http://localhost:8000';

export default {
    async fetchCoins() {
        try {
                let response = await fetch(URI + '/api/coins');
                let responseJsonData = await response.json();
                return responseJsonData;
            }
        catch(e) {
            console.log(e)
        }
    }
}
We have used fetch API by React Native to send network requests like GET and POST.
We have also used the ES7 async/await feature, which is helpful in Asynchronous tasks.
Now, we will import the FetchCoins.js file inside the Coin.js file. I am writing the whole file.
// Coin.js

import React, { Component } from 'react';
import { View, Text, StyleSheet } from 'react-native';
import ajax from '../services/FetchCoins';
import CoinList from '../components/CoinList';

const styles = StyleSheet.create({
  container: {
    flex: 1,
    justifyContent: 'center',
    backgroundColor: '#B6A6BB',
  }
})

export class Coin extends Component {

  state = {
    coins: []
  }

  async componentDidMount() {
    const coins = await ajax.fetchCoins();
    this.setState({coins});
  }

  render() {
    return (
      <View style={styles.container}>
      {
        this.state.coins.length > 0
        ? <CoinList coins={this.state.coins} />
        : <Text>No coins</Text>
      }
      </View>
    )
  }
}

export default Coin;
In this file, I first used the componentDidMount lifecycle method to fetch the data from the server.
We are using async/await for the network request.
So, I have written the async componentDidMount method. After fetching the data, I change the state of coins with the filled array data and pass that array to the new component, a CoinList.js file.
We must create that component, so let’s create it inside the src >> components folder.
// CoinList.js

import React, { Component } from 'react';
import {  View, Text, StyleSheet} from 'react-native';
import PropTypes from 'prop-types';

export default class CoinList extends Component {

  static propTypes = {
      coins: PropTypes.array.isRequired
  };
  render() {
    return (
      <View style={styles.coinsList}>
        {this.props.coins.map((coin) => {
            return (
                <View key={coin.id}>
                    <Text style={styles.cointext}>{coin.name} | { coin.price }</Text>
                </View>
            )
        })}
      </View>
    );
  }
}

const styles = StyleSheet.create({
    coinsList: {
        flex: 1,
        flexDirection: 'column',
        justifyContent: 'space-around',
    },
    cointext: {
        fontSize: 24,
        fontWeight: 'bold',
        textAlign: 'center',
    }
});
The CoinList.js file receives the data as a component. So, I used the map function to display the data in formatted text.
If you have worked with React.js before, the design style is probably familiar. But, of course, it differs from React.js web components. So, now, reload our application.
You will see something like the below screen.
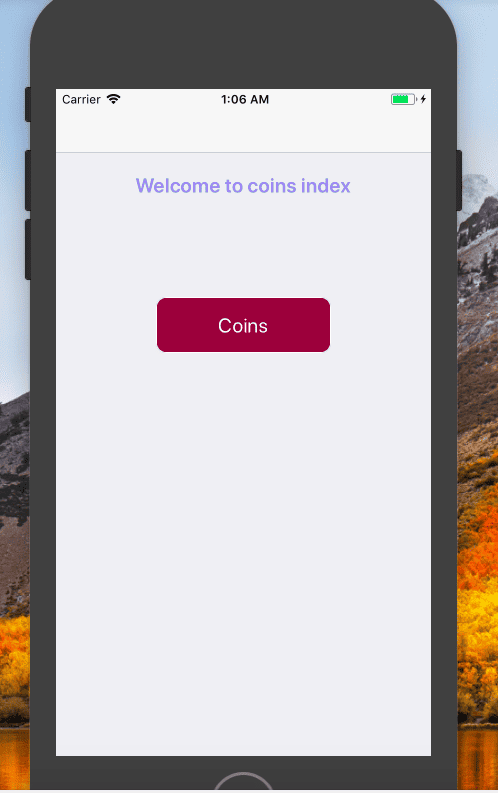
Now press the Coins button. You will see the screen with our two coins data.

This is how you can perform a network request in the React Native mobile application. It is a simple example of Fetch React Native API.
That’s it.

How To Connect React Native Application With Laravel API Tutorial - ReactJS News
[…] How To Connect React Native Application With Laravel API Tutorial […]
Jephte
Hi Krunal, Thank you on your tutorial. Just one thing, I received this error message “TypeError: ‘undefined’ is not an object (evaluating ‘this.state.coins.length’)”. I were able to display the JSON of table Coins in the browser but not able to receive them in React Native.
Krunal
I guess you did not receive the coins from the Laravel server. Check your URL to send a network request.
Sankalp
no it sill showing an error please suggest proper solution
Krunal
Please show me your error here!!
Sankalp
Like you said earlier it seems like I cant receive the coins from laravel server ,the underlying problem is that network request failed on fetch written in fetchCoin.js. I tried many solutions available on the net: changing the url to your Ip , app even has permissions to access internet but nothing seems to work. All the solutions on the net are for ios. Json table gets displayed on browser but on the app. please help
vasant
i need help for laravel code
public function updatemultipleorders()
{
$postdata = file_get_contents(“php://input”);
$request = json_decode($postdata);
$id = explode(“&”,$request->id);
$customer =explode(‘&’,$request->customer);
$service =explode(‘&’,$request->service);
$date =explode(‘&’,$request->date);
$cost =explode(‘&’,$request->cost);
$to =explode(‘&’,$request->to);
$from=explode(‘&’,$request->from);
foreach($service as $key=>$b)
{
$id1=trim($id[$key], ‘[{“”}]’);
$id2=str_replace(‘id=’, ”,$id1);
$cost1=trim($cost[$key], ‘[{“”}]’);
$cost2=str_replace(‘cost=’, ”,$cost1);
$cost3=floatval($cost2);
$customer1=trim($customer[$key], ‘[{“”}]’);
$customer2=str_replace(‘customer=’, ”,$customer1);
$date1=trim($date[$key], ‘[{“”}]’);
$date2=str_replace(‘date=’, ”,$date1);
$dbfrom=$this->fromtime1($date2);
$dbto=$this->totime1($date2);
$dbto4= strtotime($dbto);
$dbto5 = date(‘Y-m-d H:i:s’, $dbto4);
$dbfrom4= strtotime($dbfrom);
$dbfrom5 = date(‘Y-m-d H:i:s’, $dbfrom4);
$date3 = date(‘Y-m-d’,$date2);
$service1=trim($service[$key], ‘[{“”}]’);
$service2=str_replace(‘service=’, ”,$service1);
$to1=trim($to[$key], ‘[{“”}]’);
$to2=str_replace(‘to=’, ”,$to1);
$to3=str_replace(‘%3A’,’:’,$to2);
$from1=trim($from[$key], ‘[{“”}]’);
$from2=str_replace(‘from=’, ”,$from1);
$from3=str_replace(‘%3A’,’:’,$from2);
$from4= strtotime($from3);
$from5 = date(‘Y-m-d H:i:s’, $from4);
$to4= strtotime($to3);
$to5 = date(‘Y-m-d H:i:s’, $to4);
if($to5$to5)
{
}
else if($from5===$to5)
{
}
else if($to5===$from5)
{
}
else
{
$sql =’select * from booked_slots where start_time”‘.$from5.'”‘;
//
$query = $this->db->query($sql);
if($query->num_rows()==0){
$this->db->query(“UPDATE booked_slots
SET start_time='”.$from5.”‘,end_time='”.$to5.”‘,service='”.$service2.”‘ ,cost='”.$cost2.”‘ WHERE id = ‘”.$id2.”‘”);
}
}
}
}
// }
Abdel
Hi Krunal thanks for your tutorial!
When I try to access API endpoint I get network request failed error!!
Marcello
Hi Krunal, I am using your article to get my head around React Native and Laravel forthe first time. I am using MAMP on Mac. Should RNLaravel be placed in MAMP/htdocs/RNLaravele or MAMP/RNLaravel?
Also should I place my project folders in MAMP/htdocs/coins/src or MAMP/htdocs/RNLaravel/coins/src?
Thanks!
Krunal
It should be placed inside MAMP/htdocs/RNLaravel, or you can put wherever you want, does not matter, you can use laravel’s dev server by typing: php artisan serve in the root of your laravel project.
Rathavithey
Hii Krunal Says,
Can you help me after i run react native, the result show ‘No Coins’, but for url is show data,
can you help me to check ?
Rathavithey
Hii,
For url = http://localhost:8000
had you test it with React Native can support with api url in localhost ?
diego
Hi, I have an issue with my Laravel backend. When I send a request since my React Native app I have alwayes the response 401. I create a post in stackoverflow for my issue : https://stackoverflow.com/questions/54431720/how-add-in-the-header-the-authorization-for-method-fetch-in-react-native-backe
Kash
how should the phpMyAdmin database be setup?
LeV
I am using expo from my android phone, and I can’t show the data from my laravel database in my react native expo app even I already run the laravel using my PC Ip address but I still cant show the data to my expo app… please someone give me clue to this! Thank you
maturegamerpodcast
Thanks for any other informative website. Where else could I am getting that type of info written in such a
perfect manner? I’ve a mission that I’m simply now operating on, and I’ve been at the look out for such
information.
Bakari
Hello Krunal I am getting this error
×
TypeError: Object(…) is not a function
In App.js: 9
6 | import Home from “./src/screens/Home”;
7 | import Coin from “./src/screens/Coin”;
8 |
> 9 | const AppNavigator = StackNavigator({
10 | HomeScreen: { screen: Home },
11 | CoinScreen: { screen: Coin },
12 | });