Introduction
Typical web development projects have two main parts: Frontend development and Backend development.
The frontend development includes a client-side project that can be a web or mobile application. This client-side application needs to communicate with the backend application via HTTP request. That means you can send an HTTP GET, POST, PUT, or DELETE request to the server and expect a proper response.
If you work on a frontend web application, especially in React.js, you might need to send an HTTP request at some point, and that’s where the Axios library comes into play!
What is axios?
Axios is a promise-based HTTP client for a browser or node.js. Our application is browser-based, so it uses XMLHttpRequest.
To make Axios easier, you can use the async-await mechanism to make code more readable and understandable.
Axios provides a mechanism to intercept, transform, or cancel the request and get the response data.
Prerequisites
To follow this tutorial, you will have the following things installed on your machine:
- Node.js: Install whatever latest version is in your system right now.
- Vite: To create a new React.js project, I will use Vite frontend tooling.
- VSCode: It is better to use Visual Studio Code since it is a global standard for editors.
Here is a step-by-step guide for integrating Axios into React.js and sending HTTP GET and POST requests to the server.
Step 1: Install React.js
To create a simple React.js boilerplate, we will use Vite’s React template.
Type the below command:
npm create vite@latest axios-app -- --template react
Go inside the project as instructed in the above image:
cd axios-app
Install the dependencies using this command:
npm install
To start a development server with HMR, use this command:
npm run dev
Go to the browser and navigate to this URL: http://localhost:5173/
Step 2: Installing Axios
You can install the axios using this command:
npm install axios --save
Step 3: Making a GET request
The GET request is used to fetch the data from the server. You will have an API endpoint to which you will send a GET request, and it will respond to data in a json format, which you will then display on the front end.
If you open our React.js project on the editor, you will see the “src” folder; inside, you will see an main.jsx file:
Update your src/main.jsx file with the below code:
import React from 'react'
import ReactDOM from 'react-dom/client'
import App from './App.jsx'

ReactDOM.createRoot(document.getElementById('root')).render(
  <React.StrictMode>
    <App />
  </React.StrictMode>,
)
Now, if you look at the src folder, there is an App.jsx file, our main application file.
Replace the below code with the existing code in the App.jsx file:
import axios from "axios";
import React, {useState, useEffect} from "react";

const baseURL = "https://jsonplaceholder.typicode.com/todos";

export default function App() {
  const [todos, setTodos] = useState([]);

  useEffect(() => {
    axios.get(baseURL).then((response) => {
      setTodos(response.data);
    });
  }, []);

  if (todos.length === 0) return <p>Loading...</p>;

  return (
    <div>
      <h1>Todo List</h1>
      <ul>
        {todos.map(todo => (
          <li key={todo.id}>
            <input type="checkbox" checked={todo.completed} readOnly />
            {todo.title}
          </li>
        ))}
      </ul>
    </div>
  );
}
Save this file, go to the browser, and you will see this output:
In this code, we first imported two libraries: React and Axios.
Inside a functional component App, we initialized a state variable todos using the useState() hook.
When the component App mounts, we use the useEffect() hook to send an Axios GET request to the jsonplaceholder API.
If the request is successful, we update the todos state variable with the updated data using the setTodos() function.
Finally, we return the JSX code to build the user interface in React.js. This JSX code effectively creates a static todo list where each element shows a checkbox suggesting completion status and a title describing the task.
Step 4: Making a POST request
HTTP POST requests are helpful when you need to create or store data on a user-provided server.
According to the API, this must be performed on the /todos endpoint.
To add an element, use the axis.post() method.
Update your App.jsx code with the below code, and then we will understand what is happening:
import axios from "axios";
import React, { useState, useEffect } from "react";

const baseURL = "https://jsonplaceholder.typicode.com/todos";

export default function App() {
  const [todos, setTodos] = useState([]);
  const [loading, setLoading] = useState(true);  // Adding a loading state

  useEffect(() => {
    const fetchData = async () => {
      try {
        const response = await axios.get(baseURL);
        setTodos(response.data);
      } catch (error) {
        console.error('Failed to fetch data:', error);
      }
      setLoading(false);  // Set loading to false regardless of the outcome
    };
    fetchData();
  }, []);

  const createTodo = async () => {
    try {
      const newTodo = {
        userId: 1,
        id: 1000,
        title: "5th June Election",
        completed: true
      };
      const response = await axios.post(baseURL, newTodo);
      setTodos(prevTodos => [...prevTodos, response.data]);
    } catch (error) {
      console.error('Failed to create a todo
:', error);
    }
  }

  if (loading) return <p>Loading...</p>;  // Now it only shows when actually loading

  if (!todos.length) return <p>No todos found!</p>;  // Handle empty todo list

  return (
    <div>
      <h1>Todo List</h1>
      <button onClick={createTodo}>Create a Todo</button>
      <ul>
        {todos.map(todo => (
          <li key={todo.id}>
            <input type="checkbox" checked={todo.completed} readOnly />
            {todo.title}
          </li>
        ))}
      </ul>
    </div>
  );
}
When the App component mounts in this code, it executes the useEffect() hook, sends a GET request to the server, fetches the data, and displays it.
Then, we defined a createPost() function to send a POST request with the new data to the API endpoint.
After the POST request is successful, we will append new data to the previous data and update the todos state.
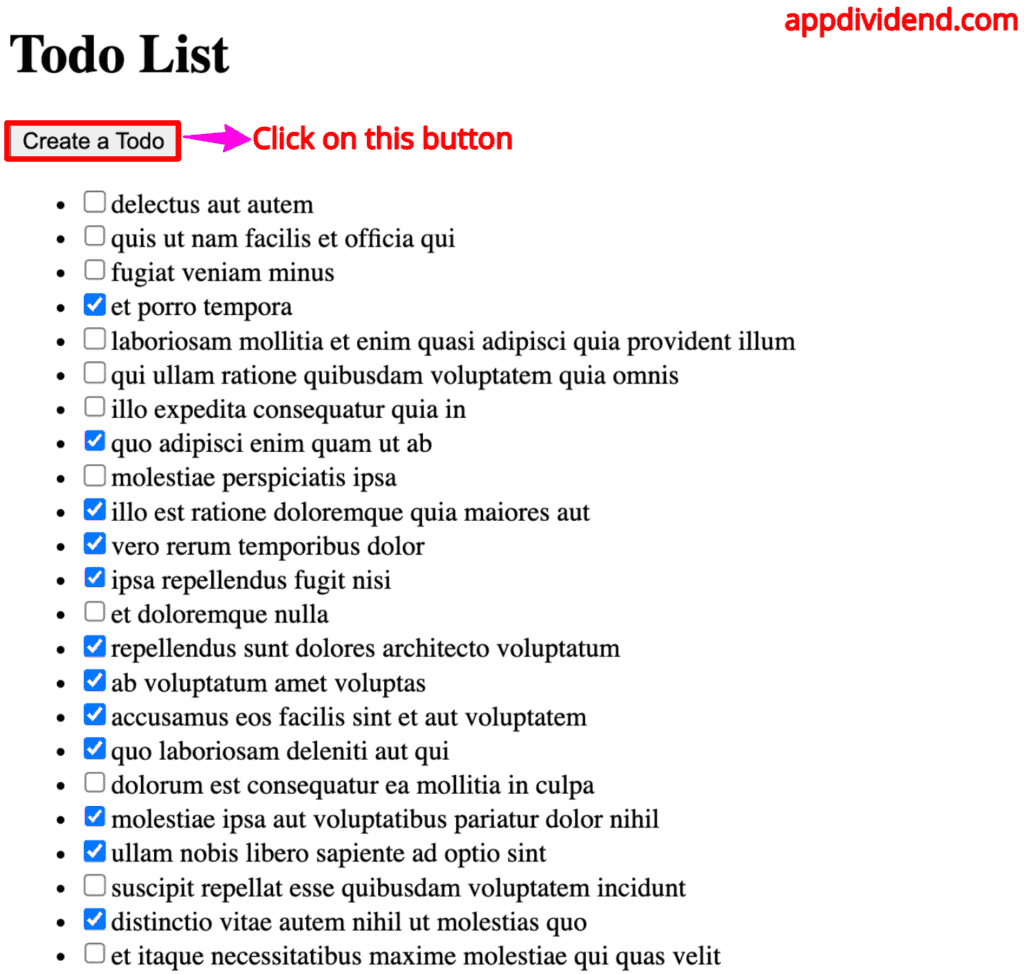
Save the file and go to the browser, and you will see a button like this:
Clicking the “Create a Todo” button will create a new todo in the list.
Step 5: Making a PUT request
You can update a specific todo item using a PUT request.
To update the specific item, use the axis.put() method.
Let’s update the 1st todo element. Update your App.jsx code with the below code:
import axios from "axios";
import React, { useState, useEffect } from "react";

const baseURL = "https://jsonplaceholder.typicode.com/todos";

export default function App() {
  const [todos, setTodos] = useState([]);
  const [loading, setLoading] = useState(true);  // Adding a loading state

  useEffect(() => {
    const fetchData = async () => {
      try {
        const response = await axios.get(`${baseURL}/1`);
        setTodos([response.data]);
      } catch (error) {
        console.error('Failed to fetch data:', error);
      }
      setLoading(false);
    };
    fetchData();
  }, []);

  const updateTodo = async () => {
    try {
      const newTodo = {
        userId: 1,
        id: 1000,
        title: "5th June Election",
        completed: true
      };
      const response = await axios.put(`${baseURL}/1`, newTodo);
      setTodos([response.data]);
    } catch (error) {
      console.error('Failed to update todo:', error);
    }
  }

  if (loading) return <p>Loading...</p>;

  if (!todos.length) return <p>No todos found!</p>;

  return (
    <div>
      <h1>Todo List</h1>
      <button onClick={updateTodo}>Update a Todo</button>
      <ul>
        {todos.map(todo => (
          <li key={todo.id}>
            <input type="checkbox" checked={todo.completed} readOnly />
            {todo.title}
          </li>
        ))}
      </ul>
    </div>
  );
}
In this code, we update a todo element whose ID is 1.
To update an element, we sent a PUT request to a specific URI, updated it with new data, and updated our UI with the new data.
We are also implementing a mechanism to handle the error if we fail to update the todo element.
Go to the browser, and you will see the “Update a todo” button like this:
If you click on the “Update a todo” button, you will see something like this:
Step 6: Making a DELETE request
You can use the “DELETE” request in axios to delete the specific resource from the server.
To delete a specific todo, use the axios.delete() method.
import axios from "axios";
import React, { useState, useEffect } from "react";

const baseURL = "https://jsonplaceholder.typicode.com/todos";

export default function App() {
  const [todos, setTodos] = useState([]);
  const [loading, setLoading] = useState(true);

  useEffect(() => {
    const fetchData = async () => {
      try {
        const response = await axios.get(`${baseURL}/1`);
        setTodos([response.data]);
      } catch (error) {
        console.error('Failed to fetch data:', error);
      }
      setLoading(false);
    };
    fetchData();
  }, []);

  const deleteTodo = async () => {
    try {
      await axios.delete(`${baseURL}/1`);
      setTodos([]);
    } catch (error) {
      console.error('Failed to delete a todo:', error);
    }
  }

  if (loading) return <p>Loading...</p>;

  if (!todos.length) return <p>No todos found!</p>;

  return (
    <div>
      <h1>Todo List</h1>
      <button onClick={deleteTodo}>Delete a Todo</button>
      <ul>
        {todos.map(todo => (
          <li key={todo.id}>
            <input type="checkbox" checked={todo.completed} readOnly />
            {todo.title}
          </li>
        ))}
      </ul>
    </div>
  );
}
In this code, we delete the first todo and update the state to an empty array.
If you click on the “Delete a Todo” button, you will see the below output.
Conclusion
The Axios library is the gold standard for sending an HTTP request to a server because it is widely used, has great community support, and has many useful features.
In this tutorial, we learned how to send a GET, POST, PUT, and DELETE request to API and how to handle the JSON response and errors.


kate spade iphone 8 plus case
This is my first time pay a visit at here and i am truly pleassant
to read all at alone place.
Brian
Thanks. A good help.
Cristiane Abreu
Thank you very much for this tutorial Krunal, I followed your instruction but I could not see the data on the mongo db on my Robo 3t, where can I see your repo so I can compare my code to your and see where I am doing the erros. Also I did not see axios db on the tutorial , just DB. Thank you very much
edwina
Im having this same issue
Musaddiq
Please also make your videos same as articals
James Gary
Another great tutorial! Thanks so much, Krunal!
jaidev
Pl correct the port no. for the get request in the above code, though it is correct on github.
Isaac
not working for me got errors
OPTIONS http://localhost:4000/usuario/registrar_usuario net::ERR_CONNECTION_REFUSED
Uncaught (in promise) Error: Network Error
max
Hi, first of all very thanks for the article, it is a good article for Full stack knowledge.
I recently tried your exercise but I apparently get the error when I try to do Post request for /add. I always hit the network error issue and my data never gets post. I tried several ways but I could not get a proper solutions Just trying to figure out if I missed anything on the backend.
It would be nice if you can shed some light on the issue. Below is the code i added in the createJS file for error handling and this is the place i always get network error.
.catch(err => {
console.log(err);
});
max
Hi Sorry but the issue is now fixed as I had forgot to start backenhttps://appdividend.com/2018/05/30/react-axios-tutorial-example-from-scratch/?bs-comment-added=1#respondd server.