
Checkboxes are standard components for gathering user input, especially when it involves multiple-choice questions, surveys, newsletter signups, etc.
Checkboxes simplify the collection of multiple values in a non-exclusive manner. Unlike the Radio button, checkboxes let users select multiple options independently.
In this article, we will handle single and multiple values of a checkbox and display them correctly in the DOM.
React’s state management capabilities make it specifically effective at handling checkboxes’ dynamic aspects, such as checking and unchecking, and responding to these changes.
Selecting single-value in checkboxes
A single-value checkbox means you will have multiple checkboxes, but you can only select one. The selected data will be sent to the server. In our case, we will display the selected data on the screen.
Here is the step-by-step guide to selecting single-value in the checkbox:
Step 1: Create a React.js project
You can create a new React project using Vite frontend tooling by the below command:
npm create vite@latest checkbox-app -- --template react
Go inside the project folder and install the dependencies:
cd checkbox-app

npm install
Now, install the Bootstrap 5 CSS Framework using this command:
npm install bootstrap --save
Start the development server using this command:
npm run dev
Step 2: Import Bootstrap CSS
Import the bootstrap.min.css file inside the src/main.jsx file:
import React from "react";
import ReactDOM from "react-dom/client";
import "bootstrap/dist/css/bootstrap.min.css";

import App from "./App";

ReactDOM.createRoot(document.getElementById("root")).render(
  <React.StrictMode>
    <App />
  </React.StrictMode>
);
Step 3: Create checkboxes
To add checkboxes, we need to add a form inside src/App.jsx file:
import { useState } from "react";
function App() {
const [selectedCategory, setSelectedCategory] = useState("");
const handleCheckboxChange = (category) => (e) => {
setSelectedCategory(e.target.checked ? category : "");
};
return (
<div className="container">
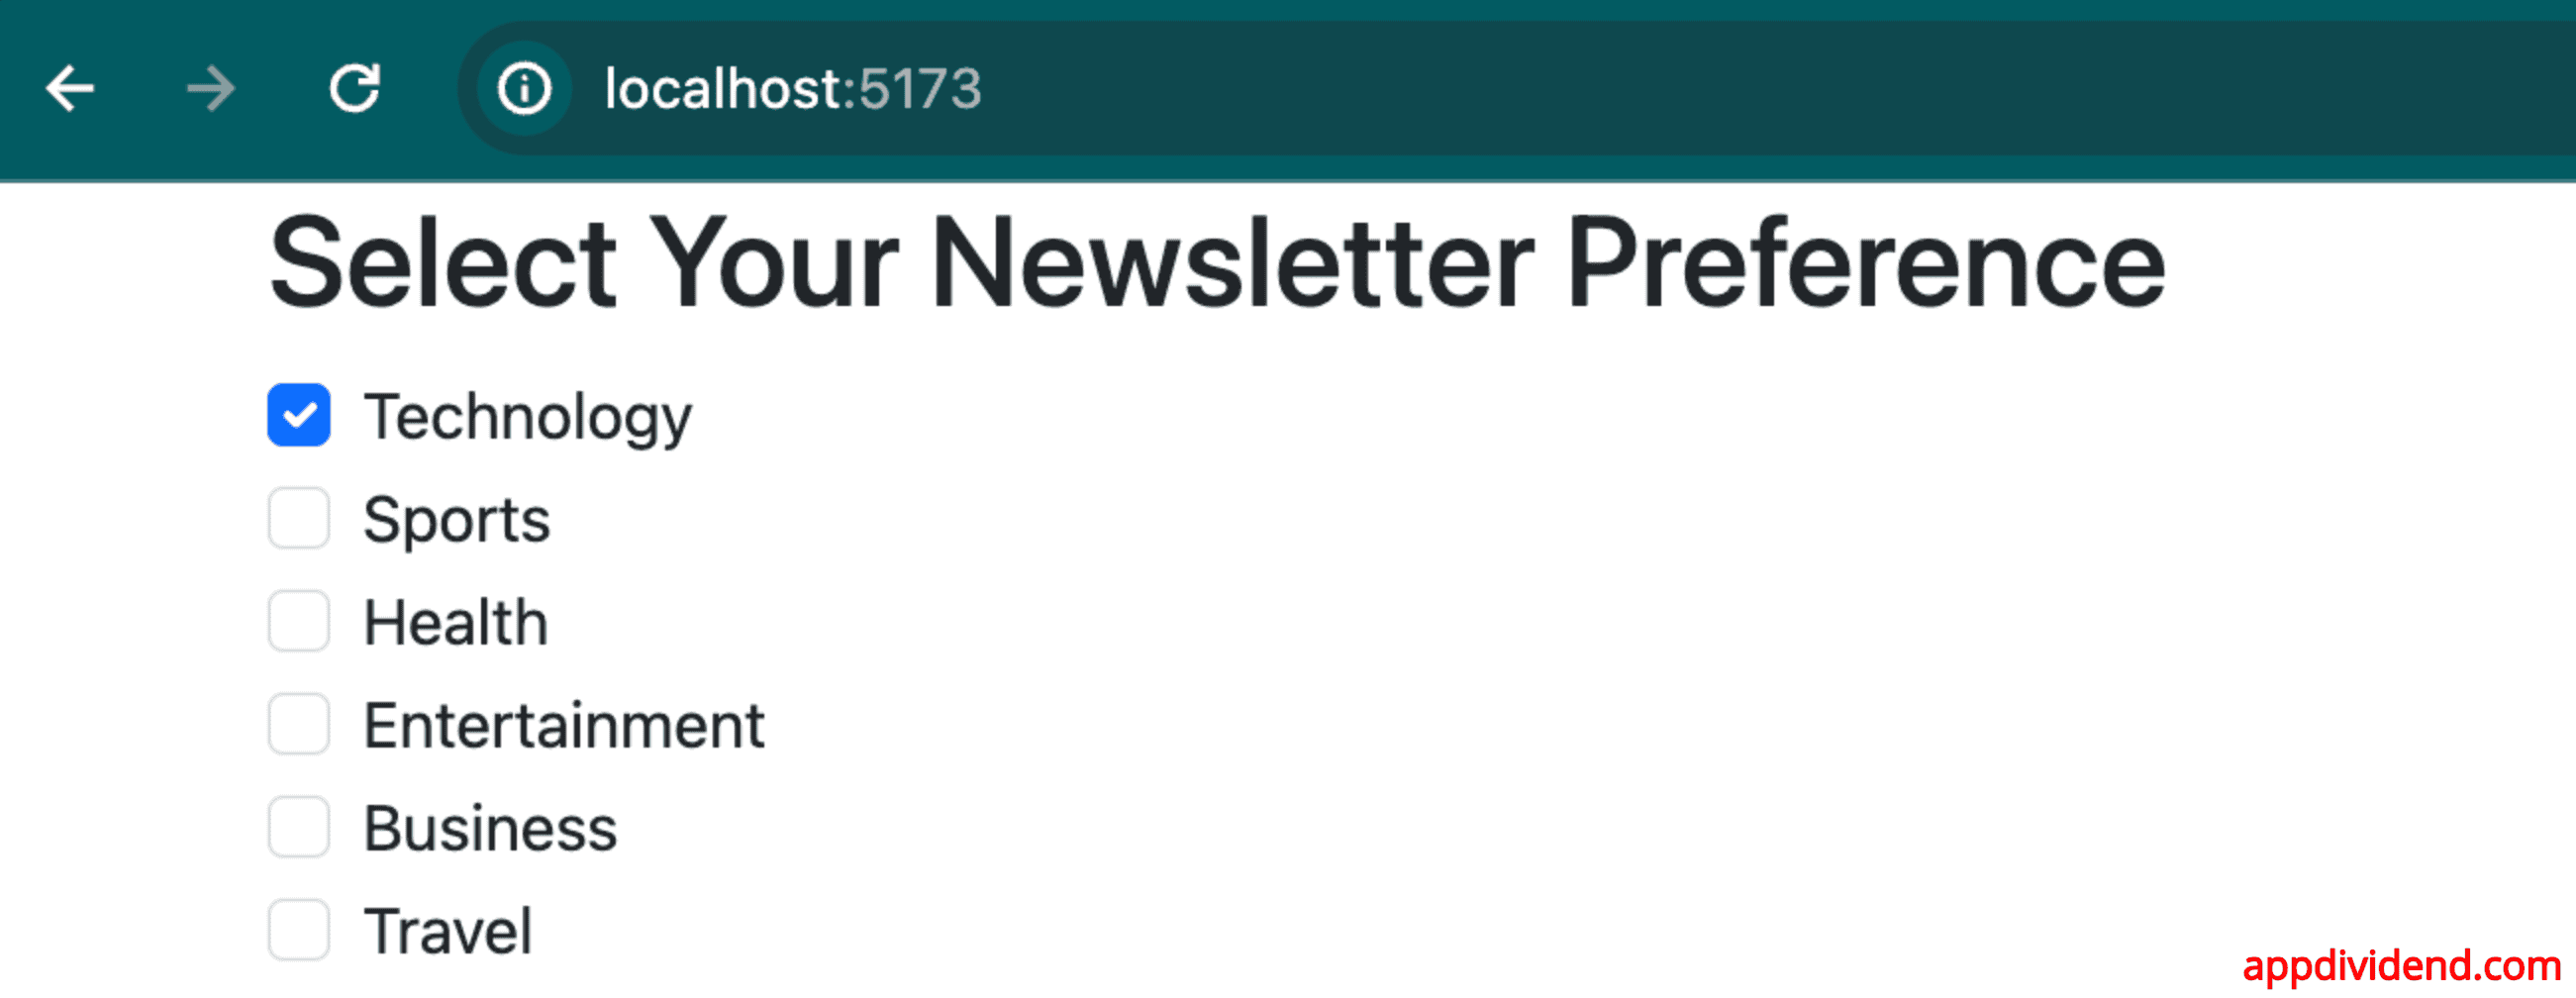
<h2>Select Your Newsletter Preference</h2>
<form>
{[
"Technology",
"Sports",
"Health",
"Entertainment",
"Business",
"Travel",
].map((category) => (
<div className="form-check" key={category}>
<label className="form-check-label">
<input
type="checkbox"
checked={selectedCategory === category}
onChange={handleCheckboxChange(category)}
className="form-check-input"
/>
{category}
</label>
</div>
))}
</form>
</div>
);
}
export default App;
In this code, we imported the useState hook from the react library.
Inside the App component, we initialized a state variable selectCategory to empty.
Then, we defined the handleCheckboxChange() function that updates the value of the selectCategory variable.
Inside the form section, we map through categories and add a checkbox based on each category.
Each checkbox has an onChange event that triggers the handleCheckboxChange() function and updates the value of the selectCategory variable using the useState hook.
The checked attribute for each checkbox is determined by comparing the selectedCategory to the category name of the checkbox. This ensures that only one checkbox can be selected at a time.
Save this file and go to the URL: http://localhost:5173/
Step 4: Display the checked value
We will create a component that dynamically displays the current subscription. If no category is selected, it shows “No category selected.”
Add the code below to the src/app.jsx component:
import { useState } from "react";

function App() {
  const [selectedCategory, setSelectedCategory] = useState("");

  const handleCheckboxChange = (category) => (e) => {
    setSelectedCategory(e.target.checked ? category : "");
  };

  const SubscriptionDetails = () => (
    <div>
      <h3>Your Current Subscription:</h3>
      <p>{selectedCategory || "No category selected."}</p>
    </div>
  );

  return (
    <div className="container">
      <h2>Select Your Newsletter Preference</h2>
      <form>
        {[
          "Technology",
          "Sports",
          "Health",
          "Entertainment",
          "Business",
          "Travel",
        ].map((category) => (
          <div className="form-check" key={category}>
            <label className="form-check-label">
              <input
                type="checkbox"
                checked={selectedCategory === category}
                onChange={handleCheckboxChange(category)}
                className="form-check-input"
              />
              {category}
            </label>
          </div>
        ))}
      </form>
      <SubscriptionDetails />
    </div>
  );
}

export default App;
In this code, we created a new Component called <SubscriptionDetails> to display the current subscription value when the user checks the checkbox.
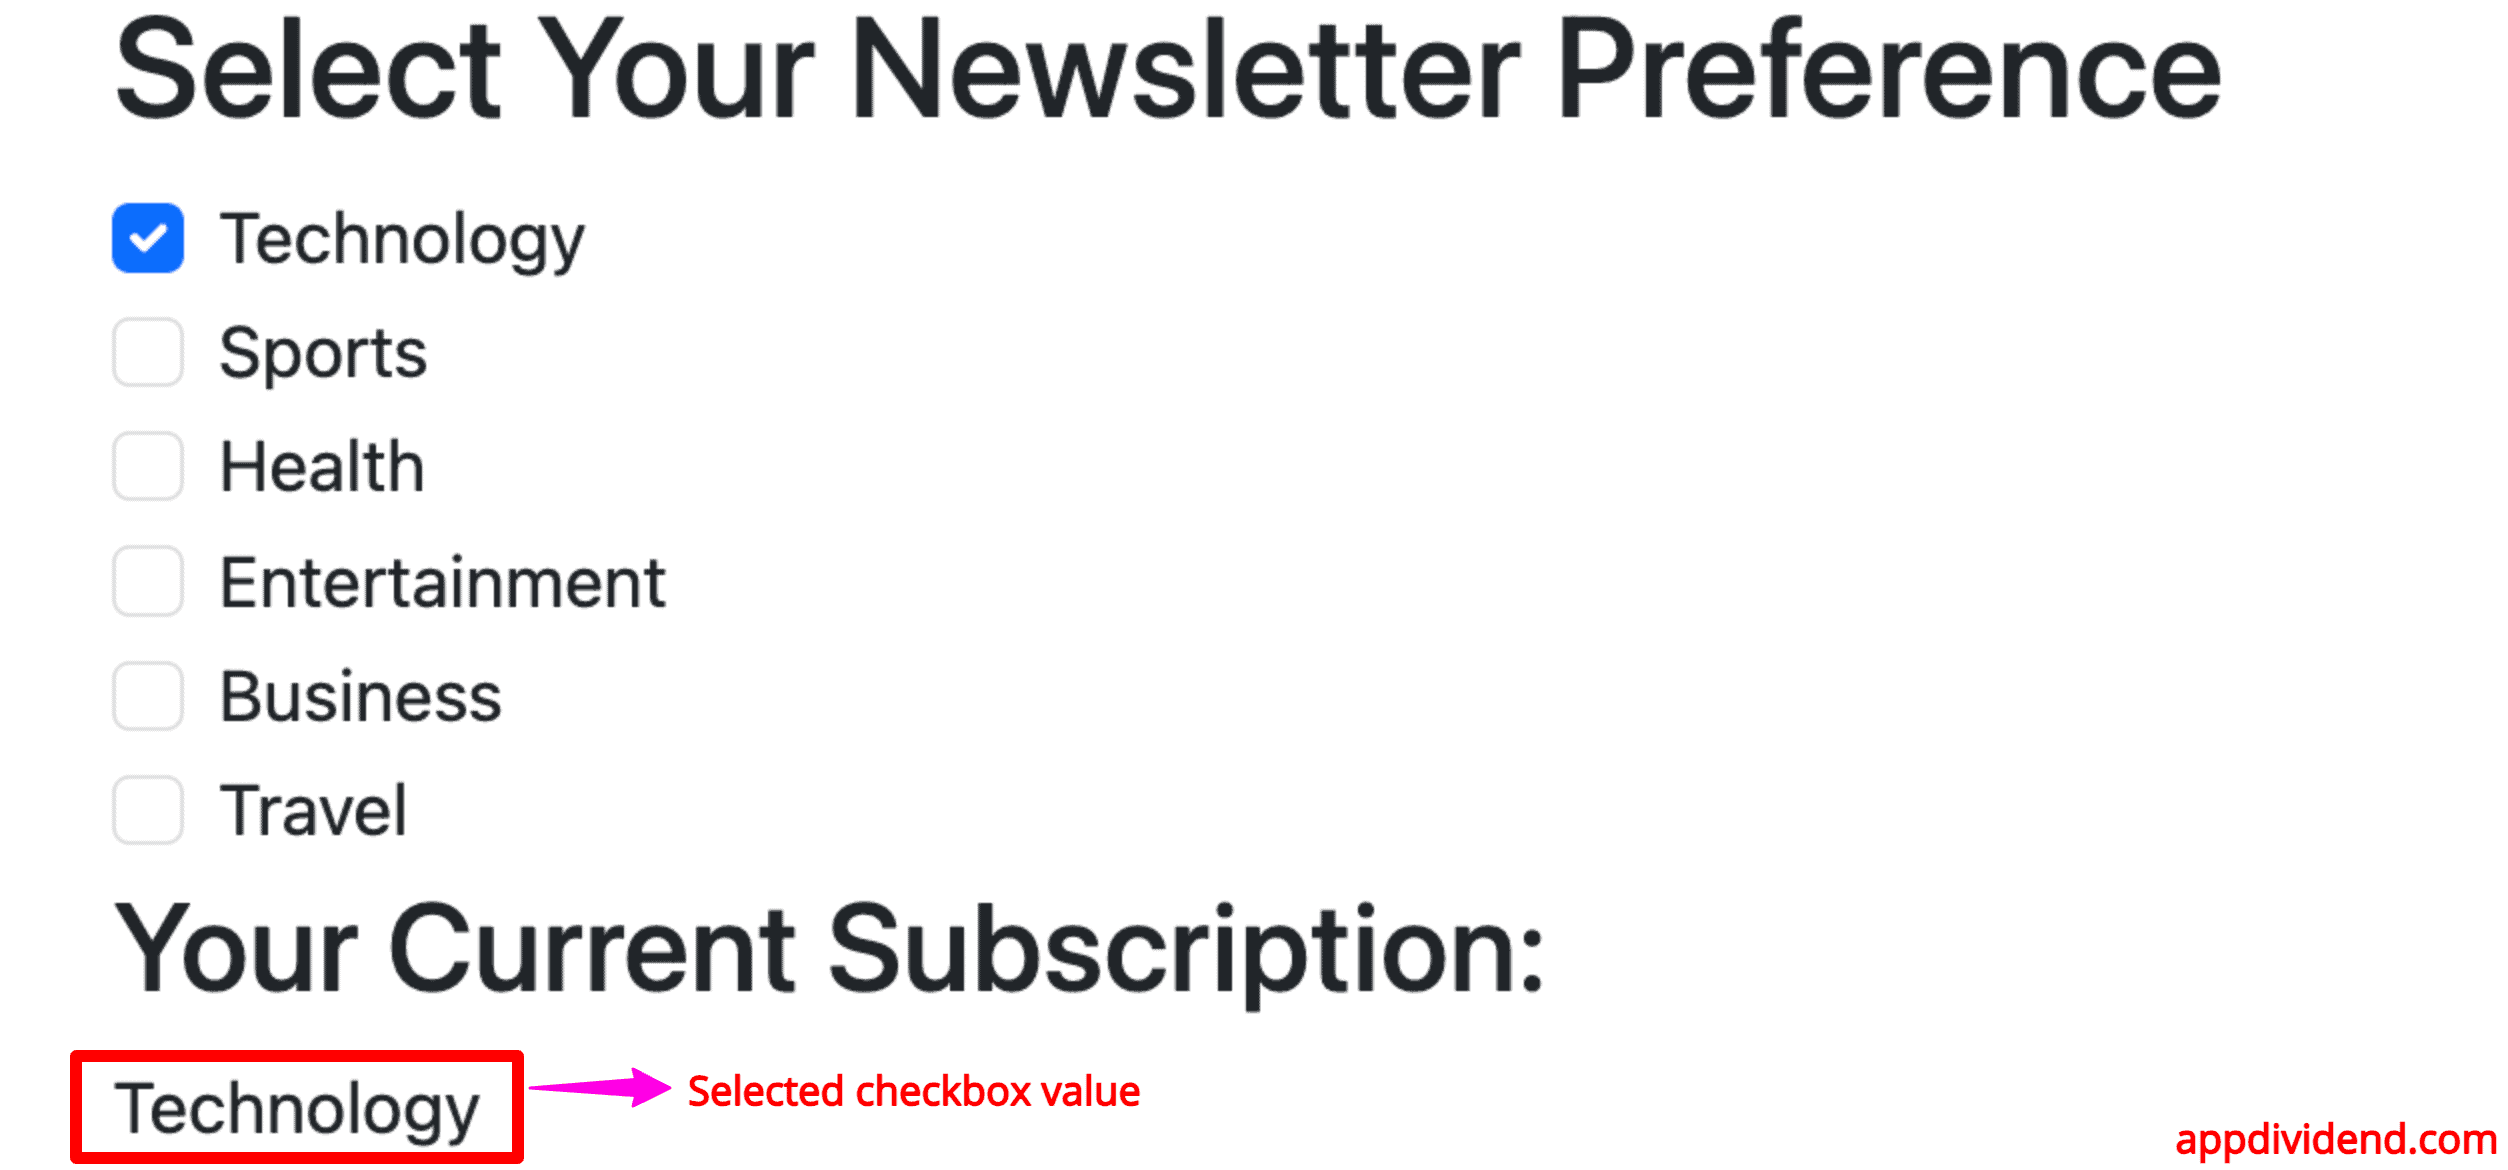
If you select the Sports or Health category, it will display that category subscription.
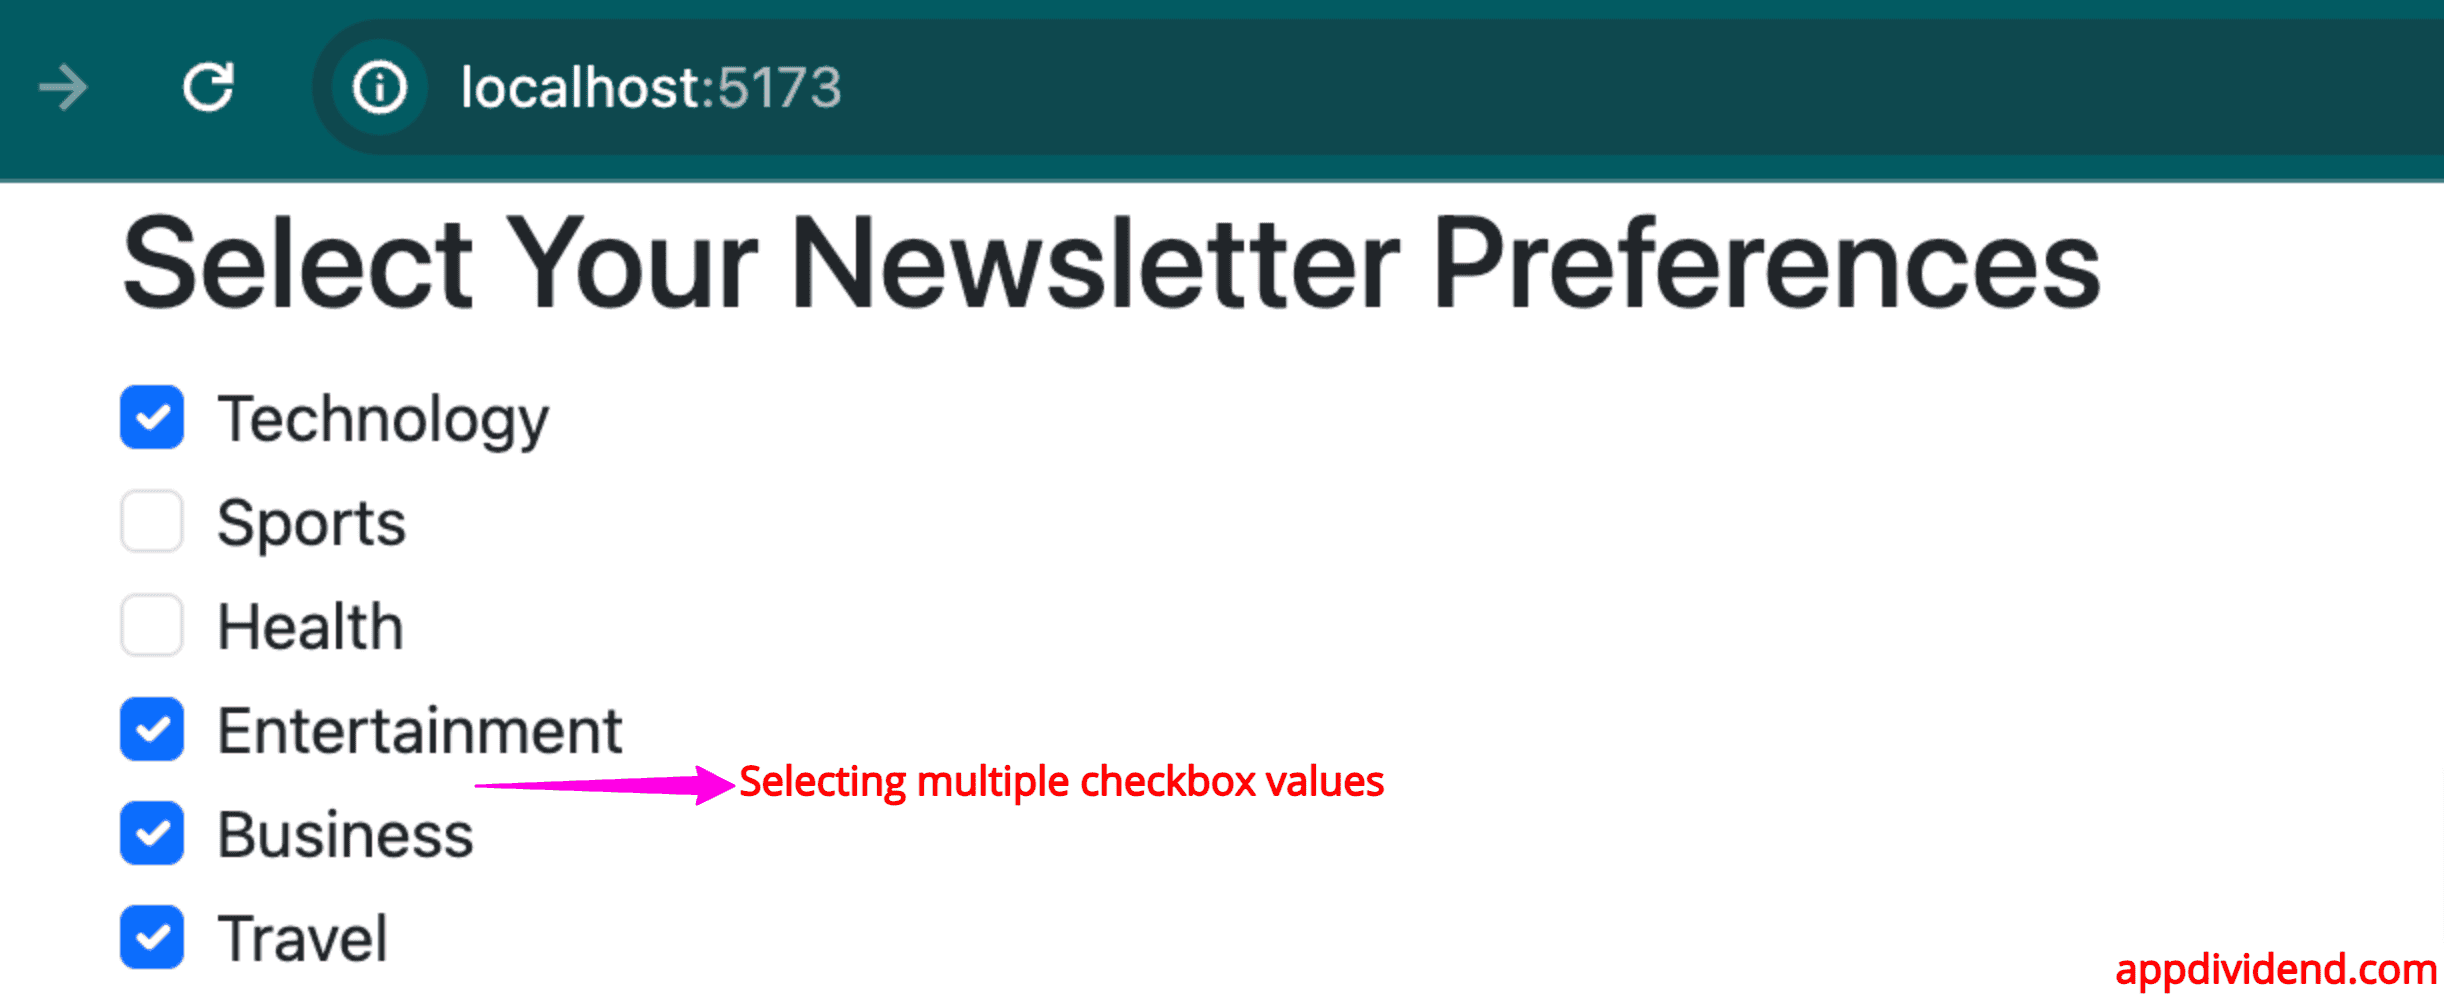
Selecting multiple values in checkboxes
You can select multiple checkbox values and display those values in the <SubscriptionDetails> component.
In this scenario, we can use React’s state to track which categories the user has subscribed to and then dynamically render a component or text based on this state.
Add the code below inside src/App.jsx file:
import { useState } from "react";

function App() {
  const [subscriptions, setSubscriptions] = useState({
    Technology: false,
    Sports: false,
    Health: false,
    Entertainment: false,
    Business: false,
    Travel: false,
  });

  const handleCheckboxChange = (category) => (e) => {
    setSubscriptions((prevSubscriptions) => ({
      ...prevSubscriptions,
      [category]: e.target.checked,
    }));
  };

  return (
    <div className="container">
      <h2>Select Your Newsletter Preferences</h2>
      <form>
        {Object.keys(subscriptions).map((category) => (
          <div className="form-check" key={category}>
            <label className="form-check-label">
              <input
                type="checkbox"
                checked={subscriptions[category]}
                onChange={handleCheckboxChange(category)}
                className="form-check-input"
              />
              {category}
            </label>
          </div>
        ))}
      </form>
    </div>
  );
}

export default App;
Instead of individual state hooks, you can manage all categories using single-state object subscriptions, simplifying state management and scaling.
The handleCheckboxChange() function updates the “subscriptions” state based on the checkbox category that triggered the change.
Save the App.jsx file, go to the browser, and select multiple checkboxes like this:
The remaining thing is to display those selected values.
To do that, we will create another component and use that component to display the checked data.
Write the below code inside the src/App.jsx file:
import { useState, memo } from "react";

const SubscriptionDetails = memo(({ subscriptions }) => {
  const subscribedCategories = Object.entries(subscriptions)
    .filter(([_, value]) => value)
    .map(([key]) => key);

  return (
    <div>
      <h3>Your Subscriptions:</h3>
      {subscribedCategories.length > 0 ? (
        <ul>
          {subscribedCategories.map((category) => (
            <li key={category}>{category}</li>
          ))}
        </ul>
      ) : (
        <p>No subscriptions selected.</p>
      )}
    </div>
  );
});

SubscriptionDetails.displayName = "SubscriptionDetails";

function App() {
  const [subscriptions, setSubscriptions] = useState({
    Technology: false,
    Sports: false,
    Health: false,
    Entertainment: false,
    Business: false,
    Travel: false,
  });

  const handleCheckboxChange = (category) => (e) => {
    setSubscriptions((prevSubscriptions) => ({
      ...prevSubscriptions,
      [category]: e.target.checked,
    }));
  };

  return (
    <div className="container">
      <h2>Select Your Newsletter Preferences</h2>
      <form>
        {Object.keys(subscriptions).map((category) => (
          <div className="form-check" key={category}>
            <label className="form-check-label">
              <input
                type="checkbox"
                checked={subscriptions[category]}
                onChange={handleCheckboxChange(category)}
                className="form-check-input"
              />
              {category}
            </label>
          </div>
        ))}
      </form>
      <SubscriptionDetails subscriptions={subscriptions} />
    </div>
  );
}

export default App;
In this file, we added a new component called “SubscriptionDetails” that dynamically displays the list of subscribed categories.
It filters through the subscriptions object to find and display which categories are true.
If no categories are selected, a message will suggest that no subscriptions have been selected.
The memo wraps the SubscriptionDetails, preventing unnecessary re-renders if the subscriptions object hasn’t changed between renders.
This approach is more efficient and requires fewer re-renders in the component while selecting multiple checkbox values.
Now, you will be able to see the selected subscription in a list view like this:
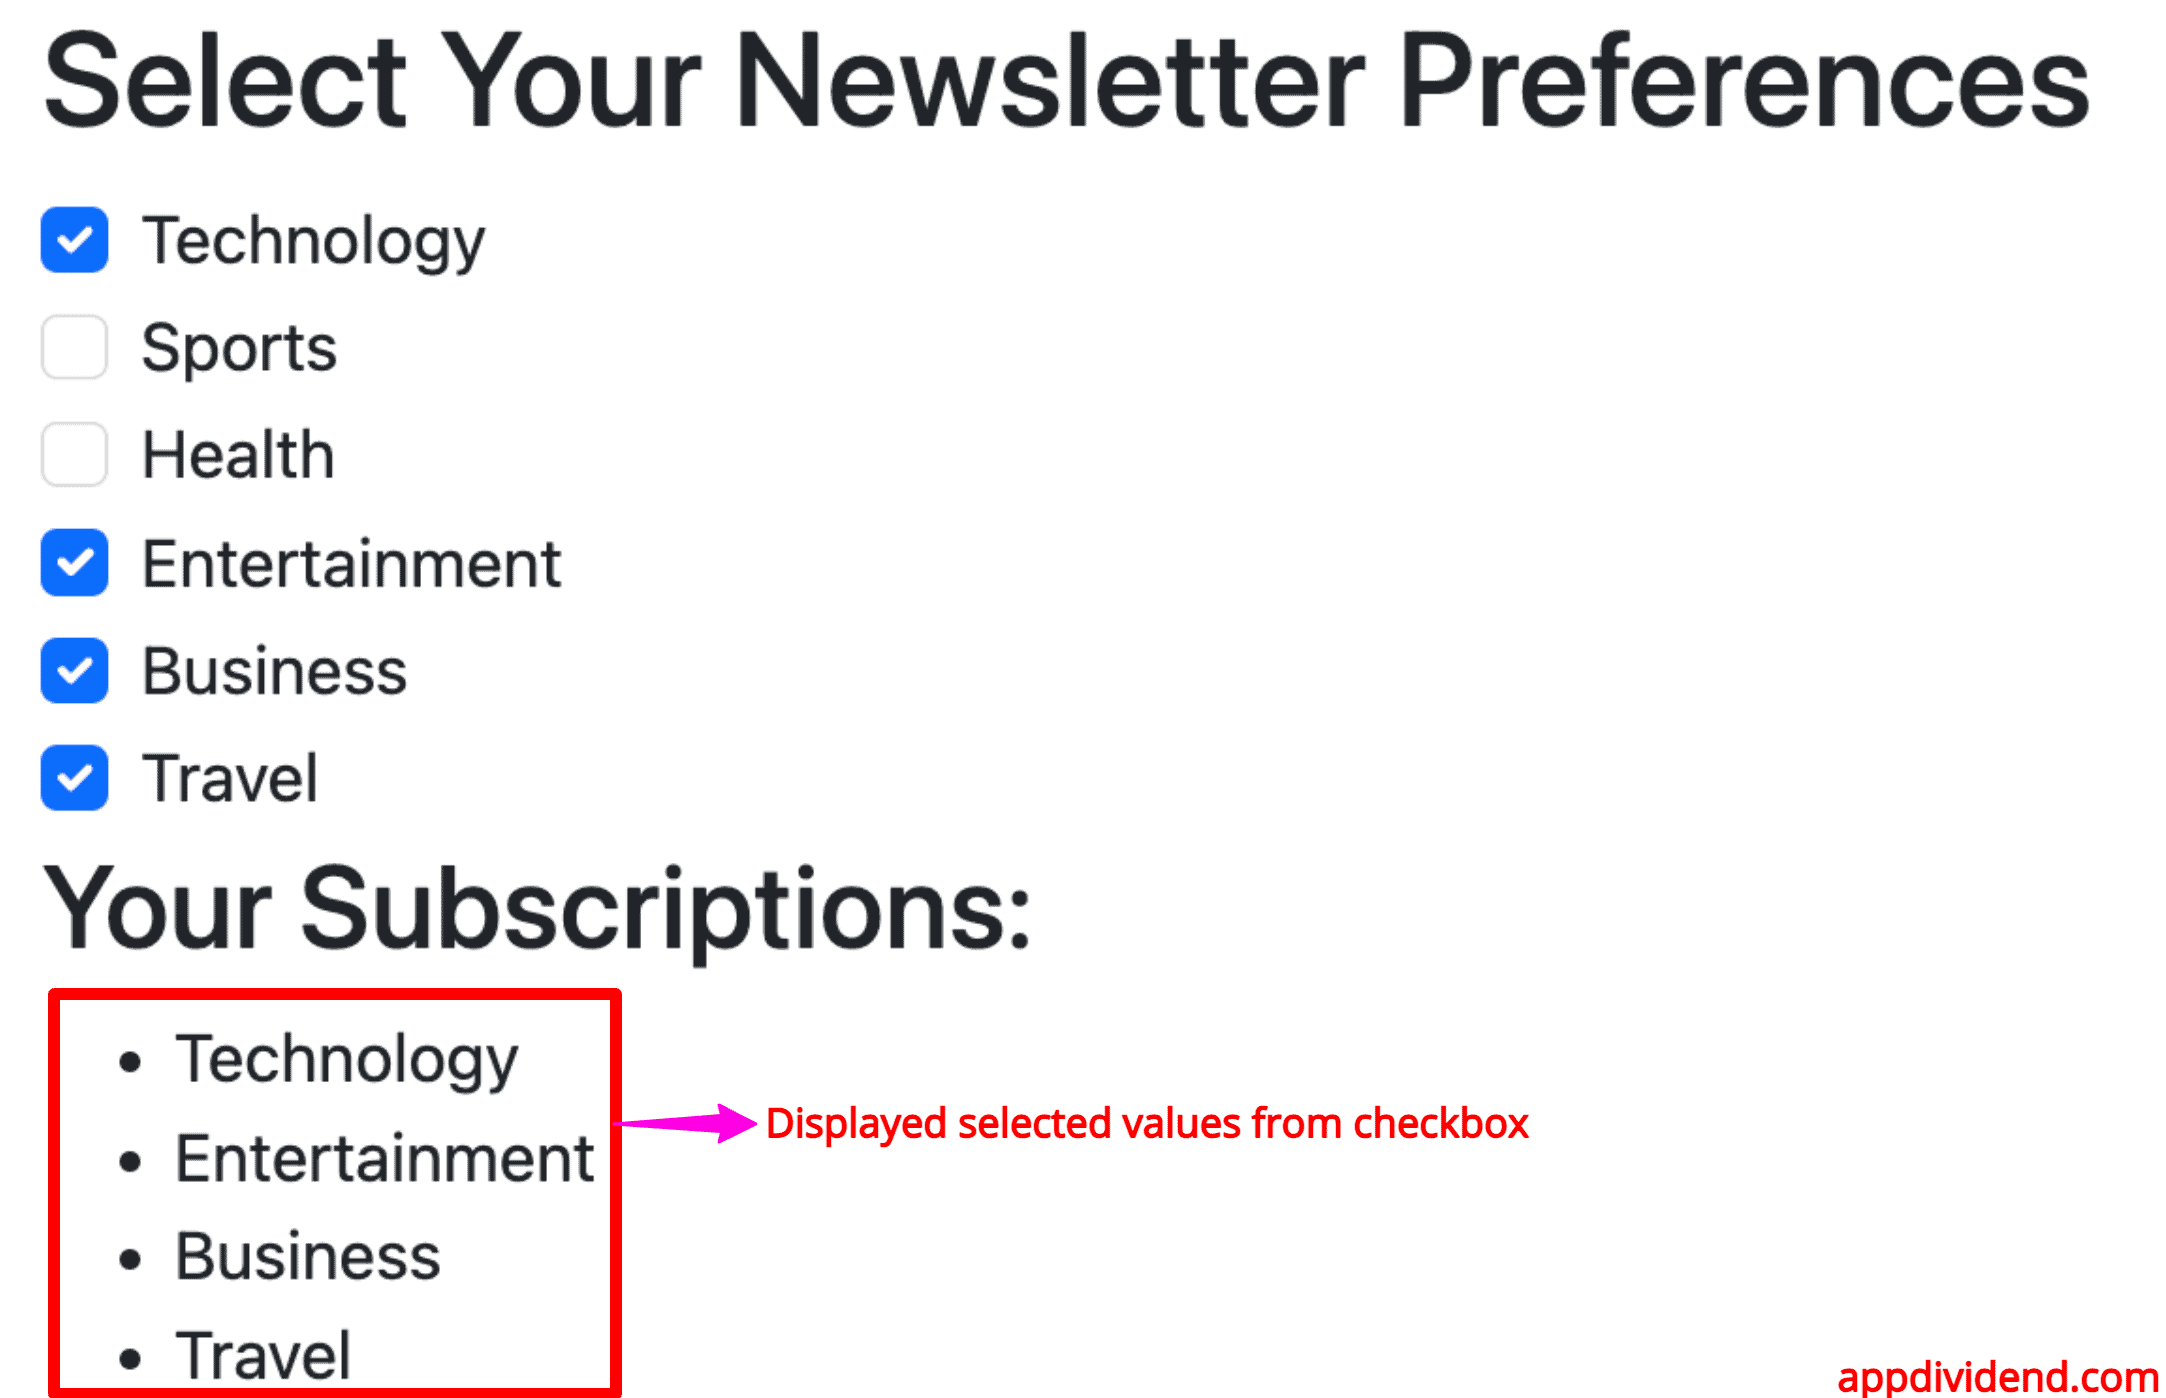
Now, we display multiple selected checkbox values properly and efficiently.
In this section, we learn how to construct multiple checkboxes based on the category, select multiple values, update the state, and display the checked values meaningfully.

Neeraj Shukla
Thanks, Bro you helped me a lot
Krunal Lathiya
Thanks, mate! I have updated this article, which covers more concepts and learning. Hope this helps!