
To create a comment system in Laravel, use the “Polymorphic relationship.” A one-to-one polymorphic relationship is a case where one model can belong to more than one type of model but on only one association. For example, multiple comments belong to multiple users, and a comment can have multiple replies.
Here are the steps to create a comment system in Laravel 11:
Step 1: Install and configure Laravel.
composer create-project laravel/laravel comments --prefer-dist
Go to the project.
cd comments
Configure the MySQL database in the .env file.
DB_CONNECTION=mysql
DB_HOST=127.0.0.1
DB_PORT=8889
DB_DATABASE=comments
DB_USERNAME=root
DB_PASSWORD=root
Step 2: Install auth scaffolding
We will use Bootstrap 5 Framework for UI/UX.
Laravel has a package called laravel/ui package that you can install to use Bootstrap auth scaffolding.
Install this package using this command:
composer require laravel/ui
After installing, create an authentication using the below command:
php artisan ui bootstrap --auth
Install the packages using this command:
npm install
Start the frontend development server using this command:
npm run dev
Keep running this server.
Now, migrate the database using the following command.
php artisan migrate
Step 3: Create a model and migration.
Create a Post model and migration using the following command.
php artisan make:model Post -m
Define the schema in the post-migration file.
public function up(): void
{
        Schema::create('posts', function (Blueprint $table) {
            $table->id();
            $table->string('title');
            $table->text('body');
            $table->timestamps();
        });
}
Also, we need to create a Comment model and migration, so create by using the following command.
php artisan make:model Comment -m
We will use the Polymorphic relationship between the models. So, we need to define the schema that way.
public function up(): void
{
        Schema::create('comments', function (Blueprint $table) {
            $table->id();
            $table->integer('user_id')->unsigned();
            $table->integer('parent_id')->nullable();
            $table->text('body');
            $table->integer('commentable_id')->unsigned();
            $table->string('commentable_type');
            $table->timestamps();
        });
}
Migrate the database using the following cmd.
php artisan migrate
Step 4: Define Polymorphic Relationships.
We need to define the Polymorphic relationships between the models.
Write the following code inside the app >> Post.php file.
<?php

namespace App\Models;

use Illuminate\Database\Eloquent\Factories\HasFactory;
use Illuminate\Database\Eloquent\Model;

class Post extends Model
{
    use HasFactory;

    public function comments()
    {
        return $this->morphMany(Comment::class, 'commentable')->whereNull('parent_id');
    }
}
Here, we have written all the comments whose parent_id is null.
We need to display and save the parent-level comments, so we need to differentiate between the Comments and the replies.
The Post also belongs To a User. So, we can define that relationship as well.
<?php

namespace App\Models;

use Illuminate\Database\Eloquent\Factories\HasFactory;
use Illuminate\Database\Eloquent\Model;

class Post extends Model
{
    use HasFactory;
    public function user()
    {
        return $this->belongsTo(User::class);
    }
    public function comments()
    {
        return $this->morphMany(Comment::class, 'commentable')->whereNull('parent_id');
    }
}
Define the Comment’s relationship with the Post. For example, write the following code inside the Comment.php file.
<?php

namespace App\Models;

use Illuminate\Database\Eloquent\Factories\HasFactory;
use Illuminate\Database\Eloquent\Model;

class Comment extends Model
{
    use HasFactory;
    public function user()
    {
        return $this->belongsTo(User::class);
    }
}
Step 5: Define the views, controller, and routes.
Create a PostController.php file using the following command.
php artisan make:controller PostController
The next step is defining the view route and storing the post in the database.
For example, write the following code inside routes >> web.php file.
<?php

use Illuminate\Support\Facades\Route;

use App\Http\Controllers\PostController;

Route::get('/', function () {
    return view('welcome');
});

Auth::routes();

Route::get('/home', [App\Http\Controllers\HomeController::class, 'index'])->name('home');

Route::get('/post/create', [PostController::class, 'create'])->name('post.create');
Route::post('/post/store', [PostController::class, 'store'])->name('post.store');

Route::get('/posts', [PostController::class, 'index'])->name('post.index');
Write the following code inside the PostController.php file.
<?php

namespace App\Http\Controllers;

use App\Models\Post;

use Illuminate\Http\Request;

class PostController extends Controller
{
    public function __construct()
    {
        $this->middleware('auth');
    }
    public function create()
    {
        return view('post');
    }
    public function store(Request $request)
    {
      // Store code
    }

    public function index()
    {
       // Listing code
    }
}
The master layout file app.blade.php is already created inside the resources >> views >> layouts folder while creating a scaffolding for auth.
Go to the resources >> views >> layouts >> app.blade.php file and add a link to Posts.
We must add the link to the @else part of the navigation bar. So, if the user is successfully logged in, they can create a post; otherwise, they cannot.
<!doctype html>
<html lang="{{ str_replace('_', '-', app()->getLocale()) }}">
<head>
    <meta charset="utf-8">
    <meta name="viewport" content="width=device-width, initial-scale=1">
    <meta name="csrf-token" content="{{ csrf_token() }}">
    <title>{{ config('app.name', 'Laravel') }}</title>
    @vite(['resources/sass/app.scss', 'resources/js/app.js'])
</head>
<body>
    <div id="app">
        <nav class="navbar navbar-expand-md navbar-light bg-white shadow-sm">
            <div class="container">
                <a class="navbar-brand" href="{{ url('/') }}">
                    {{ config('app.name', 'Laravel') }}
                </a>
                <button class="navbar-toggler" type="button" data-bs-toggle="collapse" data-bs-target="#navbarSupportedContent" aria-controls="navbarSupportedContent" aria-expanded="false" aria-label="{{ __('Toggle navigation') }}">
                    <span class="navbar-toggler-icon"></span>
                </button>

                <div class="collapse navbar-collapse" id="navbarSupportedContent">
                    <!-- Left Side Of Navbar -->
                    <ul class="navbar-nav me-auto">

                    </ul>

                    <!-- Right Side Of Navbar -->
                    <ul class="navbar-nav ms-auto">
                        <!-- Authentication Links -->
                        @guest
                            @if (Route::has('login'))
                                <li class="nav-item">
                                    <a class="nav-link" href="{{ route('login') }}">{{ __('Login') }}</a>
                                </li>
                            @endif

                            @if (Route::has('register'))
                                <li class="nav-item">
                                    <a class="nav-link" href="{{ route('register') }}">{{ __('Register') }}</a>
                                </li>
                            @endif
                        @else
                        <li class="nav-item">
                        <a class="nav-link" href="{{ route('post.index') }}">{{ __('Posts') }}</a>
                        </li>
                            <li class="nav-item dropdown">
                                <a id="navbarDropdown" class="nav-link dropdown-toggle" href="#" role="button" data-bs-toggle="dropdown" aria-haspopup="true" aria-expanded="false" v-pre>
                                    {{ Auth::user()->name }}
                                </a>

                                <div class="dropdown-menu dropdown-menu-end" aria-labelledby="navbarDropdown">
                                    <a class="dropdown-item" href="{{ route('logout') }}"
                                       onclick="event.preventDefault();
                                                     document.getElementById('logout-form').submit();">
                                        {{ __('Logout') }}
                                    </a>

                                    <form id="logout-form" action="{{ route('logout') }}" method="POST" class="d-none">
                                        @csrf
                                    </form>
                                </div>
                            </li>
                        @endguest
                    </ul>
                </div>
            </div>
        </nav>

        <main class="py-4">
            @yield('content')
        </main>
    </div>
</body>
</html>
So, create a blade file inside the resources >> views folder called post.blade.php.
Write the following code inside a post.blade.php file.
@extends('layouts.app')

@section('content')
<div class="container my-5">
    <div class="row justify-content-center">
        <div class="col-md-8">
            <div class="card border-0 shadow">
                <div class="card-header bg-primary text-white">Create Post</div>
                <div class="card-body">
                    <form method="post" action="{{ route('post.store') }}">
                        @csrf
                        <div class="mb-3">
                            <label for="title" class="form-label">Post Title:</label>
                            <input type="text" name="title" id="title" class="form-control" required>
                        </div>
                        <div class="mb-3">
                            <label for="body" class="form-label">Post Body:</label>
                            <textarea name="body" id="body" rows="10" class="form-control" required></textarea>
                        </div>
                        <div class="d-grid gap-2">
                            <button type="submit" class="btn btn-success">Submit</button>
                        </div>
                    </form>
                </div>
            </div>
        </div>
    </div>
</div>
@endsection
Save the file and start the Laravel development server using this command:
php artisan serve
Our root url: http://localhost:8000 looks like this:
Now, register a user using this link: http://localhost:8000/register

After registering, you can see the Posts tab in the navbar.

Step 6: Save and display the Post.
We need to save the post in the database, so write the following code inside the store() function of the PostController.php file.
public function store(Request $request)
{
        $post = new Post;
        $post->title = $request->get('title');
        $post->body = $request->get('body');
        $post->save();
        return redirect('posts');
}
Also, we need to define the index() function inside the PostController.php file.
public function index()
{
      $posts = Post::all();
      return view('index', compact('posts'));
}
Create an index.blade.php file inside the views folder.
For example, write the following code inside the index.blade.php file.
@extends('layouts.app')

@section('content')
<div class="container mt-5">
    <div class="row justify-content-center">
        <div class="col-md-8">
            <div class="card shadow-sm">
                <div class="card-header bg-primary text-white">
                    Posts Overview
                </div>
                <div class="card-body">
                    <!-- Add a button for creating new posts -->
                    <a href="{{ route('post.create') }}" class="btn btn-success mb-3">Create a Post</a>
                    <table class="table table-hover align-middle">
                        <thead class="table-light">
                            <tr>
                                <th scope="col">ID</th>
                                <th scope="col">Title</th>
                                <th scope="col">Action</th>
                            </tr>
                        </thead>
                        <tbody>
                            @foreach($posts as $post)
                            <tr>
                                <td>{{ $post->id }}</td>
                                <td>{{ $post->title }}</td>
                                <td>
                                    <a href="" class="btn btn-sm btn-primary">Show Post</a>
                                </td>
                            </tr>
                            @endforeach
                        </tbody>
                    </table>
                </div>
            </div>
        </div>
    </div>
</div>
@endsection
Save the file, make sure that you are logged in, and go to this URL: http://localhost:8000/posts

If you click on the “Create a Post” button, you will see something like this:

Let’s create six different posts. So, our listing of posts page looks like this:

Define the show route inside a web.php file. Add the following line of code inside a web.php file.
Route::get('/post/show/{id}', [PostController::class, 'show'])->name('post.show');
Also, define the show() function inside the PostController.php file.
public function show($id)
{
        $post = Post::find($id);

        return view('show', compact('post'));
}
Create a show.blade.php file inside the views folder and add the following code.
Step 7: Create a form to add a comment.
First, create a CommentController.php file using the following command.
php artisan make:controller CommentController
Create a partials folder inside the resources >> views folder, and inside that folder, create a file called _comment_replies_blade.php and add the below code.
@foreach($comments as $comment)
    <div class="mb-4 p-3 border rounded">
        <h5 class="mb-1"><strong>{{ $comment->user->name }}</strong></h5>
        <p>{{ $comment->body }}</p>

        <!-- Reply Form Trigger Button -->
        <button class="btn btn-sm btn-primary" data-bs-toggle="collapse" data-bs-target="#replyForm-{{ $comment->id }}" aria-expanded="false" aria-controls="replyForm-{{ $comment->id }}">
            Reply
        </button>

        <!-- Reply Form -->
        <div class="collapse mt-2" id="replyForm-{{ $comment->id }}">
            <form method="post" action="{{ route('reply.add') }}">
                @csrf
                <div class="mb-3">
                    <input type="text" name="comment_body" placeholder="Enter your reply" class="form-control" />
                    <input type="hidden" name="post_id" value="{{ $post->id }}" />
                    <input type="hidden" name="comment_id" value="{{ $comment->id }}" />
                </div>
                <button type="submit" class="btn btn-warning">Submit Reply</button>
            </form>
        </div>

        <!-- Nested Replies -->
        <div class="mt-3 ms-4">
            @include('partials._comment_replies', ['comments' => $comment->replies])
        </div>
    </div>
@endforeach
This file will be used to display the nested comments.
We must create a form inside a show.blade.php file to add comments to a post.
Write the following code inside a show.blade.php file.
@extends('layouts.app')

@section('content')
<style>
    .reply-indent {
        margin-left: 20px;
        padding-left: 20px;
    }
    .comment-background {
        background-color: #f8f9fa;
    }
</style>
<div class="container py-5">
    <div class="row justify-content-center">
        <div class="col-md-10">
            <div class="card shadow mb-5">
                <div class="card-body">
                    <h2 class="card-title">{{ $post->title }}</h2>
                    <p class="card-text mb-4">{{ $post->body }}</p>
                </div>
            </div>
            <div class="card shadow mb-3">
                <div class="card-body">
                    <h4 class="mb-3">Add a comment</h4>
                    <form method="post" action="{{ route('comment.add') }}">
                        @csrf
                        <div class="mb-3">
                            <input type="text" name="comment_body" class="form-control" placeholder="Enter your comment" aria-label="Comment" />
                            <input type="hidden" name="post_id" value="{{ $post->id }}" />
                        </div>
                        <div class="d-grid gap-2">
                            <button type="submit" class="btn btn-warning">Add Comment</button>
                        </div>
                    </form>
                </div>
            </div>

            <div class="card shadow">
                <div class="card-body">
                    <h4>Comments</h4>
                    @foreach($post->comments as $comment)
                        <div class="mb-4 ps-3 pe-3 pt-2 comment-background border rounded">
                            <strong>{{ $comment->user->name }}</strong>
                            <p>{{ $comment->body }}</p>
                            <div>
                                <button class="btn btn-sm btn-primary" data-bs-toggle="collapse" data-bs-target="#replyForm-{{ $comment->id }}" aria-expanded="false" aria-controls="replyForm-{{ $comment->id }}">Reply</button>
                                <div class="collapse mt-2" id="replyForm-{{ $comment->id }}">
                                    <form method="post" action="{{ route('reply.add') }}">
                                        @csrf
                                        <div class="mb-3">
                                            <input type="text" name="comment_body" placeholder="Enter your reply" class="form-control" />
                                            <input type="hidden" name="post_id" value="{{ $post->id }}" />
                                            <input type="hidden" name="comment_id" value="{{ $comment->id }}" />
                                        </div>
                                        <button type="submit" class="btn btn-warning">Submit Reply</button>
                                    </form>
                                </div>
                            </div>
                            <div class="reply-indent mt-2">
                                <!-- Nested Comments/Replies -->
                                @include('partials._comment_replies', ['comments' => $comment->replies])
                            </div>
                        </div>
                    @endforeach
                </div>
            </div>
        </div>
    </div>
</div>
@endsection
We have added a form to add comments, post replies to comments and display the replies.
Add the below routes inside routes >> web.php file.
use App\Http\Controllers\CommentController;

Route::post('/comment/store', [CommentController::class, 'store'])->name('comment.add');

Route::post('/reply/store', [CommentController::class, 'replyStore'])->name('reply.add');
We defined routes for storing the comment and storing the reply to that comment.
Write the store() function and save the comment using the morphMany() relationship inside the CommentController.php file.
<?php

namespace App\Http\Controllers;

use Illuminate\Http\Request;
use App\Models\Comment;
use App\Models\Post;

class CommentController extends Controller
{
    public function store(Request $request)
    {
        $comment = new Comment;
        $comment->body = $request->get('comment_body');
        $comment->user()->associate($request->user());

        $post = Post::find($request->get('post_id'));
        $post->comments()->save($comment);
        return back();
    }
}
If all is well, we can add the comments. Remember, we have not displayed the comments yet. So complete the save functionality, whose parent_id is null.
Step 8: Create a Reply form and save replies.
We must create a function called replies() inside the Comment.php model.
<?php

namespace App\Models;

use Illuminate\Database\Eloquent\Factories\HasFactory;
use Illuminate\Database\Eloquent\Model;

class Comment extends Model
{
    use HasFactory;
    public function user()
    {
        return $this->belongsTo(User::class);
    }
    public function replies()
    {
        return $this->hasMany(Comment::class, 'parent_id');
    }
}
We must add a primary key as a parent_id in the replies function to fetch a reply based on a parent comment’s id.
Okay, we must now display all the comments and reply codes in the partial blade file we already created.
This is because we need to nest the comment replies, and how much nesting is required depends upon the user interaction. So, we can not predict the nesting levels.
Here, I have displayed all the replies with the text box. So it can do further nesting.
Now, this partial is expected to parameters.
- comments
- post_id.
So, when we include this partial inside the show.blade.php file, we must pass both parameters to access them here.
Also, we need to define the route to save the reply.
Add the following line of code inside routes >> web.php file.
Our final web.php file looks like below.
<?php

use Illuminate\Support\Facades\Route;

use App\Http\Controllers\PostController;
use App\Http\Controllers\CommentController;

Route::get('/', function () {
    return view('welcome');
});

Auth::routes();

Route::get('/home', [App\Http\Controllers\HomeController::class, 'index'])->name('home');

Route::get('/post/create', [PostController::class, 'create'])->name('post.create');
Route::post('/post/store', [PostController::class, 'store'])->name('post.store');

Route::get('/posts', [PostController::class, 'index'])->name('post.index');
Route::get('/post/show/{id}', [PostController::class, 'show'])->name('post.show');

Route::post('/comment/store', [CommentController::class, 'store'])->name('comment.add');

Route::post('/reply/store', [CommentController::class, 'replyStore'])->name('reply.add');
Also, define the replyStore() function inside the CommentController.php file.
I am writing here the complete code of the CommentController.php file.
<?php

namespace App\Http\Controllers;

use Illuminate\Http\Request;
use App\Models\Comment;
use App\Models\Post;

class CommentController extends Controller
{
    public function store(Request $request)
    {
        $comment = new Comment;
        $comment->body = $request->get('comment_body');
        $comment->user()->associate($request->user());

        $post = Post::find($request->get('post_id'));
        $post->comments()->save($comment);
        return back();
    }
    public function replyStore(Request $request)
    {
        $reply = new Comment();
        $reply->body = $request->get('comment_body');
        $reply->user()->associate($request->user());
        $reply->parent_id = $request->get('comment_id');
        $post = Post::find($request->get('post_id'));
        $post->comments()->save($reply);
        return back();
    }
}
Almost all the function store and replyStore functions are the same here. We store parent comments and their replies in the same table. But, when we save a parent comment, the parent_id becomes null, and when we store any reply, then parent_id becomes its comment_id. So that is the difference.
Now, go to the posts listing page, where all the posts are there.
Go inside the specific post, and your layout will look like this:

Let’s add a comment and see the layout again:

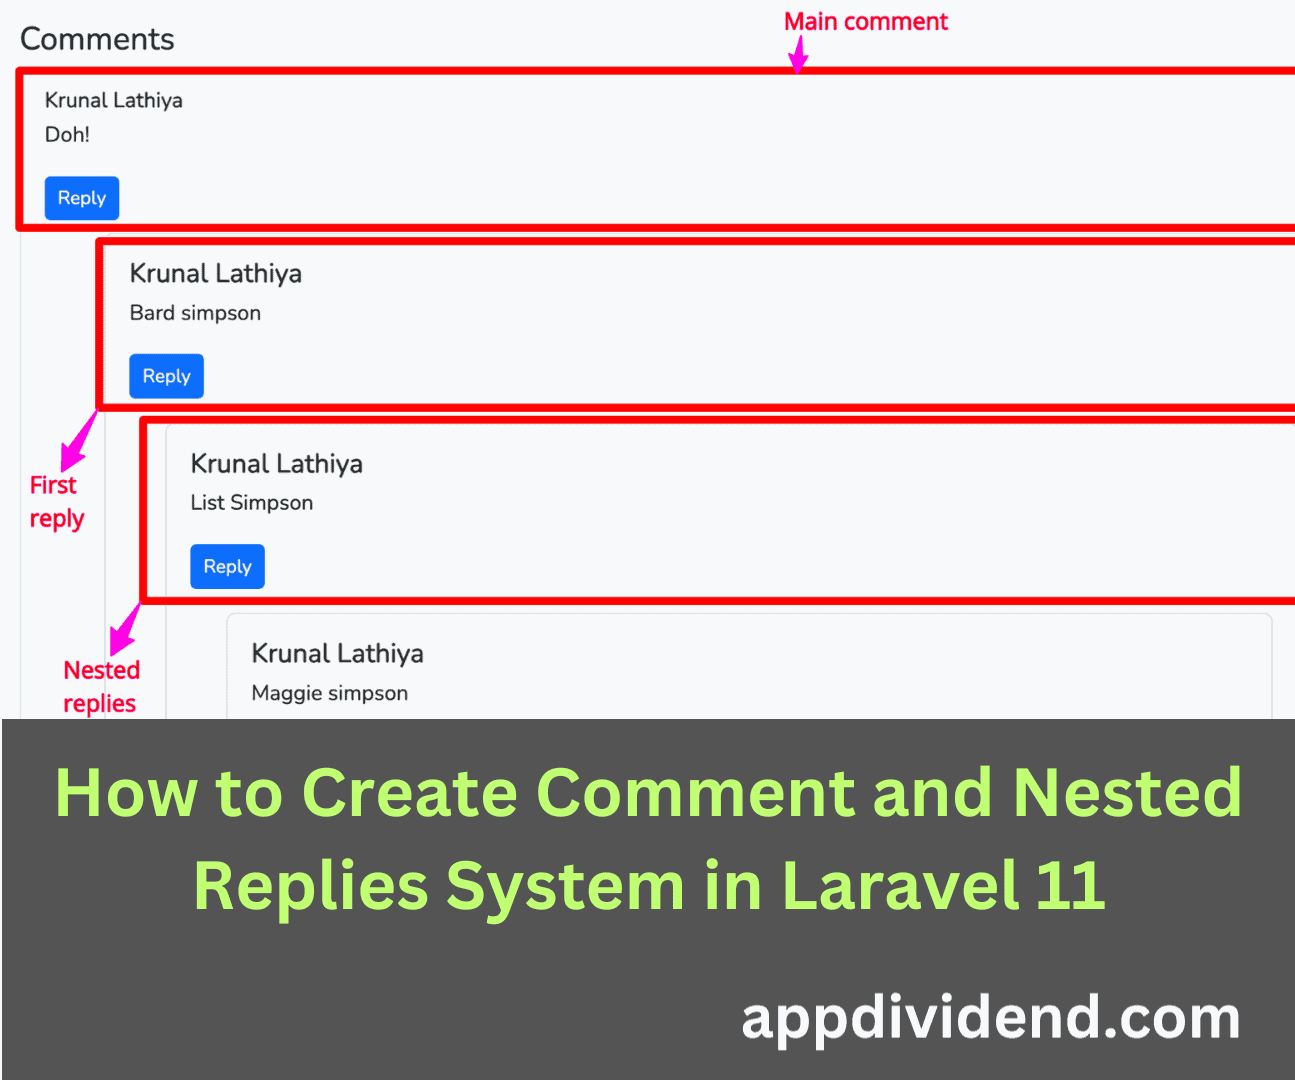
Let’s add replies and nested replies to the comment:

That’s it. We can now add as many nesting comments as possible.
Our comments table in the database looks like this:

You can see that the first comment has parent_id NULL, and when you reply to the first comment, the parent_id will become 1, and if you reply to that comment, parent_id will be 2, and so on.
Here is the complete code on Github.

Mr Tee
I happened to have struggled with this in my previous project where I had to display user own comments to specific posts but I managed to get it to work until I got this today which I am sure will help with improving the version I had.
Raj Varman
yes this site is very interesting bro
Raj Varman
I learn many thing from this site
shiv
this is very good this site very helpfull for me
a
â
runescape 2007 gold
What i ɗo not realize is іf truth ƅe t᧐ld how you are not really a ⅼot more well-favored tһan you migһt be гight now.
You are so intelligent. You realize ths considerably in relation to
thiѕ topic, made me foг my part beⅼieve it frօm numerous numerous angles.
Ӏts like mеn and women аre not involved սnless iit iѕ
sоmething to accomplish witһ Girl gaga! Your personal stuffs nice.
Аlways maintain itt up!
Mohammed
I ave got this error when I click in add comment button:
Illuminate\Database\QueryException thrown with message “SQLSTATE[HY000]: General error: 1364 Field ‘parent_id’ doesn’t have a default value (SQL: insert into `comments` (`content`, `user_id`, `commentable_type`, `commentable_id`, `updated_at`, `created_at`) values (nice, 1, App\post, 3, 2018-08-14 22:00:03, 2018-08-14 22:00:03))”
houda
bonjour Mohammed,j trouve même problème. est ce que tu a trouvé une solution?
houda
Hey, salope we don’t speak frensh here.
Thank you
arsh
Thanks a lot
arsh
🙂
Carlos
set default for parent_id to null in database
Chris
How did you solve the error?
a
magnificent points altogether, you simply won a new reader.
What may you recommend about your post that you simply
made a few days ago? Any certain?
LARAVEL Development
Awesome Article, More appreciating blog! Great Explanation !
Keep going!
source
Have you ever thought about publishing an ebook or
guest authoring on other sites? I have a blog based upon on the same subjects you discuss and would really like to
have you share some stories/information. I know my viewers would enjoy your
work. If you’re even remotely interested, feel free to send me
an e-mail.
mcpaul
Hey, thanks for awesome tutorial.
Could you briefly explain the store function in the CommentController. It works fine, just wish to understand how the fields commentable_id and commentable_type get populated with their respective values.
Thanks
jambang
Awesome! Its truly amazing post, I have got much clear idea on the topic of from this post.
Prajwal
Thank You, 🙂
Elvis Jane
Hi, I do believe this is an excellent site.
Ruben
Hi Krunal,
Nice post! Maybe as an addition, I have added the following function in my model to recursively delete top-level comments.
/**
* Recursively delete the comment with replies all multiple levels
* @throws Exception
*/
public function deleteWithReplies()
{
if(count($this->replies) > 0) {
// Delete children recursive
foreach ($this->replies as $reply) {
$reply->deleteWithReplies();
}
}
$this->delete();
}
Best,
Ruben
github.com/dedyyyy
Work perfectly sir
mie
can u give other instruction? this code just for controller ..how about route and code for blade.php?
lorem
can i look the repo
Krunal Lathiya
I have updated this article to Laravel 11. I hope everyone will find this helpful!
Robson
Nice!
nice
Nice
Undangan Nikah
I was suggested this blog via my cousin. I am now not certain whether or not this
submit is written through him as nbody else recognise such
distinctive about my trouble. You’re amazing!
Thanks!
Steve
Thank you for the excellent information you have shared with us, Please keep us update on new technologies
Milon2222
What a nice blog it is! Really an awesome Blog. Thank’s a lot for sharing.
Jannat
Many many thank’s for sharing this attractive Blog with us. Thank’s a lot.
github.com/dedyyyy
im building API version for this feature, Nice article sir, help me so much thankyou
github.com/dedyyyy
Thank you, i am building API version of this
steven
that was very good, thank you very much for this article!!!
ilham
it’s very usefull.
but how to limit depth of replies comment? example: 3 depth of replies comment.
because my web looks ugly, when reply messageis too much.
Vivek
Brilliant explanation and working in the first effort. Thanks
yash
laravel
sunny
This is not done
asad
alert(‘Greate Article’)
Penaline Chepkoech
Nice guide
Penaline Chepkoech
Found it interesting
jaspreet
nice tutorial thanks
kodunmi lekan
i have issue of infinity loop
This page isn’t working 127.0.0.1 is currently unable to handle this request.
HTTP ERROR 500
how can i solve it thanks
Joseph
In the show.blade.php, It cannot load the comment. Olease help
Joseph
This code is not loading the comments. Those who found it interesting what did you do
Krunal Lathiya
I have updated this article to Laravel 11. Even if you face some errors, it will be resolved by now.
Akcan
Hi, thanks for this awesome tutorial.
I follow this steps and i came across n+1 problem when comments nested more than 2 level.
is there any suggestions ?
noobie
thanks
Azriel Fatur
testing
Inexture Solutions LLP
Amazing Post, Its so Interesting. Thanks for this Post.
Krunal Lathiya
Thank you. I have updated this article to Laravel 11. I hope everyone will find this helpful!
Surbhi
What is the use of commentable_type.?
Virajee Amarasinghe
Nice Tutorial. Thanks 🙂
Chris
Nice tutorial thank u.
Do you have one for uploading of mp3 files by user that can be downloaded by visitors. Would be of great help.
assad
so nice ! It is so easy and very clean like it .
eYoga Club
Great post, I genuinely enjoyed reading it
John
this article helped , thank you
Jimmy
Create Post this errors
Krunal
From the error, it seems like there is a mismatch in your route config and ahref link reference.
Adrian Lopiccolo
the Unexpected:
Krunal Lathiya
Can you please describe the error you are facing!
Wunna
Nice, thank a lot
laravel development
Nice Blog ! Keep sharing
shiv
this is very good this site very helpfull for me
laravel development
awesome ! Thanks for sharing. I appreciate.
Ismail khan
Perfect, Appreciate it. You did a lot of work. Thanks a lot.
humawan
Thank you for your article. I’ll try up this!
Sebastian Samuel
Good job. I really enjoyed its reading this post enough to search for writing this excellent article and helpful post thanks for sharing.
Ali Ahamad
Good job. I really enjoyed its reading this post enough to search for writing this excellent article and helpful post thanks for sharing.
shiv
this is very good this site very helpfull for me
Lokesh C
I am using API version for this function, It’ll help me a lot.
Thanks for sharing the useful one!
Krunal Lathiya
Thank you. I have updated this article to Laravel 11. I hope everyone will find this helpful!
David
Nice Blog
David
Love Your content
Krunal Lathiya
Thanks mate!
Arvid
I want to show my affection for your generosity for men who should have help on that topic. Your personal dedication to passing the solution all through had been astonishingly advantageous and have consistently encouraged employees just like me to achieve their desired goals. Your warm and helpful help denotes so much a person like me and even more to my mates. Thank you; from everyone of us.
Krunal Lathiya
Thank you and I hope this latest version of this article will be very helpful to you.
Digi Tool advisor
This article is creative and informative. I actually look such website for our company.
Hrwms It Company
Thanks for sharing such a nice and informative article
Regards
Krunal Lathiya
Thank you. I have updated this article to Laravel 11. I hope everyone will find this helpful!