

In this small project, we will use the Chart.js library to create charts in Laravel 11.
The Chart.js is a simple and elegant JavaScript library to create different types of charts.
For this tutorial, we will create a Bar Chart. A bar chart is the ultimate way of representing data values as vertical bars.
The bar chart is helpful because it will help us analyze the trend data and compare multiple data sets side by side.
Here is the step-by-step guide:
Step 1: Create a Laravel Project
Let’s install the Laravel 11 boilerplate:
composer create-project laravel/laravel laracharts --prefer-dist
Go to phpMyAdmin or any MySQL client and create a database.
Connect the database to the Laravel application by modifying the .env file.
Switch to your editor, edit the .env file, and put your database credentials in it.
DB_CONNECTION=mysql
DB_HOST=127.0.0.1
DB_PORT=8889
DB_DATABASE=laracharts
DB_USERNAME=root
DB_PASSWORD=root
Step 2: Install Chart.js and other packages
To use Chart.js, you need to install jQuery and Chart.js.
Go to the root of your Laravel application, open the terminal, and type the below command:
npm install jquery

npm install chart.js
To use Bootstrap in Laravel 11, install the laravel/ui package.
composer require laravel/ui
The next step is to install the frontend scaffolding using the ui Artisan command:
php artisan ui bootstrap
And then install the remaining packages using this command:
npm install
We must import Chart and jQuery modules inside resources >> js >> app.js file and assign it to the global window object.
import './bootstrap';

import $ from 'jquery';

window.jQuery = window.$ = $;

import Chart from 'chart.js/auto';

window.Chart = Chart;
From now on, we will have access to “$” and “Chart” objects that we can use anywhere in our project.
Step 3: Create Controller and Model files.
For this project, we will create a form to enter specific stock data into the database, fetch that data, and create an interactive chart.
Let’s create a StockController.php file to manage the views and data. Go to the terminal and type the following command.
php artisan make:controller StockController
Create one migration and model using the following command.
php artisan make:model Stock -m
Go to the migration file, and we need to add new fields in the stocks table.
<?php

use Illuminate\Database\Migrations\Migration;
use Illuminate\Database\Schema\Blueprint;
use Illuminate\Support\Facades\Schema;

return new class extends Migration
{
    /**
     * Run the migrations.
     */
    public function up(): void
    {
        Schema::create('stocks', function (Blueprint $table) {
            $table->id();
            $table->string('stockName');
            $table->integer('stockPrice');
            $table->integer('stockYear');
            $table->timestamps();
        });
    }

    /**
     * Reverse the migrations.
     */
    public function down(): void
    {
        Schema::dropIfExists('stocks');
    }
};
Run the following command to turn a migration into a table:
php artisan migrate
Go to the routes >> web.php file and define some routes to display the form and save the data into the database.
<?php

use Illuminate\Support\Facades\Route;
use App\Http\Controllers\StockController;

Route::get('/', function () {
    return view('welcome');
});

Route::get('stock/add', [StockController::class, 'create']);
Route::post('stock/add', [StockController::class, 'store']);
Go to the StockController.php file, import the Stock.php model, and create two functions:
<?php

namespace App\Http\Controllers;

use App\Models\Stock;
use Illuminate\Http\Request;

class StockController extends Controller
{
    public function create()
    {
        return view('stock');
    }
    public function store(Request $request)
    {
        $stock = new Stock([
            'stockName' => $request->get('stockName'),
            'stockPrice' => $request->get('stockPrice'),
            'stockYear' => $request->get('stockYear'),
        ]);
        $stock->save();

        return redirect('stocks');
    }
}
The create() function will display the form, and the store() function will save the data into the database.
To prevent the mass assignment exception, we must add protected the $fillable field and fill it with an array of columns to store the data.
Go to the model Stock.php and fill the $fillable array.
<?php

namespace App\Models;

use Illuminate\Database\Eloquent\Factories\HasFactory;
use Illuminate\Database\Eloquent\Model;

class Stock extends Model
{
    use HasFactory;

    protected $fillable = ['stockName', 'stockPrice', 'stockYear'];
}
Also, we need to add a route for the index view.
// web.php

Route::get('stocks', [StockController::class, 'index']);
Return view of the index function.
// StockController.php

/**
     * Display a listing of the resource.
     *
     * @return \Illuminate\Http\Response
     */
    public function index()
    {
        return view('index');
    }
We will create an index.blade.php file later!
Step 4: Create a form to enter the stock data
Let’s create a form to enter the data into the database.
We are creating the Stock analysis chart. To do that, we will compare the Stock price against its year to see the share price performance over the years.
Create a file called stock.blade.php and add the below code to create a form.
@extends('layout')

@section('content')
<h2> Add Data To Create Charts </h2>
<form action="{{url('stock/add')}}" method="post">
    @csrf
    <div class="mb-3">
        <label for="stockName" class="form-label">Stock Name:</label>
        <input type="text" class="form-control" id="stockName" name="stockName">
    </div>
    <div class="mb-3">
        <label for="stockPrice" class="form-label">Stock Price:</label>
        <input type="text" class="form-control" id="stockPrice" name="stockPrice">
    </div>
    <div class="mb-3">
        <label for="stockYear" class="form-label">Stock Year:</label>
        <select class="form-select" id="stockYear" name="stockYear">
            <option value="1991">1991</option>
            <option value="1992">1992</option>
            <option value="1993">1993</option>
            <option value="1994">1994</option>
            <option value="1995">1995</option>
            <option value="1996">1996</option>
        </select>
    </div>
    <button type="submit" class="btn btn-primary">Submit</button>
</form>
@endsection
Save the file and start the server by typing the following command:
php artisan serve
Go to this address: http://localhost:8000/stock/add
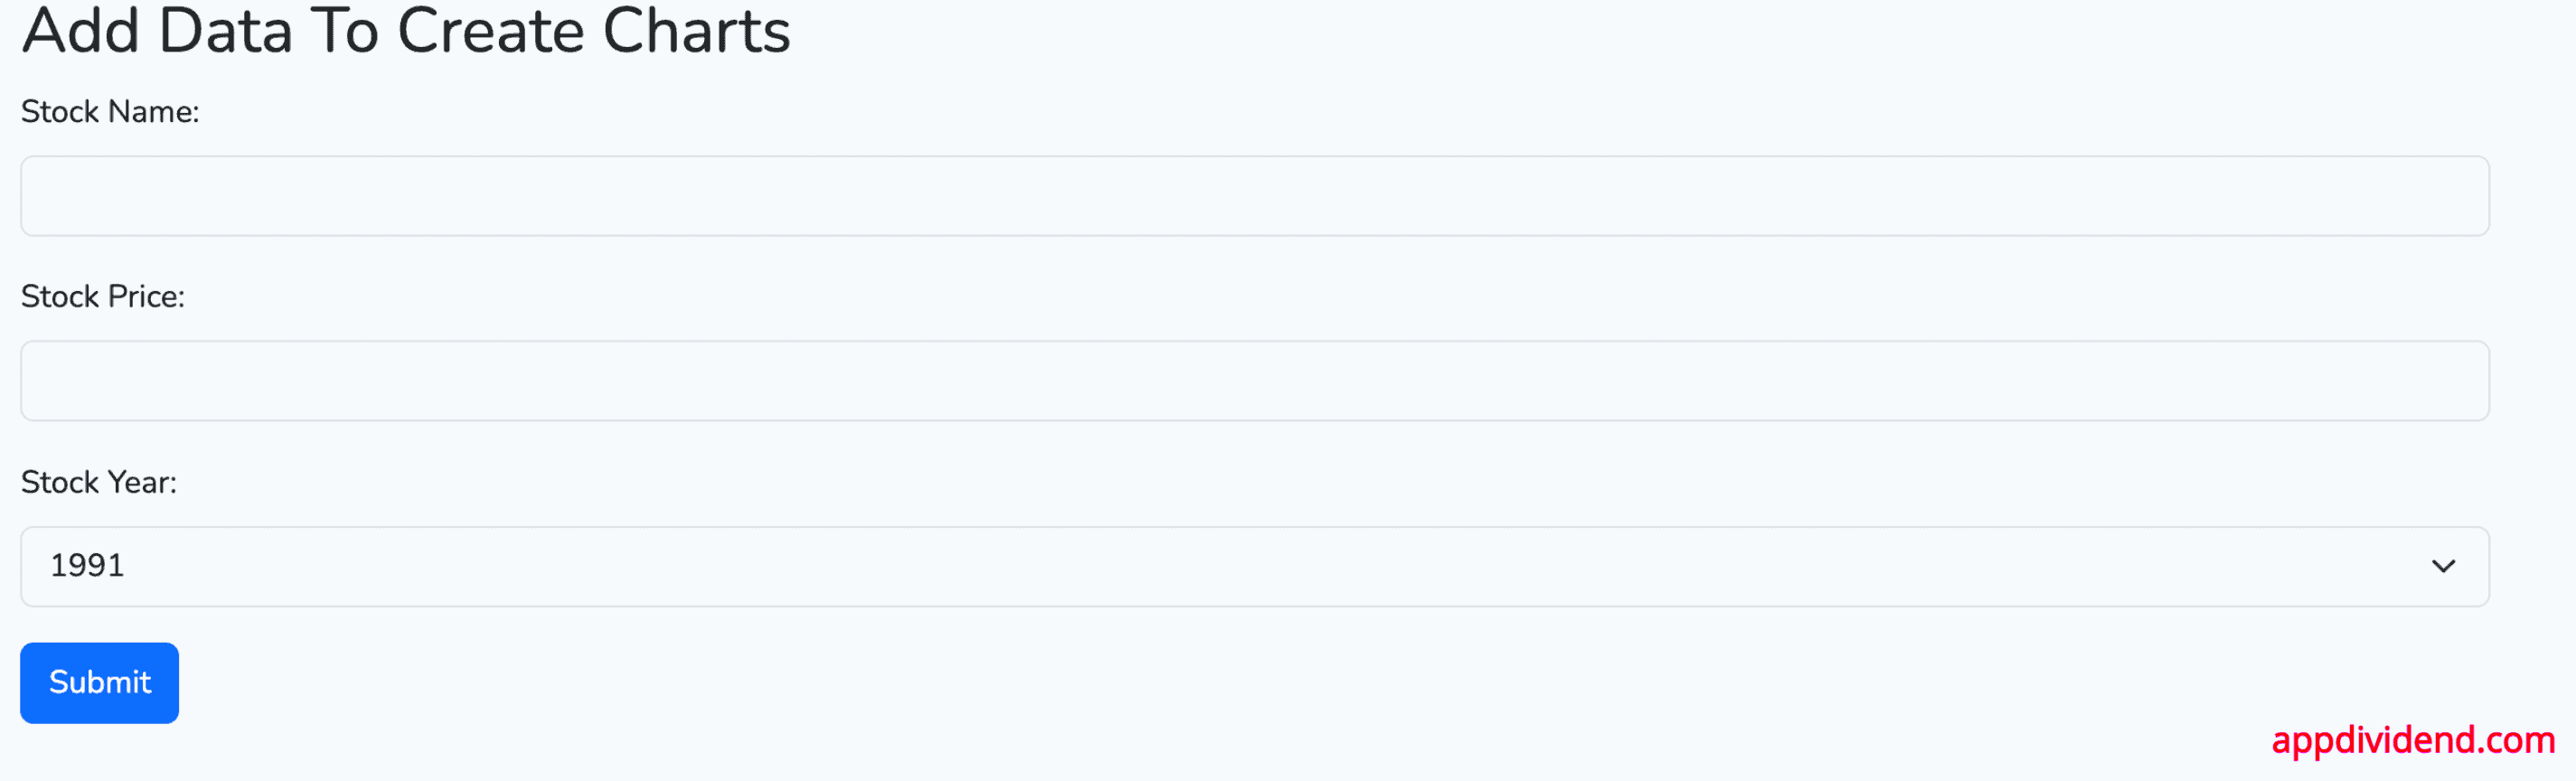
The form looks like the above image.
Now, fill out the form fields.
Let’s add a stock called “Infosys” with its price and year.
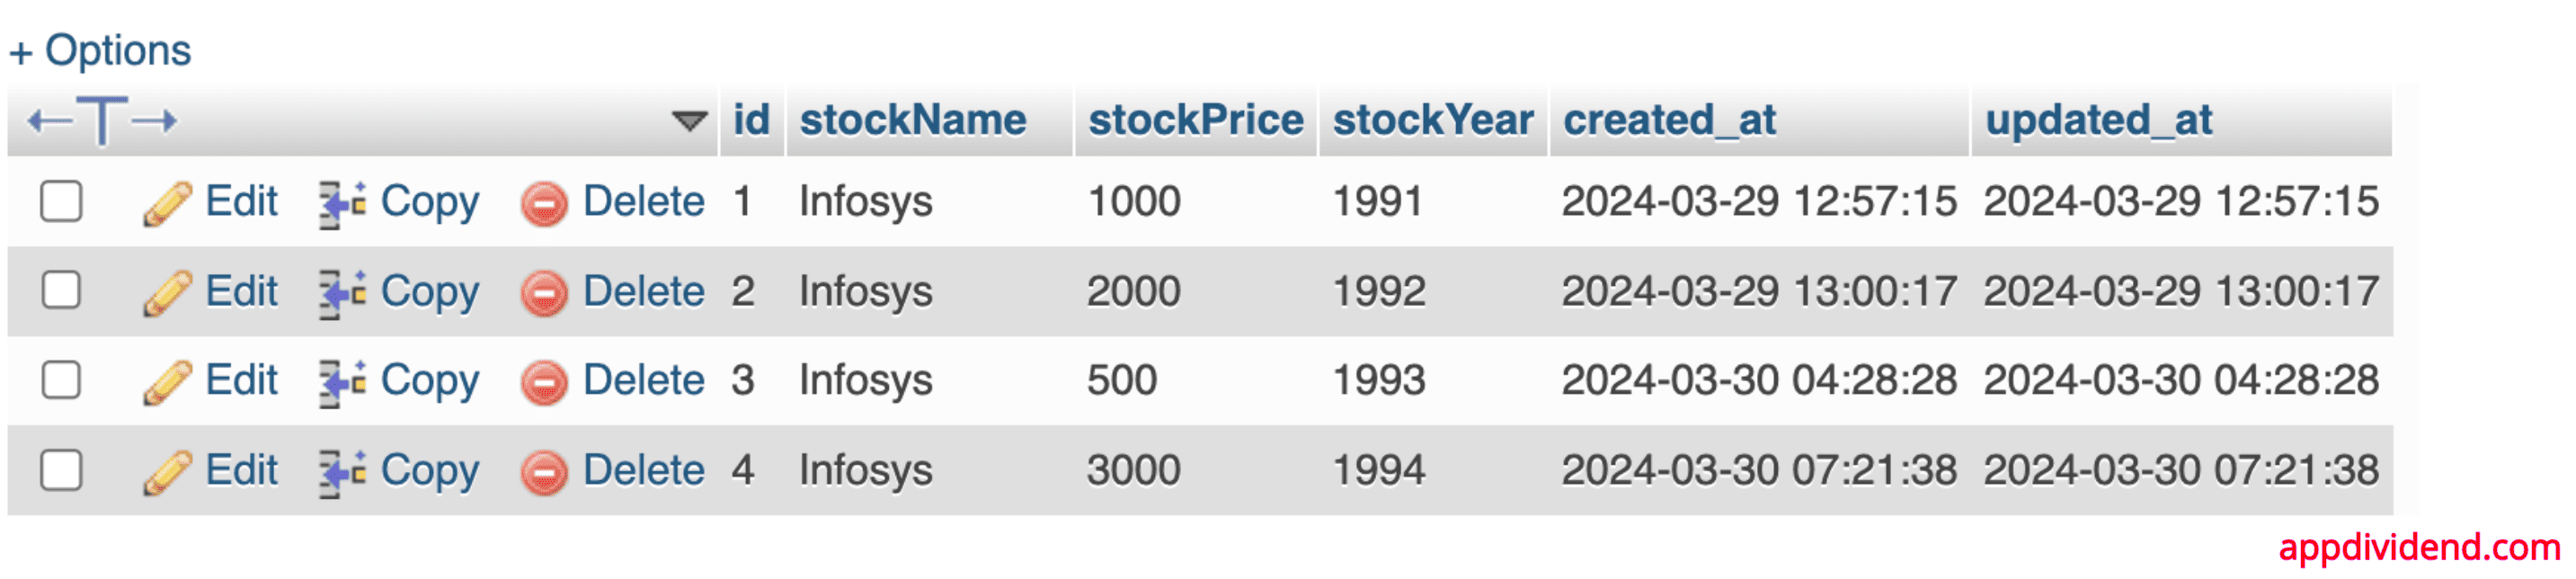
We have inserted four rows for Infosys with its price over the years, as you can see in the below image:
Step 5: Display the Bar Charts.
We need to display a Chart on the index page. I have used Bar Charts in this example.
Create a file called index.blade.php file and write the below code in it:
@extends('layout')

@section('content')
<div class="row">
    <div class="col-md-10 col-md-offset-1">
        <div class="panel panel-default">
            <div class="panel-heading"><b>Charts</b></div>
            <div class="panel-body">
                <canvas id="canvas" height="280" width="600"></canvas>
            </div>
        </div>
    </div>
</div>
<script type="module">
    var url = "{{url('stock/chart')}}";
    var Years = new Array();
    var Labels = new Array();
    var Prices = new Array();
    $(document).ready(function(){
        $.get(url, function(response){
            response.forEach(function(data){
                Years.push(data.stockYear);
                Labels.push(data.stockName);
                Prices.push(data.stockPrice);
            });
            var ctx = document.getElementById("canvas").getContext('2d');
            var myChart = new Chart(ctx, {
                type: 'bar',
                data: {
                    labels: Years,
                    datasets: [{
                        label: 'Infosys Price',
                        data: Prices,
                        borderWidth: 1
                    }]
                },
                options: {
                    scales: {
                        y: {  // Update this line
                            beginAtZero: true
                        }
                    }
                }
            });
        });
    });
</script>
@endsection
In this code, we send an AJAX request to the Laravel server to fetch the Infosys data and push the data into the Chart.js library function to show the chart.
Our next step is to create a chart() function inside the StockController.php file to fetch the Infosys data.
use DB;

public function chart()
{
        $result = DB::table('stocks')
            ->where('stockName', '=', 'Infosys')
            ->orderBy('stockYear', 'ASC')
            ->get();

        return response()->json($result);
}
We imported the DB facade to query the database.
Here is the complete code of the StockController.php file:
<?php

// StockController.php

namespace App\Http\Controllers;

use App\Models\Stock;
use DB;
use Illuminate\Http\Request;

class StockController extends Controller
{
    public function create()
    {
        return view('stock');
    }
    public function store(Request $request)
    {
        $stock = new Stock([
            'stockName' => $request->get('stockName'),
            'stockPrice' => $request->get('stockPrice'),
            'stockYear' => $request->get('stockYear'),
        ]);
        $stock->save();

        return redirect('stocks');
    }
    public function index()
    {
        return view('index');
    }
    public function chart()
    {
        $result = DB::table('stocks')
            ->where('stockName', '=', 'Infosys')
            ->orderBy('stockYear', 'ASC')
            ->get();

        return response()->json($result);
    }

}
Step 6: Running the Project
If you have followed all the steps perfectly, then go to this URL: http://localhost:8000/stocks
If you have inserted four entries like I did for the Infosys stock, then you will see the chart like this:
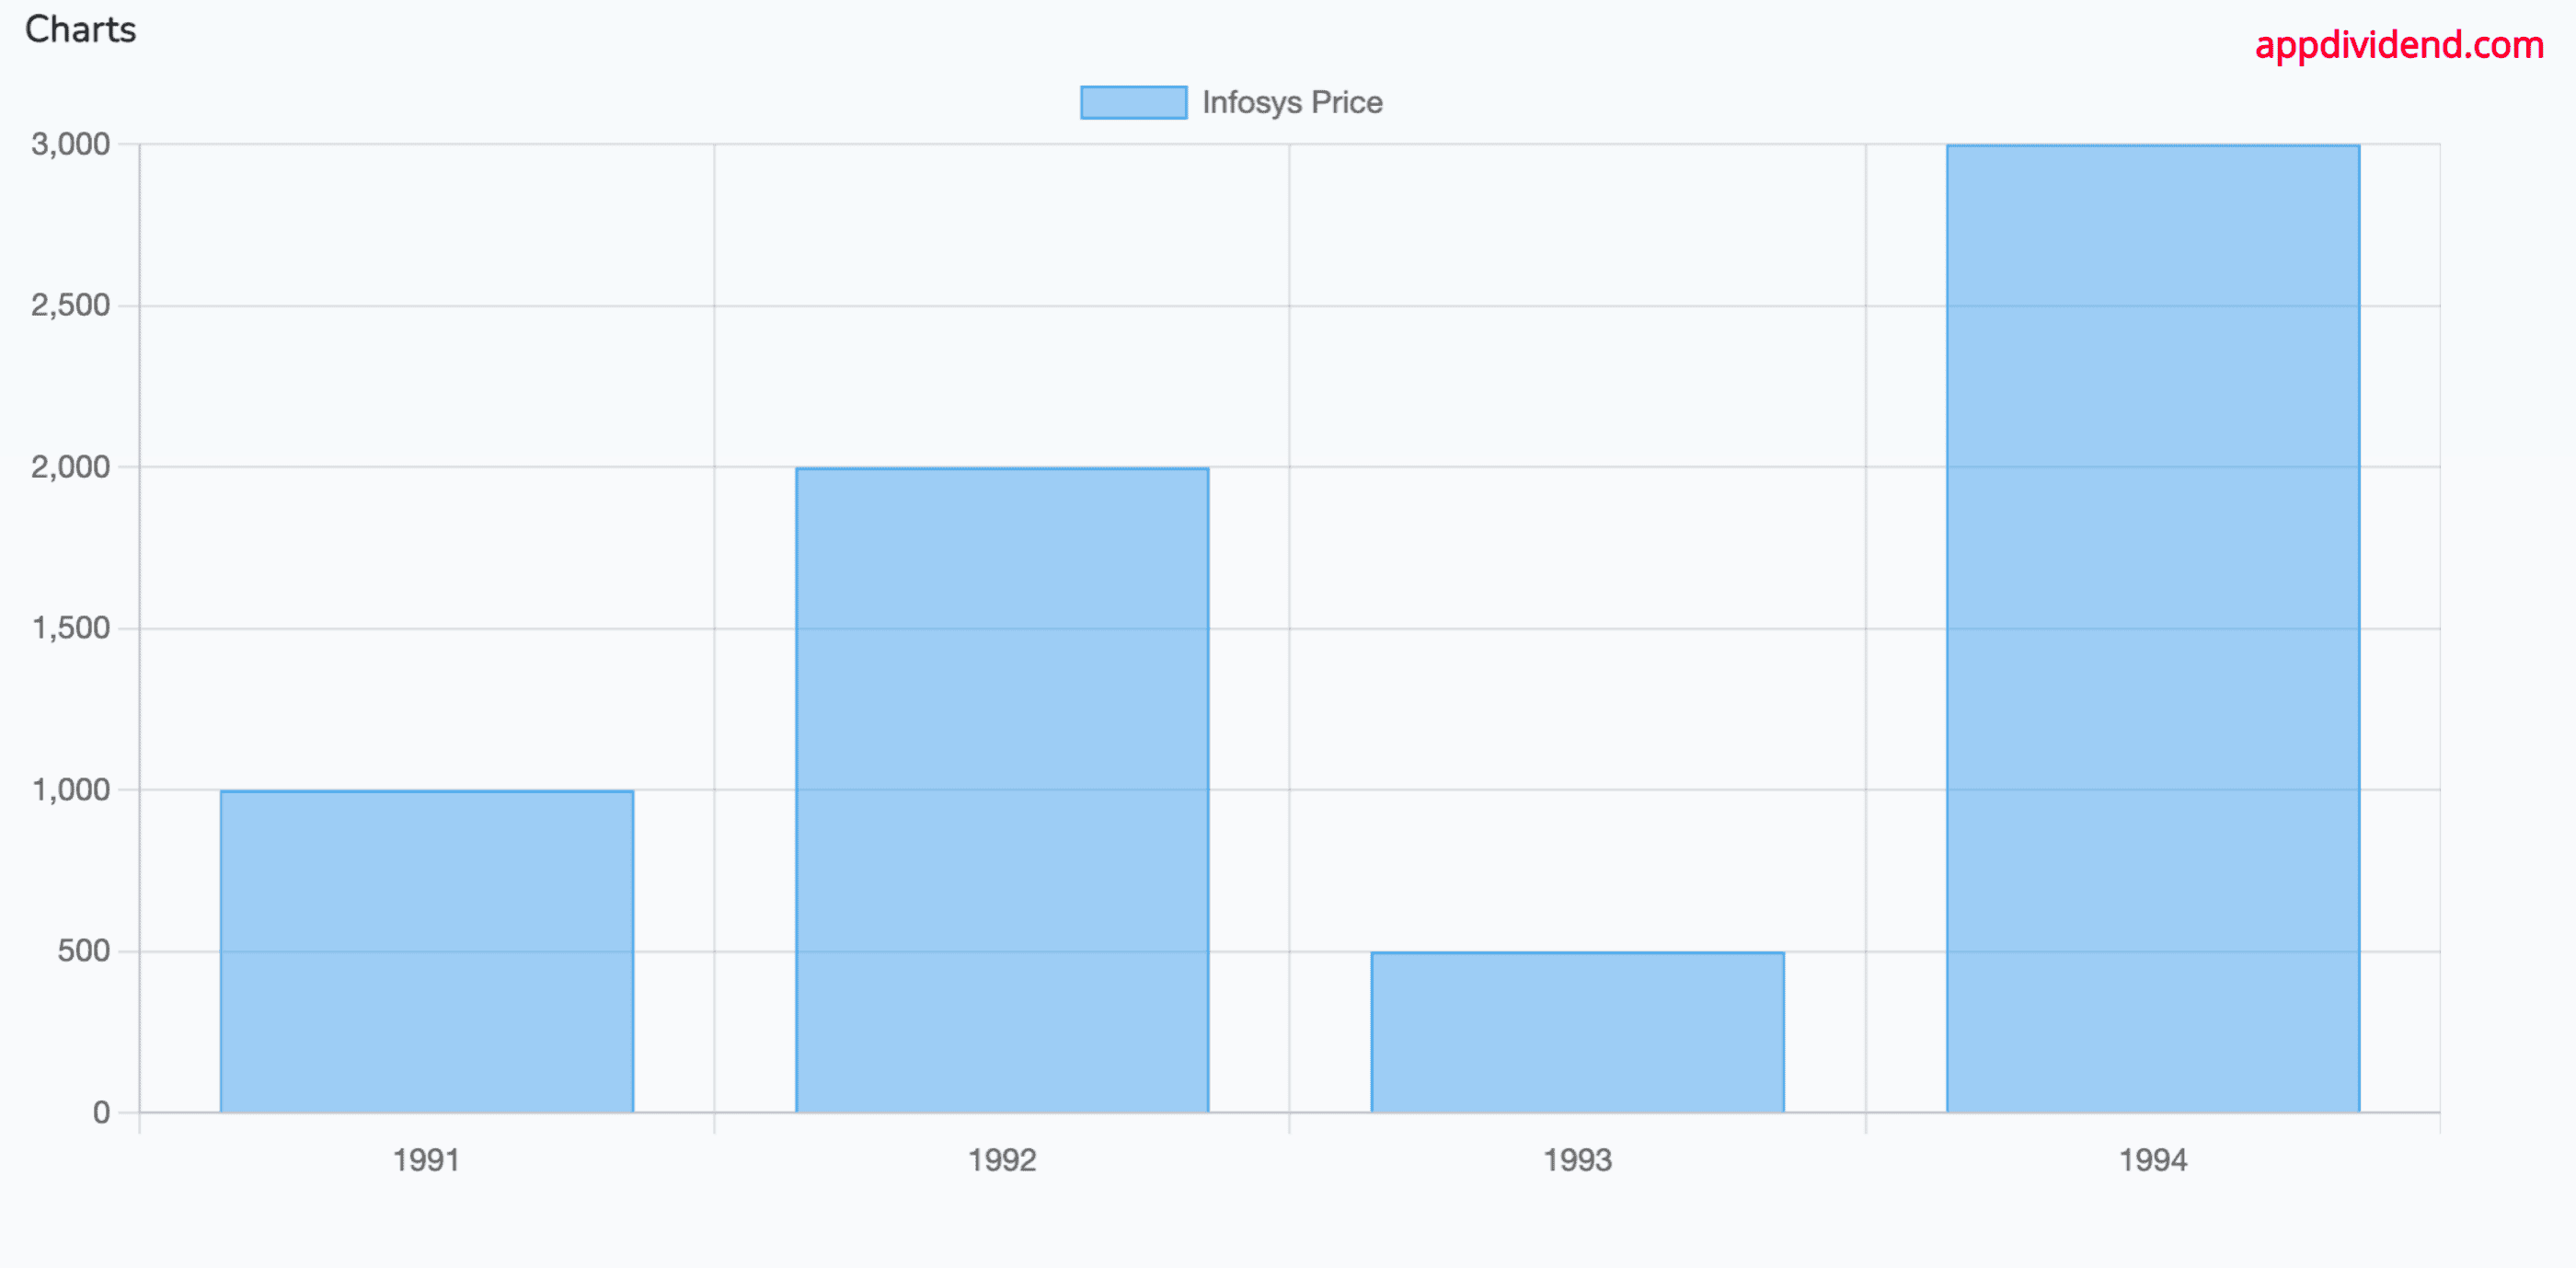
You can customize the chart based on your requirements. For more details, check out the documentation.
If you do not see anything, please go to this URL first: http://localhost:8000/stock/add
Add some entries via the form and then go to this URL: http://localhost:8000/stocks
Make sure you have two servers on:
First is the Laravel development server, which is running on port 8000 (php artisan serve)
Second is npm run dev, which is the vite development server.
That’s it.

pratyush
thx for help its a helpfull
Krunal
Thanks! Keep sharing and learning!
Andre MacNamara
Fantastic. Thanks so much/
Krunal
Thank you. Keep sharing!
Kelvin
Nice Tutorial, I followed through but at the end no chart was displayed i don’t know what’s wrong
Krunal
Maybe the backend data is not properly fetched! OR Chart.js library is not included properly. Please refer this article step-by-step!
Kel
The chart can’t display , is empty any reason?
Krunal
I have updated the article. Please refer this!
DR NIKHIL KUMAR GHORAI
please show demo on two data from database as multi axis chart
Krunal
Sure, will try my best to show it!
Jehdai
Hey, the tutorial was very helpfull and i say thank you for that, but when it comes time to display datas in the chart i get a response from the server which says that No properties and the fact is that the chart is empty.
What can i do to fix it ? Thanks for your help. I hope to read you as soon as possible
Krunal
I have updated this article to Laravel 11 and now your problem will be solved!