
Here is the step-by-step guide to integrating material table in Angular:
Step 1: Install the Angular 18 project
Install the Angular CLI if you have not installed and type the following command to create a new project:
ng new table-app
Go inside the project:
cd table-app
Step 2: Install the Angular Material
Type the following command to install Angular material using the following command:
ng add @angular/material
Step 3: Create a material-table component
You can create a custom component for displaying the table using the following command:
ng generate component material-table
It will create a material-table folder inside the src/app folder:
Import this component inside the src/app/app.component.ts file to register it in the Angular application:
import { Component } from '@angular/core';
import { RouterOutlet } from '@angular/router';
import { MaterialTableComponent } from './material-table/material-table.component';

@Component({
  selector: 'app-root',
  standalone: true,
  imports: [RouterOutlet, MaterialTableComponent],
  templateUrl: './app.component.html',
  styleUrl: './app.component.css',
})

export class AppComponent {
  title = 'Angular Modules';
}
And add the below line inside the src/app/app.component.html file:
<app-material-table></app-material-table>
Step 4: Create a data service
To create a service in Angular, use the below command:
ng g service data
Add the below code inside the src/app/data.service.ts file:
import { Injectable } from '@angular/core';
import { HttpClient } from '@angular/common/http';
import { Observable } from 'rxjs';

@Injectable({
  providedIn: 'root',
})
export class DataService {
  private apiUrl = 'https://jsonplaceholder.typicode.com/todos';

  constructor(private http: HttpClient) {}

  getUsers(): Observable<any[]> {
    return this.http.get<any[]>(this.apiUrl);
  }
}
In this code, we imported the HttpClient module to communicate with a backend API to fetch the data.
The DataService class has a getUsers() function that returns an Observable.
In Angular 18, importing the HttpClient module is somewhat different than it used to be.
We need to register the provideHttpClient class to the Angular application, and to do that exactly, import the provideHttpClient module inside the src/app/app.config.ts file like this:
import { ApplicationConfig, provideZoneChangeDetection } from '@angular/core';
import { provideRouter } from '@angular/router';
import { provideHttpClient } from '@angular/common/http';

import { routes } from './app.routes';
import { provideAnimationsAsync } from '@angular/platform-browser/animations/async';

export const appConfig: ApplicationConfig = {
  providers: [
    provideZoneChangeDetection({ eventCoalescing: true }),
    provideRouter(routes),
    provideAnimationsAsync(),
    provideHttpClient(),
  ],
};
Step 5: Update the Table Component to use the Service
Add the following code inside the src/app/material-table/material-table.component.ts file:
import { Component, OnInit, ViewChild, AfterViewInit } from '@angular/core';
import { MatTableDataSource, MatTableModule } from '@angular/material/table';
import { MatPaginator, MatPaginatorModule } from '@angular/material/paginator';
import { MatSort, MatSortModule } from '@angular/material/sort';
import { MatInputModule } from '@angular/material/input';
import { MatFormFieldModule } from '@angular/material/form-field';
import { MatButtonModule } from '@angular/material/button';
import { MatIconModule } from '@angular/material/icon';
import { CommonModule } from '@angular/common';
import { DataService } from '../data.service';

export interface User {
  userId: number;
  id: number;
  title: string;
  completed: boolean;
}

@Component({
  selector: 'app-material-table',
  standalone: true,
  imports: [
    CommonModule,
    MatTableModule,
    MatPaginatorModule,
    MatSortModule,
    MatInputModule,
    MatFormFieldModule,
    MatButtonModule,
    MatIconModule,
  ],
  templateUrl: './material-table.component.html',
  styleUrl: './material-table.component.css',
})
export class MaterialTableComponent implements OnInit, AfterViewInit {
  displayedColumns: string[] = ['userId', 'id', 'title', 'completed'];
  dataSource = new MatTableDataSource<User>([]);
  data: any = '';

  @ViewChild(MatPaginator) paginator?: MatPaginator | undefined;
  @ViewChild(MatSort) sort?: MatSort | undefined;

  constructor(private dataService: DataService) {}

  ngOnInit() {
    this.fetchData();
  }
  ngAfterViewInit() {
    if (this.paginator) {
      this.dataSource.paginator = this.paginator;
    }
    if (this.sort) {
      this.dataSource.sort = this.sort;
    }
  }

  fetchData() {
    this.dataService.getUsers().subscribe((data) => {
      this.dataSource.data = data;
    });
  }

  applyFilter(event: Event) {
    const filterValue = (event.target as HTMLInputElement).value;
    this.dataSource.filter = filterValue.trim().toLowerCase();

    if (this.dataSource.paginator) {
      this.dataSource.paginator.firstPage();
    }
  }
  clearFilter() {
    this.dataSource.filter = '';
    if (this.dataSource.paginator) {
      this.dataSource.paginator.firstPage();
    }
  }
}
Step 6: Update the Table Component Template
Add the below code in app/src/material-table/material-table.component.html file:
<div class="table-container">
  <mat-form-field appearance="outline" class="filter-input">
    <mat-label>Search</mat-label>
    <input matInput (keyup)="applyFilter($event)" placeholder="Ex. Hydrogen" />
    <button
      mat-icon-button
      matSuffix
      aria-label="Clear"
      (click)="clearFilter()"
    >
      <mat-icon>close</mat-icon>
    </button>
  </mat-form-field>

  <table mat-table [dataSource]="dataSource" matSort class="mat-elevation-z8">
    <!-- ID Column -->
    <ng-container matColumnDef="userId">
      <th mat-header-cell *matHeaderCellDef mat-sort-header>UserID</th>
      <td mat-cell *matCellDef="let element">{{ element.userId }}</td>
    </ng-container>

    <!-- Name Column -->
    <ng-container matColumnDef="id">
      <th mat-header-cell *matHeaderCellDef mat-sort-header>ID</th>
      <td mat-cell *matCellDef="let element">{{ element.id }}</td>
    </ng-container>

    <!-- Username Column -->
    <ng-container matColumnDef="title">
      <th mat-header-cell *matHeaderCellDef mat-sort-header>Title</th>
      <td mat-cell *matCellDef="let element">{{ element.title }}</td>
    </ng-container>

    <!-- Email Column -->
    <ng-container matColumnDef="completed">
      <th mat-header-cell *matHeaderCellDef mat-sort-header>Completed</th>
      <td mat-cell *matCellDef="let element">{{ element.completed }}</td>
    </ng-container>

    <!-- Header and Row Declarations -->
    <tr mat-header-row *matHeaderRowDef="displayedColumns"></tr>
    <tr mat-row *matRowDef="let row; columns: displayedColumns"></tr>
  </table>

  <mat-paginator
    [pageSizeOptions]="[5, 10, 25, 100]"
    showFirstLastButtons
  ></mat-paginator>
</div>
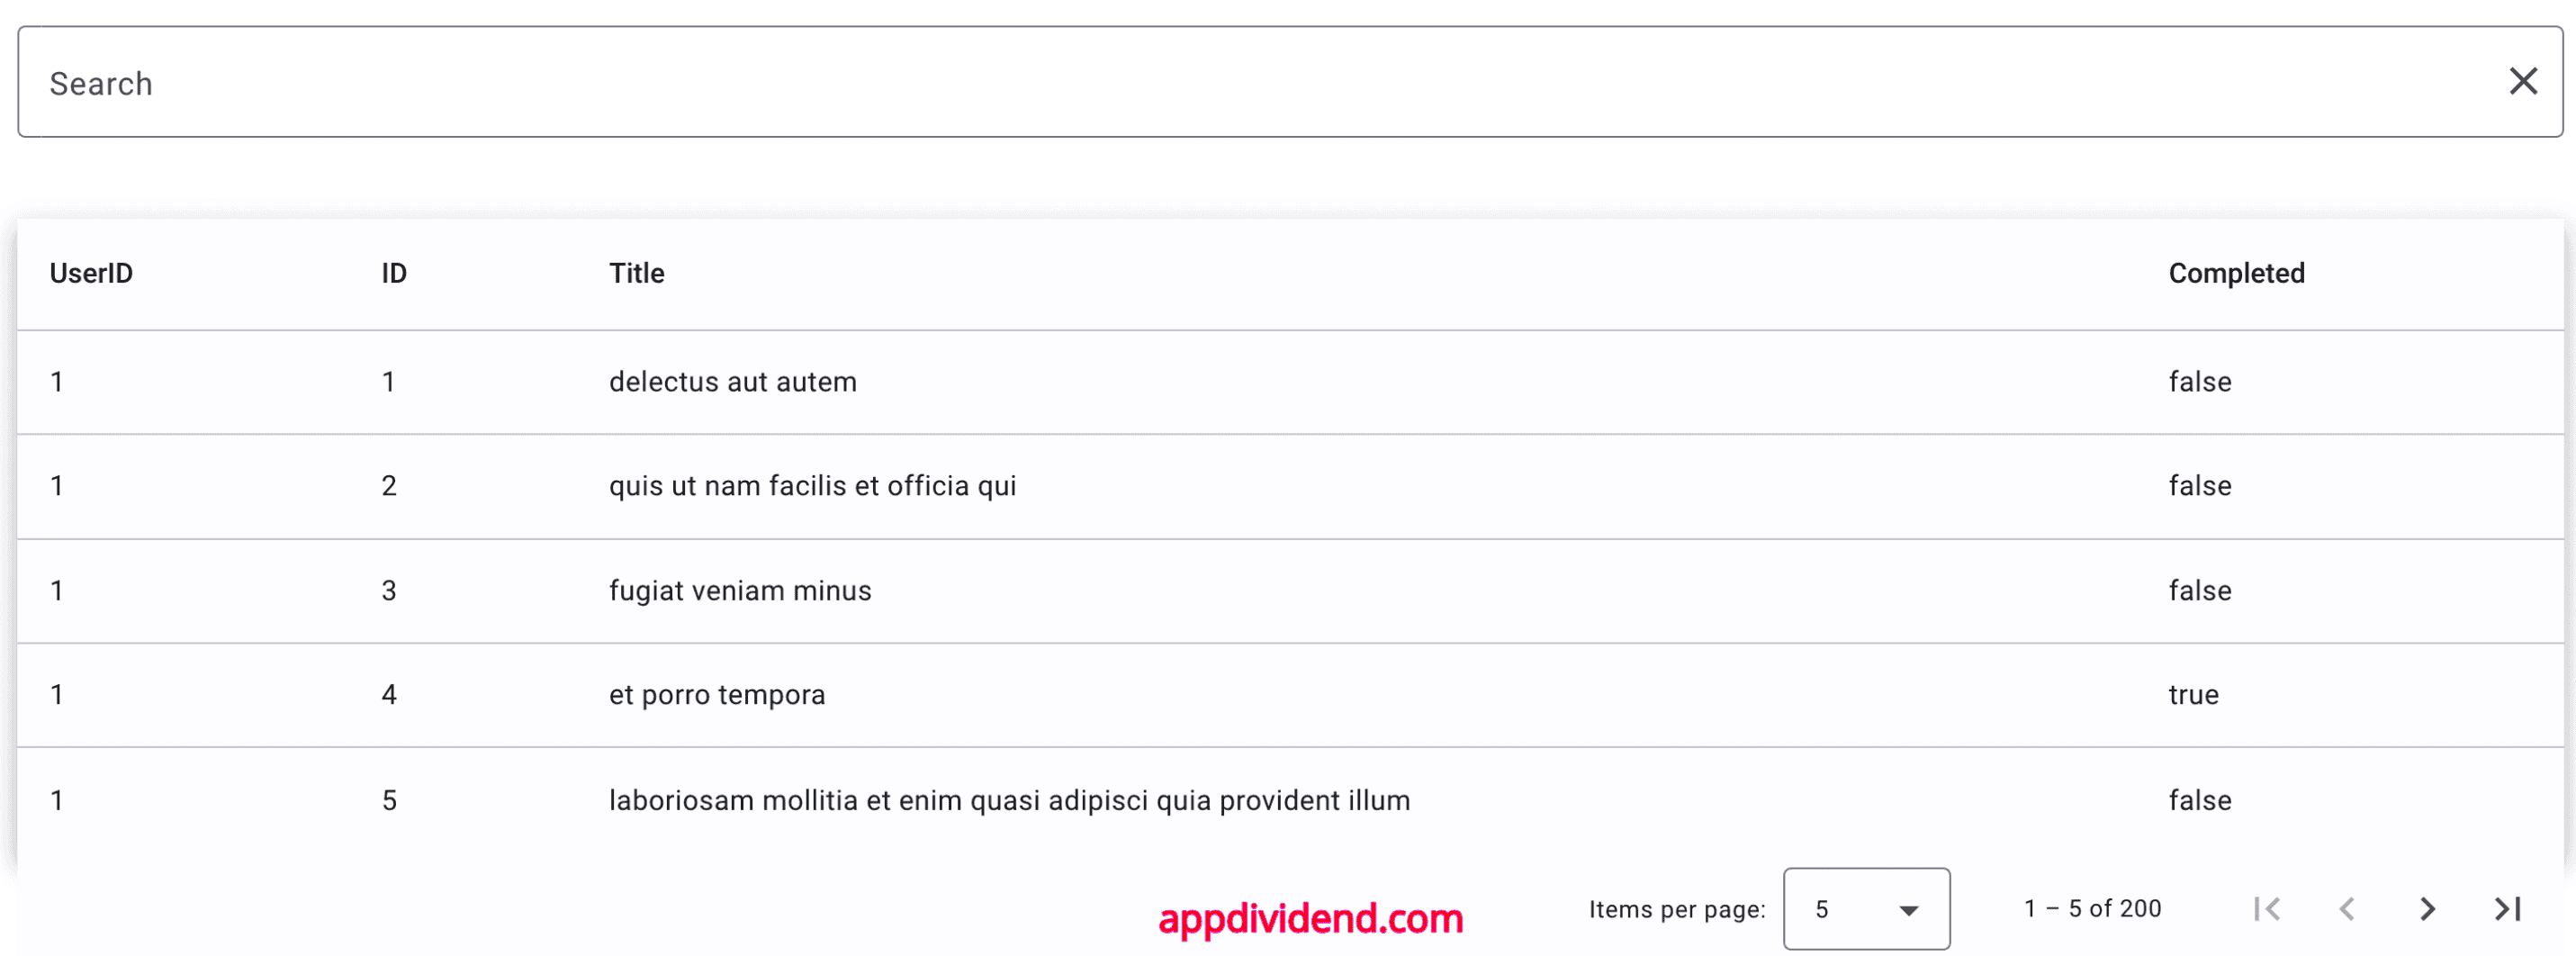
Save the file and start the development server:
ng serve --open
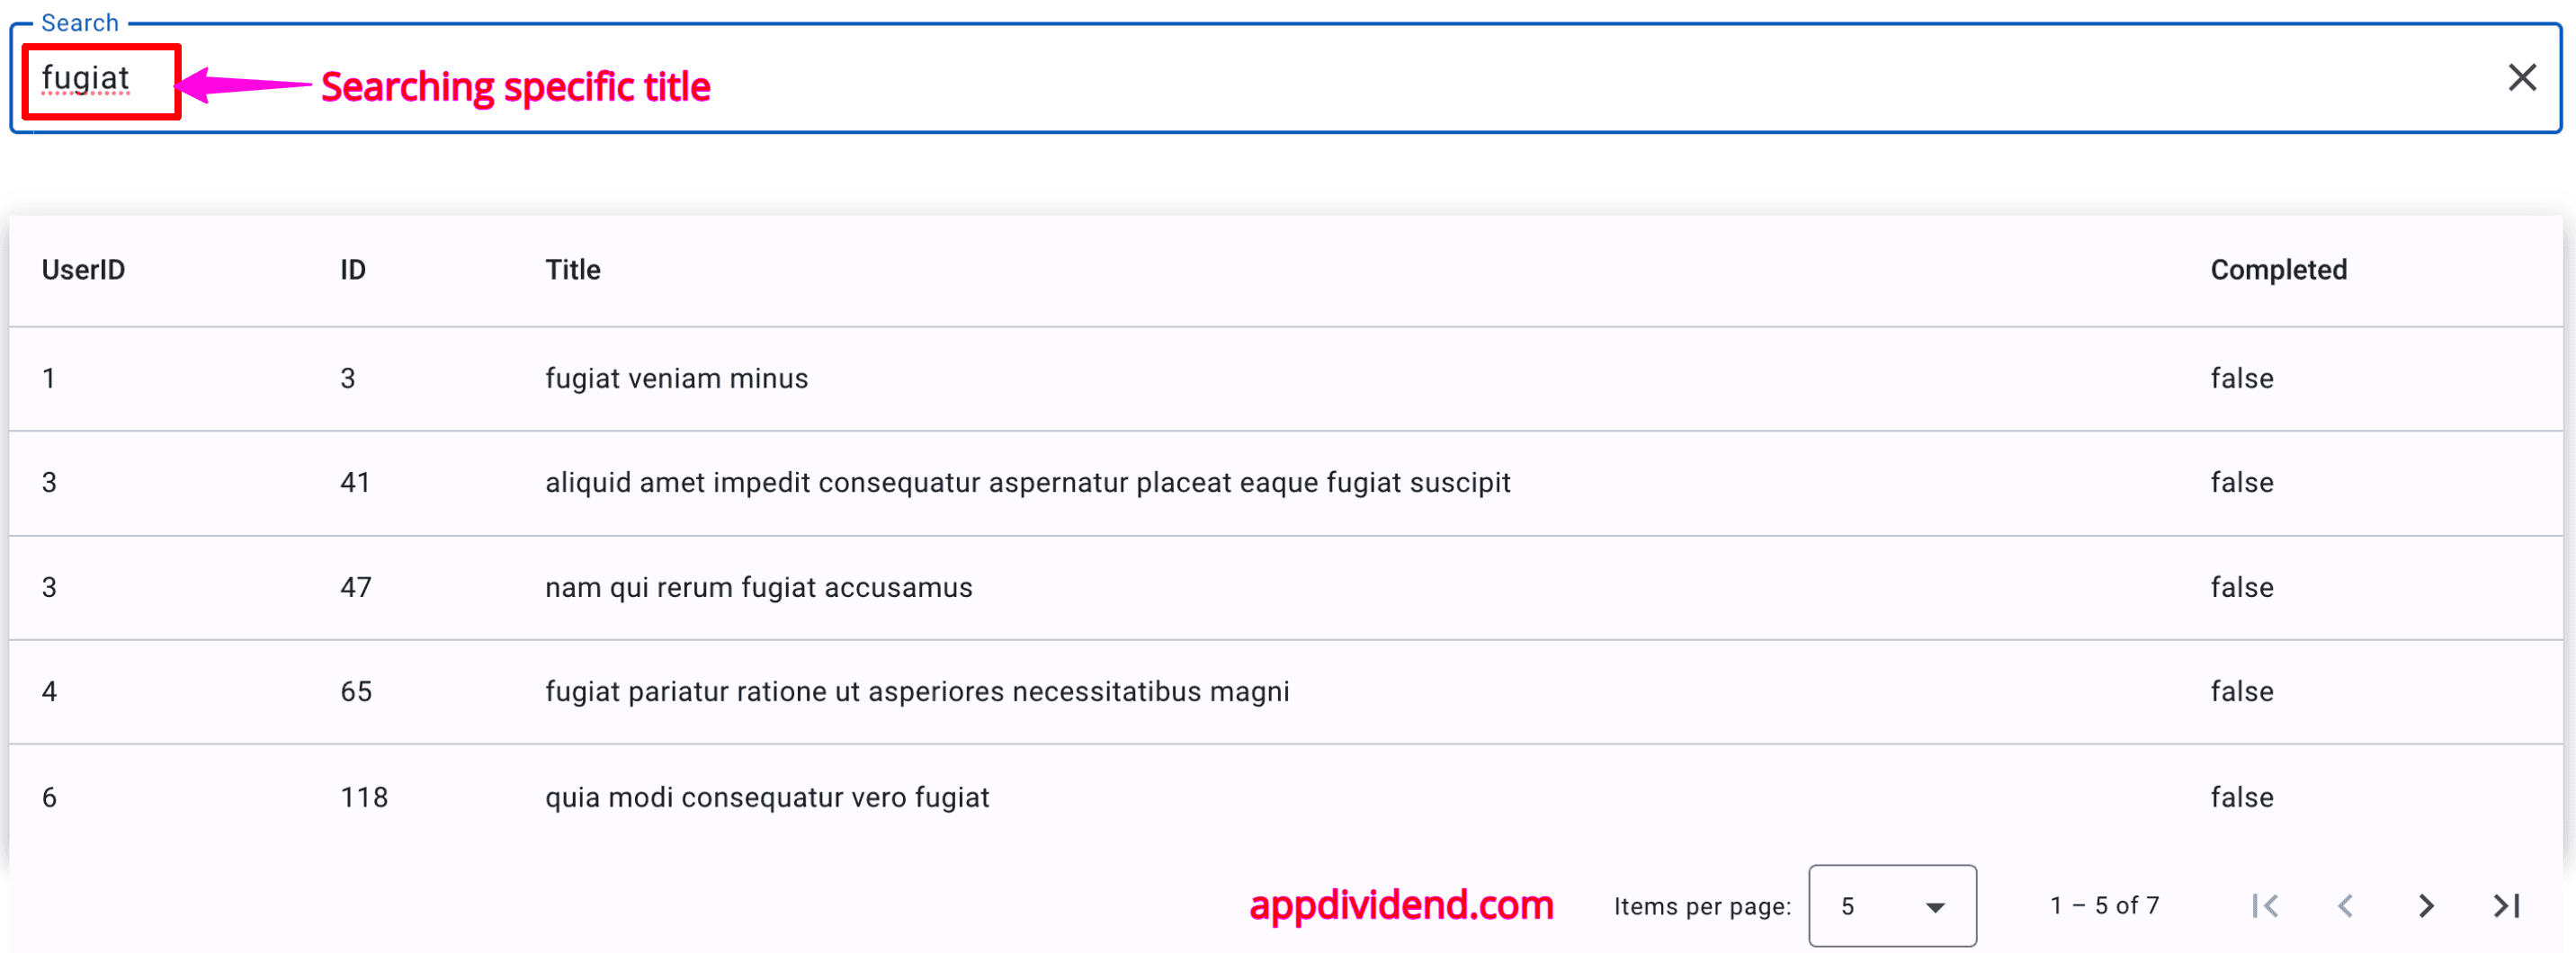
You can search the specific data in the data table like this:
Let’s sort the data based on the “title” column:
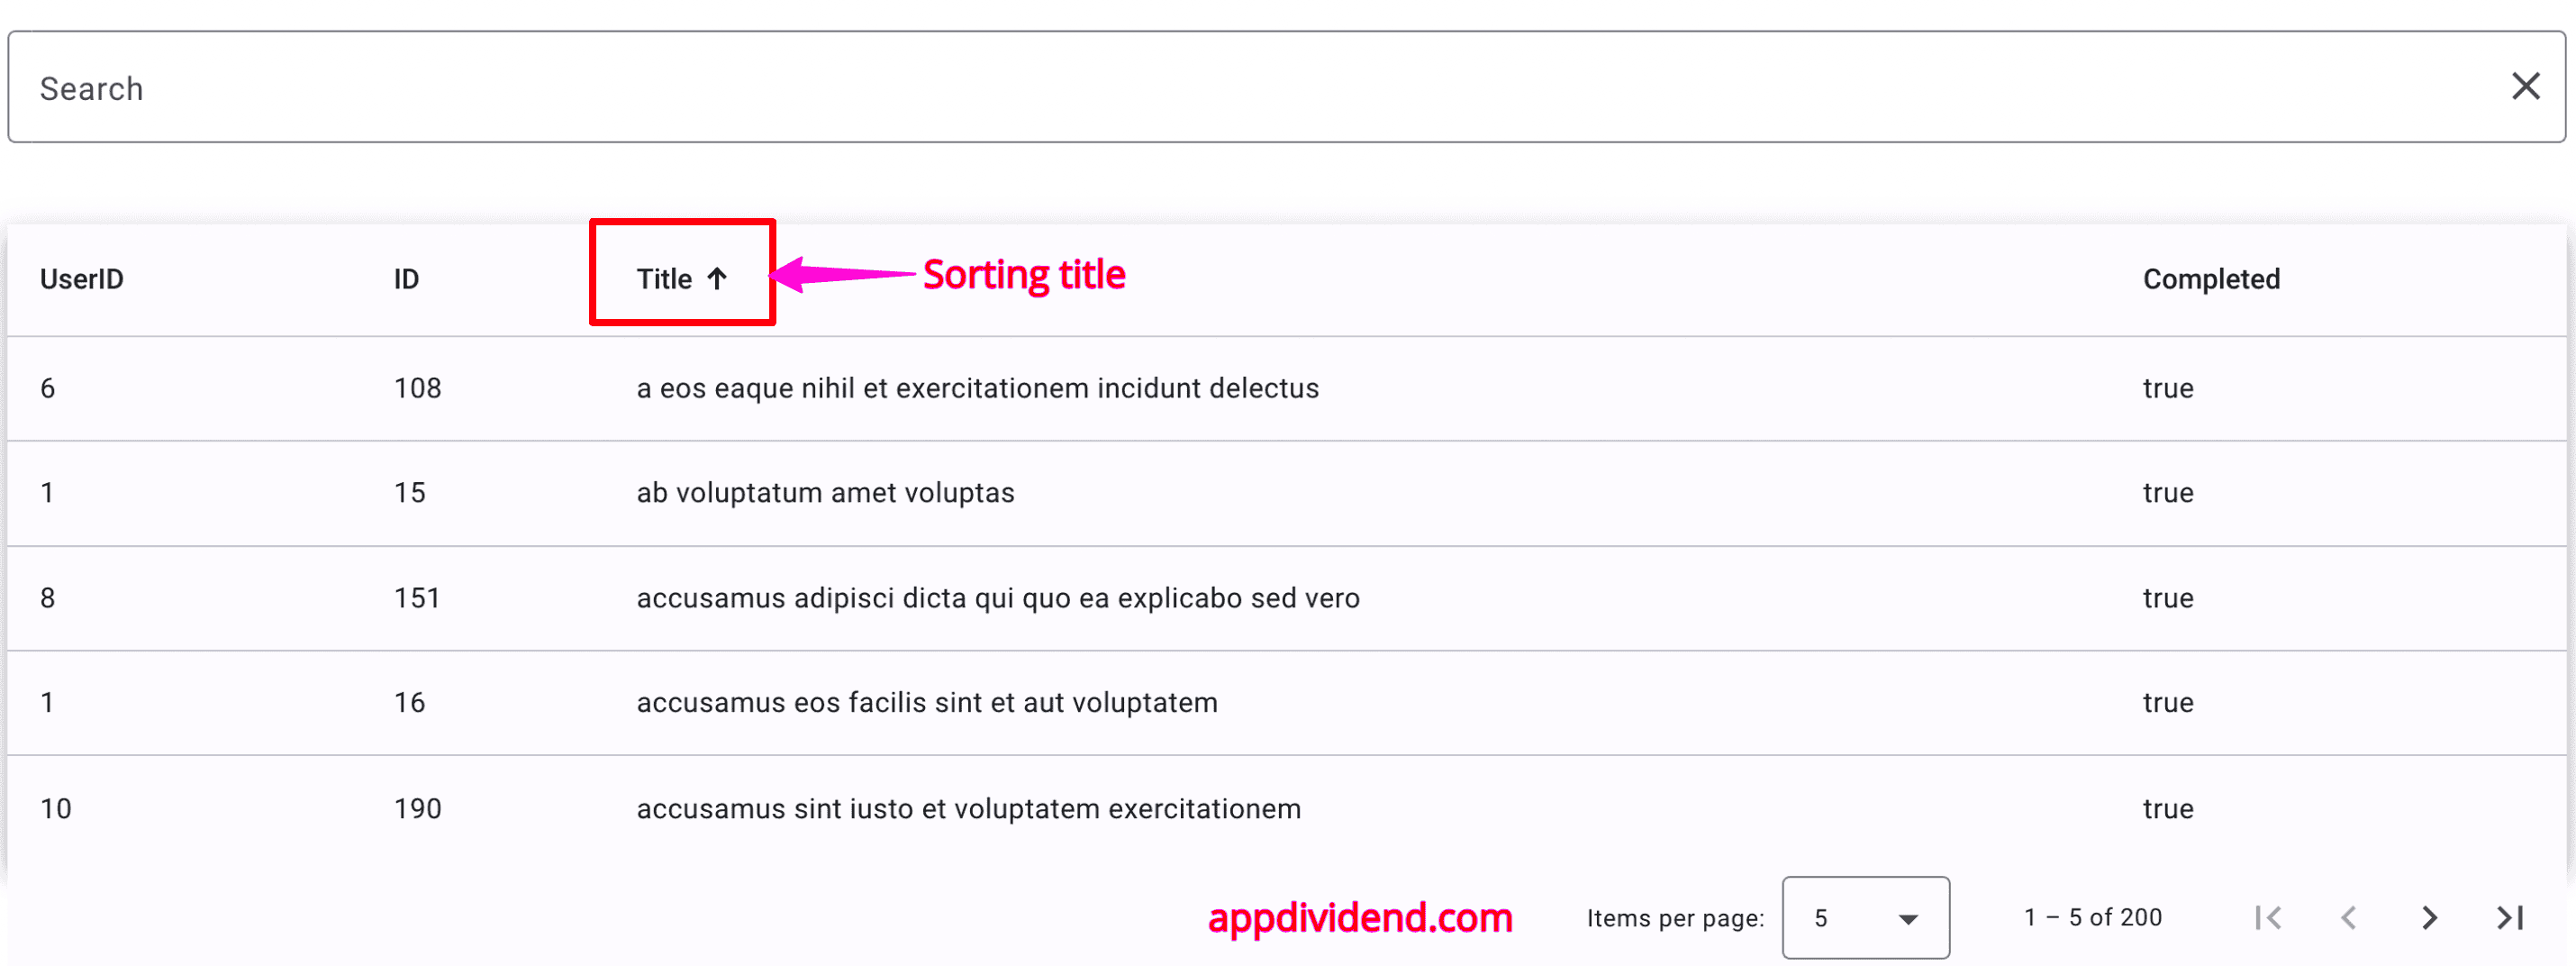
That’s it!

Gajanan
HI,
I am getting below error
Error: The selector “app-root” did not match any elements
Ayush Shukla
First of all a huge thanks to you guys specially KRUNAL, your articles are such an amazing that everyone can understand it very easily. I am learning angular through your blog.
I have my data in MySQL database and I want to access(show) it on Angular 6 using NodeJS as an intermediary. Is it possible to access that using rest APIs. If I want to apply CRUD operations, how can I do that.
If there is any link please give me that else make an article covering this problem. Means how our data in database can be displayed on angular, we can add/delete data to database by adding /deleting through angular and vice-versa.
Thanks in Advance
Ayush
Ashraf
Thanks for this tutorials.
mohamed abbullah
i want to contribute to this good article .
there is 2 error can face any one who will read this article in angular 6 :
you may facing error with ng2-completer > install it via
npm cache clean –force
npm i ng2-completer –save
Abhijith
Hi,
i have done the same program but i am getting an error as follow
“ERROR Error: Cannot find a differ supporting object ‘Response with status: 200 OK for URL: http://localhost:4000/characters‘ of type ‘object’. NgFor only supports binding to Iterables such as Arrays.”
can you please find me a solution
Thilini Weerasinghe
That was amazing.I like that very much . But I couldn’t get the data for my table . can you please help me.
YASSINE ZELLAMA
Hello,
Can someone pls send me the final file, i did not succeed in making the table
Umesh
how we can add column header dynamically in that table ?
Umesh
dynamically column header adding ?
fatemeh Maleki
Can I show a total of my rows in the footer of the table?
Ram Naresh
I am not able to see the smart table
Karuppasamy
How can I do, Create, Edit, Delete actions, update to API
kartik pandey
ts
this.userService.List().subscribe((data: user[]) => {
this.totalRows = data.length;
this.list=data;
});
html
Total rows: {{ totalRows }}
kapil
how can I update delete database
Shirish Bathe
Hi,
Tried to follow your blog but I am getting following error:
“ERROR in The target entry-point “ng2-smart-table” has missing dependencies:
– @akveo/ng2-completer”
I am using latest angular version.
Wass
Hi @Shirish,
you should add this dependecies to fix the issue:
“` npm install @akveo/ng2-completer –save-dev “`