

For this tutorial, you need the latest versions of Angular and Node.js because we will use Node.js as the backend and Mongodb as the database. This is a simple MEAN stack application.
Here is the step-by-step guide to creating a crud application in Angular 18:
Step 1: Setup Angular 18
If you have an older @angular/cli version, you can run the following command to install the latest version.
npm uninstall -g @angular/cli

npm cache verify

npm install -g @angular/cli
You will create a new Angular project using the following command.
ng new ngcrud

cd ngcrud
After going inside the project folder, open the project in Visual Studio Code using the following command. If you are not using it, then start using it. It is the best Editor for Javascript development.
We enabled routing for our application during installation. This is new in Angular because it prompts us while installing the Angular boilerplate. You can check the app.routes.ts file inside the src >> app directory.
Step 2: Install Angular Material
Next, install the Angular Material using the following command.
ng add @angular/material
Step 3: Generate Angular Components
Type the following command to generate Angular Components. We will perform create, read, and update operations. So, we will create three components.
ng g c gst-add

ng g c gst-get

ng g c gst-edit
Let’s register these three components inside the src/app/app.routes.ts file:
// app.routes.ts

import { Routes } from '@angular/router';
import { GstAddComponent } from './gst-add/gst-add.component';
import { GstEditComponent } from './gst-edit/gst-edit.component';
import { GstGetComponent } from './gst-get/gst-get.component';

export const routes: Routes = [
  { path: 'business/create', component: GstAddComponent },
  { path: 'business/edit/:id', component: GstEditComponent },
  { path: 'business', component: GstGetComponent },
];
Step 4: Create an Angular Navigation
Import necessary material and routing-related modules inside the src/app/app.component.ts file.
// app.component.ts

import { Component } from '@angular/core';
import { MatToolbarModule } from '@angular/material/toolbar';
import { MatButtonModule } from '@angular/material/button';
import { MatIconModule } from '@angular/material/icon';
import { MatMenuModule } from '@angular/material/menu';
import { RouterLink, RouterLinkActive, RouterOutlet } from '@angular/router';
import { CommonModule } from '@angular/common';

@Component({
  selector: 'app-root',
  standalone: true,
  imports: [
    MatToolbarModule,
    MatButtonModule,
    MatIconModule,
    MatMenuModule,
    RouterLink,
    RouterLinkActive,
    RouterOutlet,
    CommonModule,
  ],
  templateUrl: './app.component.html',
  styleUrl: './app.component.css',
})
export class AppComponent {
  title = 'ngcrud';
}
Write the following code inside the app.component.html file.
<!-- app.component.html -->

<mat-toolbar color="primary">
  <mat-toolbar-row>
    <span>My App</span>
    <span class="spacer"></span>
    <a mat-button routerLink="business/create" routerLinkActive="active"
      >Create Business</a
    >
    <a mat-button routerLink="business" routerLinkActive="active">Business</a>
  </mat-toolbar-row>
</mat-toolbar>
<div class="container">
  <router-outlet></router-outlet>
</div>
Save the file, and start the development server:
ng serve -o

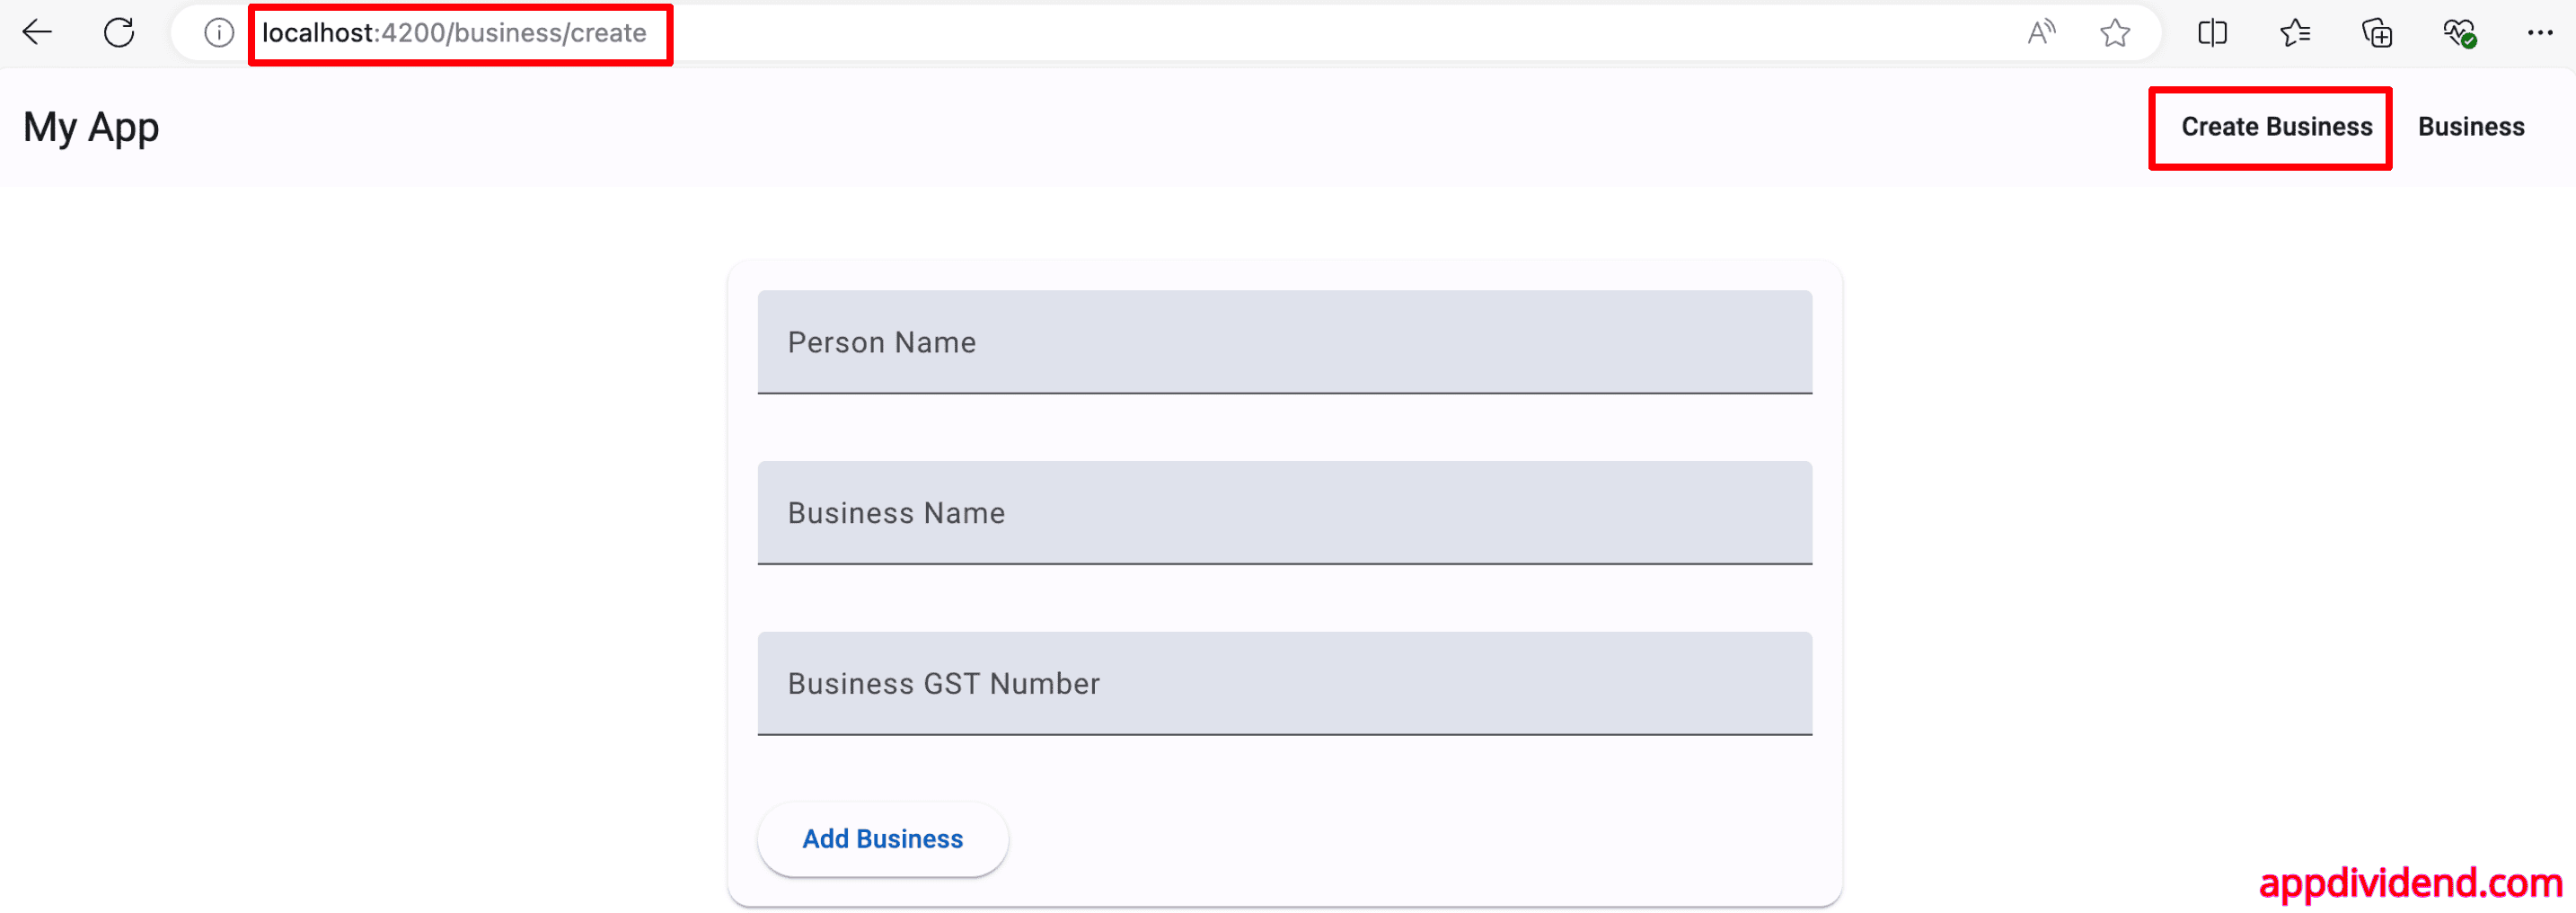
If you click on the “Create Business” page, it looks like this:

Step 5: Adding a Material form
Import ReactiveFormsModule, FormGroup, and FormControl modules inside the src/app/gst-add/gst-add.component.ts file:
// gst-add.component.ts

import { Component } from '@angular/core';
import { ReactiveFormsModule, FormGroup, FormControl } from '@angular/forms';
import { MatCardModule } from '@angular/material/card';
import { MatFormFieldModule } from '@angular/material/form-field';
import { MatInputModule } from '@angular/material/input';
import { MatButtonModule } from '@angular/material/button';

@Component({
  selector: 'app-gst-add',
  standalone: true,
  imports: [
    ReactiveFormsModule,
    MatCardModule,
    MatFormFieldModule,
    MatInputModule,
    MatButtonModule,
  ],
  templateUrl: './gst-add.component.html',
  styleUrl: './gst-add.component.css',
})
export class GstAddComponent {
  form: FormGroup = new FormGroup({
    personName: new FormControl(''),
    businessName: new FormControl(''),
    businessGST: new FormControl(''),
  });

  onSubmit() {
    if (this.form.valid) {
      console.log(this.form.value);
    }
  }
}
Inside the src/app/gst-add/gst-add.component.html file, add the following code:
<!-- gst-add.component.html -->
<mat-card>
  <mat-card-content>
    <form [formGroup]="form" (ngSubmit)="onSubmit()">
      <div>
        <mat-form-field appearance="fill">
          <mat-label>Person Name</mat-label>
          <input matInput formControlName="personName" />
        </mat-form-field>
      </div>
      <div>
        <mat-form-field appearance="fill">
          <mat-label>Business Name</mat-label>
          <input matInput formControlName="businessName" />
        </mat-form-field>
      </div>
      <div>
        <mat-form-field appearance="fill">
          <mat-label>Business GST Number</mat-label>
          <input matInput formControlName="businessGST" />
        </mat-form-field>
      </div>
      <div>
        <button mat-raised-button color="primary" type="submit">
          Add Business
        </button>
      </div>
    </form>
  </mat-card-content>
</mat-card>
And also, add the CSS code in src/app/gst-add/gst-add.component.css:
/* gst-add.component.css */

mat-card {
  max-width: 600px;
  margin: 20px auto;
}

mat-form-field {
  width: 100%;
  margin-bottom: 16px;
}
Go to this URL: http://localhost:4200/business/create
Step 6: Adding Angular Form Validation
Write the following code inside the gst-add.component.ts file.
// gst-add.component.ts

import { Component } from '@angular/core';
import {
  ReactiveFormsModule,
  FormGroup,
  FormBuilder,
  Validators,
} from '@angular/forms';
import { MatCardModule } from '@angular/material/card';
import { MatFormFieldModule } from '@angular/material/form-field';
import { MatInputModule } from '@angular/material/input';
import { MatButtonModule } from '@angular/material/button';
import { CommonModule } from '@angular/common';

@Component({
  selector: 'app-gst-add',
  standalone: true,
  imports: [
    CommonModule,
    ReactiveFormsModule,
    MatCardModule,
    MatFormFieldModule,
    MatInputModule,
    MatButtonModule,
  ],
  templateUrl: './gst-add.component.html',
  styleUrls: ['./gst-add.component.css'],
})
export class GstAddComponent {
  angForm: FormGroup;

  constructor(private fb: FormBuilder) {
    this.angForm = this.fb.group({
      person_name: ['', [Validators.required, Validators.minLength(3)]],
      business_name: ['', [Validators.required, Validators.minLength(3)]],
      business_gst_number: [
        '',
        [Validators.required, Validators.pattern(/^[0-9]{15}$/)],
      ],
    });
  }

  onSubmit() {
    if (this.angForm.valid) {
      console.log(this.angForm.value);
    }
  }
}
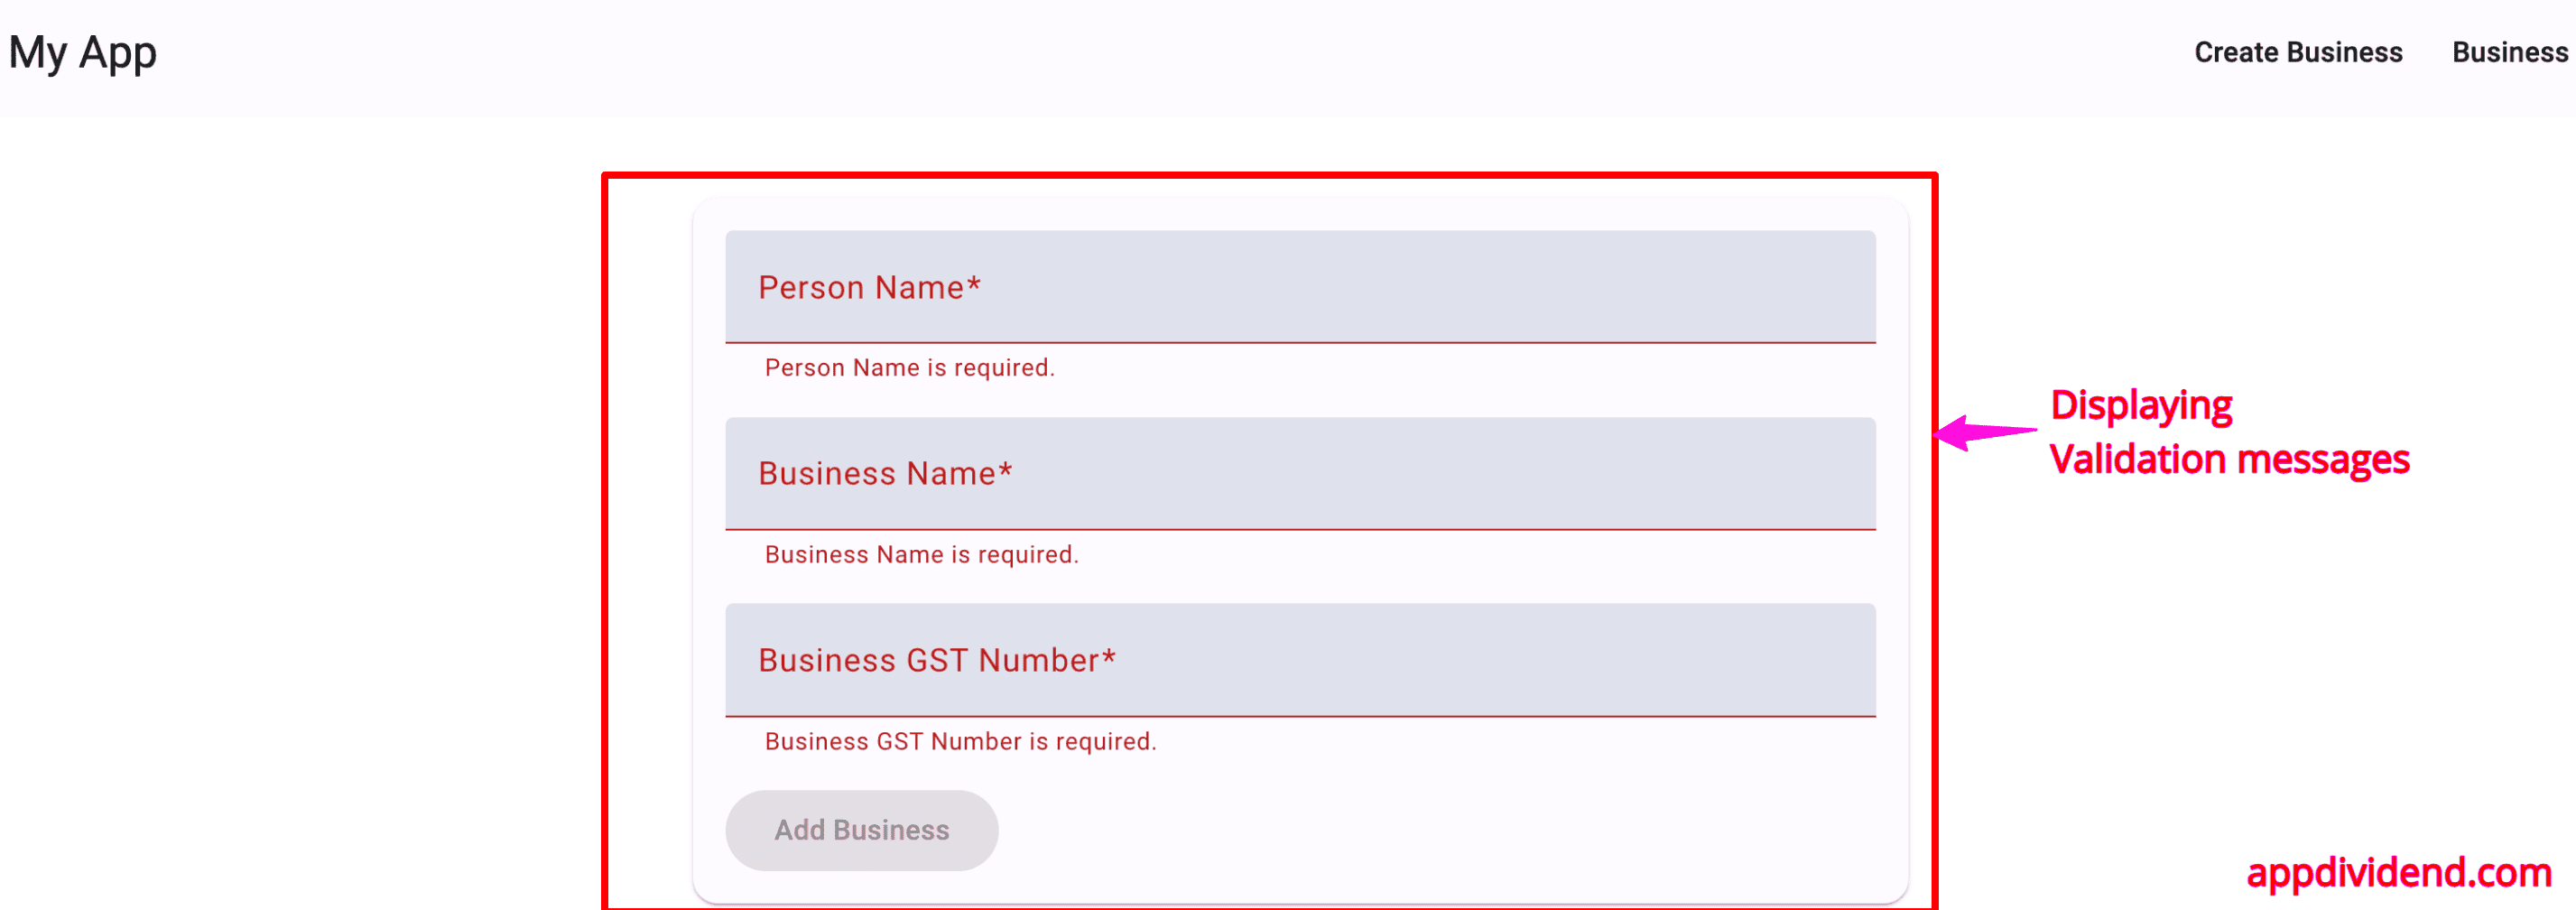
We used the form builder to handle all the validation. In that constructor, we create a form with the validation rules. In our example, there are three fields. If the input text is empty, it will give an error, and we need to display it.
Write the following code inside the gst-add.component.html file.
<mat-card>
  <mat-card-content>
    <form [formGroup]="angForm" (ngSubmit)="onSubmit()">
      <div>
        <mat-form-field appearance="fill">
          <mat-label>Person Name</mat-label>
          <input matInput formControlName="person_name" />
          <mat-error *ngIf="angForm.get('person_name')?.hasError('required')">
            Person Name is required.
          </mat-error>
          <mat-error *ngIf="angForm.get('person_name')?.hasError('minlength')">
            Person Name must be at least 3 characters long.
          </mat-error>
        </mat-form-field>
      </div>
      <div>
        <mat-form-field appearance="fill">
          <mat-label>Business Name</mat-label>
          <input matInput formControlName="business_name" />
          <mat-error *ngIf="angForm.get('business_name')?.hasError('required')">
            Business Name is required.
          </mat-error>
          <mat-error
            *ngIf="angForm.get('business_name')?.hasError('minlength')"
          >
            Business Name must be at least 3 characters long.
          </mat-error>
        </mat-form-field>
      </div>
      <div>
        <mat-form-field appearance="fill">
          <mat-label>Business GST Number</mat-label>
          <input matInput formControlName="business_gst_number" />
          <mat-error
            *ngIf="angForm.get('business_gst_number')?.hasError('required')"
          >
            Business GST Number is required.
          </mat-error>
          <mat-error
            *ngIf="angForm.get('business_gst_number')?.hasError('pattern')"
          >
            Business GST Number must be a 15-digit number.
          </mat-error>
        </mat-form-field>
      </div>
      <div>
        <button
          mat-raised-button
          color="primary"
          type="submit"
          [disabled]="angForm.invalid"
        >
          Add Business
        </button>
      </div>
    </form>
  </mat-card-content>
</mat-card>
Save the file and go to the browser. If you do not put any value inside the input box, you will see the errors.
Step 7: Configuring the HttpClientModule
In Angular 18, importing the HttpClient module is somewhat different than it used to be.
We need to register the provideHttpClient class to the Angular application, and to do that exactly, import the provideHttpClient module inside the src/app/app.config.ts file like this:
// app.config.ts

import { ApplicationConfig, provideZoneChangeDetection } from '@angular/core';
import { provideRouter } from '@angular/router';
import { provideHttpClient } from '@angular/common/http';

import { routes } from './app.routes';
import { provideAnimationsAsync } from '@angular/platform-browser/animations/async';

export const appConfig: ApplicationConfig = {
  providers: [
    provideZoneChangeDetection({ eventCoalescing: true }),
    provideRouter(routes),
    provideAnimationsAsync(),
    provideHttpClient(),
  ],
};
Step 8: Create a model
Inside the src >> app folder, create one file called Business.ts and add the following code.
// src/app/Business.ts

export default class Business {
  person_name?: String;
  business_name?: String;
  business_gst_number?: Number;
}
Step 9: Create an Angular Service file.
Type the following command to generate the service file.
ng g service business
Step 10: Submit the data to the node server
We need to write the code to send the HTTP POST request with the data to the Node.js server and save the data into the MongoDB database.
Write the following code inside the business.service.ts file.
// business.service.ts

import { Injectable } from '@angular/core';
import { HttpClient } from '@angular/common/http';
import { Observable } from 'rxjs';

@Injectable({
  providedIn: 'root',
})
export class BusinessService {
  private uri = 'http://localhost:4000/business';

  constructor(private http: HttpClient) {}

  addBusiness(
    person_name: string,
    business_name: string,
    business_gst_number: string
  ): Observable<any> {
    const obj = {
      person_name: person_name,
      business_name: business_name,
      business_gst_number: business_gst_number,
    };
    console.log(obj);
    return this.http.post(`${this.uri}/add`, obj);
  }
}
We defined our backend API URL but have not created any backend yet. we will do it in a couple of steps.
When there are no errors, we can submit the form, which will call the component’s addBusiness function.
From there, we will call the Angular service, which will send the HTTP Post request to the Node.js server.
Add the addBusiness function inside the gst-add.component.ts file.
Write the following code inside the gst-add.component.ts file.
import { Component } from '@angular/core';
import {
  ReactiveFormsModule,
  FormGroup,
  FormBuilder,
  Validators,
} from '@angular/forms';
import { MatCardModule } from '@angular/material/card';
import { MatFormFieldModule } from '@angular/material/form-field';
import { MatInputModule } from '@angular/material/input';
import { MatButtonModule } from '@angular/material/button';
import { CommonModule } from '@angular/common';

import { BusinessService } from '../business.service';

@Component({
  selector: 'app-gst-add',
  standalone: true,
  imports: [
    CommonModule,
    ReactiveFormsModule,
    MatCardModule,
    MatFormFieldModule,
    MatInputModule,
    MatButtonModule,
  ],
  templateUrl: './gst-add.component.html',
  styleUrls: ['./gst-add.component.css'],
})
export class GstAddComponent {
  angForm: FormGroup;

  constructor(
    private fb: FormBuilder,
    private businessService: BusinessService
  ) {
    this.angForm = this.fb.group({
      person_name: ['', [Validators.required, Validators.minLength(3)]],
      business_name: ['', [Validators.required, Validators.minLength(3)]],
      business_gst_number: [
        '',
        [Validators.required, Validators.pattern(/^[0-9]{15}$/)],
      ],
    });
  }

  onSubmit() {
    if (this.angForm.valid) {
      const { person_name, business_name, business_gst_number } =
        this.angForm.value;
      this.businessService
        .addBusiness(person_name, business_name, business_gst_number)
        .subscribe({
          next: (response) =>
            console.log('Business added successfully', response),
          error: (err) => console.error('Error adding business', err),
        });
    }
  }
}
Here, we have defined the function and also imported the business.service.ts file. Next, instantiate the object inside the constructor and call the function of the businsess.service.ts file.
We have already coded the addBusiness function inside the business.service.ts file. Now, we need to configure the backend API.
Step 11: Create a Node.js backend API
Inside the Angular root folder, create a folder called api and go inside that folder. Remember, it will be a separate project from Angular, so its node_modules will differ from those of Angular.
Open the terminal inside the api folder and type the following command.
npm init -y
Install the following node-specific modules.
npm install --save express body-parser cors mongoose
Now, inside the api folder, create a server.js file. Add the code below in it:
// server.js

const express = require('express');
const path = require('path');
const bodyParser = require('body-parser');
const cors = require('cors');
const mongoose = require('mongoose');

const app = express();
const port = process.env.PORT || 4000;

// Middleware
app.use(cors());
app.use(bodyParser.json());

// Database connection
const dbUrl = 'mongodb://localhost:27017/ngcrud';
mongoose.connect(dbUrl)
    .then(() => console.log('MongoDB connected'))
    .catch(err => console.log('MongoDB connection error:', err));

// Example route
app.get('/', (req, res) => {
    res.send('Hello World');
});

// Start the server
app.listen(port, () => {
    console.log('Listening on port ' + port);
});
The next thing is to connect the MongoDB database with our Node.js application.
If you have not installed the MongoDB database, install it and start the mongodb server.
I am using MongoDB compass software to use mongodb database. So, open that and connect it to the mongo server. Now, I connected the app to the database.
I am writing plain credentials for mongodb for this tutorial, but you can use the process.env to write credentials in the .env file.
Save the file, go to the terminal, and start the node server.
node server
Right now, you have three servers running.
- Angular Development Server
- Nodemon server
- MongoDB server
Remember, all three servers are running fine without errors; otherwise, our application will not work.
Step 12: Create a model and routes for our application.
We must create two folders inside the api root folder called routes and models.
In the models’ folder, create one model called Business.js.
// Business.js

const mongoose = require('mongoose');
const Schema = mongoose.Schema;

// Define collection and schema for Business
const BusinessSchema = new Schema({
    person_name: {
        type: String,
        required: true,
        trim: true
    },
    business_name: {
        type: String,
        required: true,
        trim: true
    },
    business_gst_number: {
        type: String,
        required: true,
        unique: true,
        trim: true
    }
}, {
    collection: 'business'
});

module.exports = mongoose.model('Business', BusinessSchema);
We defined our schema for the business collection. We have three fields: person_name, business_name, and business_gst_number.
In the routes folder, create one file called the business.route.js.
Write the CRUD code inside the business.route.js file.
// business.routes.js

const express = require('express');
const businessRoutes = express.Router();

// Require Business model in our routes module
let Business = require('../models/Business');

// Defined store route
businessRoutes.route('/add').post(async (req, res) => {
    try {
        let business = new Business(req.body);
        await business.save();
        res.status(200).json({ 'business': 'Business added successfully' });
    } catch (err) {
        res.status(400).send("Unable to save to database");
    }
});

// Defined get data (index or listing) route
businessRoutes.route('/').get(async (req, res) => {
    try {
        const businesses = await Business.find();
        res.json(businesses);
    } catch (err) {
        res.status(400).send(err);
    }
});

// Defined edit route
businessRoutes.route('/edit/:id').get(async (req, res) => {
    try {
        let id = req.params.id;
        const business = await Business.findById(id);
        res.json(business);
    } catch (err) {
        res.status(400).send(err);
    }
});

// Defined update route
businessRoutes.route('/update/:id').post(async (req, res) => {
    try {
        let id = req.params.id;
        const business = await Business.findById(id);
        if (!business) {
            return res.status(404).send('Document not found');
        }

        business.person_name = req.body.person_name;
        business.business_name = req.body.business_name;
        business.business_gst_number = req.body.business_gst_number;

        await business.save();
        res.json('Update complete');
    } catch (err) {
        res.status(400).send("Unable to update the database");
    }
});

// Defined delete | remove | destroy route
businessRoutes.route('/delete/:id').delete(async (req, res) => {
  try {
    const result = await Business.findByIdAndDelete(req.params.id);
    if (result) {
      res.json('Successfully removed');
    } else {
      res.status(404).json('Document not found');
    }
  } catch (err) {
     console.error(`Error deleting business with id: ${req.params.id}`, err);
     res.status(400).send(err);
  }
});
We used the Mongoose model to save, update, and delete the database.
Mongoose is an ORM used in the MongoDB database. We have all the CRUD operations on the route file; we must import them inside the server.js file.
Our final server.js file looks like this.
// server.js

const express = require('express');
const path = require('path');
const bodyParser = require('body-parser');
const cors = require('cors');
const mongoose = require('mongoose');

// Database connection
const dbUrl = 'mongodb://localhost:27017/ngcrud';
mongoose.connect(dbUrl)
    .then(() => console.log('MongoDB connected'))
    .catch(err => console.log('MongoDB connection error:', err));

const businessRoute = require('./routes/business.route');

const app = express();
const port = process.env.PORT || 4000;

// Middleware
app.use(bodyParser.json());
app.use(cors());
app.use('/business', businessRoute);

// Static files (optional if you have any static files to serve)
// app.use(express.static(path.join(__dirname, 'public')));

// Example route (optional)
// app.get('/', (req, res) => {
//   res.send('Hello World');
// });

// Start the server
app.listen(port, () => {
    console.log(`Listening on port ${port}`);
});
Start the Node.js server, and you will see something like this:
node server

Listening on port 4000
MongoDB connected
Step 13: Test the store data functionality
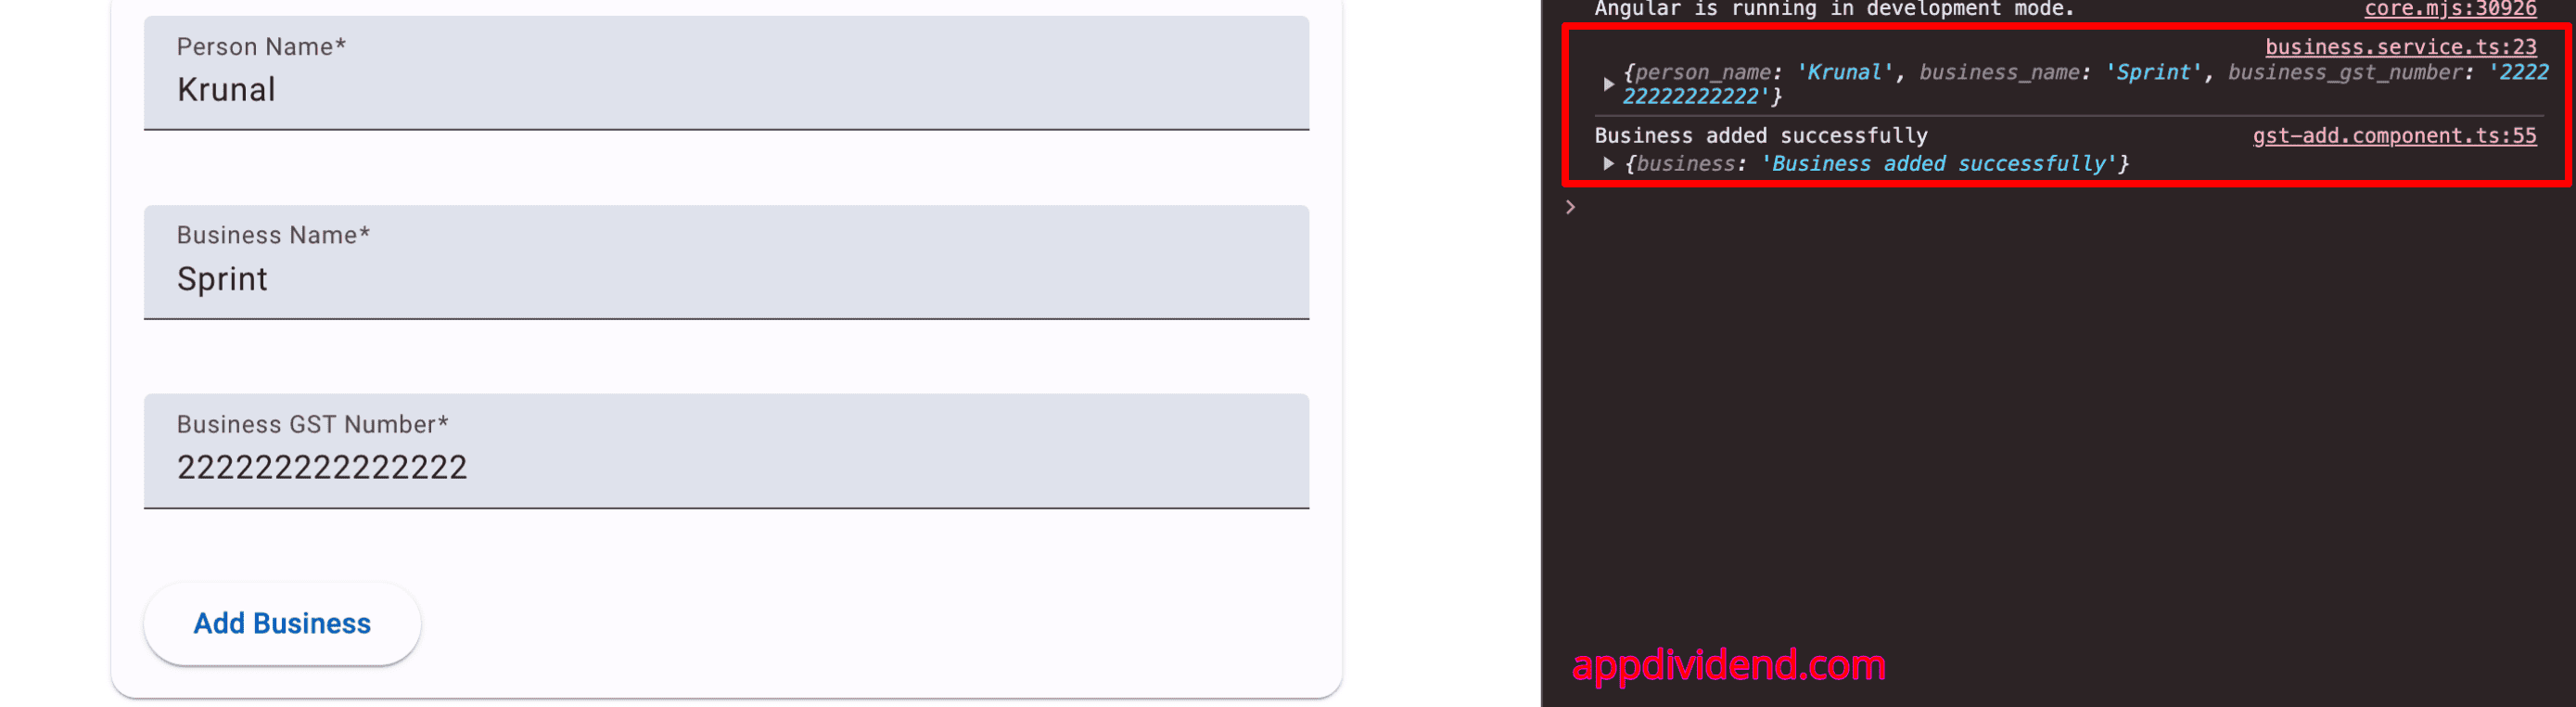
If all the servers are running, you can go to the browser, fill in the form data, and add the business. If you are successful, you will see something like this on your screen.
We can check on the database using the following commands.
Open your mongodb database manager and check the saved values like this:
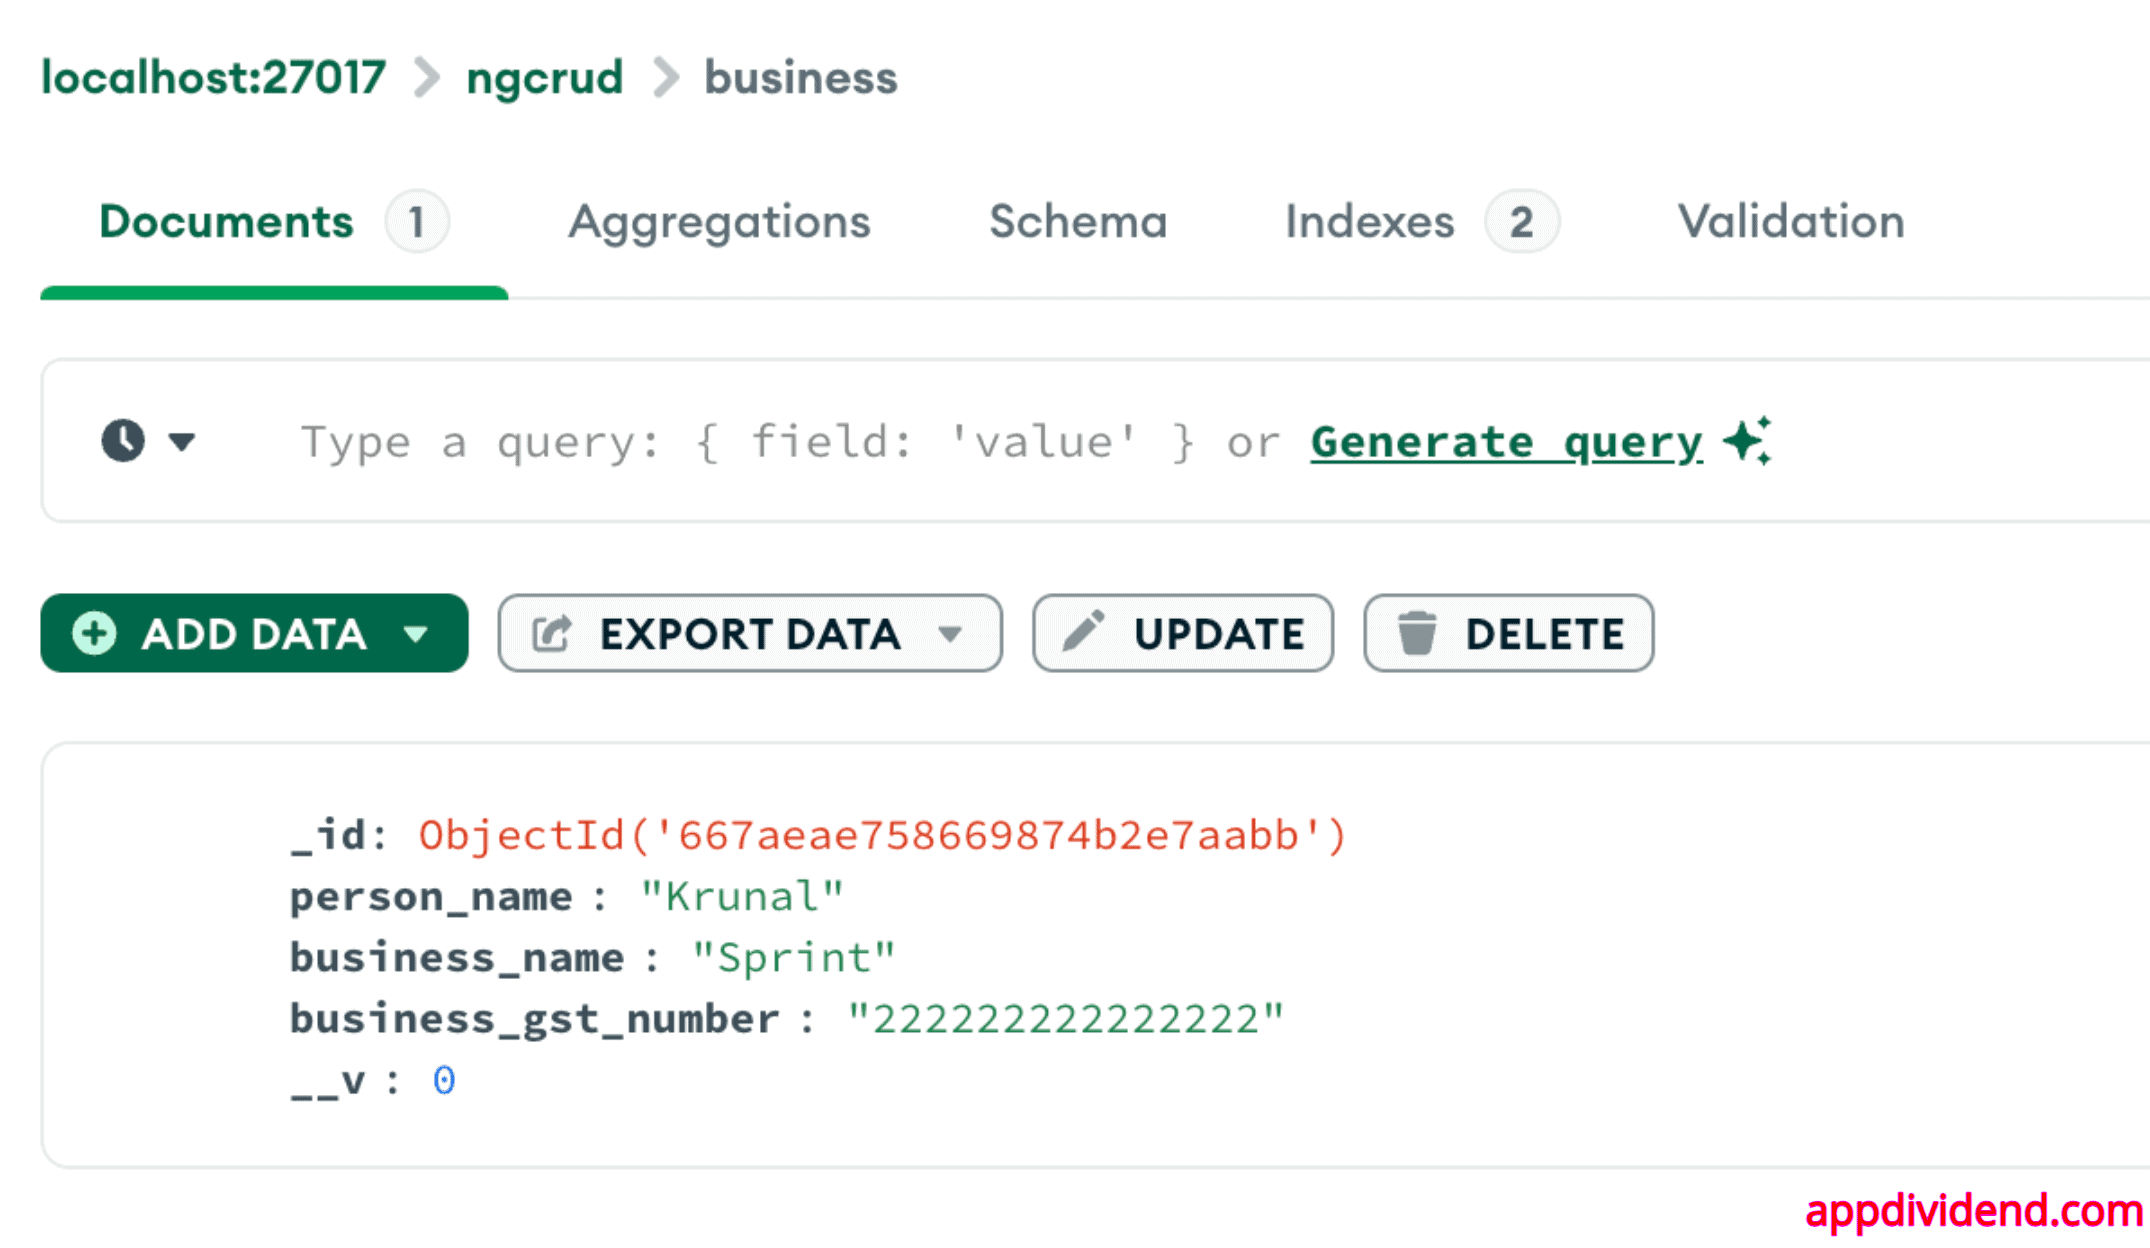
Here, we can see that the values are stored in the MongoDB database. Yes!! We have succeeded.
Now, the remaining operations are Read, Update, and Delete.
Step 14: Display the data on the frontend
We need to fetch the data from the Node.js server. To fetch the data, we need to create a separate function in the src/app/business.service.ts file like this:
// src/app/business.service.ts

getBusinesses(): Observable<any[]> {
    return this.http.get<any[]>(this.uri);
}
In the gst-get.component.ts file, use this service file to fetch the data.
// gst-get.component.ts

import { CommonModule } from '@angular/common';
import { Component, OnInit } from '@angular/core';
import { RouterLink } from '@angular/router';
import { MatTableModule } from '@angular/material/table';
import { MatButtonModule } from '@angular/material/button';

import { BusinessService } from '../business.service';

@Component({
  selector: 'app-gst-get',
  standalone: true,
  imports: [CommonModule, RouterLink, MatTableModule, MatButtonModule],
  templateUrl: './gst-get.component.html',
  styleUrl: './gst-get.component.css',
})
export class GstGetComponent implements OnInit {
  businesses: any[] = [];
  displayedColumns: string[] = [
    'person_name',
    'business_name',
    'business_gst_number',
    'actions',
  ];

  constructor(private businessService: BusinessService) {}

  ngOnInit() {
    this.businessService.getBusinesses().subscribe((data: any[]) => {
      this.businesses = data;
    });
  }
}
Finally, add the below code in the src/app/gst-get.component.html file:
<mat-table [dataSource]="businesses" class="mat-elevation-z8">
  <ng-container matColumnDef="person_name">
    <mat-header-cell *matHeaderCellDef> Person Name </mat-header-cell>
    <mat-cell *matCellDef="let business"> {{ business.person_name }} </mat-cell>
  </ng-container>

  <ng-container matColumnDef="business_name">
    <mat-header-cell *matHeaderCellDef> Business Name </mat-header-cell>
    <mat-cell *matCellDef="let business">
      {{ business.business_name }}
    </mat-cell>
  </ng-container>

  <ng-container matColumnDef="business_gst_number">
    <mat-header-cell *matHeaderCellDef> GST Number </mat-header-cell>
    <mat-cell *matCellDef="let business">
      {{ business.business_gst_number }}
    </mat-cell>
  </ng-container>

  <ng-container matColumnDef="actions">
    <mat-header-cell *matHeaderCellDef> Actions </mat-header-cell>
    <mat-cell *matCellDef="let business">
      <a [routerLink]="['/business/edit', business._id]" mat-button color="primary"
        >Edit</a
      >
      <a [routerLink]="" mat-button color="warn">Delete</a>
    </mat-cell>
  </ng-container>

  <mat-header-row *matHeaderRowDef="displayedColumns"></mat-header-row>
  <mat-row *matRowDef="let row; columns: displayedColumns"></mat-row>
</mat-table>
Save the file and go to this URL: http://localhost:4200/business

Step 15: Edit and Update Data
We need to fetch the data from the MongoDB database using _id wise and display that data in the gst-edit.component.html file.
Inside the business.service.ts file, we need to code the getBusinessById() and updateBusiness() methods to update the data.
// business.service.ts

getBusinessById(id: string): Observable<any> {
    return this.http.get(`${this.uri}/edit/${id}`);
}

updateBusiness(id: string, business: any): Observable<any> {
    return this.http.post(`${this.uri}/update/${id}`, business);
}
To make the gst-edit.component.ts fully functional, we need to ensure that it can load a business’s details into the form for editing and then submit the updated data.
Add the below code inside the src/app/gst-edit/gst-edit.component.ts file:
// src/app/gst-edit/gst-edit.component.ts

import { Component, OnInit } from '@angular/core';
import { ActivatedRoute, Router } from '@angular/router';
import {
  FormGroup,
  FormBuilder,
  Validators,
  ReactiveFormsModule,
} from '@angular/forms';
import { BusinessService } from '../business.service';

import { MatCardModule } from '@angular/material/card';
import { MatFormFieldModule } from '@angular/material/form-field';
import { MatInputModule } from '@angular/material/input';
import { MatButtonModule } from '@angular/material/button';
import { CommonModule } from '@angular/common';

@Component({
  selector: 'app-gst-edit',
  standalone: true,
  imports: [
    ReactiveFormsModule,
    MatCardModule,
    MatFormFieldModule,
    MatInputModule,
    MatButtonModule,
    CommonModule,
  ],
  templateUrl: './gst-edit.component.html',
  styleUrl: './gst-edit.component.css',
})
export class GstEditComponent implements OnInit {
  angForm!: FormGroup;
  business: any = {};

  constructor(
    private route: ActivatedRoute,
    private router: Router,
    private bs: BusinessService,
    private fb: FormBuilder
  ) {
    this.createForm();
  }

  createForm() {
    this.angForm = this.fb.group({
      person_name: ['', Validators.required],
      business_name: ['', Validators.required],
      business_gst_number: ['', Validators.required],
    });
  }

  ngOnInit() {
    this.route.params.subscribe((params) => {
      this.bs.getBusinessById(params['id']).subscribe((res) => {
        this.business = res;
        this.angForm.patchValue({
          person_name: this.business.person_name,
          business_name: this.business.business_name,
          business_gst_number: this.business.business_gst_number,
        });
      });
    });
  }

  updateBusiness() {
    this.route.params.subscribe((params) => {
      this.bs
        .updateBusiness(params['id'], this.angForm.value)
        .subscribe((res) => {
          console.log('Business updated successfully');
          this.router.navigate(['/business']);
        });
    });
  }
}
Finally, we need to write the form inside the gst-edit.component.html file.
<mat-card>
  <mat-card-content>
    <form [formGroup]="angForm" (ngSubmit)="updateBusiness()">
      <div>
        <mat-form-field appearance="fill">
          <mat-label>Person Name</mat-label>
          <input matInput formControlName="person_name" />
          <mat-error *ngIf="angForm.get('person_name')?.hasError('required')">
            Person Name is required.
          </mat-error>
        </mat-form-field>
      </div>
      <div>
        <mat-form-field appearance="fill">
          <mat-label>Business Name</mat-label>
          <input matInput formControlName="business_name" />
          <mat-error *ngIf="angForm.get('business_name')?.hasError('required')">
            Business Name is required.
          </mat-error>
        </mat-form-field>
      </div>
      <div>
        <mat-form-field appearance="fill">
          <mat-label>Business GST Number</mat-label>
          <input matInput formControlName="business_gst_number" />
          <mat-error
            *ngIf="angForm.get('business_gst_number')?.hasError('required')"
          >
            Business GST Number is required.
          </mat-error>
        </mat-form-field>
      </div>
      <div>
        <button
          mat-raised-button
          color="primary"
          type="submit"
          [disabled]="angForm.invalid"
        >
          Update Business
        </button>
      </div>
    </form>
  </mat-card-content>
</mat-card>
Also, add the CSS code in the src/app/gst-edit/gst-edit.component.css file:
/* gst-edit.component.css */

mat-card {
  max-width: 600px;
  margin: 20px auto;
}

mat-form-field {
  width: 100%;
  margin-bottom: 16px;
}
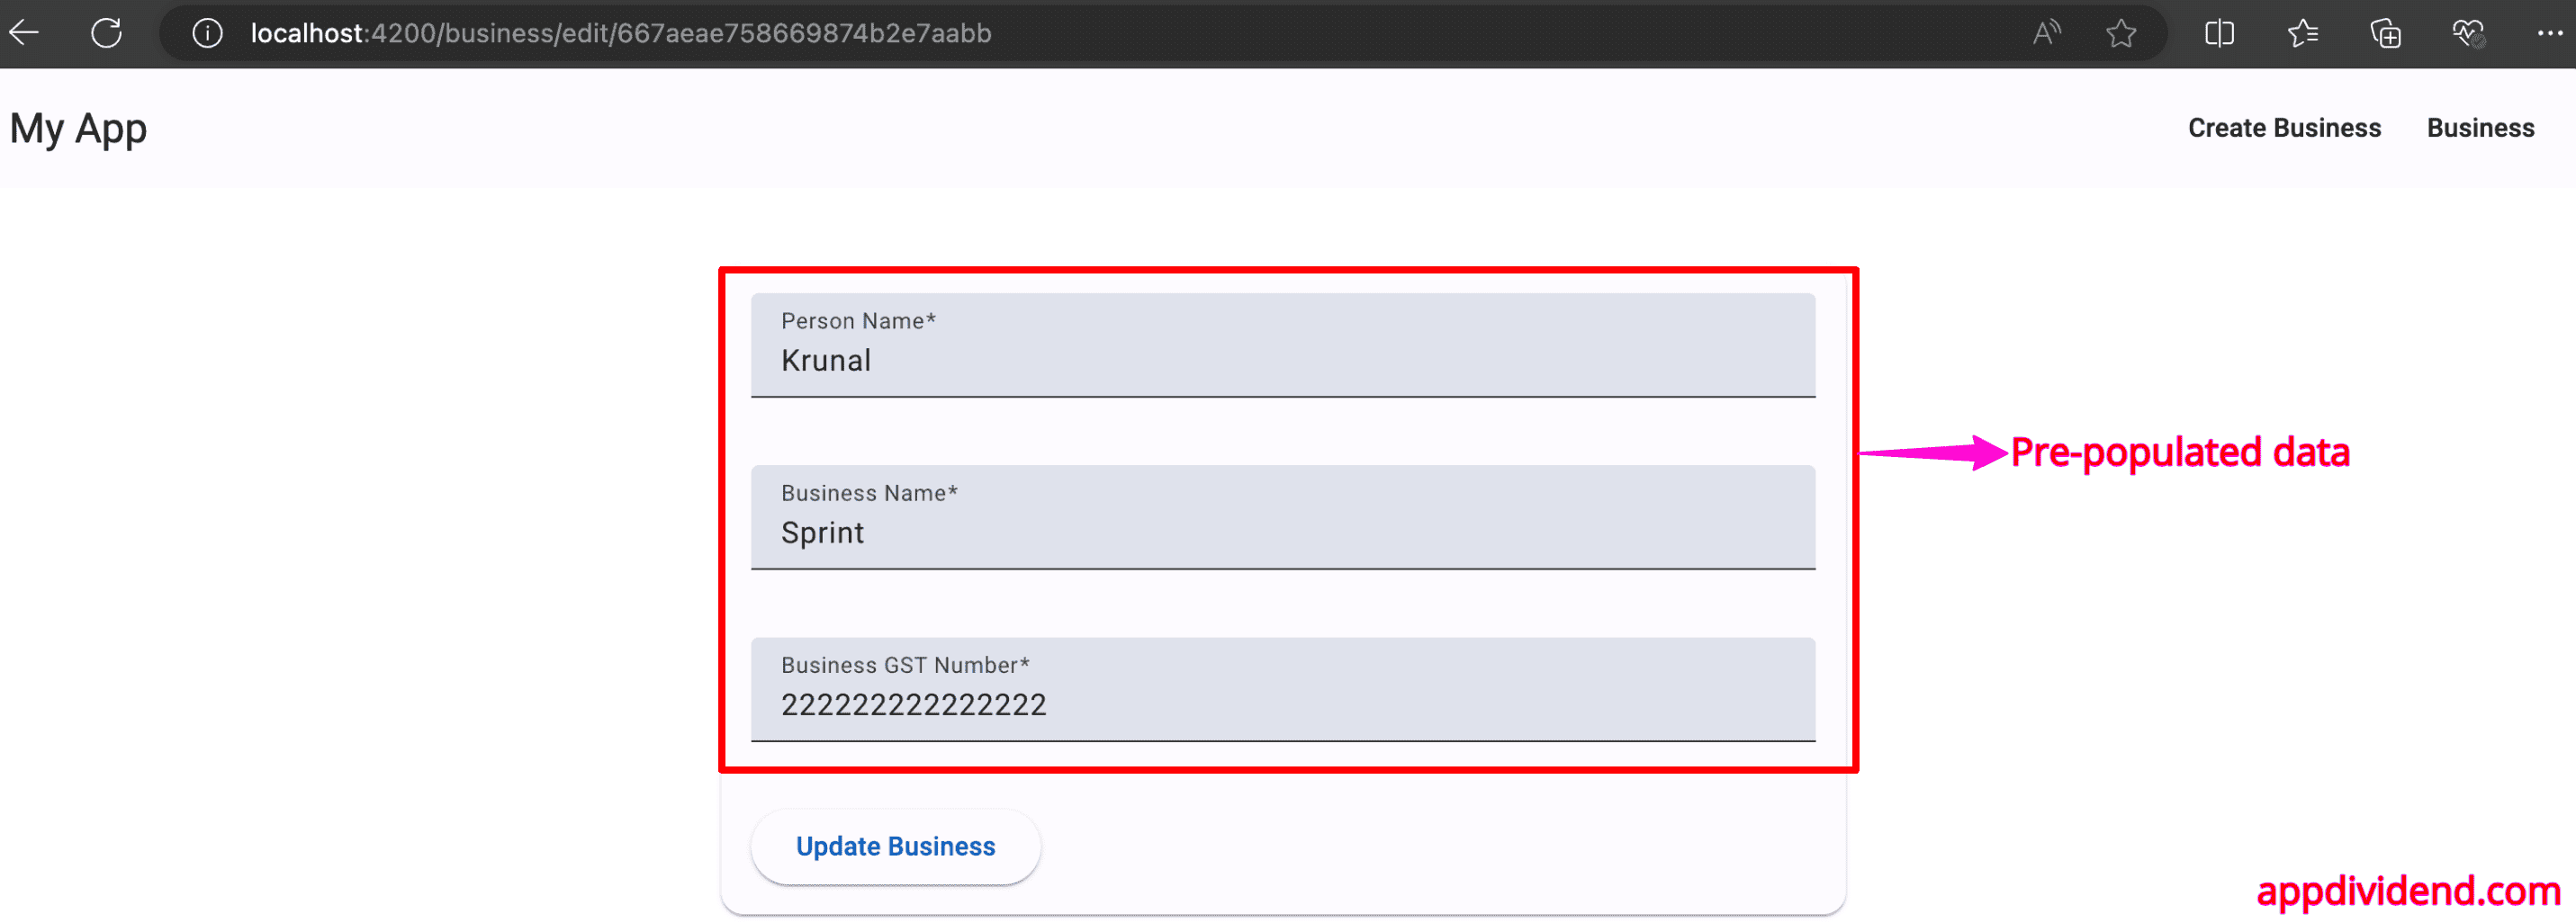
Save the file, go to the listing page, click the edit button, and see the populated form from the database.
Step 16: Delete the data.
Write a deleteBusiness() function in the business.service.ts file like this:
// business.service.ts

import { Injectable } from '@angular/core';
import { HttpClient } from '@angular/common/http';
import { Observable } from 'rxjs';

@Injectable({
  providedIn: 'root',
})
export class BusinessService {
  private uri = 'http://localhost:4000/business';

  constructor(private http: HttpClient) {}

  addBusiness(
    person_name: string,
    business_name: string,
    business_gst_number: string
  ): Observable<any> {
    const obj = {
      person_name: person_name,
      business_name: business_name,
      business_gst_number: business_gst_number,
    };
    console.log(obj);
    return this.http.post(`${this.uri}/add`, obj);
  }
  getBusinesses(): Observable<any[]> {
    return this.http.get<any[]>(this.uri);
  }

  getBusinessById(id: string): Observable<any> {
    return this.http.get(`${this.uri}/edit/${id}`);
  }

  updateBusiness(id: string, business: any): Observable<any> {
    return this.http.post(`${this.uri}/update/${id}`, business);
  }

  deleteBusiness(id: string): Observable<any> {
    return this.http.delete(`${this.uri}/delete/${id}`);
  }
}
Here is the complete code for the gst-get.component.ts file:
// gst-get.component.ts

import { CommonModule } from '@angular/common';
import { Component, OnInit } from '@angular/core';
import { RouterLink } from '@angular/router';
import { MatTableModule } from '@angular/material/table';
import { MatButtonModule } from '@angular/material/button';

import { BusinessService } from '../business.service';

@Component({
  selector: 'app-gst-get',
  standalone: true,
  imports: [CommonModule, RouterLink, MatTableModule, MatButtonModule],
  templateUrl: './gst-get.component.html',
  styleUrl: './gst-get.component.css',
})
export class GstGetComponent implements OnInit {
  businesses: any[] = [];
  displayedColumns: string[] = [
    'person_name',
    'business_name',
    'business_gst_number',
    'actions',
  ];

  constructor(private businessService: BusinessService) {}

  ngOnInit() {
    this.businessService.getBusinesses().subscribe((data: any[]) => {
      this.businesses = data;
    });
  }

  deleteBusiness(id: string) {
    this.businessService.deleteBusiness(id).subscribe((res) => {
      console.log('Deleted');
      this.businesses = this.businesses.filter(
        (business) => business._id !== id
      );
    });
  }
}
That’s it, mates!
Here is the complete Github code.

Dobby
Why didn’t you use angular material instead of bootstrap? It would be very nice article for me. Anyway, thanks for this article tho.
Poly
Why didn’t you use Angular Material instead of bootstrap? it would be very nice. Thanks anyway.
Doly
Why didn’t you use Angular Material instead of bootstrap? it would be very nice. Thank you!
Krunal
Will use for future projects.
lamasbr
Firstly, I would like to thank you for this article. I am learning Angular for the first time now and your article was very helpful.
I had a problem with the edit form. When I click on Edit button, change any field and submit, the following error was displayed in the console: “Form submission canceled because the form is not connected”. To workaround this, was necessary add type=”button” on the submit button.
Now I have another issue, when I submit the edit form with new values, I’m redirected to the initial page but to see the new values, I need to refresh manually. How can I fix it?
Thank you,
Cheers from Brazil.
Danton
My work around for this was: window.location.href = `/business/edit/${params[‘id’]}`;
in place of: this.router.navigate([‘business’]);
I also tried this.router.navigate([‘business/edit’]); but got a similar error I think I’m going to try it with ${params[‘id’]} later tonight and see where that gets me.
Danton
Excuse me I meant I used
window.location.href = ‘/business’;
not: window.location.href = `/business/edit/${params[‘id’]}`;
sorry about that
þorN
Thanks a lot, it works for me. I had to change the link in the list to the edit component from /edit to /business/edit
Dave
Yes I had to do that also to get the Edit link to work:
Edit
Dave
actually that breaks the page, what worked for me is to remove the leading / and just use edit – there is another post to that effect below
prads
for me is to remove the leading / and just use edit
Aravind
I’m getting this error ,
Can’t able to find where i went wrong
`this.bs.addBusiness is not a function
at GstAddComponent.push../src/app/gst-add/gst-add.component.ts.GstAddComponent.addBusiness (gst-add.component.ts:30)`
Krunal
You need to add the addBusiness function. You can refer my GitHub code.
Cody
I really like this tutorial except for one little thing. Why didn’t you write the back-end API in Typescript? You did the front end in Typescript.
sundar
project is working. Add Business button is clicking value added in mongodb. but page cannot be refreshed. same problem for delete and view. how can set for page reload in value added.
Bert Wilms
Hi, i’m new in Angular, Nodejs development. I would like to thank you for this Article.
unfortunately, i’m not able to figure out why i get following error.
POST http://localhost:4000/business/add 404 (Not Found)
core.js:12501 ERROR HttpErrorResponse {headers: HttpHeaders, status: 404, statusText: “Not Found”, url: “http://localhost:4000/business/add”, ok: false, …}error: “↵↵↵↵Error↵↵↵Cannot POST /business/add↵↵↵”headers: HttpHeaders {normalizedNames: Map(0), lazyUpdate: null, lazyInit: ƒ}message: “Http failure response for http://localhost:4000/business/add: 404 Not Found”name: “HttpErrorResponse”ok: falsestatus: 404statusText: “Not Found”url: “http://localhost:4000/business/add”__proto__: HttpResponseBase
When i start the nodeserver everything looks fine.
[nodemon] starting `node server.js`
Listening on port 4000
Database is connected
The mongodb is up and running. i’ve tried local, and also with a db on cloud.mongodb.com atlas.
Could you help me please,
Thx,
Bert
Juls
Same problem here tried to restart nodemon but now i cannot run error 48 on my ubuntu.. Have you tried to edit the service change to uri = ‘/business ‘ only? Thanks
Juls
I encountered the same problem and i solved now by adding permission on mongodb. My problem now is unable to submit after the edit and cant delete item.. Anyone can help? I check my node it stop after delete or edit and need to restart..
Mohan
I did not face issue with delete, but yes with edit.
Changed business.route.js where “Business.findById(req.params.id, function(err, next, business)” the retrieved data was present in NEXT and ended up using that object instead of the BUSINESS for the update.
prads
Thanks , update works as per your solution .. changed to Business.findById(req.params.id, function(err, business, next)
Mohammed Safee Uddin
Remove process.ENV || from the port variable in server.js and send the port as a parameter in app.listen() function of server variable. Don’t forget to change keep the same port number at your client business.service.ts in uri variable and port variable in server.js
ifthikar
POST http://localhost:4000/business/add 404 (Not Found)
core.js:12501 ERROR HttpErrorResponse {headers: HttpHeaders, status: 404, statusText: “Not Found”, url: “http://localhost:4000/business/add”, ok: false, …}error: “↵↵↵↵Error↵↵↵Cannot POST /business/add↵↵↵”headers: HttpHeaders {normalizedNames: Map(0), lazyUpdate: null, lazyInit: ƒ}message: “Http failure response for http://localhost:4000/business/add: 404 Not Found”name: “HttpErrorResponse”ok: falsestatus: 404statusText: “Not Found”url: “http://localhost:4000/business/add”__proto__: HttpResponseBase HOW DID YOU FIX THIS PROBLEM?
Ian
In the server.js file, include the routing to the const express variable:
const express = require(‘express’),
path = require(‘path’),
bodyParser = require(‘body-parser’),
cors = require(‘cors’),
mongoose = require(‘mongoose’),
config = require(‘../api/DB’),
api = require(‘../api/routes/business.route’);
then lower in the serve.js file in the const app variable include:
const app = express();
app.use(bodyParser.json());
app.use(cors());
app.use(‘/business’,api);
Arnold
In business.service.ts file the uri variable change it to ‘/business’. In Server.js change port to 4200 and remove process.ENV ||.
Ankush Jassal
Hi @Arnold I tried the same that you specify above but still i am also getting same problem that Ifthikar encounter. How can i resolve.
Raghav
Still same Problem coming for me i have tried above mentionne=d fixes
Juls
Same problem here tried to restart nodemon but now i cannot run error 48 on my ubuntu.. Have you tried to edit the service change to uri = ‘/business ‘ only? Thanks
Paul
Hi! Good tutorial.
i’m a beginner in angular and I meet a problem when i run nodemon server, can you help me to understand this error!
That’s my error code:
[nodemon] 1.18.7
[nodemon] to restart at any time, enter `rs`
[nodemon] watching: *.*
[nodemon] starting `node server index.js`
internal/modules/cjs/loader.js:582
throw err;
^
Error: Cannot find module ‘/home/odon/Bureau/angular7CRUD/index.js’
at Function.Module._resolveFilename (internal/modules/cjs/loader.js:580:15)
at Function.Module._load (internal/modules/cjs/loader.js:506:25)
at Function.Module.runMain (internal/modules/cjs/loader.js:741:12)
at startup (internal/bootstrap/node.js:285:19)
at bootstrapNodeJSCore (internal/bootstrap/node.js:739:3)
[nodemon] app crashed – waiting for file changes before starting…
Nandini Verma
run the nodemon server in /api directory
Tony Z
I fixed my issue by first running $npm i in the /api directory
Then I ran $npx nodemon server.js
NOTE in the second node command you want to use npx not npm.
$ npx nodemon server.js
[nodemon] 1.18.11
[nodemon] to restart at any time, enter `rs`
[nodemon] watching: *.*
[nodemon] starting `node server.js`
Listening on port 4000
Database is connected
Apurva
Hi,
This is a nice tutorial so far, but I’m getting an error while edit
enableProdMode() to enable the production mode.
core.js:14597 ERROR Error: Uncaught (in promise): Error: Cannot match any routes. URL Segment: ‘edit/5c0504f2c89130599b6199f7’
Error: Cannot match any routes. URL Segment: ‘edit/5c0504f2c89130599b6199f7’
at ApplyRedirects.push../node_modules/@angular/router/fesm5/router.js.ApplyRedirects.noMatchError (router.js:2469)
at CatchSubscriber.selector (router.js:2450)
at CatchSubscriber.push../node_modules/rxjs/_esm5/internal/operators/catchError.js.CatchSubscriber.error (catchError.js:34)
at MapSubscriber.push../node_modules/rxjs/_esm5/internal/Subscriber.js.Subscriber._error (Subscriber.js:80)
at MapSubscriber.push../node_modules/rxjs/_esm5/internal/Subscriber.js.Subscriber.error (Subscriber.js:60)
at MapSubscriber.push../node_modules/rxjs/_esm5/internal/Subscriber.js.Subscriber._error (Subscriber.js:80)
at MapSubscriber.push../node_modules/rxjs/_esm5/internal/Subscriber.js.Subscriber.error (Subscriber.js:60)
at MapSubscriber.push../node_modules/rxjs/_esm5/internal/Subscriber.js.Subscriber._error (Subscriber.js:80)
at MapSubscriber.push../node_modules/rxjs/_esm5/internal/Subscriber.js.Subscriber.error (Subscriber.js:60)
at
Hoang
You need to change the routerlink in gst-get.component.html file to:Edit
Daniel
in the gst-edit-html where the[routerlink]=[‘/edit’, business._id] you need to remove the “/” and just have [routerlink]=[‘edit’, business._id]
Nics
Update function not working.
narmit
Hey can you do this with ms sql instead of mongodb. I tried to do it but i cant get it to work
Mosu
Thank you for your tutorial.
By the way, is there any way to get a page refresh a data after edit page?
I try to get it work even with a navigate to homepage then back to business page but it doesn’t work
Himanshu Chhatbar
Nice article
Mihajlo
Hey, tnx for the article, nice work.
khaledmoez
hello,
thank you for your tutoriel, it was very helpful.
I think there is a little mistake in the text you wrote at the begining of paragraph #13.
you say :
“Now, we need to create two folders inside the root folder called routes and models.”
i think you should add the word “api” so the sentence would become:
“Now, we need to create two folders inside the api root folder called routes and models.”
Regards
Pankaja
Hi kunal,
I am issue when we migrated our Angular 4 application served up via nodejs to Angular 7. All the migration went smooth and was able to make the necessary coding changes. But I keep getting the following error – “ERROR in ./node_modules/jsonpath/generated/parser.js
Module not found: Error: Can’t resolve ‘fs’… ” along with similar error for ‘path’ … So then I realized that while building the app it is trying to compile the server.js file as well and that is where both the require(‘fs’) and require(‘path’) are in the code. I am not sure what in addition we have to do here in Angular 7 so this error doesn’t occur. Any help is greatly appreciated.
Thanks
Monaj
Hi
Thanks for the tutorial. I had a few errors with delete function, and mongose functions, and had to copy paste your code from github to make it work.
Please, what is the easiest way to make the initial homepage UPDATE whenever there is an update or deletion ?
Also, what’s the easiest and most efficient sanitizing methods that would be of use here server side I mean to avoid mysql injection
dhamodar
// plz add port variable in app.listen like this so node server is available
const server = app.listen(port,function(){
console.log(‘Listening on port ‘ + port);
});
Vishnu
Exactly this is the correct way 🙂 this will solve issues like @Bert Wilms Says
Manidip Mandal
Every is working fine but data in updating in real time. i am pretty new in this. Suppose i have edited a business and cam back t business list but nothing reflected until i refresh the page. Please help..
Waleed Umer
Very nice article.
Now how to publish this whole project?
By simply using “ng build –prod” command ?
Luke Harris
to have the page update automatically after an edit, change the business service “updateBusiness()” so it no longer subscribes response, and return the response instead:
updateBusiness(person_name, business_name, business_gst_number,id){
const obj = {
person_name: person_name,
business_name: business_name,
business_gst_number: business_gst_number
};
return this.http.post(`${this.uri}/update/${id}`, obj);
}
Then, in your gst-edit.component, subscribe to the response so you know when the async call is finished, then navigate back to the business page:
updateBusiness(person_name, business_name, business_gst_number){
this.route.params.subscribe(params => {
this.bs.updateBusiness(person_name, business_name, business_gst_number, params[‘id’]).subscribe((data: string) =>{
console.log(data);
this.router.navigate([‘business’]);
});
})
}
To auto-update on a delete, create a function that pulls the records just like ngOnInit() does:
getBusinesses(): void {
this.bs
.getBusinesses()
.subscribe((data: Business[]) => {
this.businesses = data;
})
}
Change the deleteBusiness() function as follows:
deleteBusiness(id) {
this.bs.deleteBusiness(id).subscribe(res => {
console.log(‘Deleted’);
this.getBusinesses();
});
}
You can now also replace the function in ngOnInit() with your new function:
ngOnInit() {
this.getBusinesses();
}
russunit
Thanks Luke;
to piggyback on this idea, I added code to navigate to the business list page and update on adding a business.
in business.service.ts:
addBusiness(person_name, business_name, business_gst_number) {
const obj = {
person_name: person_name,
business_name: business_name,
business_gst_number: business_gst_number
};
console.log(obj);
return this.http.post(`${this.uri}/add`, obj);
}
In gst-add.component.ts:
addBusiness(person_name, business_name, business_gst_number) {
this.route.params.subscribe(params => {
this.bs.addBusiness(person_name, business_name, business_gst_number).subscribe((data:string) =>{
console.log(data);
this.router.navigate([‘business’]);
});
})
}
Jeffrey
This is great. I found this really useful.
I’d like to know how I can containerize this entire project using docker.
N1cK
Great tutorial ! One little mistake though: It needs to be
Add Business
azhar khan
its very good and easy to understand
i am from india
Kelvin Nganga
For some reason my update doesn’t work…i made some few changes to be able to view the edit page..once i edit the information and try to update…it throws an error..as well as crushes my back end..wondering there was an issue in routing ..or we sending data the wrong way…anyone who has encountered similar issue and figured it out would appreciate any ideas..
errors
throw er; // Unhandled ‘error’ event..this pops up on my console..together with app crashed waiting for file changes before starting..
when i inspect my page on the browser…i get bellow error
Failed to load :4000/business/update/5c58867ae9b49122530bbfb8:1 F
resource: net::ERR_CONNECTION_REFUSED
Tanvi Desai
I could solve this error by removing next in update in business.route.js
// Defined update route
businessRoutes.route(‘/update/:id’).post(function (req, res) {
and also implemented changes suggested by Luke Harris for auto-refresh after successful update.
Guillermo
Thank You!
Harsha
Thanks a lot Krunal.
After searching, and following loads of video tutorials, I have found what I was looking … A Simple Mean Stack Tutorial that works. I wanted to know how the back end and the front end connects. Its all there!!!
russunit
“If you have not installed the MongoDB database then install it…”
could someone please give instructions to install the MongoDB database? I have installed the node package for MongoDB but I don’t see where there are instructions to install the database.
russunit
edit: I am getting a 400 error when I try to add a business so I believe my problem is missing this step… I get the same error both on the code I built from the tutorial and on the code that i cloned from github.
russunit
edit: Nevermind, my 400 error was from trying to use letters for the business number field.
russunit
edit: my issue was that I was trying to enter a non-numeric entry for the GST Number.
To validate this field to be sure it’s a number, in gst-add.component.ts, replace this line:
business_gst_number: [”, Validators.required ]
with this line:
business_gst_number: [”, Validators.compose([
Validators.required,
Validators.pattern(‘[0-9]+’)
]) ]
Then, in gst-add.component.ts, add this block under the “business gst number is required” div:
Business GST Number must be an integer.
russunit
I was getting a 400 error trying to enter a non-numeric entry for the GST Number.
To validate this field to be sure it’s a number, in gst-add.component.ts, replace this line:
business_gst_number: [”, Validators.required ]
with this line:
business_gst_number: [”, Validators.compose([
Validators.required,
Validators.pattern(‘[0-9]+’)
]) ]
Then, in gst-add.component.ts, add this block under the “business gst number is required” div:
Business GST Number must be an integer.
Lovely
Edit Function is not working. It show error :
ERROR Error: Uncaught (in promise): Error: Cannot match any routes. URL Segment: ‘edit/5c80a7850c013406ecac4c74’
Error: Cannot match any routes. URL Segment: ‘edit/5c80a7850c013406ecac4c74’
Please help me to solve this.
Lala Von Puddles
Hi Lovely,
In gst-get.component.html change this router link from this:
[routerLink]=”[‘/edit’, business._id]”
To this:
[routerLink]=”[‘/business/edit’, business._id]”
Also, in your business.route.js update route function remove the ‘next’ param.
Change from this:
Business.findById(req.params.id, function(err, next, business)
To this:
Business.findById(req.params.id, function(err, business)
Daniel
Hi Lala,
I had the same problem as Lala, but adding your changes did not help. adding /business to the router link makes an incorrect url (buiness/business/edit/id) and removing the next in the route did not change it. I still get this error:
Error: Uncaught (in promise): Error: Cannot match any routes. URL Segment: ‘edit/5ca95027e4b02b44b4f31181’
Error: Cannot match any routes. URL Segment: ‘edit/5ca95027e4b02b44b4f31181’
Any ideas?
Daniel
nevermind, i removed the “/” from “/edit” and it works
Karan
Step #3 doesn’t seem to work with Angular 7.2.8. Nothing shows up in the browser.
Gurmeet Singh
I have tried each and every step but add, display data didn’t work, there is no error while compiling, please help.
mohd adnan shoheb
it was really helpful, don’t stop creating such project it helps a lot for freshers
Aleksandr Skobeltcyn
Thanks, really useful boilerplate or starter kit
priyanka
thank you for this angular code understanding.
did you have code for backend using mysql?
If yes then please send to me.
I really need it.
kamal mistry
hii Kunal I Get This Error :
headers: Object { normalizedNames: Map(0), lazyUpdate: null, headers: Map(0) }
message: “Http failure response for http://localhost:4000/business: 0 Unknown Error”
name: “HttpErrorResponse”
ok: false
status: 0
statusText: “Unknown Error”
url: “http://localhost:4000/business”
: Object { constructor: HttpErrorResponse() }
kamal mistry
hii Kunal I Get Error In Post Data To Mongo Db …
headers: Object { normalizedNames: Map(0), lazyUpdate: null, headers: Map(0) }
message: “Http failure response for http://localhost:4000/business: 0 Unknown Error”
name: “HttpErrorResponse”
ok: false
status: 0
statusText: “Unknown Error”
url: “http://localhost:4000/business”
: Object { constructor: HttpErrorResponse() }
kamal mistry
Hii Kunal I Get This Error Please Reply…
error: “nnnnErrornnnCannot POST /business/addnnn”
headers: Object { normalizedNames: Map(0), lazyUpdate: null, lazyInit: lazyInit()
}
message: “Http failure response for http://localhost:4200/business/add: 404 Not Found”
name: “HttpErrorResponse”
ok: false
status: 404
statusText: “Not Found”
url: “http://localhost:4200/business/add”
: {…}
constructor: function HttpErrorResponse()
: {…}
constructor: function HttpResponseBase()
: {…}
__defineGetter__: function __defineGetter__()
__defineSetter__: function __defineSetter__()
__lookupGetter__: function __lookupGetter__()
__lookupSetter__: function __lookupSetter__()
__proto__:
constructor: function Object()
hasOwnProperty: function hasOwnProperty()
isPrototypeOf: function isPrototypeOf()
propertyIsEnumerable: function propertyIsEnumerable()
toLocaleString: function toLocaleString()
toSource: function toSource()
toString: function toString()
ValueOf: function valueOf()
: function __proto__()
: function __proto__()
Ankush Jassal
I am also getting same error while saving data.
http://localhost:4200/business/add 404 (Not Found)
How to resolve this?
hajer
hello could you help me ?, where is tje angular root folder i can t find it
hajer
hello , i need a help where is the root angular folder , is it in the project or outside , thank you
Santosh Kori
Great tutorial but it will helpful if use observable so it will update data on the fly
hajer
hello Santoch Kori , how to import js file inside server.js , could you help me 🙂
mohamed
please try with mysql database instead of mongodb…
CRUD operation
mohamed
please try with mysql database instead of mongodb for same CRUD operation
thanks,
hajer
hi thank you
Pedro Macedo
Great post, except that it doesn’t work.
Tommy Jensen
I would like to try this with a cloud mongodb instead of using a local mongodb. What would need to be changed to do this?
lavi
update not working
Dave
See Lala’s fix above for the server side business.route.js – you need to remove the next param from the callback function on findById(); also instead of return next(…) you should return something like this:
res.status(400).send(err);
Ignore the client side change in that comment, should just remove the leading slash from Edit.
lavi
//get-edit.component.ts
updateBusiness(person_name,business_name,business_gst_number){
this.route.params.subscribe((params)=>{
this.bs.updateBusiness(person_name, business_name, business_gst_number, params[‘id’]).subscribe((data:any)=>{
console.log(data)
});
this.router.navigate([‘business’]);
})
}
//business.service.ts file
updateBusiness(person_name,business_name,business_gst_number,id){
const obj={
person_name:person_name,
business_name:business_name,
business_gst_number:business_gst_number
};
return this.http.put(`${url}/update/${id}`,obj);
}
lavi
unable to update data
what to do
Emile Achadde
Thank you very much for this remarkable course.
I have two small remarks :
1. to install nodemon, you need to be root and add -g option : “sudo npm install -g nodemon –save””
2. you should launch “ng serve” after having launch the server.
That’s all !
Rick
hi, i have been following the tutorial but can’t start nodemon server, i get this error:
PS E:\Projects\Angular\angular7CRUD\api> nodemon server
[nodemon] 1.19.0
[nodemon] to restart at any time, enter `rs`
[nodemon] watching: *.*
[nodemon] starting `node server.js`
E:\Projects\Angular\angular7CRUD\api\server.js:1
(function (exports, require, module, __filename, __dirname) { ��c
^
SyntaxError: Invalid or unexpected token
at new Script (vm.js:80:7)
at createScript (vm.js:274:10)
at Object.runInThisContext (vm.js:326:10)
at Module._compile (internal/modules/cjs/loader.js:664:28)
at Object.Module._extensions..js (internal/modules/cjs/loader.js:
at Module.load (internal/modules/cjs/loader.js:600:32)
at tryModuleLoad (internal/modules/cjs/loader.js:539:12)
at Function.Module._load (internal/modules/cjs/loader.js:531:3)
at Function.Module.runMain (internal/modules/cjs/loader.js:754:12
at startup (internal/bootstrap/node.js:283:19)
[nodemon] app crashed – waiting for file changes before starting…
i can’t find a solution, can anyone help me pleae 🙂
Rick
Well. after several hours of trying to solve this, the answer was a bit embarrassing.
i had my server.js and DB.js files with some hidden chars that started the file, therefore they were not executing correctly (i should have happened by copying the content, along with some hidden format or something), now i got the server running, and going to try to finish this great guide.
jaimin
Hello sir..where to create api folder??
inside src or inside app or anywhere else…there is error showing in server.js file that
const express = require(‘express’),
path = require(‘path’),
bodyParser = require(‘body-parser’),
cors = require(‘cors’),
mongoose = require(‘mongoose’),
config = require(‘./DB’);
mongoose not found and body parser not fount etc.
Vijaya
Amazing POST for MEAN stack beginners. Thanks Krunal. I also faced the refresh issue and solved it after
calling this.router.navigate([‘business’]); inside subscribe.
Update example:
updateBusiness(person_name, business_name, business_gst_number) {
this.route.params.subscribe(params => {
this.bs.updateBusiness(person_name, business_name, business_gst_number, params.id).subscribe(res => {
alert(res);
this.router.navigate([‘business’]);
}
);
});
}
Vijaya from India
Benjamin
in the step
So first, write the following code inside the gst-edit.component.ts file.
you missed the actual update code, so it won’t work.
The missing code is:
updateBusiness(person_name, business_name, business_gst_number) {
this.route.params.subscribe(params => {
this.bs.updateBusiness(person_name, business_name, business_gst_number, params[‘id’]);
this.router.navigate([‘business’]);
});
Thanks!
Benjamin
also in business routes you have this line
Business.findById(req.params.id, function(err, next, business) {
which is wrong, and in your github, the working version, is
Business.findById(req.params.id, function(err, business) {
otherwise the backend server crashes with TypeError: next is not a function
Otherwise, thanks for the tutorial!
Swathi
HI,
I wanted to know, if i can check the existing data in DB and SHOULD NOT allow the user to enter the same user name/business name that already exists in DB.
Can you please help me with this
kaleem
I am going to try this app this weekend.
Wim
HI,
When I update a business row , I navigate back to ‘business’ route to get a list of all business routes.
I added the line this.router.navigate([‘business’]);
updateBusiness(person_name, business_name, business_gst_number) {
this.route.params.subscribe(params => {
this.bs.updateBusiness(person_name, business_name, business_gst_number, params[‘id’]);
this.router.navigate([‘business’]);
});
}
However I noticed that on the list of business rows I change is NOT listed, although the row is updated correctly in Mongodb.
Maybe the call to this.router.navigate([‘business’]); is performed before the update takes place (async?)
How can I correct this.
Many Thanks,
Wim.
Charl van der merwe
excellent article, really helped me get started using Mongo and Angular.Has one mistake about the business edit routing but the comments are all over it!
Abhishek Chauhan
Nice tutorial
Jabeur
Hello,
Thank you for the article however I have an issue here, so how can I fixe it? please
export class AppComponent {
title = ‘angular7crud’;
constructor(private _loadingBar: SlimLoadingBarService, private _router: Router) {
this._router.events.subscribe((event: Event) => {
this.navigationInterceptor(event);
});
}
private navigationInterceptor(event: Event): void {
if (event instanceof NavigationStart) {
this._loadingBar.start();
}
if (event instanceof NavigationEnd) {
this._loadingBar.complete();
}
if (event instanceof NavigationCancel) {
this._loadingBar.stop();
}
if (event instanceof NavigationError) {
this._loadingBar.stop();
}
}
}
ERROR in src/app/app.component.ts(14,35): error TS2345: Argument of type ‘(event: Event) => void’ is not assignable to parameter of type ‘(value: Event) => void’. Types of parameters ‘event’ and ‘value’ are incompatible.
Type ‘import(“D:/Angular/angular7crud/node_modules/@angular/router/src/events”).Event’ is not assignable to type ‘Event’.
Type ‘RouterEvent’ is missing the following properties from type ‘Event’: bubbles, cancelBubble, cancelable, composed, and 18 more.
Ahsan
Whenever I try to submit the data, I get the following error:
http://localhost:4000/business/add 500 (Internal Server Error)
zone-evergreen.js:2952 POST
Ahsan
Moreover, when I click the edit button I get the following error:
Uncaught (in promise): Error: Cannot match any routes. URL Segment: ‘edit/5d5bdeea119c3d3714eacf92’
Error: Cannot match any routes. URL Segment: ‘edit/5d5bdeea119c3d3714eacf92’
Anas TAYAA
you have to change /edit by business/edit
Dheeraj Bharti
Good article for the beginners. Stick to the basic it won’t give you any error. Keep posting.
Cheers!
Jai Kumar Singh
Hi,
This was a great tutorial . I learned much from this.
I have one question as well as i am facing this issue in update section.
When i am updating any new data , after click on Update Business button ‘data updated in database’. But Updated data not reflecting on business list view . When i refreshed the page new data populate .
Please can you tell me how can do this without refreshing the page ?
Thanks and Regards
Julius Acar
On gst-get.component.ts,
I keep getting this error: import Business from ‘../Business’;
I already tried to change it or even import it automatically.
Should it be like this by any chance? import Business from ‘../business.model’;
prads
I am implementing similar example referring above example but data don’t bind to table unless click on input field which is outside table. Once I click on input field table shows automatically. I want to show table data on component loads. I am calling a component in app.component (trough Menu) using router link .
Dani
Hi Sir,
Thank you for this great tutorial.
I have some doubt. How can I join two collections and get the result and return back to angular component.
Please help me. I am using above code for my custom application. I stucked in joining of collections.
Waiting for reply.