
Here are the steps to create a CRUD application in React.js:
Step 1: Install React Application
npx create-react-app reactcrud
cd reactcrud
npm start
If you are facing any issues with compiling, please create a .env file on the root and add the following line of code.
SKIP_PREFLIGHT_CHECK=true
Go to this URL: http://localhost:3000/
Install the Bootstrap 4 Framework using the following command.
yarn add bootstrap

# or

npm install bootstrap --save
Import the Bootstrap CSS Framework inside our project.
Modify the code inside the src >> App.js file.
// App.js
import React, { Component } from 'react';
import 'bootstrap/dist/css/bootstrap.min.css';
class App extends Component {
render() {
return (
<div className="container">
<h2>React CRUD Tutorial</h2>
</div>
);
}
}
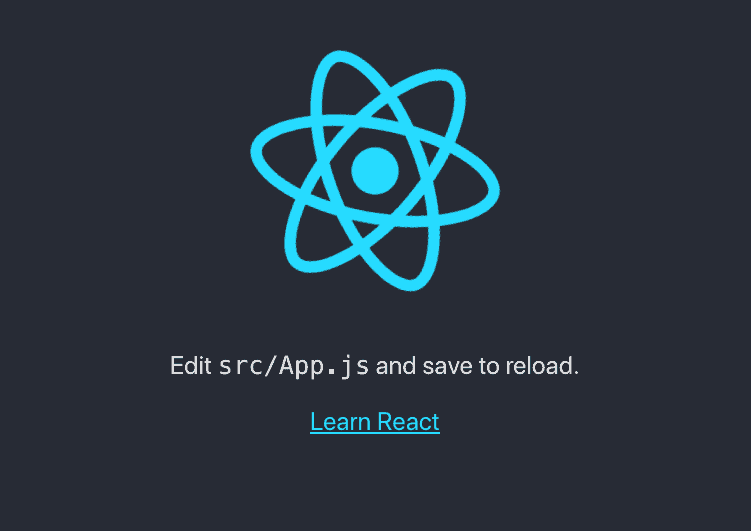
export default App;Save the file and go to the browser, and you can see that we have successfully integrated Bootstrap 4 into our React application.
Step 2: Configure React routing
Type the following command to install the react-router-dom module. If you want to find more information about the react-router-dom module, then you can follow this documentation.
yarn add react-router-dom

# or

npm install react-router-dom --save
Go to the index.js file and Wrap the BrowserRouter object around the App.js component.
// index.js

import React from 'react';
import ReactDOM from 'react-dom';
import { BrowserRouter } from 'react-router-dom';

import App from './App';
import * as serviceWorker from './serviceWorker';

ReactDOM.render(
 <BrowserRouter>
   <App />
 </BrowserRouter>, document.getElementById('root'));

serviceWorker.unregister();
Now, create three components.
Create one directory called components inside the src folder, and inside that folder, make three components.
- create.component.js
- edit.component.js
- index.component.js
// create.component.js

import React, { Component } from 'react';

export default class Create extends Component {
    render() {
        return (
            <div>
                <p>Welcome to Create Component!!</p>
            </div>
        )
    }
}
// edit.component.js

import React, { Component } from 'react';

export default class Edit extends Component {
    render() {
        return (
            <div>
                <p>Welcome to Edit Component!!</p>
            </div>
        )
    }
}
// index.component.js

import React, { Component } from 'react';

export default class Index extends Component {
    render() {
        return (
            <div>
                <p>Welcome to Index Component!!</p>
            </div>
        )
    }
}
Now, add the navigation bar in our React CRUD example. Then, write the following code inside the App.js file.
// App.js

import React, { Component } from 'react';
import 'bootstrap/dist/css/bootstrap.min.css';
import { BrowserRouter as Router, Switch, Route, Link } from 'react-router-dom';

import Create from './components/create.component';
import Edit from './components/edit.component';
import Index from './components/index.component';

class App extends Component {
  render() {
    return (
      <Router>
        <div className="container">
          <nav className="navbar navbar-expand-lg navbar-light bg-light">
            <Link to={'/'} className="navbar-brand">React CRUD Example</Link>
            <div className="collapse navbar-collapse" id="navbarSupportedContent">
              <ul className="navbar-nav mr-auto">
              <li className="nav-item">
                  <Link to={'/'} className="nav-link">Home</Link>
                </li>
                <li className="nav-item">
                  <Link to={'/create'} className="nav-link">Create</Link>
                </li>
                <li className="nav-item">
                  <Link to={'/index'} className="nav-link">Index</Link>
                </li>
              </ul>
            </div>
          </nav> <br/>
          <h2>Welcome to React CRUD Tutorial</h2> <br/>
          <Switch>
              <Route exact path='/create' component={ Create } />
              <Route path='/edit/:id' component={ Edit } />
              <Route path='/index' component={ Index } />
          </Switch>
        </div>
      </Router>
    );
  }
}

export default App;
Save the file and go to the browser.

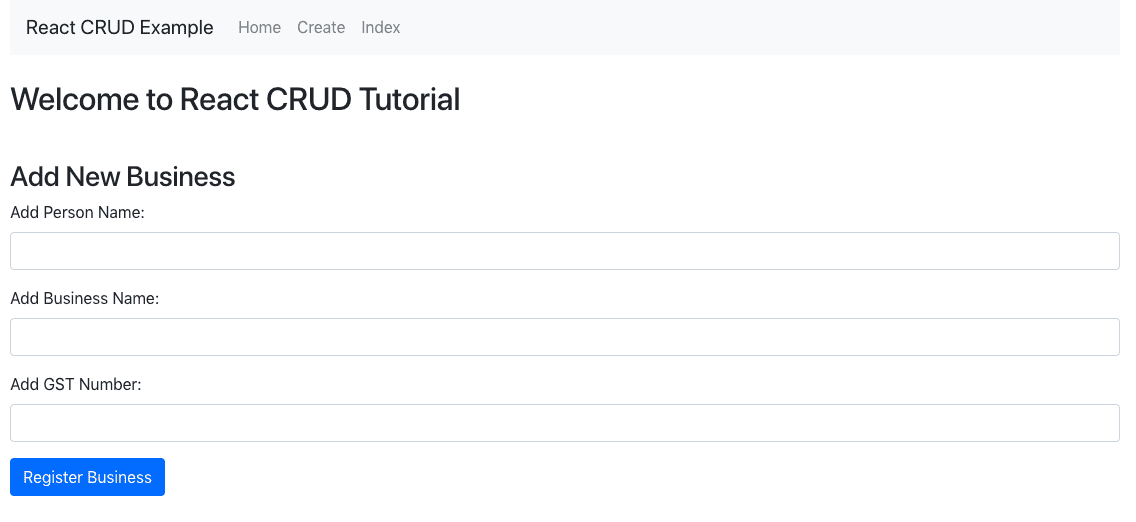
Step 3: Create the bootstrap form
Write the code to generate the bootstrap form inside the create.component.js file.
// create.component.js

import React, { Component } from 'react';

export default class Create extends Component {
    render() {
        return (
            <div style={{marginTop: 10}}>
                <h3>Add New Business</h3>
                <form>
                    <div className="form-group">
                        <label>Add Person Name:  </label>
                        <input type="text" className="form-control"/>
                    </div>
                    <div className="form-group">
                        <label>Add Business Name: </label>
                        <input type="text" className="form-control"/>
                    </div>
                    <div className="form-group">
                        <label>Add GST Number: </label>
                        <input type="text" className="form-control"/>
                    </div>
                    <div className="form-group">
                        <input type="submit" value="Register Business" className="btn btn-primary"/>
                    </div>
                </form>
            </div>
        )
    }
}
Step 4: Submit the Form
We have three fields.
- person name
- business name
- gst number
So we need to create four functions that can track the values of the textbox and set that state according to it. Also, the fourth function will send the POST request to the node express server.
First, we will define the constructor and set the initial state, then bind this to the different events inside the constructor.
Then define the different functions with each input text value. So when the user types inside the textbox, we set the state according to it.
So, let’s say the user is typing the person’s name inside the textbox; we are changing the state value of the person’s name. Then, finally, the same for all of the inputs, and when we submit the form, we get the values from the state and send them to the POST request.
// App.js
import React, { Component } from 'react';
export default class Create extends Component {
constructor(props) {
super(props);
this.onChangePersonName = this.onChangePersonName.bind(this);
this.onChangeBusinessName = this.onChangeBusinessName.bind(this);
this.onChangeGstNumber = this.onChangeGstNumber.bind(this);
this.onSubmit = this.onSubmit.bind(this);
this.state = {
person_name: '',
business_name: '',
business_gst_number:''
}
}
onChangePersonName(e) {
this.setState({
person_name: e.target.value
});
}
onChangeBusinessName(e) {
this.setState({
business_name: e.target.value
})
}
onChangeGstNumber(e) {
this.setState({
business_gst_number: e.target.value
})
}
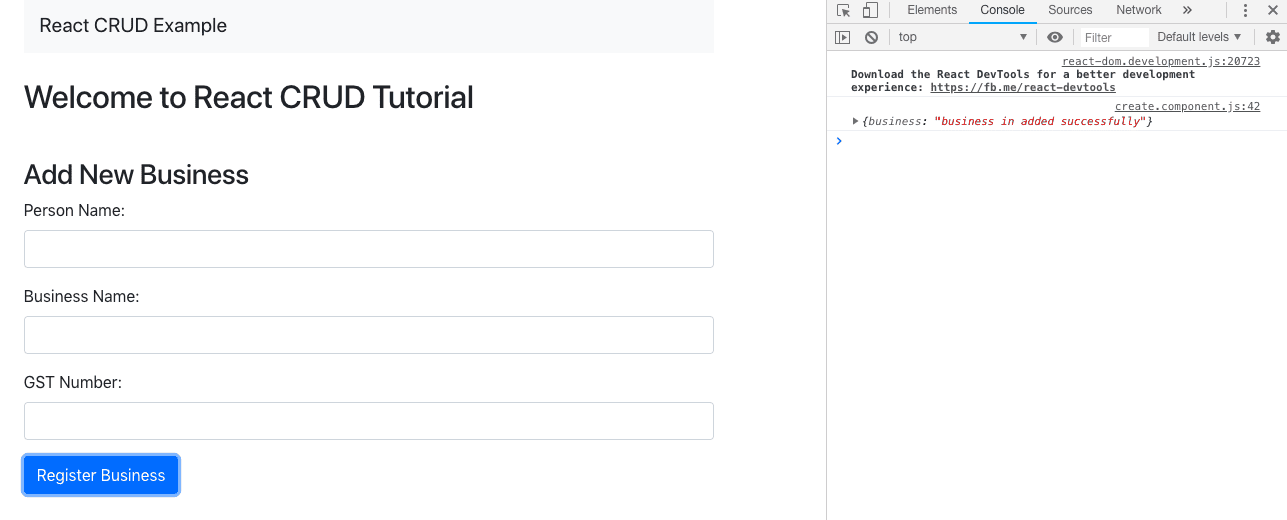
onSubmit(e) {
e.preventDefault();
console.log(`The values are ${this.state.person_name}, ${this.state.business_name}, and ${this.state.business_gst_number}`)
this.setState({
person_name: '',
business_name: '',
business_gst_number: ''
})
}
render() {
return (
<div style={{ marginTop: 10 }}>
<h3>Add New Business</h3>
<form onSubmit={this.onSubmit}>
<div className="form-group">
<label>Person Name: </label>
<input
type="text"
className="form-control"
value={this.state.person_name}
onChange={this.onChangePersonName}
/>
</div>
<div className="form-group">
<label>Business Name: </label>
<input type="text"
className="form-control"
value={this.state.business_name}
onChange={this.onChangeBusinessName}
/>
</div>
<div className="form-group">
<label>GST Number: </label>
<input type="text"
className="form-control"
value={this.state.business_gst_number}
onChange={this.onChangeGstNumber}
/>
</div>
<div className="form-group">
<input type="submit" value="Register Business" className="btn btn-primary"/>
</div>
</form>
</div>
)
}
}
Step 5: Create a backend on Node.js
We will create a backend API in Node, Express, and MongoDB. Inside our reactcrud project root, create one folder called API, go inside that folder, and initialize the package.json file.
npm init -y
Install the following node.js dependencies.
yarn add express body-parser cors mongoose

# or

npm install express body-parser cors mongoose --save
Also, install the nodemon as a development dependency. So that we do not need to restart every time we change our server code.
npm install nodemon --save-dev
Inside the api folder, create one file called the server.js and add the following code.
// server.js

const express = require('express');
const app = express();
const bodyParser = require('body-parser');
const PORT = 4000;
const cors = require('cors');

app.use(cors());
app.use(bodyParser.urlencoded({extended: true}));
app.use(bodyParser.json());

app.listen(PORT, function(){
  console.log('Server is running on Port:',PORT);
});
Save the file, open a new tab terminal inside the api folder, and hit the following command to spin up the node.js server.
nodemon server
You can see inside the terminal that our node.js server is running.

Step 6: Setup a MongoDB database
If you are a beginner in the MongoDB database, please check out the tutorial below.
I have already installed MongoDB on Mac. So I am starting the MongoDB server by the following command.
mongod
Inside the api folder, create one file called DB.js and add the following line of code.
// DB.js

module.exports = {
  DB: 'mongodb://localhost:27017/reactcrud'
}
In my local MongoDB database, the username and password are empty, but in the production, you need to create one admin user and assign the database to that user.
Import this DB.js file into the server.js file.
// server.js

const express = require('express');
const app = express();
const bodyParser = require('body-parser');
const PORT = 4000;
const cors = require('cors');
const mongoose = require('mongoose');
const config = require('./DB.js');

mongoose.Promise = global.Promise;
mongoose.connect(config.DB, { useNewUrlParser: true }).then(
  () => {console.log('Database is connected') },
  err => { console.log('Can not connect to the database'+ err)}
);

app.use(cors());
app.use(bodyParser.urlencoded({extended: true}));
app.use(bodyParser.json());

app.listen(PORT, function(){
  console.log('Server is running on Port:',PORT);
});
Save the file, and you can see inside the terminal that our node.js application is connected to a MongoDB database.
Step 7: Create a Mongoose Schema
The next step is to create a schema for the MongoDB database. For that, create a file inside the api project root called business.model.js and add the following code.
// business.model.js

const mongoose = require('mongoose');
const Schema = mongoose.Schema;

// Define collection and schema for Business
let Business = new Schema({
  person_name: {
    type: String
  },
  business_name: {
    type: String
  },
  business_gst_number: {
    type: Number
  }
},{
    collection: 'business'
});

module.exports = mongoose.model('Business', Business);
We have taken three fields, person_name, business_name, and business_gst_number, with their data types.
Step 8: Define the route for the Node.js Express application
Write the CRUD code inside the business.route.js file.
// business.route.js

const express = require('express');
const businessRoutes = express.Router();

// Require Business model in our routes module
let Business = require('./business.model');

// Defined store route
businessRoutes.route('/add').post(function (req, res) {
  let business = new Business(req.body);
  business.save()
    .then(business => {
      res.status(200).json({'business': 'business in added successfully'});
    })
    .catch(err => {
    res.status(400).send("unable to save to database");
    });
});

// Defined get data(index or listing) route
businessRoutes.route('/').get(function (req, res) {
    Business.find(function(err, businesses){
    if(err){
      console.log(err);
    }
    else {
      res.json(businesses);
    }
  });
});

// Defined edit route
businessRoutes.route('/edit/:id').get(function (req, res) {
  let id = req.params.id;
  Business.findById(id, function (err, business){
      res.json(business);
  });
});

//  Defined update route
businessRoutes.route('/update/:id').post(function (req, res) {
    Business.findById(req.params.id, function(err, business) {
    if (!business)
      res.status(404).send("data is not found");
    else {
        business.person_name = req.body.person_name;
        business.business_name = req.body.business_name;
        business.business_gst_number = req.body.business_gst_number;

        business.save().then(business => {
          res.json('Update complete');
      })
      .catch(err => {
            res.status(400).send("unable to update the database");
      });
    }
  });
});

// Defined delete | remove | destroy route
businessRoutes.route('/delete/:id').get(function (req, res) {
    Business.findByIdAndRemove({_id: req.params.id}, function(err, business){
        if(err) res.json(err);
        else res.json('Successfully removed');
    });
});

module.exports = businessRoutes;
Here, we have defined the CRUD operations for MongoDB. So when the request hits the server, it maps the URI, and according to URI, the above function will be executed, and a database operation will be performed and send the response to the client.
We have used a Mongoose ORM to save, update, and delete the data from the database. Mongoose is an ORM used in the MongoDB database. We have all the CRUD operations on the route file; we must import them inside the server.js file.
So, our final server.js file looks like this.
// server.js

const express = require('express');
const app = express();
const bodyParser = require('body-parser');
const PORT = 4000;
const cors = require('cors');
const mongoose = require('mongoose');
const config = require('./DB.js');
const businessRoute = require('./business.route');

mongoose.Promise = global.Promise;
mongoose.connect(config.DB, { useNewUrlParser: true }).then(
  () => {console.log('Database is connected') },
  err => { console.log('Can not connect to the database'+ err)}
);

app.use(cors());
app.use(bodyParser.urlencoded({extended: true}));
app.use(bodyParser.json());

app.use('/business', businessRoute);

app.listen(PORT, function(){
  console.log('Server is running on Port:',PORT);
});
Save the file and see the terminal and check if we got any errors.
Step 9: Install the Axios library and send a POST request.
Install the Axios library and send the POST request.
yarn add axios

# or

npm install axios --save
Send the HTTP POST request and the form data to the node js server. We will send the data as an object because we have used the body parser at the backend to pluck the data from the request and save it in the database.
Write the following code inside the create.component.js file.
// create.component.js

import React, { Component } from 'react';
import axios from 'axios';

export default class Create extends Component {
  constructor(props) {
    super(props);
    this.onChangePersonName = this.onChangePersonName.bind(this);
    this.onChangeBusinessName = this.onChangeBusinessName.bind(this);
    this.onChangeGstNumber = this.onChangeGstNumber.bind(this);
    this.onSubmit = this.onSubmit.bind(this);

    this.state = {
      person_name: '',
      business_name: '',
      business_gst_number:''
    }
  }
  onChangePersonName(e) {
    this.setState({
      person_name: e.target.value
    });
  }
  onChangeBusinessName(e) {
    this.setState({
      business_name: e.target.value
    })
  }
  onChangeGstNumber(e) {
    this.setState({
      business_gst_number: e.target.value
    })
  }

  onSubmit(e) {
    e.preventDefault();
    const obj = {
      person_name: this.state.person_name,
      business_name: this.state.business_name,
      business_gst_number: this.state.business_gst_number
    };
    axios.post('http://localhost:4000/business/add', obj)
        .then(res => console.log(res.data));

    this.setState({
      person_name: '',
      business_name: '',
      business_gst_number: ''
    })
  }

  render() {
    return (
        <div style={{ marginTop: 10 }}>
            <h3>Add New Business</h3>
            <form onSubmit={this.onSubmit}>
                <div className="form-group">
                    <label>Person Name:  </label>
                    <input
                      type="text"
                      className="form-control"
                      value={this.state.person_name}
                      onChange={this.onChangePersonName}
                      />
                </div>
                <div className="form-group">
                    <label>Business Name: </label>
                    <input type="text"
                      className="form-control"
                      value={this.state.business_name}
                      onChange={this.onChangeBusinessName}
                      />
                </div>
                <div className="form-group">
                    <label>GST Number: </label>
                    <input type="text"
                      className="form-control"
                      value={this.state.business_gst_number}
                      onChange={this.onChangeGstNumber}
                      />
                </div>
                <div className="form-group">
                    <input type="submit" value="Register Business" className="btn btn-primary"/>
                </div>
            </form>
        </div>
    )
  }
}
Now, submit the form with proper values, open your browser console panel, and see the response.
Also, now check inside the MongoDB database and see the values.
To see the values inside the database, we can start a Mongo shell and look at the values in the database.
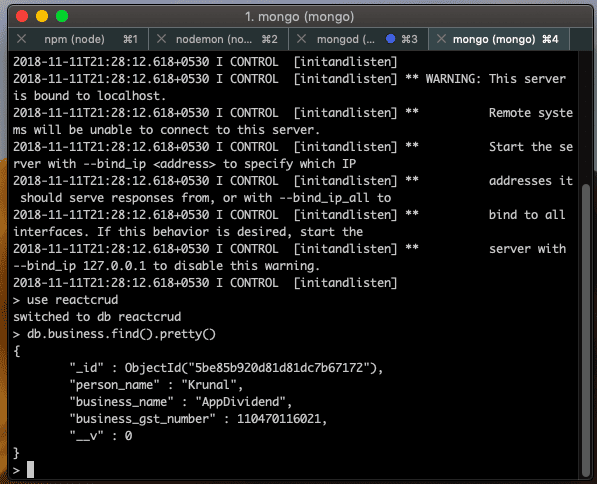
So, we can see that our data has been added successfully.
Step 10: How to display data in React js
// index.component.js

import React, { Component } from 'react';
import axios from 'axios';
import TableRow from './TableRow';

export default class Index extends Component {

  constructor(props) {
      super(props);
      this.state = {business: []};
    }
    componentDidMount(){
      axios.get('http://localhost:4000/business')
        .then(response => {
          this.setState({ business: response.data });
        })
        .catch(function (error) {
          console.log(error);
        })
    }
    tabRow(){
      return this.state.business.map(function(object, i){
          return <TableRow obj={object} key={i} />;
      });
    }

    render() {
      return (
        <div>
          <h3 align="center">Business List</h3>
          <table className="table table-striped" style={{ marginTop: 20 }}>
            <thead>
              <tr>
                <th>Person</th>
                <th>Business</th>
                <th>GST Number</th>
                <th colSpan="2">Action</th>
              </tr>
            </thead>
            <tbody>
              { this.tabRow() }
            </tbody>
          </table>
        </div>
      );
    }
  }
So, here, we have sent the GET request to the node.js server and fetched that data from an API.
We have imported the TableRow.js component. So let us create that component. Then, inside the components folder, create one more component called TableRow.js and add the following code.
// TableRow.js

import React, { Component } from 'react';

class TableRow extends Component {
  render() {
    return (
        <tr>
          <td>
            {this.props.obj.person_name}
          </td>
          <td>
            {this.props.obj.business_name}
          </td>
          <td>
            {this.props.obj.business_gst_number}
          </td>
          <td>
            <button className="btn btn-primary">Edit</button>
          </td>
          <td>
            <button className="btn btn-danger">Delete</button>
          </td>
        </tr>
    );
  }
}

export default TableRow;
This component is responsible for displaying the row data fetched from the backend.
Save the file, go to the browser, and see this URL: http://localhost:3000/index.

Step 11: Edit and Update Functionality in React js
First, add the Link to the TableRow.js file.
// TableRow.js

import { Link } from 'react-router-dom';

<Link to={"/edit/"+this.props.obj._id} className="btn btn-primary">Edit</Link>
Add the following code to the edit.component.js file.
// edit.component.js

import React, { Component } from 'react';
import axios from 'axios';

export default class Edit extends Component {
  constructor(props) {
    super(props);
    this.onChangePersonName = this.onChangePersonName.bind(this);
    this.onChangeBusinessName = this.onChangeBusinessName.bind(this);
    this.onChangeGstNumber = this.onChangeGstNumber.bind(this);
    this.onSubmit = this.onSubmit.bind(this);

    this.state = {
      person_name: '',
      business_name: '',
      business_gst_number:''
    }
  }

  componentDidMount() {
      axios.get('http://localhost:4000/business/edit/'+this.props.match.params.id)
          .then(response => {
              this.setState({
                person_name: response.data.person_name,
                business_name: response.data.business_name,
                business_gst_number: response.data.business_gst_number });
          })
          .catch(function (error) {
              console.log(error);
          })
    }

  onChangePersonName(e) {
    this.setState({
      person_name: e.target.value
    });
  }
  onChangeBusinessName(e) {
    this.setState({
      business_name: e.target.value
    })
  }
  onChangeGstNumber(e) {
    this.setState({
      business_gst_number: e.target.value
    })
  }

  onSubmit(e) {
    e.preventDefault();
    const obj = {
      person_name: this.state.person_name,
      business_name: this.state.business_name,
      business_gst_number: this.state.business_gst_number
    };
    axios.post('http://localhost:4000/business/update/'+this.props.match.params.id, obj)
        .then(res => console.log(res.data));

    this.props.history.push('/index');
  }

  render() {
    return (
        <div style={{ marginTop: 10 }}>
            <h3 align="center">Update Business</h3>
            <form onSubmit={this.onSubmit}>
                <div className="form-group">
                    <label>Person Name:  </label>
                    <input
                      type="text"
                      className="form-control"
                      value={this.state.person_name}
                      onChange={this.onChangePersonName}
                      />
                </div>
                <div className="form-group">
                    <label>Business Name: </label>
                    <input type="text"
                      className="form-control"
                      value={this.state.business_name}
                      onChange={this.onChangeBusinessName}
                      />
                </div>
                <div className="form-group">
                    <label>GST Number: </label>
                    <input type="text"
                      className="form-control"
                      value={this.state.business_gst_number}
                      onChange={this.onChangeGstNumber}
                      />
                </div>
                <div className="form-group">
                    <input type="submit"
                      value="Update Business"
                      className="btn btn-primary"/>
                </div>
            </form>
        </div>
    )
  }
}
So, what we have done is we have used the component lifecycle method to fetch the data from the API.
That data must be displayed inside the textbox because this is an edit form. Next, it is the same thing as we have written the code in the create.component.js file.
Save the file and go to the edit page from the index or listing page. If the data is not displayed, please check that you have the running node.js server on the backend.

We have also written the code that will update the data because we have written the function to send the request to the node.js server and update the data based on the ID.
Step 12: Delete operation in React
Now, the only thing remaining is to delete the data. First, define the delete function inside the TableRow.js file.
// TableRow.js

import React, { Component } from 'react';
import { Link } from 'react-router-dom';
import axios from 'axios';

class TableRow extends Component {

  constructor(props) {
        super(props);
        this.delete = this.delete.bind(this);
    }
    delete() {
        axios.get('http://localhost:4000/business/delete/'+this.props.obj._id)
            .then(console.log('Deleted'))
            .catch(err => console.log(err))
    }
  render() {
    return (
        <tr>
          <td>
            {this.props.obj.person_name}
          </td>
          <td>
            {this.props.obj.business_name}
          </td>
          <td>
            {this.props.obj.business_gst_number}
          </td>
          <td>
            <Link to={"/edit/"+this.props.obj._id} className="btn btn-primary">Edit</Link>
          </td>
          <td>
            <button onClick={this.delete} className="btn btn-danger">Delete</button>
          </td>
        </tr>
    );
  }
}

export default TableRow;
That’s it.

Hamish Anderson
Thank you, clear example and explanation!
wahyu
delete function is successfully deleted from database but component didn’t update. need refresh page to get true result
jahrin
paste this code in index.component.js file. (#10 )
componentDidUpdate() {
axios.get(‘http://localhost:4000/business’)
.then(response => {
this.setState({ business: response.data });
})
.catch(function (error) {
console.log(error);
})
}
Sakuya
thank you so much!!
Radek
It’s not good solution beacause it creates a infinite loop and a lot of get requests over and over. React documentation recommend if statement before setState to compare new props with previous:
“You may call setState() immediately in componentDidUpdate() but note that it must be wrapped in a condition… or you’ll cause an infinite loop. It would also cause an extra re-rendering which, while not visible to the user, can affect the component performance.”
bik
This is my code. You can take a look
componentDidUpdate() {
axios.get(‘http://localhost:4000/business’)
.then(response => {
console.log(JSON.stringify(response.data) === JSON.stringify(this.state.business))
if(JSON.stringify(response.data) !== JSON.stringify(this.state.business))
this.setState({ business: response.data });
})
.catch(function (error) {
console.log(error);
})
}
Fred
Your solution didn’t work for me but this did
componentDidUpdate() {
axios.get(‘http://localhost:4000/business’)
.then(response => {
this.setState({ business: response.data });
})
.catch(function (error) {
console.log(error);
})
}
Suresh Kumar
Cool! Fred, your solution looks clean. Thanks!
Baspa
Is it clean to have a node_modules folder inside another folder? So after step #5 I have 2 node_modules folders in my project. I’m a beginner but it just doesn’t feel right or does it not matter?
James
I’m still a beginner at this myself…but yes, there’s going to be *two* node_modules folders: one in the api directory and one in the parent directory.
James
I’m a beginner too…but the project does require *two* node_modules folders: one for the React (front-end) app and one for the Express (back-end) app.
helmi
tanks!!!
gold
Excellent tutorial!
alejandro
GoodMmoring, Sorry for my English, I am study this language. So, I have problema…
./src/App.js
Module not found: Can’t resolve ‘bootstrap/dist/css/bootstrap.mim.css’ in ‘D:\PENDRIVER\TEST\TEST_REACT\reactcrud\src’
How to salve problem? Thanks…
Zeeshan
Just npm i bootstrap
Alejandro Fuentes
Hi, good morning, I have a problem with compilation:
Failed to compile.
./src/App.js
Module not found: Can’t resolve ‘bootstrap/dist/css/bootstrap.mim.css’ in ‘D:\PENDRIVER\TEST\TEST_REACT\reactcrud\src’
You can help me about?
Thankss
Krunal
Spelling mistake it is bootstrap.min.css
Bakorshisha Kharkongor
Hello Kunal I am Bakorshisha, I have been following this tutorial and to be honest its really helpful, just wanted to ask a favor can you do a tutorial on how to add image in react using multer in the backend and also how to edit that image…. Please really greatful if you could help out here.
Adil Ali
Hey kunal my update form does not have the data prepopulated
imran
Very good explanation, i did not find anywhere this kind of explanation.
Thanks again.
zobosu
thank you very much.
i hope you post a lot of blog like this.
zainy
i want to insert an image file from create.component.js file and store this image to db
i can’t finding multiple insert implementation . any suggestion ?
Ryan
Hi! I’m working through this tutorial and it had been going well, but after step #9 the server is giving me the dreaded “cannot GET” response when I try to load the page. I’ve checked the GitHub repo, and my code is exactly the same in structure and content. Can anyone help me with this?
Rao
Hi Krunal, Thanks for this great tutorial, I was able to complete this without any errors.
When I am updating/deleting the records, the update and delete is happening fine, but in the index page, it still shows the previous state values, it is not updating the latest values, when I tried componentDidUpdate(), it is working but going in infinite loop, can you please help me in solving this issue?
Thanks
Pramod Rawate
Hey Krunal. Thanks a lot for the tutorial. But i too also have the same problem. Everything works fine. But when update or delete is performed i am on Index page but i cant see updated data. I need to refresh the page. How to update the code. Could you provide the solution for this.
ddelfin7
Hi friends !
First , Thanks for tutorial Krunal. Good job!
Now , I make tutorial and I’m going to add for that refresh in real time when press input delete.
In this url you can check code : https://github.com/diegodelfin7/reactcrud
anandhi c
thank you .it was very helpful
Gothami
just refresh the page after the updated the data like below,
onSubmit(e) {
e.preventDefault();
const obj = {
person_name: this.state.person_name,
business_name: this.state.business_name,
business_gst_number: this.state.business_gst_number
};
axios.post(‘http://localhost:4000/business/update/’+this.props.match.params.id, obj)
.then(res => {
console.log(res.data);
window.location.reload()
});
this.props.history.push(‘/index’);
}
Marco Bessa
thks… but where i put this code ?
Zevi
pls move “this.props.history.push(‘/index’);” into call back function block.
axios.post(‘http://localhost:4000/business/update/’ + this.props.match.params.id, obj)
.then(res => {
console.log(res.data);
this.props.history.push(‘/index’);
});
Justas
Why does state updating doesn’t work? You need to refresh page to refresh the state, it lost the point of react.
Krunal
Nope, it does lose the point of Single Page Application. In SPA, you do not need to refresh the page. You can see an example of PayPal. They also using React, Facebook, all apps are refreshing their pages. React is for building UI. Building a single page app is dependent upon us, not on the library.
Rohit Saini
You Are Tony Stark On india (Iron Men). Great tutorial as always. God Bless you boy. Cheers!!!
Pramod Rawate
Hey Krunal, does your index page gets updated automatically after editing and updating the entries ?
Because in my case i need to refresh the page to see the edited or updated values.
Please revert back if possible.
Thanks.
Ozzie
Great tutorial! When i click add Business, nothing seems to happen in the MongoDB. I manually added an entry into the DB, hoping to see it when I go to ‘index’ in the React App, however nothing shows up. Any idea where the issue may be? Looks like React isn’t connecting to Mongo correctly?
Rizky
Great tutorial sir i appreciate
Help sir im in phase #5: Create a backend on Node.js
i have problem when execute the Nodemon Server it says
nodemon : The term ‘nodemon’ is not recognized as the name of a cmdlet, function, script file, or operable program. Check the
spelling of the name, or if a path was included, verify that the path is correct and try again.
At line:1 char:1
+ nodemon server
+ ~~~~~~~
+ CategoryInfo : ObjectNotFound: (nodemon:String) [], CommandNotFoundException
+ FullyQualifiedErrorId : CommandNotFoundException
Sakuya
Go inside the api directory and type the following command on the terminal:
npm install nodemon –save-dev
then type nodemon server.js
Yury
Great tutorial, thanks. But I’m stuck at nodemon… Help, please
Mac:api iam$ npm install nodemon –save-dev
…
+ nodemon@1.19.1
added 282 packages from 144 contributors and audited 2469 packages in 13.978s
found 0 vulnerabilities
Mac:api iam$ nodemon server
bash: nodemon: command not found
Mac:api iam$ ls
node_modules package-lock.json package.json server.js ‘~
Mac:api iam$ nodemon server.js
bash: nodemon: command not found
Rakshith
Great Tutorial but I am stuck at step 9. I am not able to add to the db.
Getting this error
OPTIONS http://localhost:4000/business/add net::ERR_CONNECTION_REFUSED
createError.js:17 Uncaught (in promise) Error: Network Error
at createError (createError.js:17)
at XMLHttpRequest.handleError (xhr.js:87)
Please help me with this problem.
It seems like http://localhost:4000/business/add is not reachable.
Rakshith
Silly mistake. I had to open two terminals, one in api directory and one in root directory. Run npm start on both the terminals and it works. Hope this helps.
pan
but still doesn’t work
DRS
Any solution about this one ? I try ur suggets but still didn’t work.
Silent
same bro…
anandhi c
thank you so much .it was very helpful
Ayed Ramadeen
Thank you, good explanation
test
it just doesn’t work for me.i npm installed both api and react, as well as started them. i still get connection error.
Alireza
Thank you
Bhupendra
Add app.use(“/business”,businessRoute); line in server.js below app.use(bodyParser.json()); your prob will get resolve. Because business mapping is not done with routing file.
Enjoy 🙂
Rob
regarding #10: Display the backend data/
I get the index.component.js displaying correctly on mac browsers (Chrome and Safari) but on iPad / mobile (Safari and Chrome) only the head is shown. no data is shown from TableRow.js
If I manually add a table row into index.component.js the row displays correctly on an iPad.
Any suggestions on what could be going wrong here?
Hari
Great Awesome tutorial,…
Thank you Bro,…
Septiana
I’m can’t do mongod..
im already installed it, looks like i need to do something..
anyone help?
Arif Ragil
the tutorial is very good and easy to understand
but there are obstacles if you have edited or deleted then the data cannot be auto changed
Sunita
update and delete aren’t working . can you help ??
sandeep
Thanks nice example
pan
hi sir i error with Error: Network Error
at createError (createError.js:17)
at XMLHttpRequest.handleError (xhr.js:87)
xhr.js:173 GET http://localhost:4000/business net::ERR_CONNECTION_REFUSED
Allaudhin
good article.,explained to clearly
alpesh
how can i implement search functionality
CHANDRASEKAR
In post react component, you can use single change Handler inside for each input elements.
changeHandler = e => {
this.setState({ [e.target.name]: e.target.value })
}
and
axios.post(‘apiURL’, this.state)
Neha D P
Any one can refer to https://github.com/nehadpfriends/MERN-stack-Products-application
Simple application to learn basic flow of React–redux
srininvas
Hi Kunal,I have been following this tutorial and to be honest its really helpful, just wanted to ask a favor can you do a tutorial on how to add image in react using multer in the backend and also how to edit that image…. Please really greatful if you could help out here.
Maite Perez
Good morning Krunal,
Your article was very useful for me. Thank You !!!!
I wanted to ask you how is the best way to perform validations in React js, is the only point I need to complete my form.
Thanks in advance!!
deep
Hi Krunal ,Getting problem with link, links change url but not rendered component. can you please help with that?. It works when i reload page after click any link
Richa
Hi,
After delete I want to go back to the index page(listing page). What should I use?
joe
Why are you wrapping the BrowserRouter 2x ? In Step 2 index.js file, you wrap the BrowserRouter around App component; then again in same step, in the App.js file, you wrapped BrowserRoute around everything you are returning. Fix it please.
Snowby Dave
Thank you soo much.
Himang
Thanks, This is the first ever best tutorial i found for react beginner to do CRUD !! Awesome !!
Joe Anonymus
greate…how to auto refrersh after action create, update and delete
sridhar
Hi krunal
How To Implement Hooks Concept To MERN?
TRK
HI Kunal, can you help me in this function?
businessRoutes.route(‘/’).get(function (req, res) {
Business.find(function(err, businesses){
if(err){
console.log(err);
}
else {
res.json(businesses);
}
});
});
what should i do if want to get only Business names without GST numbers etc.
Sara
Hi Kunal,
Really nice tutorial.
I got an error.
500 (Internal Server Error)
createError.js:17 Uncaught (in promise) Error: Request failed with status code 500
at createError (createError.js:17)
at settle (settle.js:19)
at XMLHttpRequest.handleLoad (xhr.js:60).
Can you please help me to solve it?
Smile
Hello
I have learned a lots about MERN stack.
Greeting for you.
All are perfect.
Thanks and Best Regards.
Snorlax
anybody else having the following issue
after updating the code in App.js in step #2, the links in the nav bar are not showing up. The routes themselves work if I manually type them in the URL bar but they’re not rendering on the nav bar
rajesh
Thanks for posting. Its an Important topic to be read.
avinashjadhav
Hi Kunal,
Really nice tutorial , i’m happy with your post
small request from my side can you post on signup and login with sessions
James
Hi, can you help please
POST http://localhost:4000/business/add 404 (Not Found)
createError.js:16 Uncaught (in promise) Error: Request failed with status code 404
at createError (createError.js:16)
at settle (settle.js:17)
at XMLHttpRequest.handleLoad (xhr.js:61)
Saurabh
there is an error in #4 Submit the Form. the code is for the create.component.js file, not for the App.js (wrongly mentioned //App.js)
Suresh Kumar
Great tutorial! Crystal clear! Keep it up! Looking forward for more tutorials from you.
Siddharth
Nothing is displayed on screen when I load “http://localhost:3000/business” .
Only [] is displayed, nothing else.
console.log displays “Server is running on Port: 3000
Database is connected”
Please help!