
Angular NgModel is a built-in directive that creates a FormControl instance from the domain model and binds it to a form control element.
The ngmodel directive binds the value of HTML controls (input, select, textarea) to application data.
We can achieve it in both the component element and the HTML element. The two-way binding uses the syntax as [()] or bind- keyword.
Two-way binding uses the syntax of property binding and event binding together. Property binding uses the syntax as bracket [] or bind- and event binding uses the syntax as the parenthesis () or on- and these bindings are considered one-way binding.
Two-way binding works in both directions setting and fetching the value. The two-way binding uses a specific name pattern.
Here is a step-by-step guide:
Step 1: Installing Angular
npm install -g @angular/cli
Generate the Angular project using the following command.
ng new model
It will create an Angular boilerplate.
Import the FormsModule inside the app.module.ts file.
// app.module.ts

import { BrowserModule } from '@angular/platform-browser';
import { NgModule } from '@angular/core';
import { FormsModule } from '@angular/forms';

import { AppComponent } from './app.component';

@NgModule({
  declarations: [
    AppComponent
  ],
  imports: [
    BrowserModule,
    FormsModule
  ],
  providers: [],
  bootstrap: [AppComponent]
})
export class AppModule { }
Step 2: Creating the AppData model
Inside the src >> app folder, create a file called AppData.ts and add the following code.
// AppData.ts

export class AppData {
  constructor(
      public name: String
  ) {}
}
Import this model file inside the app.component.ts file.
// app.component.ts

import { Component } from '@angular/core';
import { AppData } from './AppData';

@Component({
  selector: 'app-root',
  templateUrl: './app.component.html',
  styleUrls: ['./app.component.css']
})
export class AppComponent {
  title = 'app';
  data = new AppData('');
}
Step 3: Adding HTML code
Write the following code inside the app.component.html file.
<input type="text" class="form-control" id="name"
  required
  [(ngModel)]="data.name" />

<p>Hello {{ data.name }}!</p>
- For each
inputtag, we use thengModeldirective to bind data with the syntax:[(ngModel)]="data.name"( AppData is the data model inapp.component.ts) class - Added the
nameattribute to theinputtag. It is a requirement whenusedg[(ngModel)]in combination with a form.
Save the file and go to the http://localhost:4200
You can see that using the NgModel directive, we can do the two-way data binding.
If we need to inspect the properties of the associated FormControl (like validity state), export the directive into the local template variable using the ngModel as the key (ex: #myVar=” ngModel”).
You then access the control using a directive’s control property, but most properties used (like valid and dirty) fall through to the control anyway for direct access.
First, we need to import the FormsModule inside the app.module.ts file.
import { FormsModule } from '@angular/forms';

imports: [
    ...
    FormsModule
  ],
Otherwise, we will get the error like a compiler.js:2175 Uncaught Error: Template parse errors: There is no directive with “exportAs” set to “ngModel”.
Write the following code inside the app.component.ts file.
// app.component.ts
import { Component } from '@angular/core';
@Component({
selector: 'app-root',
template: `
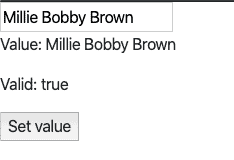
<input [(ngModel)]="name" #it="ngModel" required>
<p>Value: {{ name }}</p>
<p>Valid: {{ it.valid }}</p>
<button (click)="setValue()">Set value</button>
`,
styleUrls: ['./app.component.css']
})
export class AppComponent {
name = '';
setValue() { this.name = 'Millie Bobby Brown'; }
}
Save and go to the browser.
If you press the setValue button, the following will be the output.
Step 4: Using ngModel within the form in Angular
import { Component } from '@angular/core';
import {NgForm} from '@angular/forms';
@Component({
  selector: 'app-root',
  template: `
    <form #it="ngForm" (ngSubmit)="onSubmit(it)" novalidate>
      <input name="first" ngModel required #first="ngModel">
      <input name="last" ngModel required #last="ngModel">
      <button>Submit</button>
    </form>
    <p>First name value: {{ first.value }}</p>
    <p>First name valid: {{ first.valid }}</p>
    <p>last name value: {{ last.value }}</p>
    <p>last name valid: {{ last.valid }}</p>
    <p>Form value: {{ it.value | json }}</p>
    <p>Form valid: {{ it.valid }}</p>
  `,
  styleUrls: ['./app.component.css']
})
export class AppComponent {
  onSubmit(it: NgForm) {
    console.log(it.value);  // { first: '', last: '' }
    console.log(it.valid);  // false
  }
}
Go to the browser and see the magic of the Angular ngmodel.
That’s it!

Mario Luiz
Tenks,
This tutorial helps me a lot.
Krunal
Your welcome. Keep learning and sharing.