
The useState is a fundamental hook in React that lets you add state variables to functional components. It returns two parameters: The current state and a function updating it.
The useEffect hook lets you perform side effects in functional components. But what are the side effects? Well, side effects include data fetching, subscriptions, manually changing the DOM, and more. The useEffect hook runs every render of the component.
Together, these hooks enable functional components to manage state and side effects.
Here is the step-by-step guide to using Formik with React hooks, including useState and useEffect.
Step 1: Setup a new React project
You can create a new React project using the command below:
npm create vite@latest my-react-app -- --template react
It will create a new project folder called “my-react-app” and go inside the project folder:
cd my-react-app

npm install
Step 2: Install MUI, Formik, and Yup
We are using MUI for styling and Formik to manage the form state. We will use Yup libraries for validation.
Type the command below to install all libraries:
npm install formik yup @mui/material @emotion/react @emotion/styled
Step 3: Create an API Utility Module
Install the Axios library to send an HTTP request to an API.
npm install axios
Inside the src folder, create a new file called Api.js and add the code below:
// Api.js

import axios from 'axios';

export const fetchUserData = async () => {
    try {
        const response = await axios.get('https://jsonplaceholder.typicode.com/users/1');
        return response.data;
    } catch (error) {
        console.error('Error fetching data', error);
        throw error;
    }
};
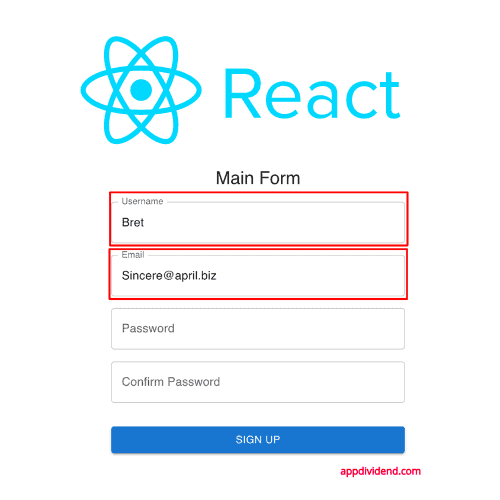
You can see that we are using a fake online REST API for testing and prototyping. We will use the /users endpoint to get user data.
Basically, we will populate the email and username values in the main form. In real life, this should not be the case when creating a signup form, but for this project, this setup helps understand how useState and useEffect hooks help create a form with formik.
Step 4: Creating Reusable Styled Components
Create a styledComponent.jsx file inside the src folder and add the code below:
// styledComponent.jsx

import { styled } from "@mui/system";
import { TextField, Button, Container } from "@mui/material";

export const StyledContainer = styled(Container)(({ theme }) => ({
  marginTop: theme.spacing(8),
  display: "flex",
  flexDirection: "column",
  alignItems: "center",
}));

export const StyledForm = styled("form")(({ theme }) => ({
  width: "100%", // Fix IE 11 issue.
  marginTop: theme.spacing(1),
}));

export const StyledTextField = styled(TextField)(({ theme }) => ({
  margin: theme.spacing(1, 0),
}));

export const StyledButton = styled(Button)(({ theme }) => ({
  margin: theme.spacing(3, 0, 2),
}));
Step 5: Creating a Custom Hook for Form Handling
Create a new folder, “hooks”, inside the “src” folder, and inside the “hooks” folder, create a new hook file using the useSignupForm.js file, and add the code below:
// useSignupForm.js

import { useState, useEffect } from 'react';
import { useFormik } from 'formik';
import * as Yup from 'yup';
import { fetchUserData } from '../Api';

const validationSchema = Yup.object({
    username: Yup.string().required('Username is required'),
    email: Yup.string().email('Invalid email address').required('Email is required'),
    password: Yup.string().min(8, 'Password should be at least 8 characters long').required('Password is required'),
    confirmPassword: Yup.string().oneOf([Yup.ref('password'), null], 'Passwords must match').required('Confirm password is required'),
});

export const useSignupForm = () => {
    const [initialValues, setInitialValues] = useState({
        username: '',
        email: '',
        password: '',
        confirmPassword: '',
    });

    useEffect(() => {
        const fetchData = async () => {
            try {
                const data = await fetchUserData();
                setInitialValues({
                    username: data.username || '',
                    email: data.email || '',
                    password: '',
                    confirmPassword: '',
                });
            } catch (error) {
                console.error('Error fetching initial form values', error);
            }
        };

        fetchData();
    }, []);

    const formik = useFormik({
        initialValues,
        enableReinitialize: true,
        validationSchema,
        onSubmit: (values) => {
            console.log('Form data', values);
        },
    });

    return formik;
};
The useSignupForm.js hook manages the form state, validation, and side effects, encapsulating the form logic.
Step 6: Organize the Main Form Component
Create a MainForm.jsx file inside the src folder and add the code below:
// MainForm.jsx

import { Typography } from "@mui/material";
import {
  StyledContainer,
  StyledForm,
  StyledTextField,
  StyledButton,
} from "./styledComponents";
import { useSignupForm } from "./hooks/useSignupForm";

const MainForm = () => {
  const formik = useSignupForm();

  return (
    <StyledContainer component="main" maxWidth="xs">
      <Typography component="h1" variant="h5">
        Main Form
      </Typography>
      <StyledForm onSubmit={formik.handleSubmit}>
        <StyledTextField
          variant="outlined"
          fullWidth
          id="username"
          name="username"
          label="Username"
          value={formik.values.username}
          onChange={formik.handleChange}
          error={formik.touched.username && Boolean(formik.errors.username)}
          helperText={formik.touched.username && formik.errors.username}
        />
        <StyledTextField
          variant="outlined"
          fullWidth
          id="email"
          name="email"
          label="Email"
          value={formik.values.email}
          onChange={formik.handleChange}
          error={formik.touched.email && Boolean(formik.errors.email)}
          helperText={formik.touched.email && formik.errors.email}
        />
        <StyledTextField
          variant="outlined"
          fullWidth
          id="password"
          name="password"
          label="Password"
          type="password"
          value={formik.values.password}
          onChange={formik.handleChange}
          error={formik.touched.password && Boolean(formik.errors.password)}
          helperText={formik.touched.password && formik.errors.password}
        />
        <StyledTextField
          variant="outlined"
          fullWidth
          id="confirmPassword"
          name="confirmPassword"
          label="Confirm Password"
          type="password"
          value={formik.values.confirmPassword}
          onChange={formik.handleChange}
          error={
            formik.touched.confirmPassword &&
            Boolean(formik.errors.confirmPassword)
          }
          helperText={
            formik.touched.confirmPassword && formik.errors.confirmPassword
          }
        />
        <StyledButton
          type="submit"
          fullWidth
          variant="contained"
          color="primary"
        >
          Sign Up
        </StyledButton>
      </StyledForm>
    </StyledContainer>
  );
};

export default MainForm;
You can see that the MainForm.jsx component uses the custom hook (useSignupForm.js) and styled-components (styledComponents.jsx) to build the form UI.
Step 7: Use the Form Component in App
Modify the src/App.jsx file and import the MainForm.jsx component:
// App.jsx

import { CssBaseline } from "@mui/material";
import MainForm from "./MainForm";

function App() {
  return (
    <>
      <CssBaseline />
      <MainForm />
    </>
  );
}

export default App;
And our src/main.jsx file looks like this:
// main.jsx

import React from "react";
import ReactDOM from "react-dom/client";
import App from "./App.jsx";

ReactDOM.createRoot(document.getElementById("root")).render(
  <React.StrictMode>
    <App />
  </React.StrictMode>
);
Save the file and start the development server using the below command:
npm run dev
Go to this URL: http://localhost:5173/
We used the useEffect hook to get the data from the example API, fetch the username and email, and display it in the text fields. We are managing the state of form fields using the useState hook.
When you submit the form, it will log the values in the console.
That’s all for this tutorial!
