
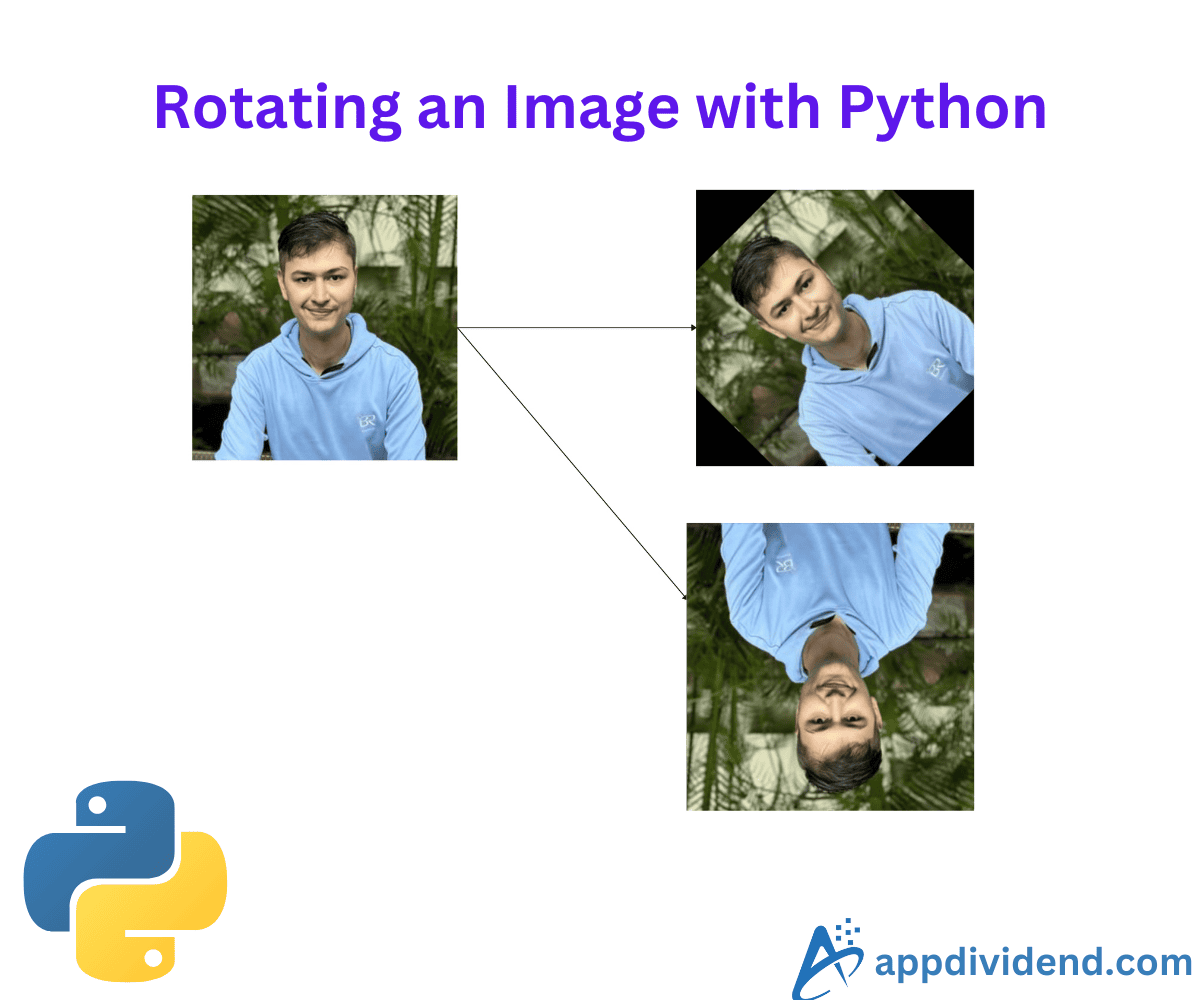
Rotating images involves transforming an image by shifting its pixel positions around a specific point based on an angle. In most cases, that particular point is the center, and angles are in degrees (e.g., 90°, 180°, 270°, or custom angles like 45°).
A positive angle represents a counterclockwise direction.
A negative angle represents a clockwise direction.
Here are two ways to rotate an image in Python:
- Using an image.rotate() function from Pillow
- Using cv2.getRotationMatrix2D function from opencv-python
Digital images are two-dimensional arrays of pixel values represented by rows and columns. You can create a rotation by applying a transformation matrix to each pixel coordinate.
By default, images rotate around their center point. However, you can change the rotating point to any point. For example, you can rotate the image around the top-left or bottom-right corner.
While rotating your image, ensure that you have a proper canvas size to accommodate the rotated image. If your canvas size is small, you need to resize it to make it bigger by filling the extra space with a background color.
Method 1: Using an image.rotate() function from Pillow
The Pillow library provides the .rotate() function, which accepts an angle and expand arguments, and rotates the image based on the center point.
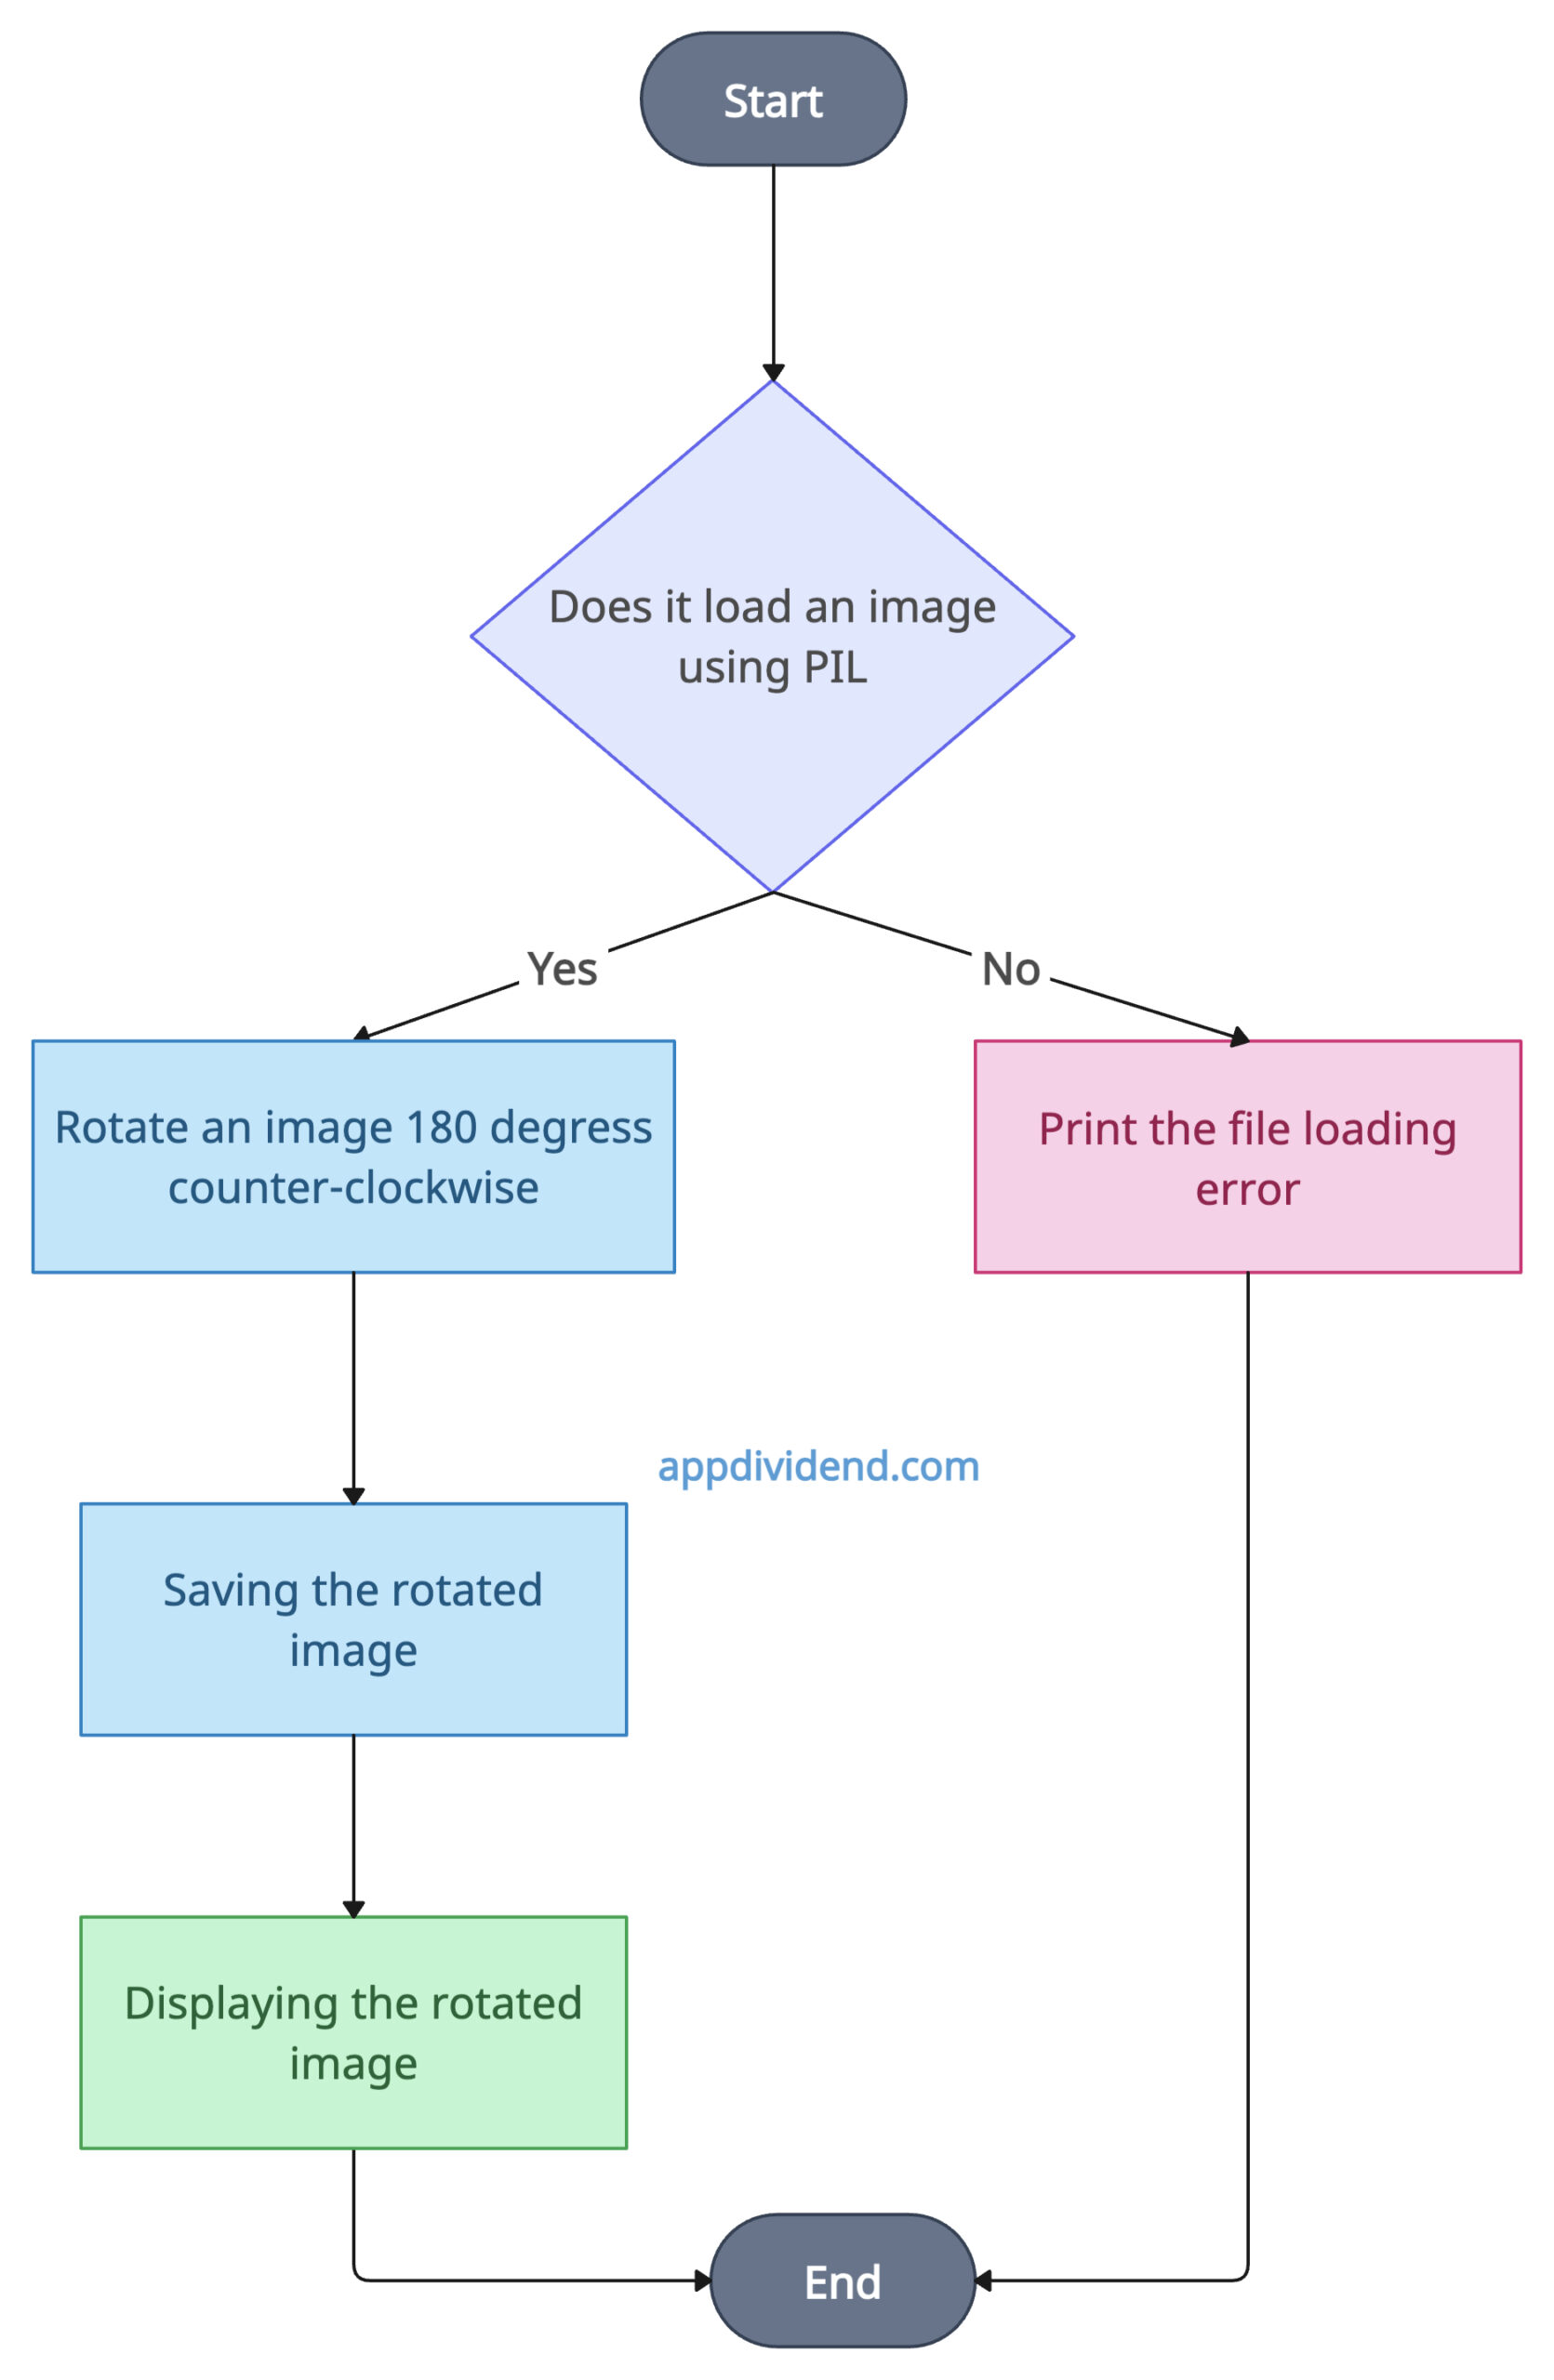
The diagram above illustrates each step of the process for rotating an image and displaying it to the user. If the image does not load properly, it will either print the error or handle it.
Install the “pillow” library using the command below:
pip install pillow
Code example
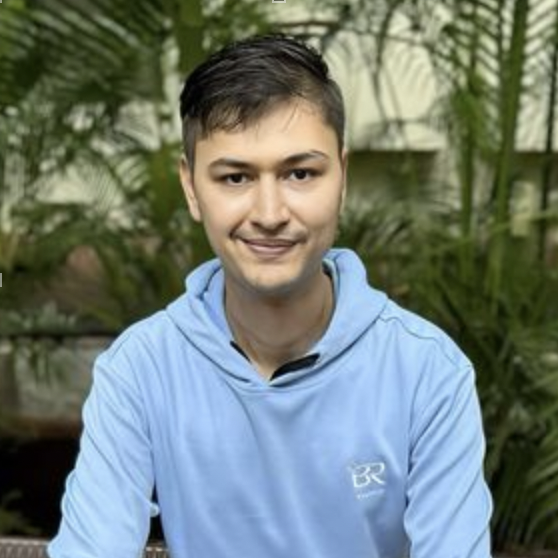
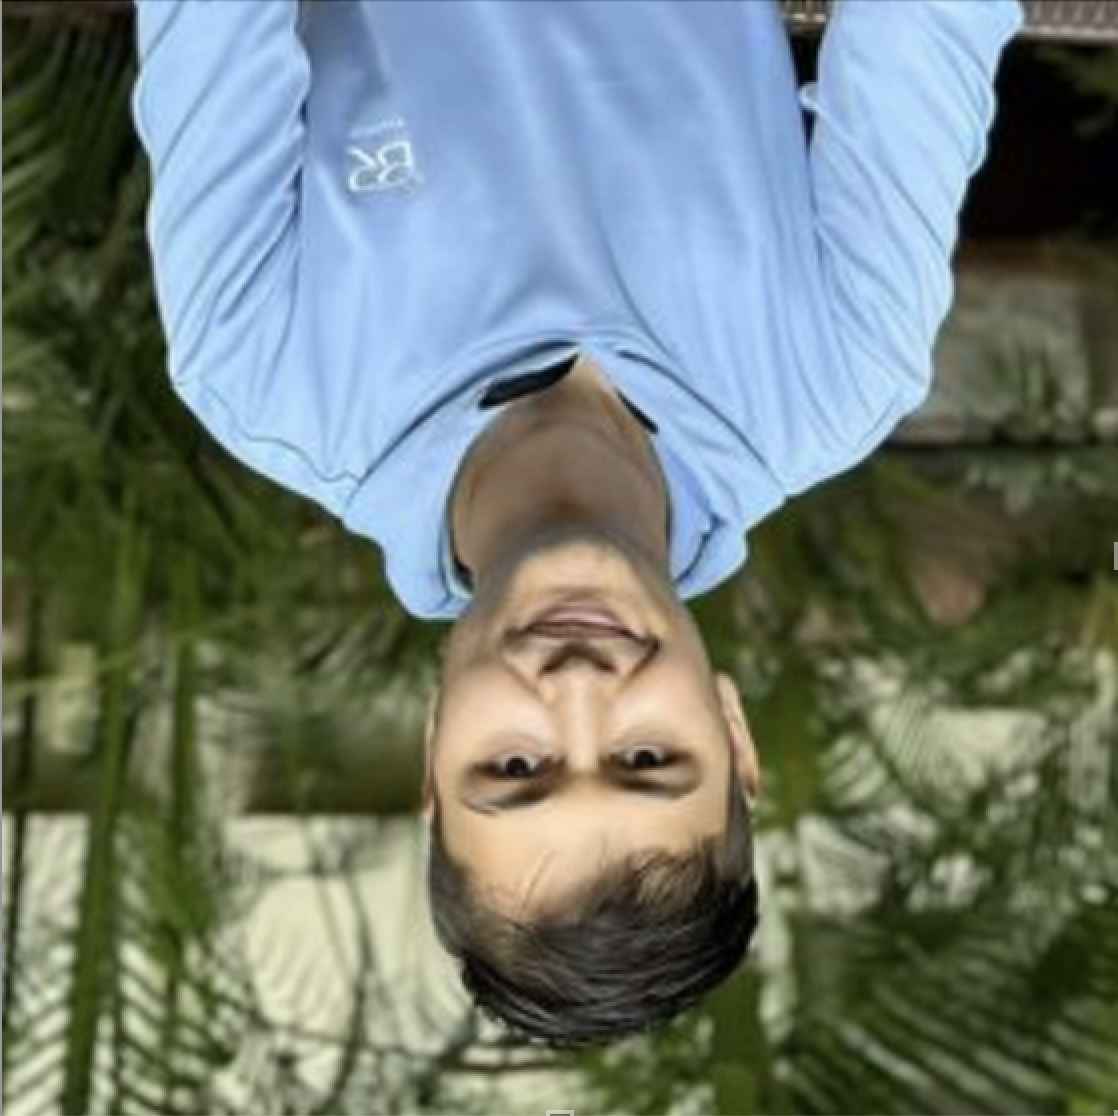
Let’s rotate an image by 180° and display it.
from PIL import Image

# Replacing 'krunal.png' with the path to your image file
image = Image.open('krunal.png')

# Rotating the image by 180 degrees counter-clockwise
rotated_image = image.rotate(180, expand=True)

# Saving the rotated image
rotated_image.save('rotated_image.png')

# Displaying the rotated image
rotated_image.show()
Before rotating an image
After rotating an image
You can see the new image file, “rotated_image.png,” being created in your current working directory.
The pillow offers an intuitive interface that supports a broad range of image formats and provides optimized performance.
However, it is not as robust as opencv because opencv provides more tools to manipulate images. If you are looking for a simpler approach, I recommend you use the pillow’s “image.rotate()” function.
Method 2: Using the cv2.getRotationMatrix2D function from opencv-python
The opencv-python library provides the cv2.getRotationMatrix2D() function to create the rotation matrix. In the next step, we use the “cv2.warpAffine()” function to apply the rotation.
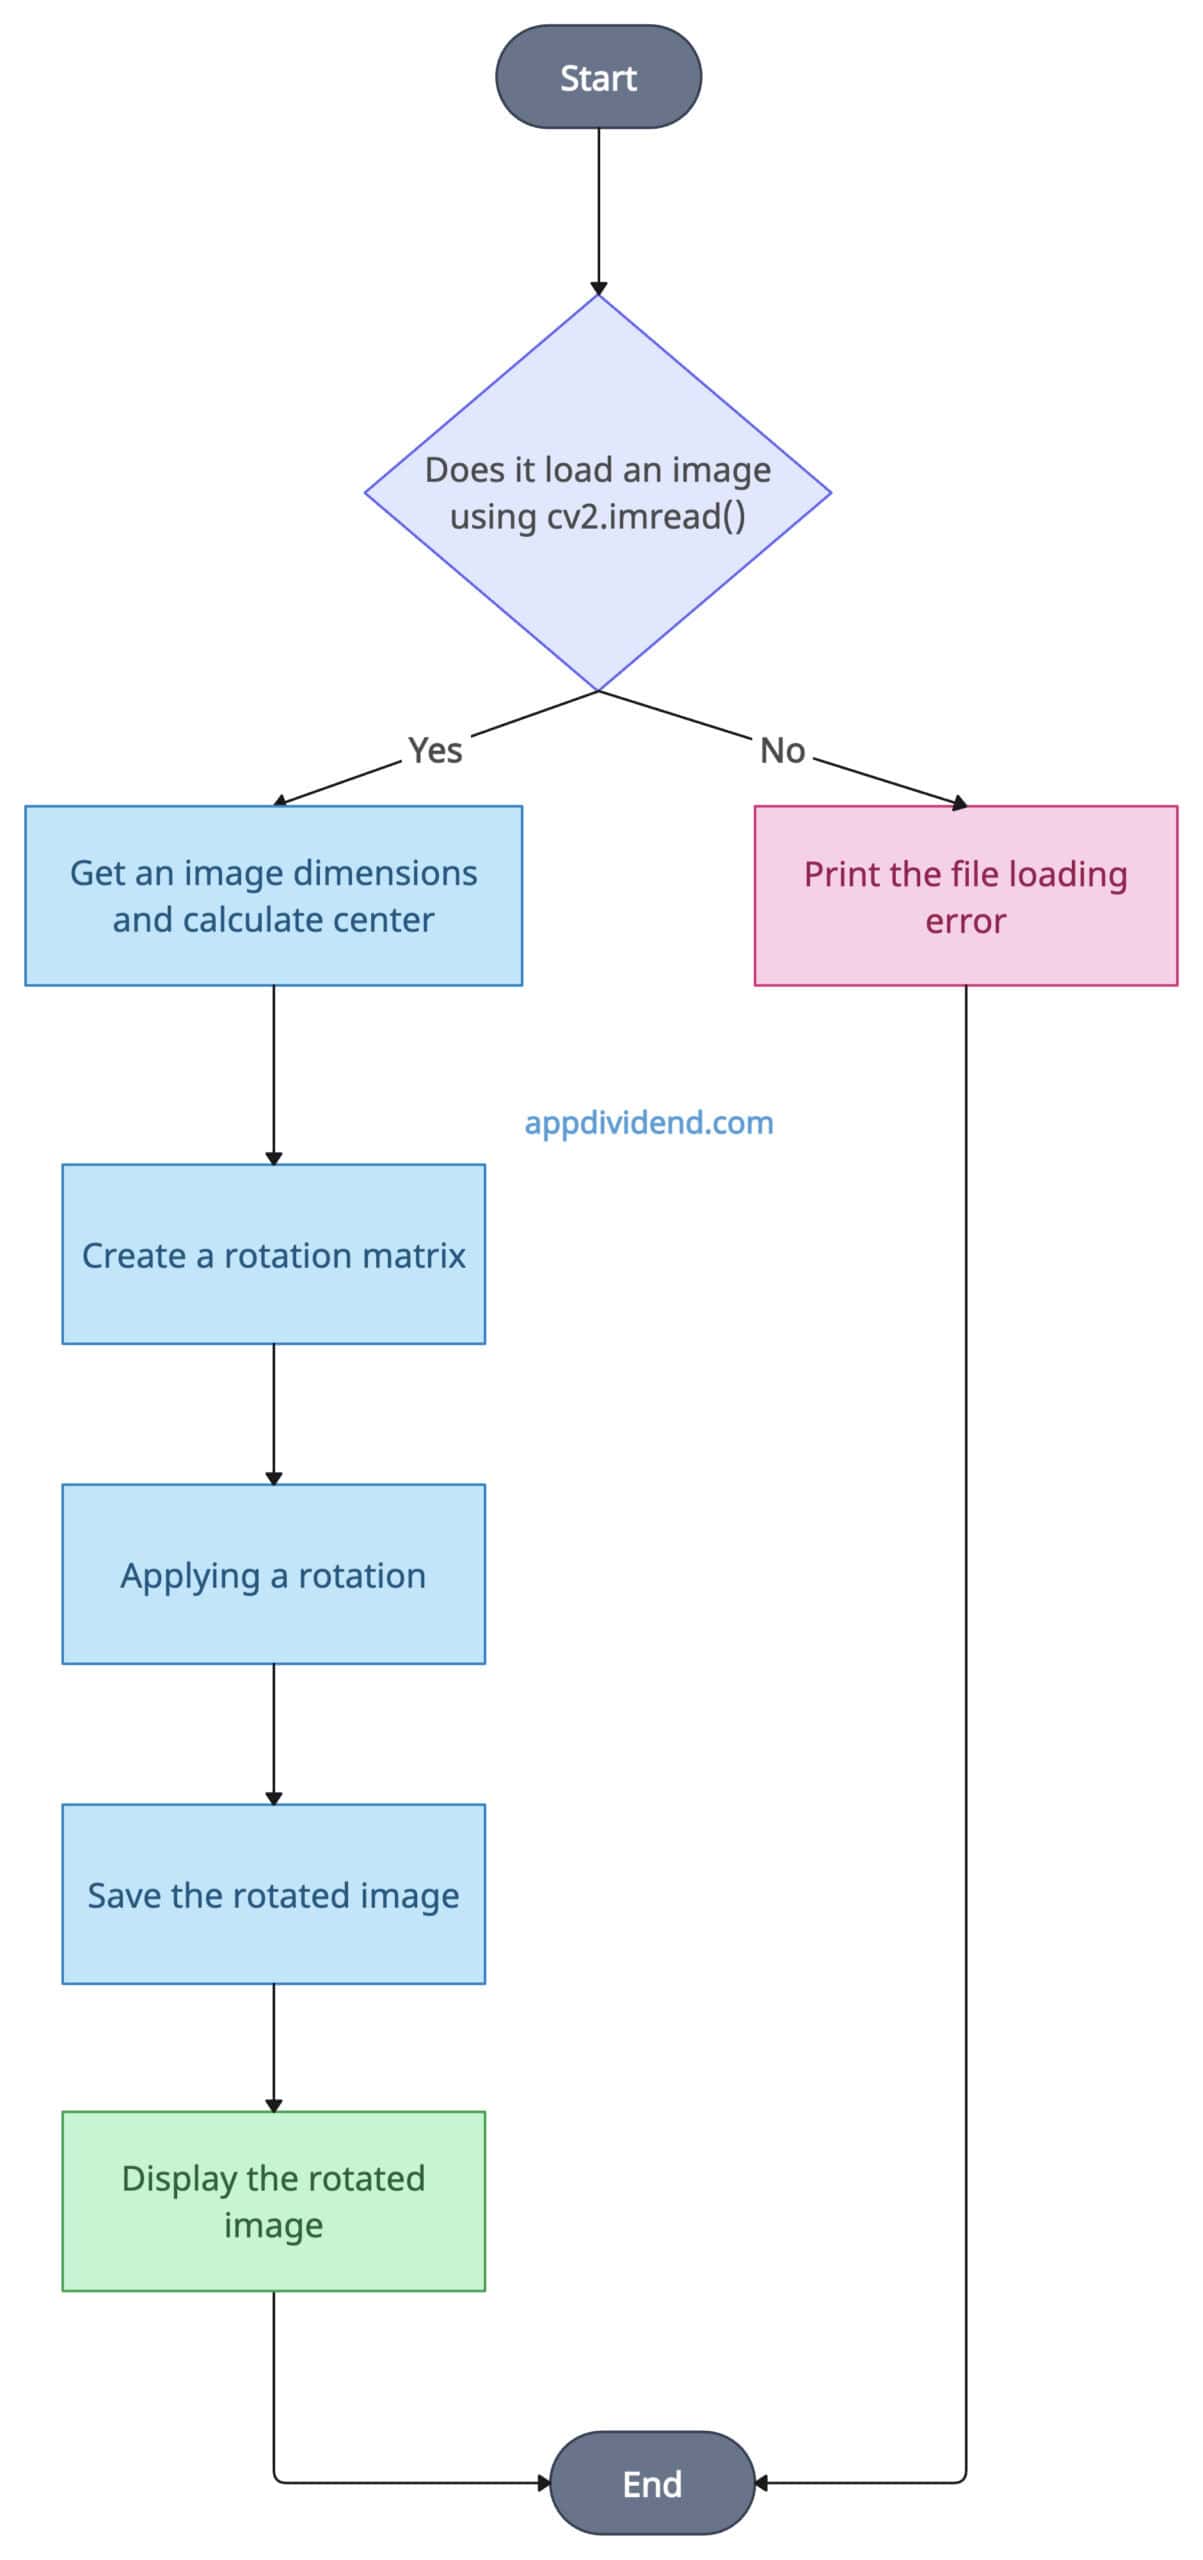
The above diagram illustrates each step, from reading an image using the cv2.imread() function to obtain the image dimensions, calculating the center, creating a rotation matrix, applying the rotation matrix to the image, saving the rotated image, and displaying the rotated image.
Install the “opencv-python” library using the command below:
pip install opencv-python
Code example
Let’s rotate an image to 45° from the center.
import cv2

# Replacing 'krunal.png' with the path to your image file
image = cv2.imread('krunal.png')

# Get the image dimension
(h, w) = image.shape[:2]

# Checkout the center of the rotation
center = (w // 2, h // 2)

# Rotating angle in degrees
angle = 45

# Scaling factor
scale = 1.0

# Creating a rotation matrix
M = cv2.getRotationMatrix2D(center, angle, scale)

# Applying a rotation
rotated_image = cv2.warpAffine(image, M, (w, h))

# Saving the rotated image
cv2.imwrite('./images/cv_rotated_image.png', rotated_image)

# Displaying the rotated image
cv2.imshow('Rotated Image', rotated_image)
cv2.waitKey(0)
cv2.destroyAllWindows()
Before rotating an image
After rotating an image

If you are performing large-scale image operations, the OpenCV library is your go-to choice. It is optimized for real-time large-scale image processing applications and supports complex computer vision algorithms.
However, OpenCV uses BGR instead of RGB, which can be confusing for beginners, and it requires a steep learning curve.
Based on my experience, I recommend using the OpenCV approach when you are already performing image processing in your application.
If you are only rotating an image and not performing any other computer vision task, then my suggestion would be to use the PIL approach, as the OpenCV library is too large and it is not feasible to install it solely for image rotation.
Rotating around an arbitrary point
Until now, we have rotated an image around its center. In this section, we will rotate an image around a specific arbitrary point.
Code example
# Rotating Around an Arbitrary Point
import cv2

# Reading the input image
image = cv2.imread('krunal.png')

# Rotation angel in degrees
angle = 90

# Scaling factor
scale = 1.0

# Defining arbitrary point (x, y)
center_of_rotation = (100, 200)

# Getting the rotation matrix
M = cv2.getRotationMatrix2D(center_of_rotation, angle, scale)

# Adjusting the Output dimensions
(h, w) = image.shape[:2]
rotated_image = cv2.warpAffine(image, M, (w, h))

# Saving the rotated image
cv2.imwrite('./images/cv_rotated_image_arbitrary.png', rotated_image)

# Displaying the rotated image
cv2.imshow('Rotated Image', rotated_image)
cv2.waitKey(0)
cv2.destroyAllWindows()
Before the rotation around an arbitrary point
After the rotation around an arbitrary point

You can see that we rotated an image around an arbitrary point (100, 200) of the image. The process is the same as the one described in the OpenCV section above.
The only changes are in the arbitrary point and angle, which is 90°.
Rotating a Region of Interest (ROI)
In image processing, the Region of Interest (ROI) refers to a specific section of an image that you want to focus on from the rest of the image.
For example, in a facial recognition app, you may define the ROI around a person’s face, or in medical imaging, you focus on a specific bone-breaking area to highlight it.
Code example
# Rotating a Region of Interest
import cv2

# Reading the input image
image = cv2.imread('krunal.png')

# Coordinates of the ROI
x, y, w, h = 100, 100, 200, 200
roi = image[y:y+h, x:x+w]

# Rotating the ROI
(h_roi, w_roi) = roi.shape[:2]
center_roi = (w_roi // 2, h_roi // 2)

# Getting the Rotation matrix
M = cv2.getRotationMatrix2D(center_roi, 45, 1.0)
rotated_roi = cv2.warpAffine(roi, M, (w_roi, h_roi))

# Placing the rotated ROI back to the image
roi_rotated_image = image.copy()
roi_rotated_image[y:y+h, x:x+w] = rotated_roi

# Saving the rotated image
cv2.imwrite('./images/cv_roi_rotated_image.png', roi_rotated_image)

# Displaying the rotated image
cv2.imshow('Rotated ROI', roi_rotated_image)
cv2.waitKey(0)
cv2.destroyAllWindows()
Before rotating ROI
After rotating ROI
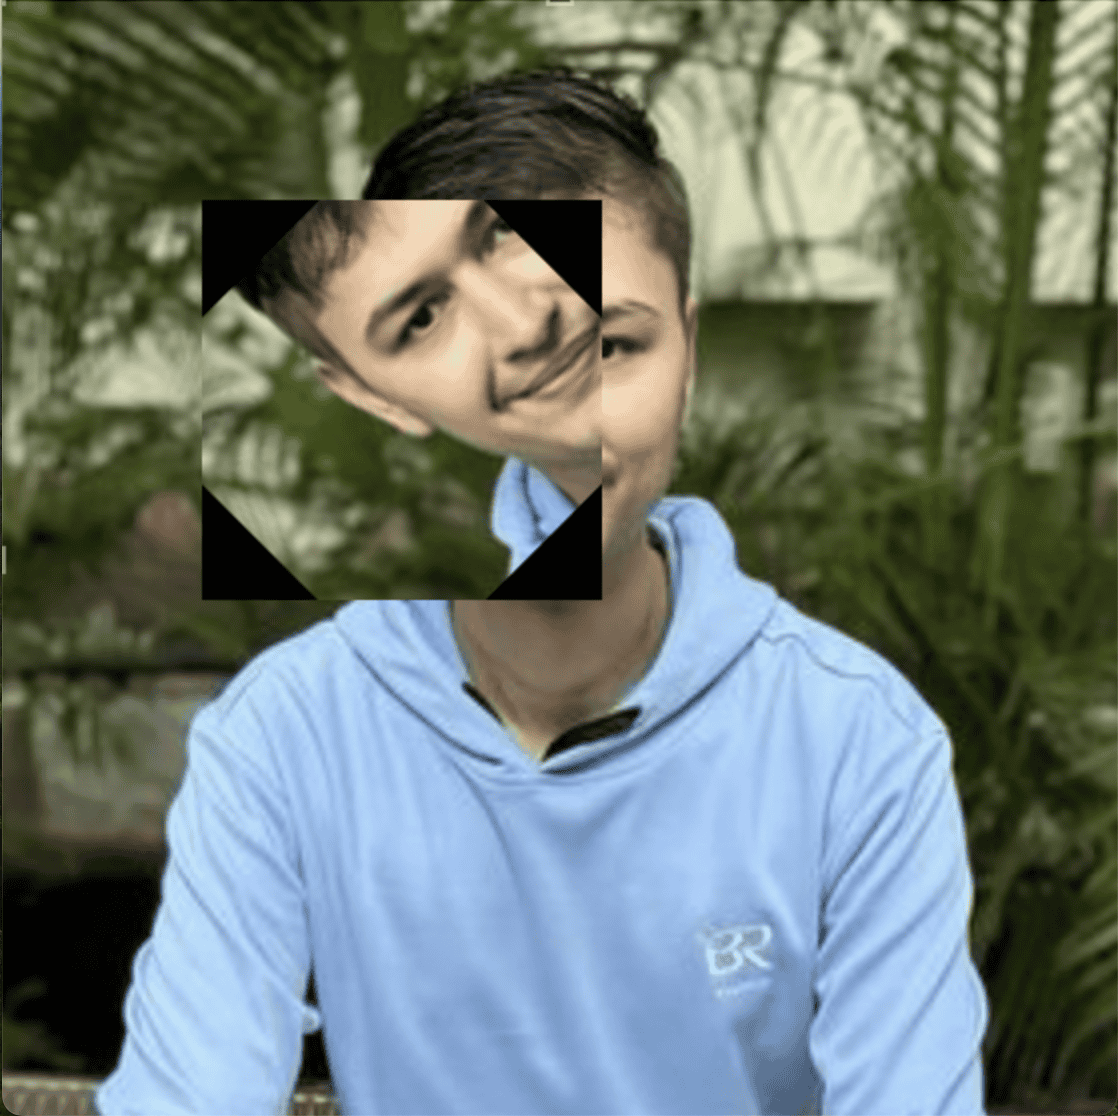
As shown in the above output image, we have rotated the left side of my face by 45°. So, the left side of the face is ROI, and we only rotated that portion.
Affine rotation
Affine rotation enables us to perform a combination of linear transformations, including rotation, scaling, shearing, and translation.
To do that, first, we need to have three non-collinear points in both the source and destination images. Then, create an affine transformation matrix and apply it. Finally, display the transformed image.
Code example
# Affine rotation
import cv2
import numpy as np

# Reading the input image
image = cv2.imread('krunal.png')

# Defining src and destination points
pts_src = np.float32([[50, 50], [200, 50], [50, 200]])

# Points in the transformed image
pts_dst = np.float32([[10, 100], [200, 50], [100, 250]])

# Getting affine transformation matrix
M = cv2.getAffineTransform(pts_src, pts_dst)

# Applying the transformation
affine_transformed_image = cv2.warpAffine(
    image, M, (image.shape[1], image.shape[0]))

# Saving the rotated image
cv2.imwrite('./images/cv_affine_transformed_image.png',
            affine_transformed_image)

# Displaying the rotated image
cv2.imshow('Affine Rotated Image', affine_transformed_image)
cv2.waitKey(0)
cv2.destroyAllWindows()
Before applying an affine transformation
After applying an affine transformation

That’s all!