

Here are three ways to extract audio from video with Python:
- Using the Moviepy library
- Using FFmpeg with subprocess
- Using the ffmpeg-python library
Here is the “sample.mp4” video file we will use for this tutorial:
Method 1: Using the Moviepy library
MoviePy is an external library for video editing, allowing you to read and write all common video and audio formats.
First, we will load a video file using the VideoFileClip() function and then use the .audio property to extract audio from it.
Decision Tree Diagram
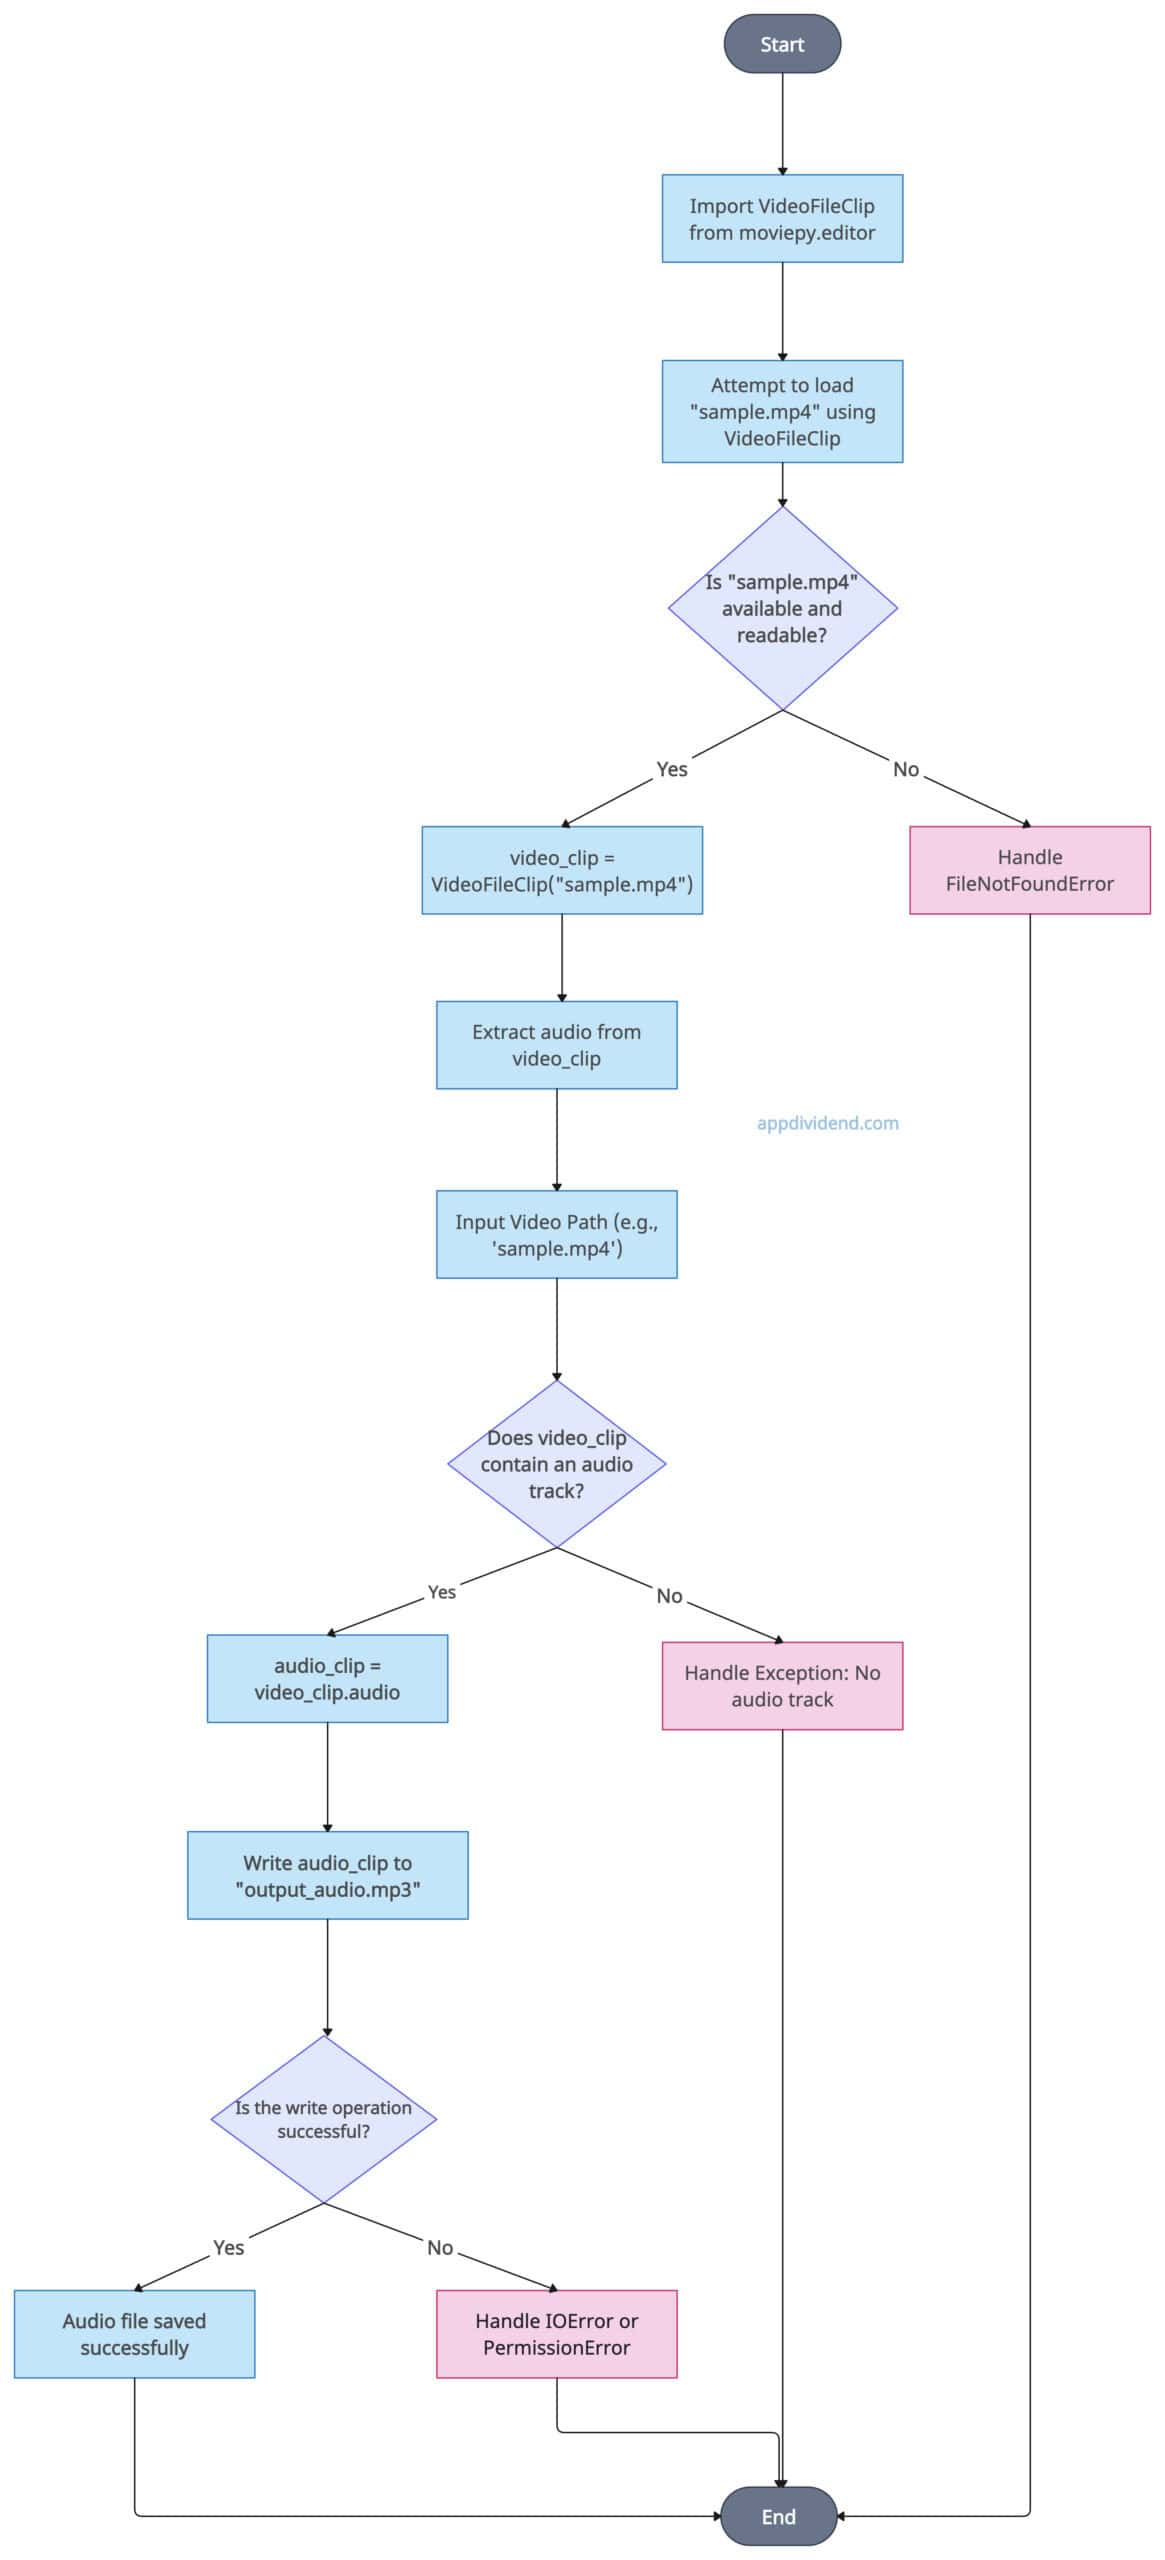
The above decision tree diagram illustrates the process flow from start to endpoint. This diagram will help us implement how we should proceed with Python code.
Example
from moviepy.editor import VideoFileClip
import os

def extract_audio_from_video(video_path, output_audio_path):
    try:
        # Checking if the video file exists
        if not os.path.exists(video_path):
            raise FileNotFoundError(f"Video file '{video_path}' not found.")

        # Loading the video file
        try:
            video_clip = VideoFileClip(video_path)
        except Exception as e:
            raise Exception(f"Error loading video file: {e}")

        # Extracting the audio
        try:
            audio_clip = video_clip.audio
            if audio_clip is None:
                raise ValueError("No audio track found in the video.")
        except Exception as e:
            raise Exception(f"Error extracting audio: {e}")

        # Saving the audio to a file
        try:
            output_dir = os.path.dirname(output_audio_path)
            if not os.path.exists(output_dir):
                os.makedirs(output_dir)  # Create output directory if it doesn't exist
            audio_clip.write_audiofile(output_audio_path)
        except Exception as e:
            raise Exception(f"Error saving audio file: {e}")

        print("Audio extracted successfully!")

    except Exception as e:
        print(f"An error occurred: {e}")

# Calling the custom function
extract_audio_from_video("sample.mp4", "output_audio.mp3")
Output
In the above code, we ensured that we would catch as many errors as possible using a try-except mechanism while performing file operations and extracting the audio. This type of approach is considered the safest, and you won’t encounter any unwanted errors while executing.
You can see from the code that moviepy provides a very easy-to-use API, and it supports a wide variety of audio and video formats. You don’t need to interact with external tools.
However, it is a slower method compared to the direct use of the FFmpeg approach, which we will explore in the following method.
You are also dependent on third-party libraries, such as “moviepy” and its dependencies.
The moviepy method is specifically helpful when you need to manipulate both audio and video files, and your primary objective is to get things done without getting too much involved in time efficiency.
It has a time complexity of O(n) and a space complexity of O(1).
Method 2: Using FFmpeg with subprocess
FFmpeg is a command-line tool for multimedia processing. You can invoke FFmpeg commands through Python’s built-in subprocess module to extract the audio file.
We will import the subprocess module, define the input video file path and output audio file path, create the ffmpeg command-line list, pass both defined paths to it, and execute the subprocess.
Decision Tree Diagram
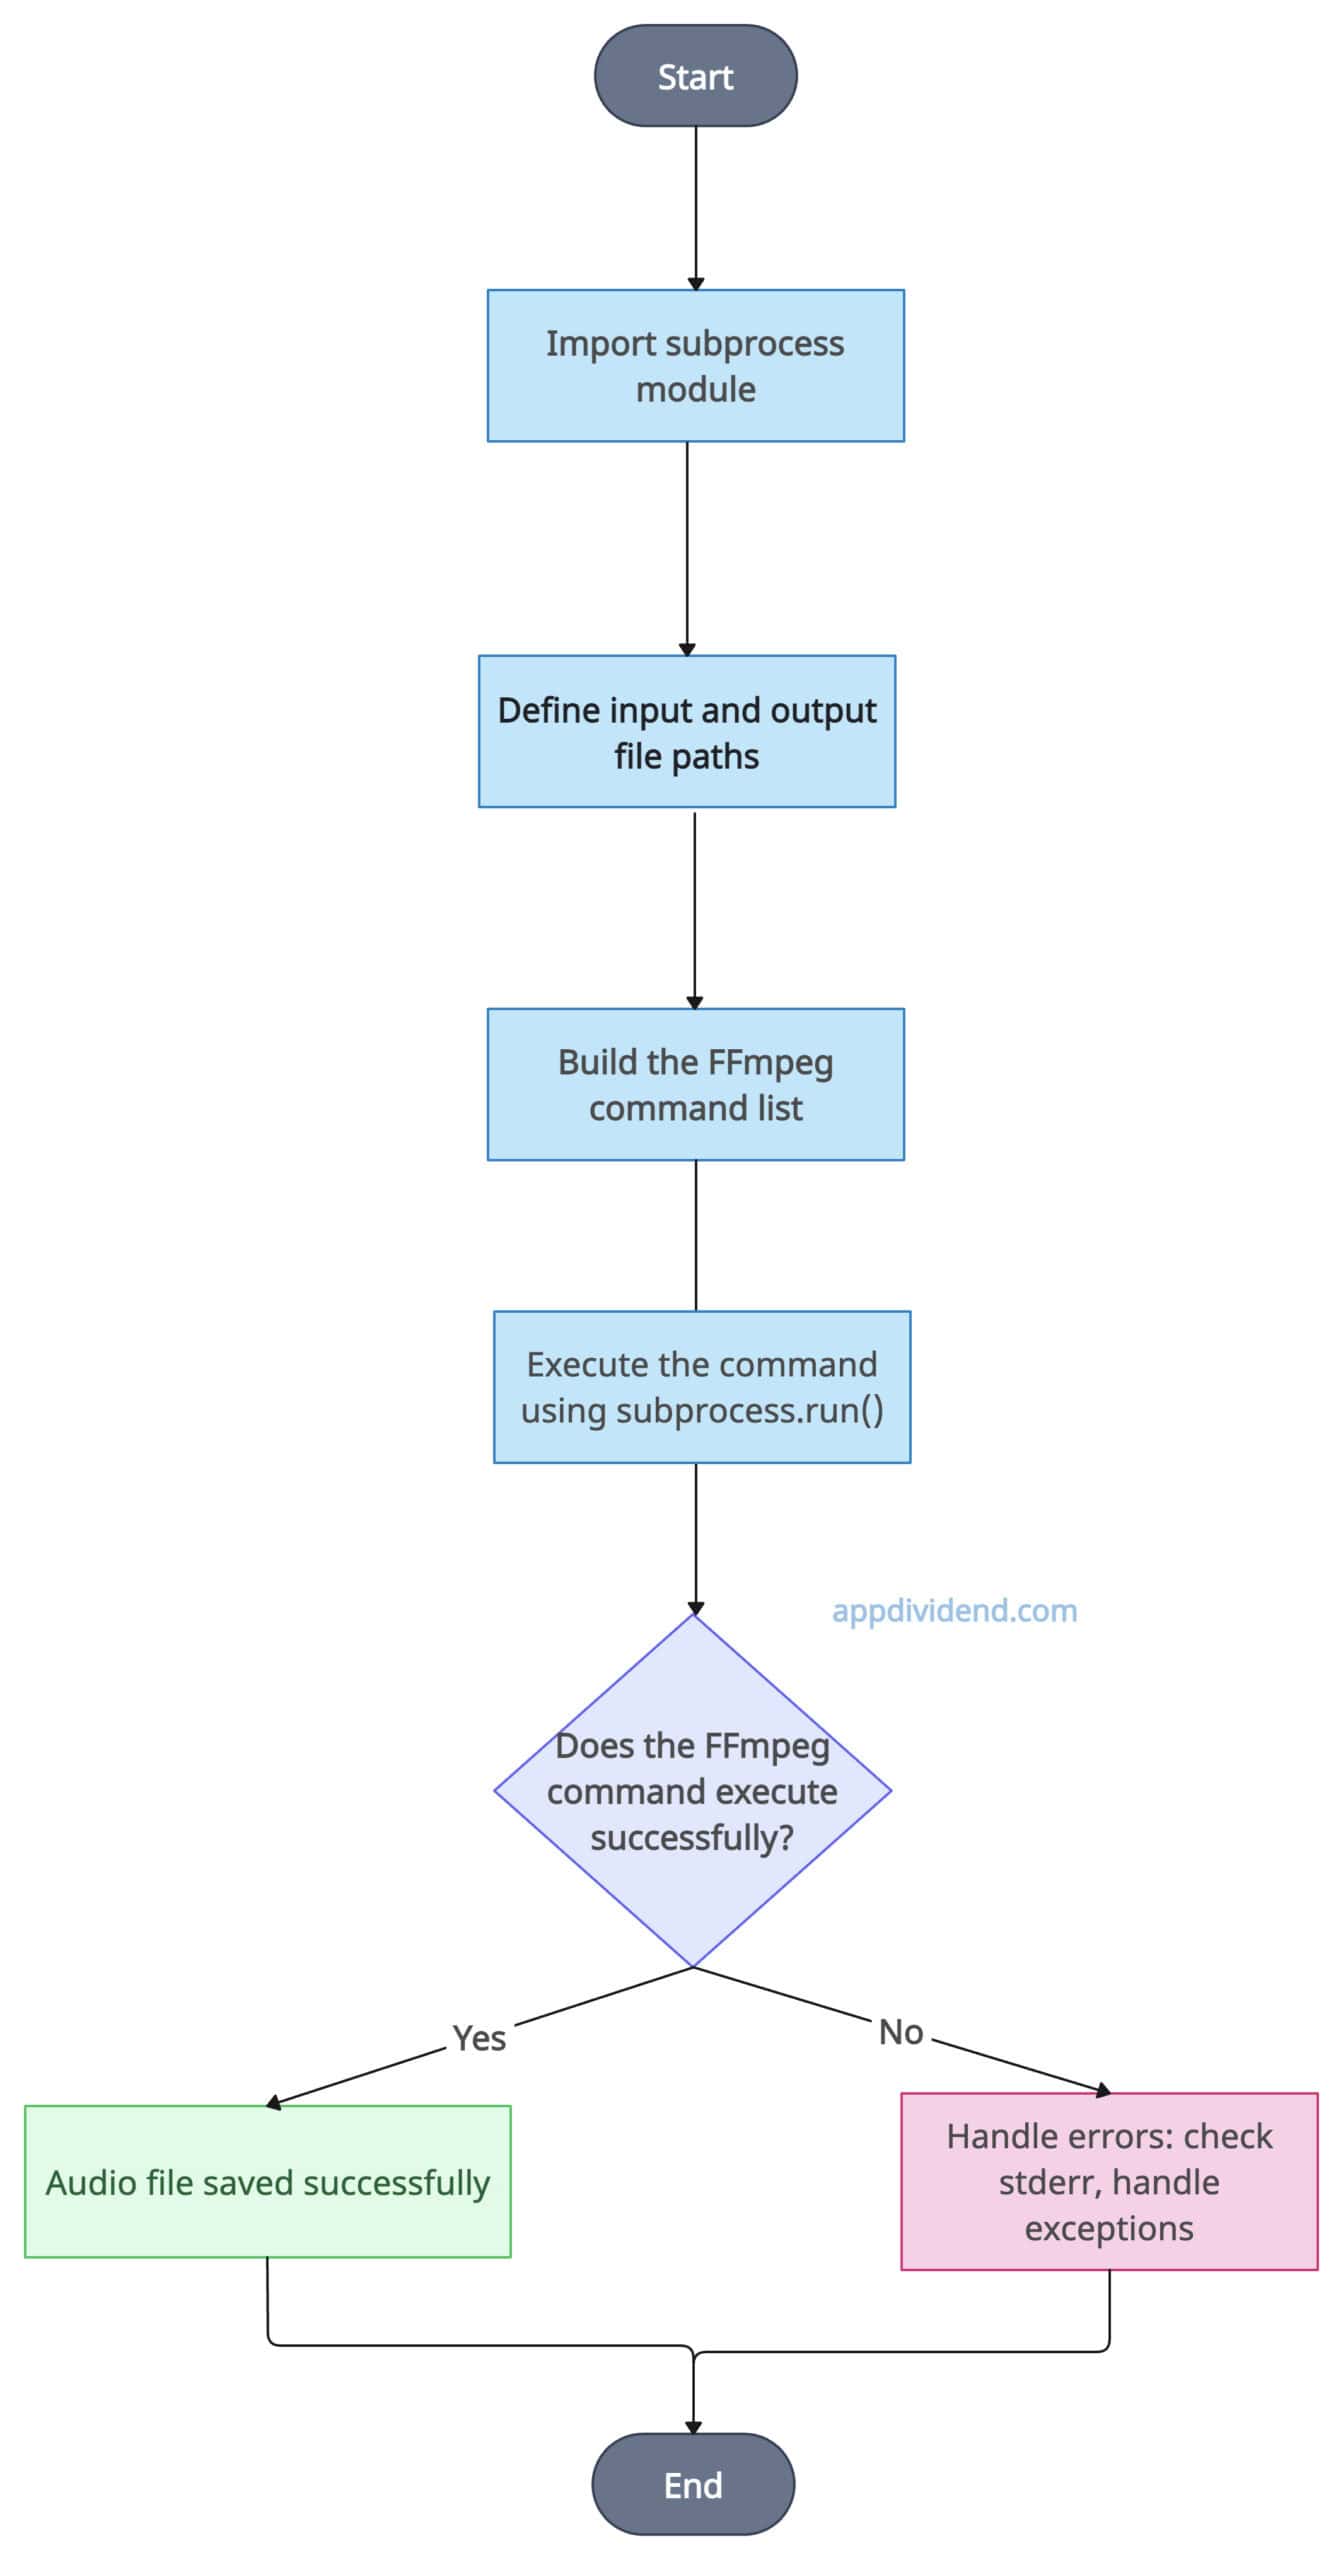
The above diagram illustrates the basic idea of how ffmpeg with subprocess works to get the output audio file from the video. It is a step-by-step flow diagram.
Install the FFMpeg in your system if you have not already used the command below:
brew install ffmpeg
Example
import subprocess
import os

def extract_audio_with_ffmpeg(input_file, output_file):
    try:
        # Checking if input video file exists
        if not os.path.exists(input_file):
            raise FileNotFoundError(f"Input file '{input_file}' not found.")

        # Ensuring the output directory exists
        output_dir = os.path.dirname(output_file)
        if output_dir and not os.path.exists(output_dir):
            os.makedirs(output_dir)

        # FFmpeg command to extract audio
        command = [
            "ffmpeg",
            "-i", input_file,
            "-q:a", "0",
            "-map", "a",
            output_file,
            "-y"
        ]

        # Running the subprocess with FFmpeg
        try:
            result = subprocess.run(command, stdout=subprocess.PIPE, stderr=subprocess.PIPE)
            if result.returncode != 0:
                raise Exception(f"FFmpeg error: {result.stderr.decode('utf-8')}")
        except Exception as e:
            raise Exception(f"Error running FFmpeg command: {e}")

        print("Audio is extracted successfully!")

    except Exception as e:
        print(f"An error occurred: {e}")

# Calling the custom function
extract_audio_with_ffmpeg("sample.mp4", "sample_audio.mp3")
Output
It is a faster and more efficient approach compared to the Moviepy Library and requires lower memory consumption. However, it requires installing FFMpeg on your machine, and handling errors becomes quite tricky with this type of method.
If you are creating a high-performance application where execution speed is very important, then you can opt for this approach.
The time complexity is O(1) and the space complexity is O(1).
Method 3: Using the ffmpeg-python Library
ffmpeg-python is a wrapper library for the FFmpeg command-line tool, which we saw in the section above. It will help you create command-line commands programmatically.
Decision Tree Diagram
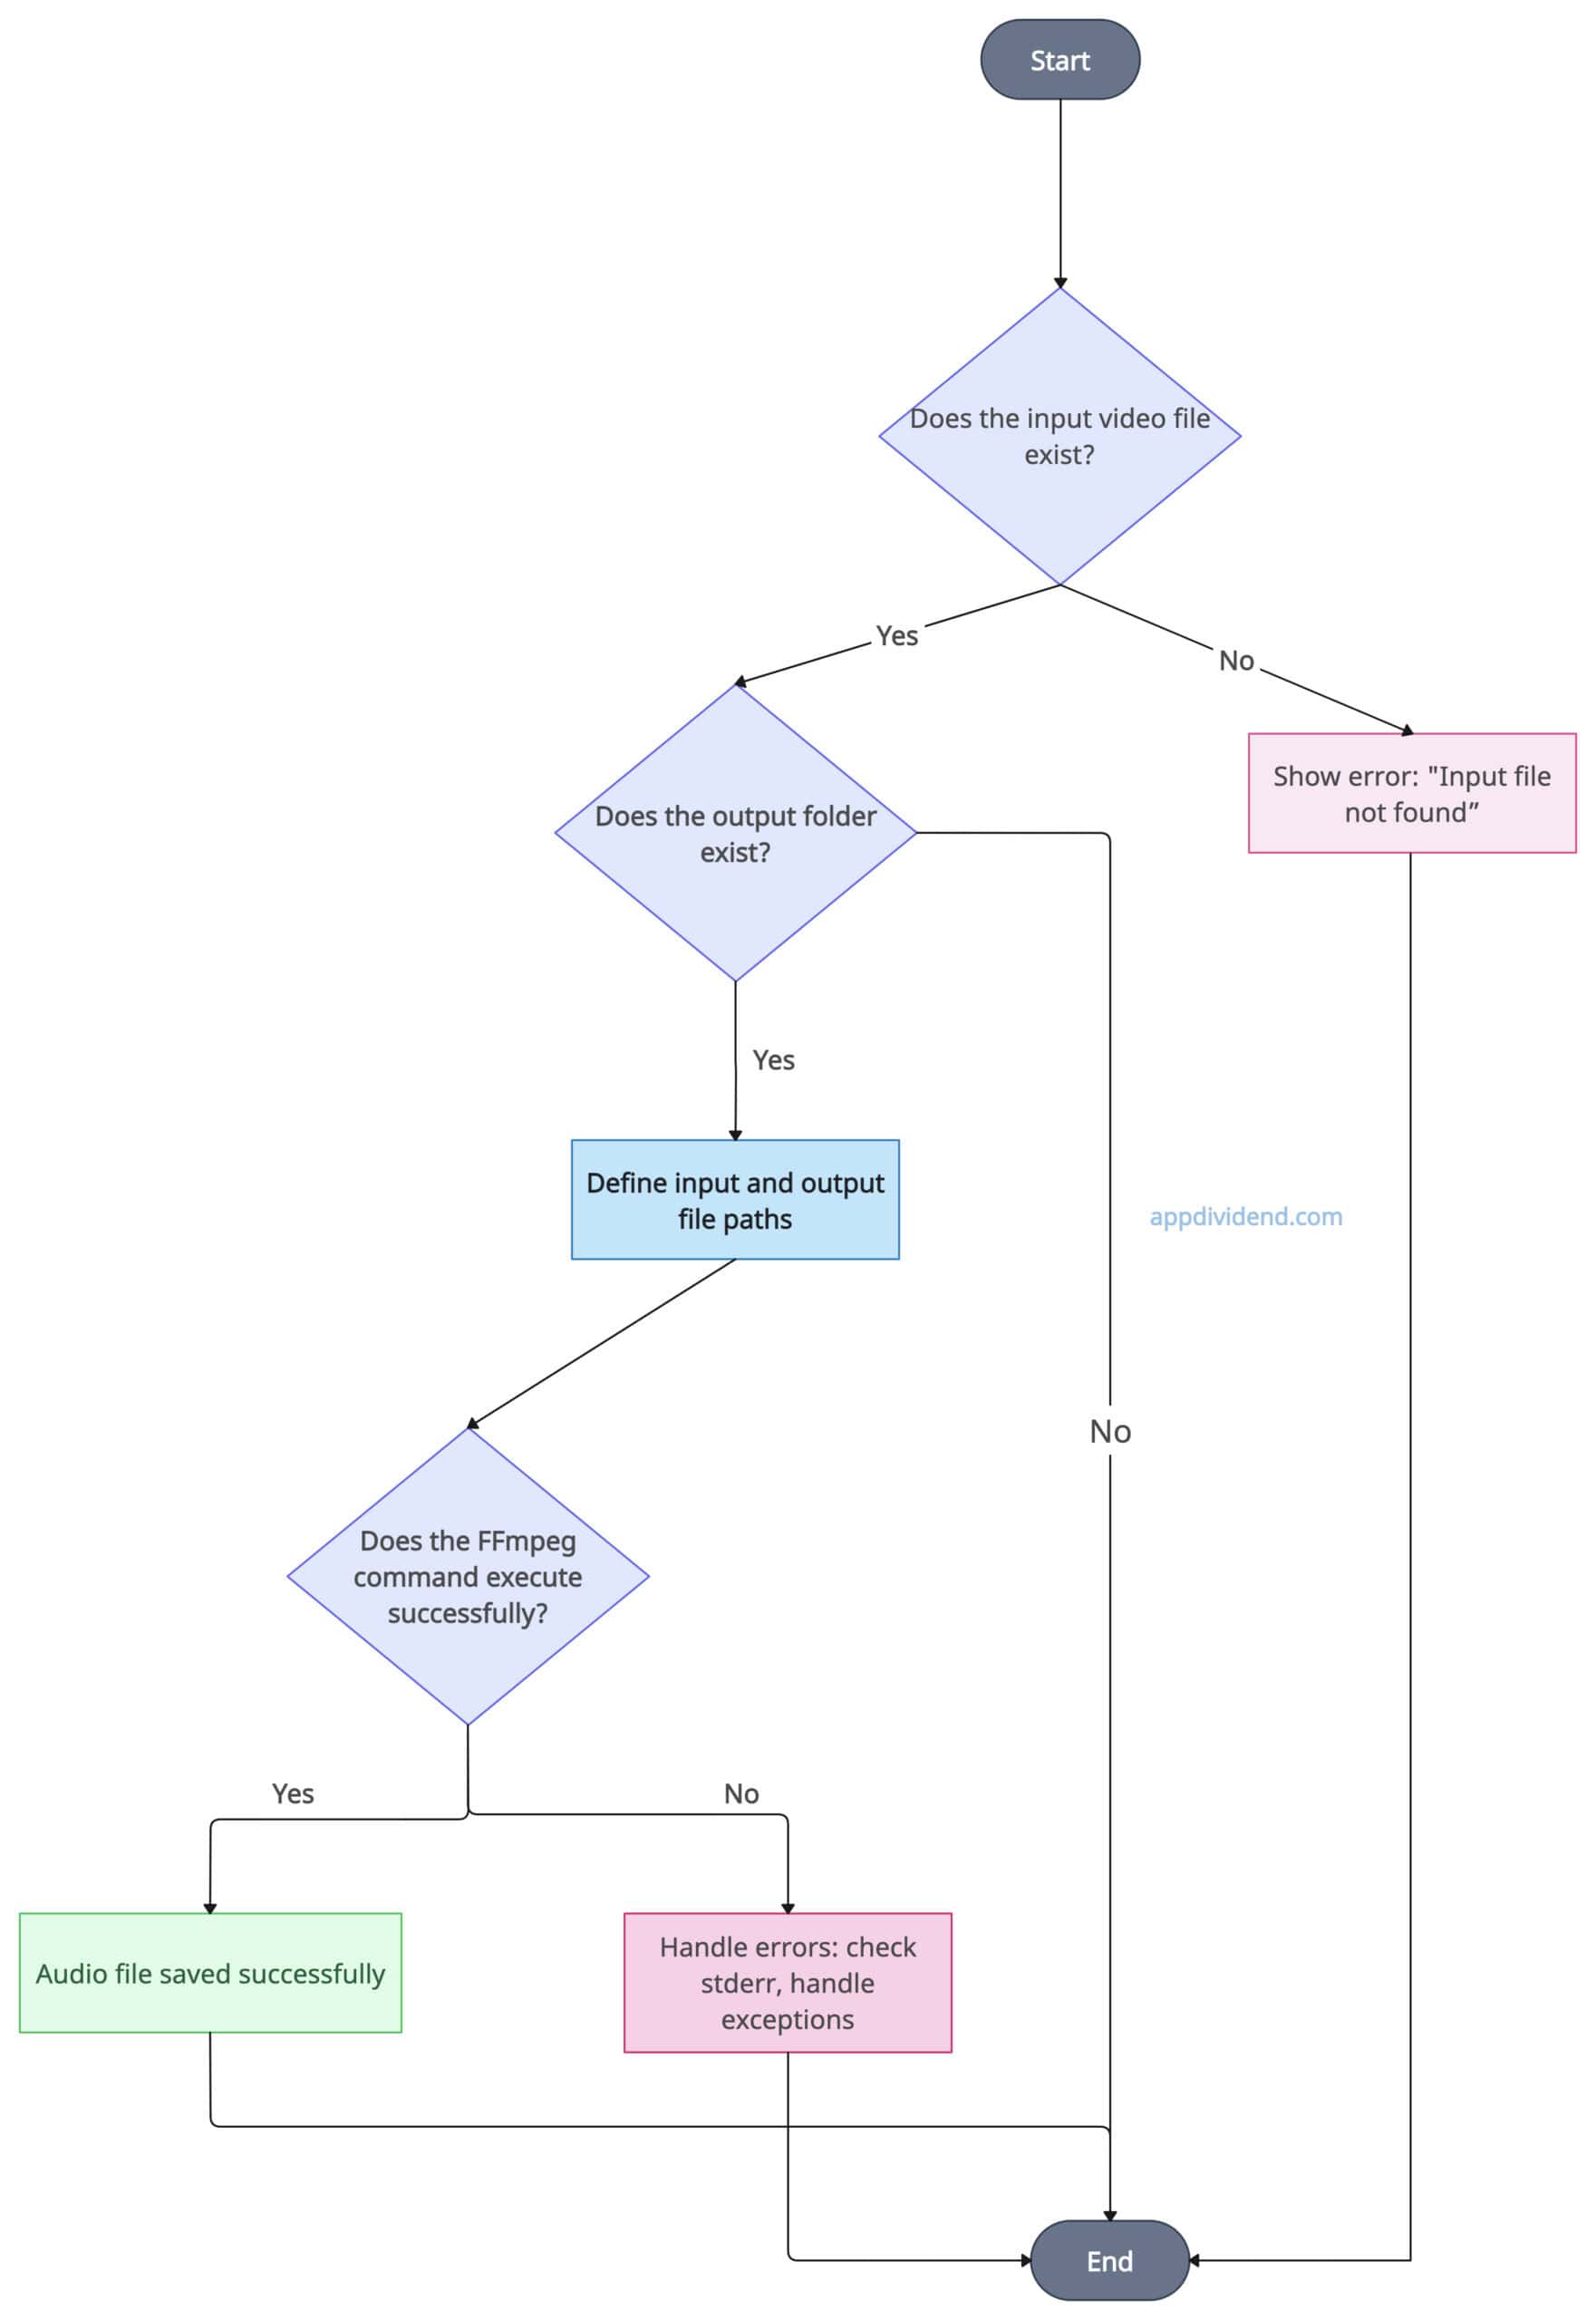
The above output image indicates the decision flow diagram of the ffmpeg-python library. We simplify the process with a diagram to help you understand what will happen behind the scenes.
Install the ffmpeg-python library using the command below:
pip install ffmpeg-python
After installation, you can import it using the command “import ffmpeg”.
Example
import ffmpeg
import os


def extract_audio_with_ffmpeg_python(input_file, output_file):
    try:
        # Checking if input video file exists
        if not os.path.exists(input_file):
            raise FileNotFoundError(f"Input file '{input_file}' not found.")

        # Ensuring the output directory exists
        output_dir = os.path.dirname(output_file)
        if output_dir and not os.path.exists(output_dir):
            os.makedirs(output_dir)

        # Building the FFmpeg command
        try:
            stream = ffmpeg.input(input_file)
            stream = ffmpeg.output(stream, output_file,
                                   **{'q:a': 0, 'map': 'a'})
            ffmpeg.run(stream)
        except ffmpeg.Error as e:
            raise Exception(f"FFmpeg error: {e.stderr.decode('utf-8')}")
        except Exception as e:
            raise Exception(f"Error building or running FFmpeg command: {e}")

        print("Audio is extracted successfully!")

    except Exception as e:
        print(f"An error occurred: {e}")


# Calling the custom function
extract_audio_with_ffmpeg_python("sample.mp4", "main_audio.mp3")
Output
In the above code, we performed input and output operations using ffmpeg.input(), ffmpeg.output(), and ffmpeg.run() functions to do the job.
The ffmpeg-python approach provides a better API to interact with the command line, and it has better integration with Python’s exception (error-handling) system. However, you need to learn both the ffmpeg system and the package’s API, which can be a learning curve.
The time complexity is O(1) since it uses the ffmpeg system, and the space complexity is also O(1).
Measuring execution time for each method
I conducted experiments, timing each method, and concluded that the ffmpeg-python wrapper method is the fastest, outpacing direct ffmpeg usage with the subprocess module.
Here is a bar chart of my findings:
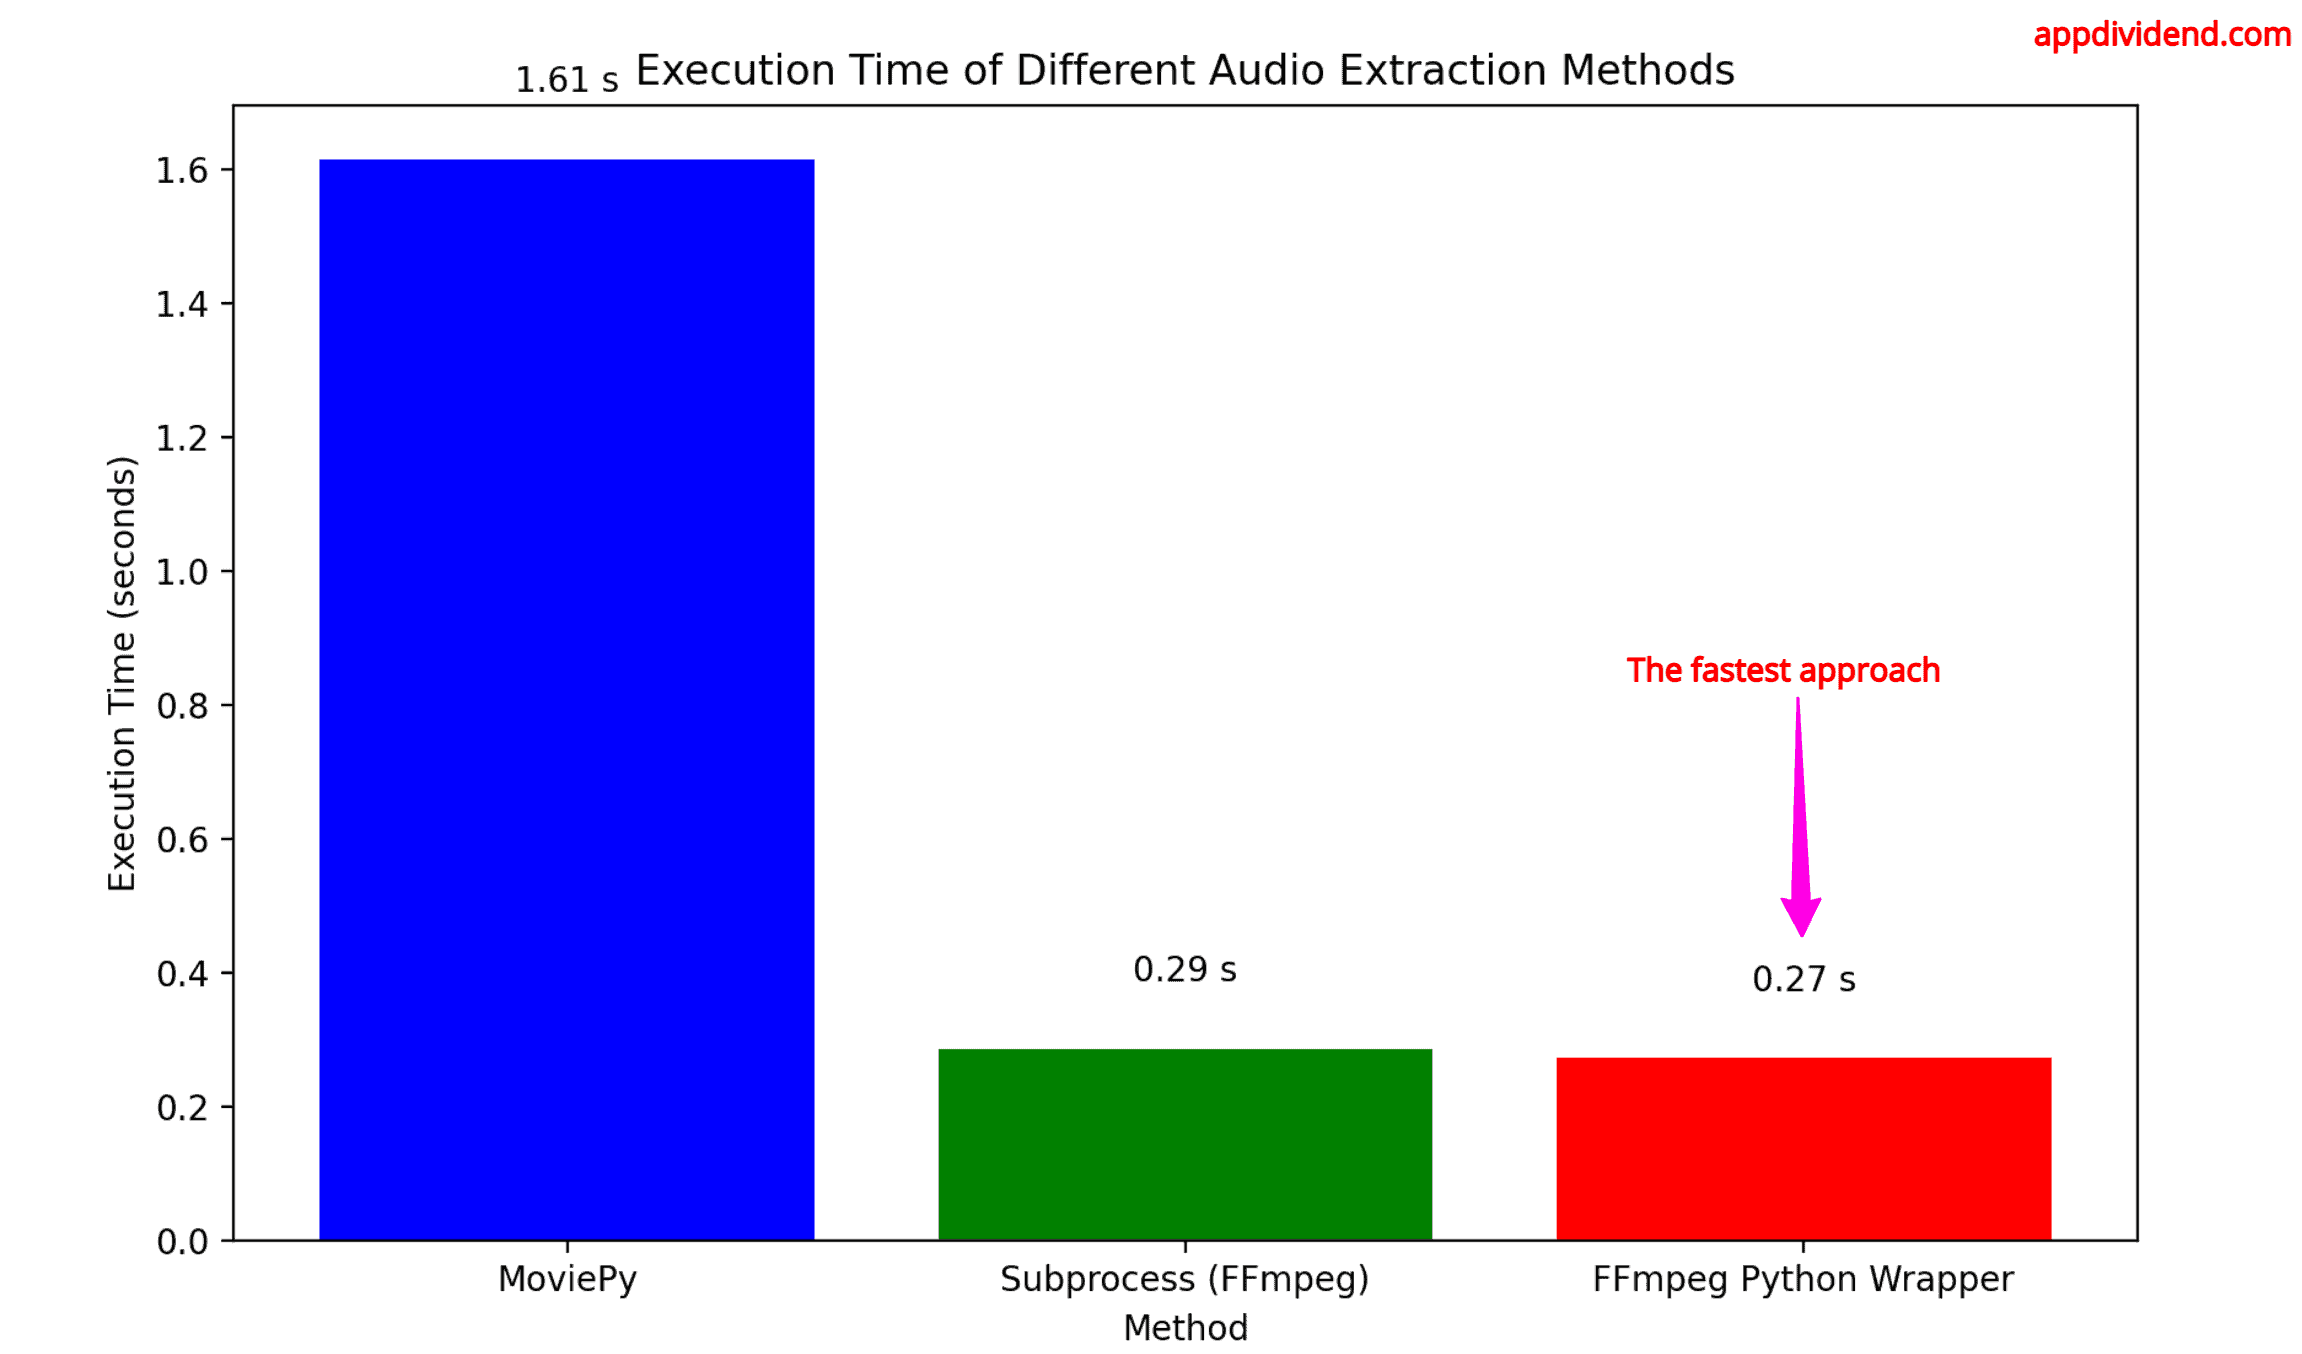
As shown in the above image, the slowest method is Moviepy, which took approximately 1.61 seconds, while the fastest method is ffmpeg-python, which took 0.27 seconds.