

Here are two ways to extract metadata from audio with Python:
- Using TinyTag library
- Using FFmpeg’s ffprobe via subprocess
The metadata from audio and video files provides additional information about the media. It helps us organize multimedia files for large collections easily.
The basic metadata consists of format details, codecs, bitrates, sample rates, duration, title, album, artist, genre, year, composer, comment, and more.
We will use the sample.mp3 file for this practical:
Method 1: Using TinyTag library
The tinytag is a popular library used to find metadata for audio files. The popular format for audio is .mp3. When you use the tinytag library to fetch the metadata, it will return as a dictionary.
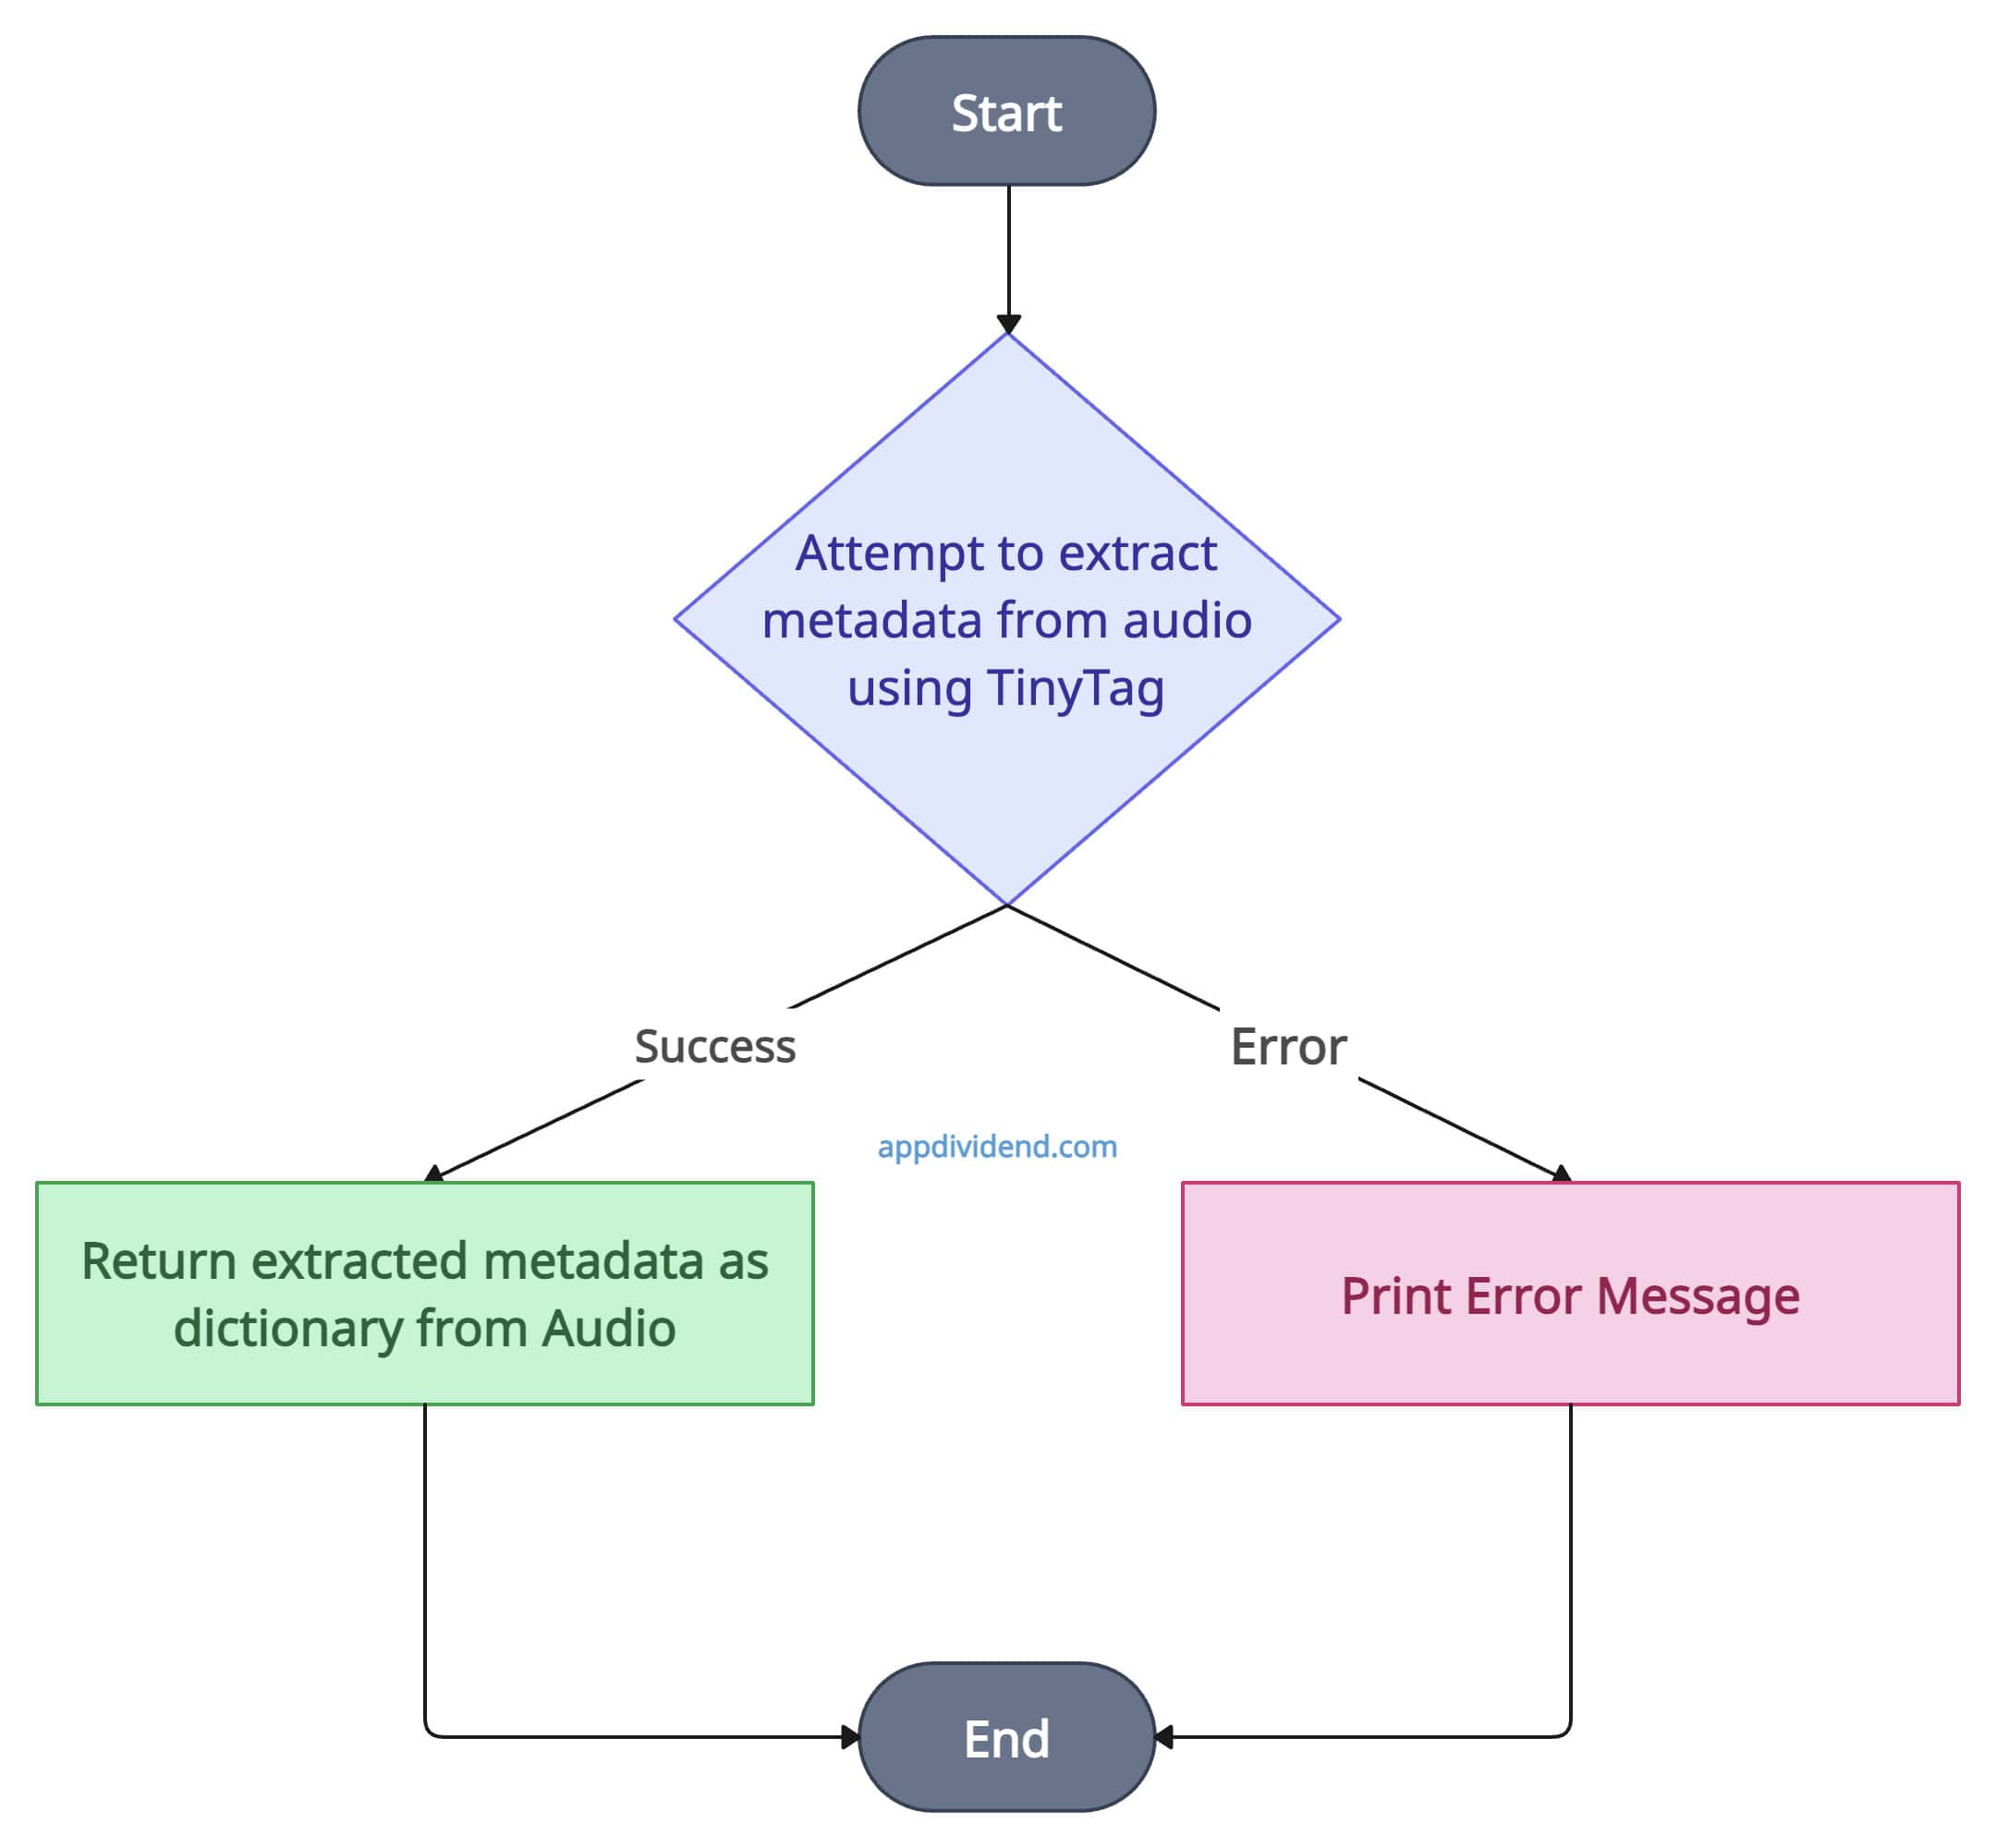
You can see from the diagram that we attempt to get the metadata.
If we get succeed, then we will have a dictionary containing all the data. If we encounter an error, we will print it to the console.
Install the TinyTag library using the command below: pip install tinytag
from tinytag import TinyTag


# Custom function to get metadata
def get_audio_metadata_tinytag(file_path):
    try:
        tag = TinyTag.get(file_path)
        metadata = {
            'title': tag.title,
            'artist': tag.artist,
            'album': tag.album,
            'duration': tag.duration,        # in seconds
            'bitrate': tag.bitrate,          # in kbps
            'samplerate': tag.samplerate,    # in Hz
            'genre': tag.genre,
            'year': tag.year,
            'track': tag.track,
            'comment': tag.comment,
            'composer': tag.composer,
            'disc': tag.disc,
        }
        return metadata
    except Exception as e:
        print(f"Error extracting metadata: {e}")
        return None


# Calling the custom function that will print metadata as key-value pair
if __name__ == "__main__":
    metadata = get_audio_metadata_tinytag('./audio/sample.mp3')
    if metadata:
        for key, value in metadata.items():
            print(f"{key}: {value}")
Output
title: None
artist: None
album: None
duration: 53.981143060325806
bitrate: 320.0
samplerate: 44100
genre: None
year: 2018
track: None
comment: None
composer: None
disc: None
The above output is metadata for the sample.mp3 file. We printed the data in the form of a dictionary’s key-value pair.
If you are looking for a quick way to obtain the metadata, I highly recommend using this approach. It works seamlessly with other operating systems.
Method 2: Using FFmpeg’s ffprobe via subprocess
The FFMpeg library provides an FFprobe tool that you can use to extract metadata from audio-like multimedia files. You can use FFprobe with Python’s built-in subprocess module, where you will create a command for extraction and execute that command.
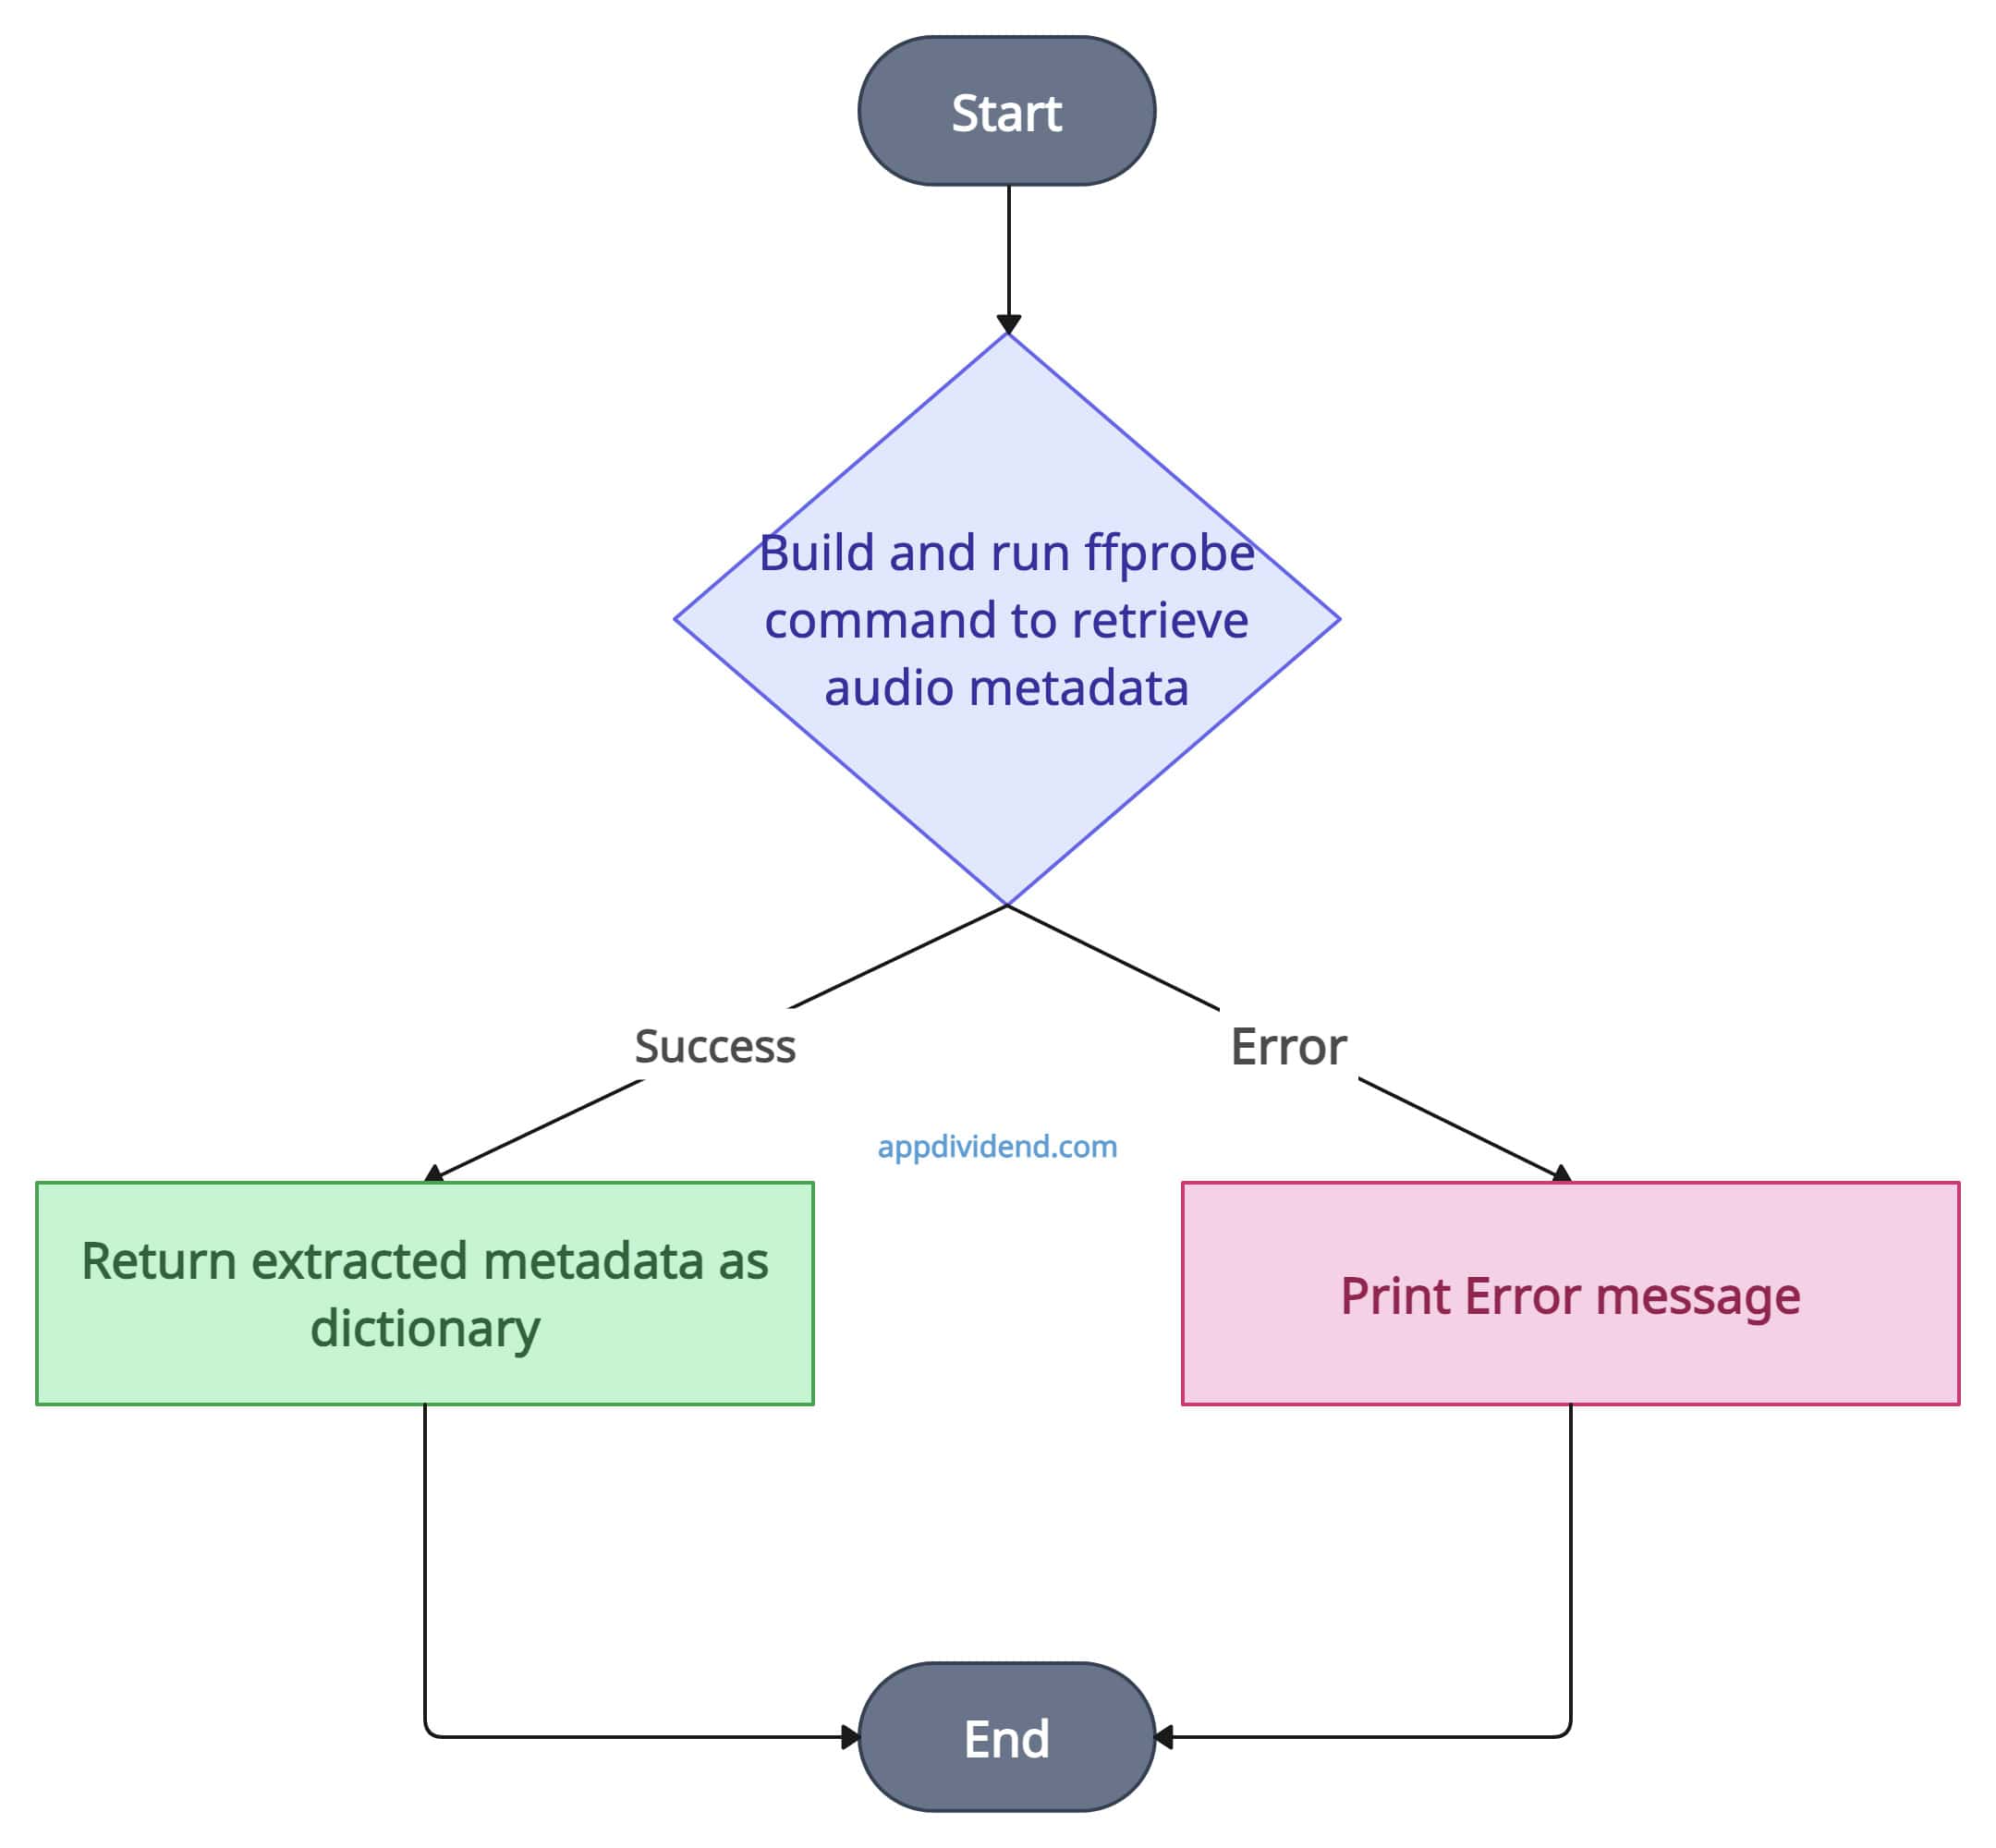
From the diagram, we can see that we first need to create a ffprobe command for extraction and then execute it, which returns the metadata as a dictionary.
To work with FFMpeg, we need to install it first. I am using a Mac, so I can install it using the command below:
brew install ffmpeg
If you are using Windows or Linux, check out the downloads page.
import subprocess
import json

def get_audio_metadata_ffprobe(file_path):
    cmd = [
        'ffprobe', '-v', 'error',
        '-print_format', 'json',
        '-show_format',
        '-show_streams',
        file_path
    ]
    try:
        result = subprocess.run(cmd, stdout=subprocess.PIPE, stderr=subprocess.PIPE, text=True, check=True)
        metadata = json.loads(result.stdout)
        return metadata
    except subprocess.CalledProcessError as e:
        print(f"Error occurred: {e.stderr}")
        return None

# Usage Example
if __name__ == "__main__":
    metadata = get_audio_metadata_ffprobe('./audio/sample.mp3')
    if metadata:
        print(json.dumps(metadata, indent=4))
Output

The FFMpeg with ffprobe approach supports a wide range of audio formats, including MP3, AAC, FLAC, WAV, etc. JSON output facilitates easy parsing and integration with other systems.
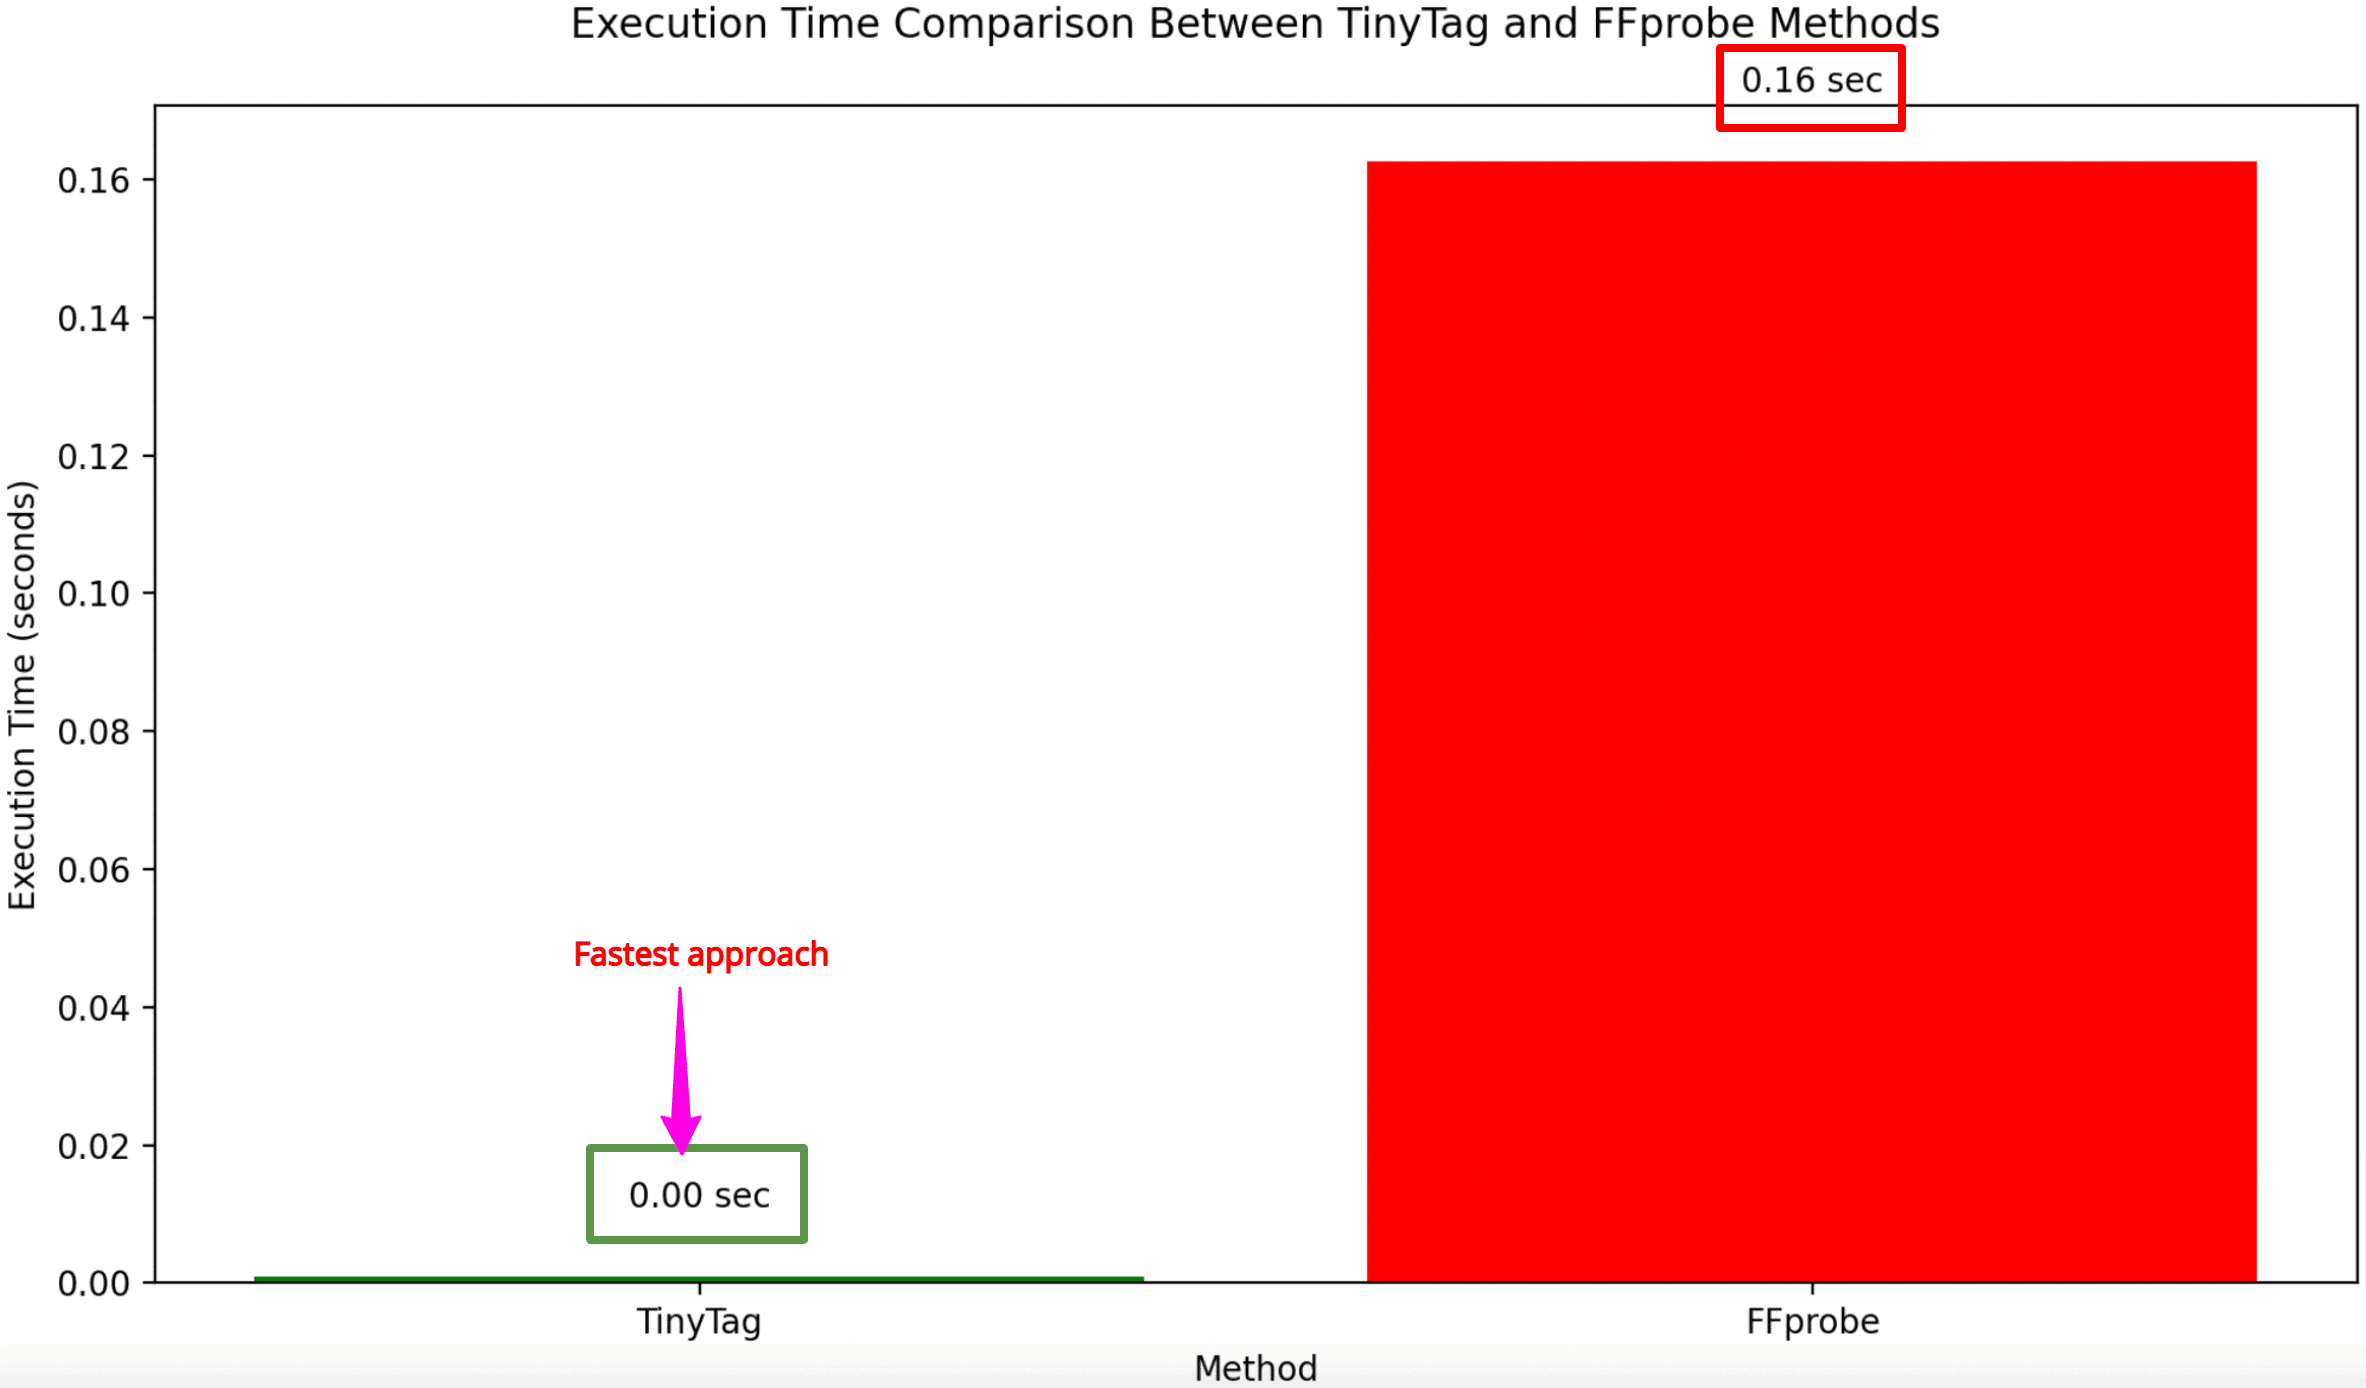
Time measurement for both methods
I ran a test and found that TinyTag takes almost no time to fetch metadata from audio files, making it the fastest approach. Below is the bar chart of this finding:
Extracting metadata from video
Here are two ways to extract metadata from video:
- Using FFmpeg’s ffprobe via subprocess
- Using ffmpeg-python
Here is the demo video “sample.mp4” whose metadata we will fetch:
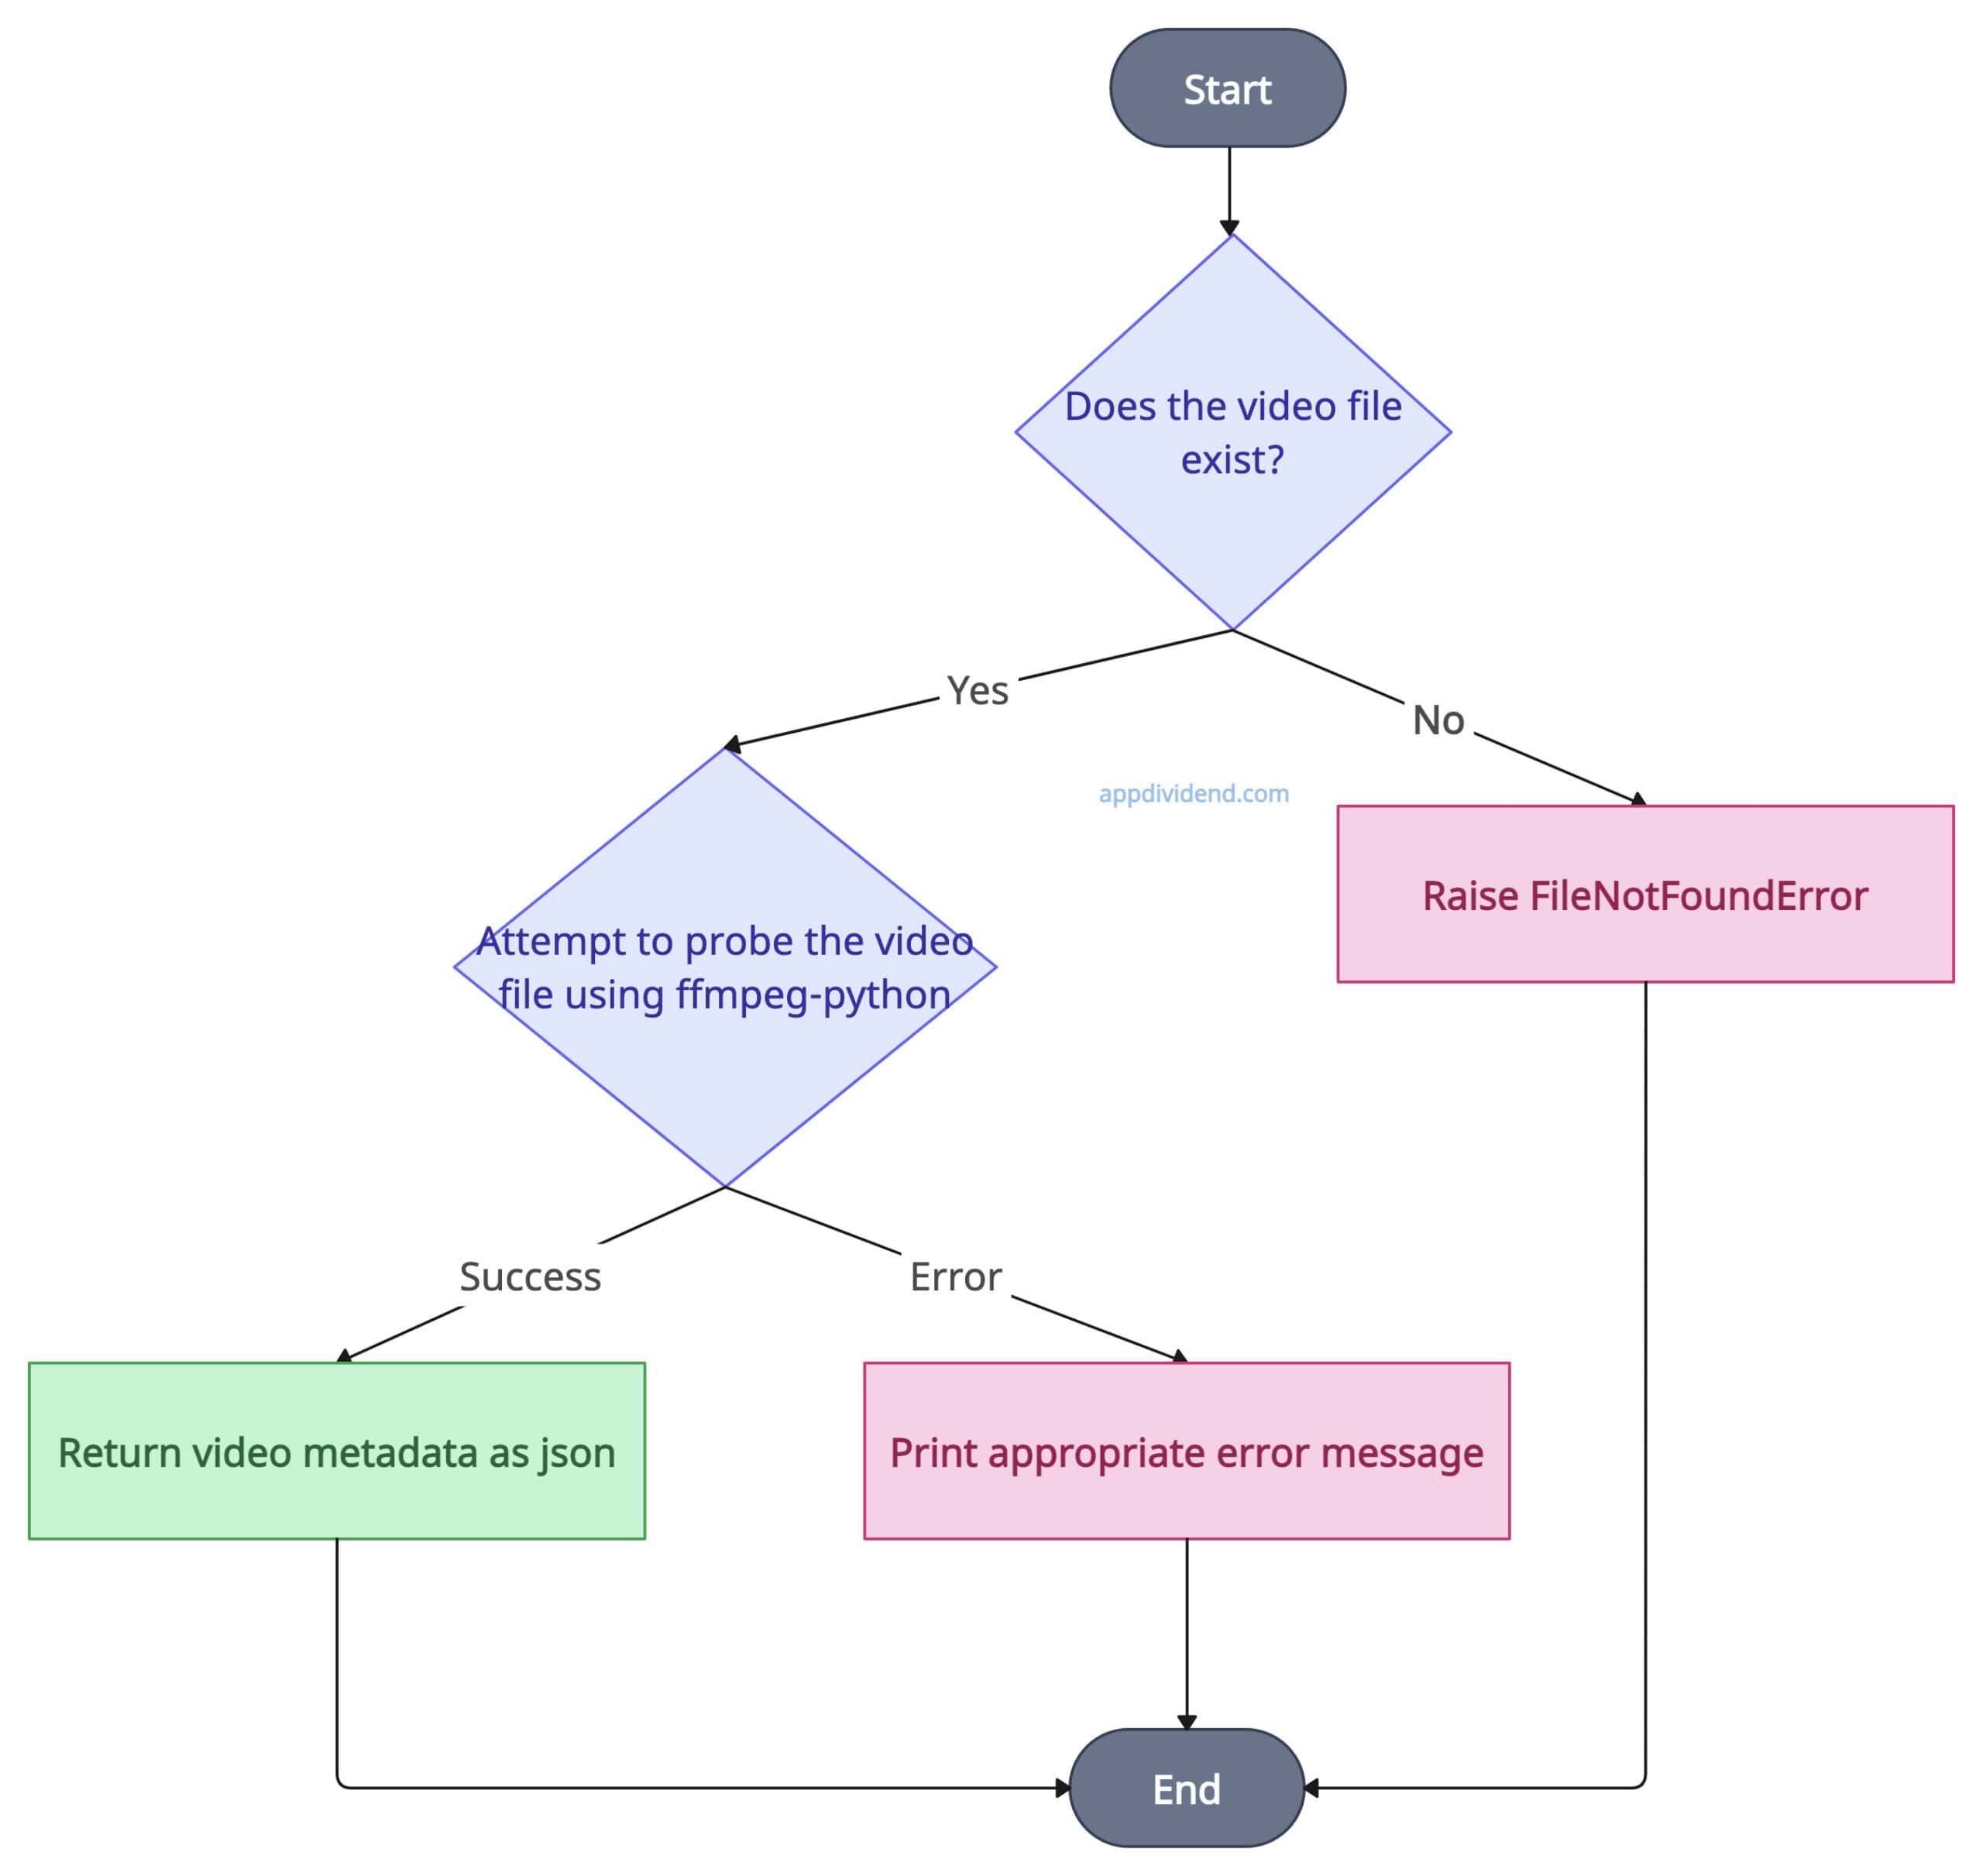
Method 1: Using FFmpeg’s ffprobe via subprocess
FFprobe is a component provided by the FFMpeg library that you can use with Python’s subprocess module to create and execute commands to retrieve metadata.

The above simple diagram explains how to create and run the ffprobe command, and if it is a success, we will get the metadata as an output.
As I explained earlier, if you are working with FFmpeg, you need to install it first.
I am using a Mac, so I can install it using the command below:
brew install ffmpeg
If you are using Windows or Linux, check out the downloads page.
Code example
import subprocess
import json
import os

# Creating custom function that returns metadata
def get_video_metadata_ffprobe(file_path):
    try:
        # Checking if the file exists
        if not os.path.exists(file_path):
            raise FileNotFoundError(f"File '{file_path}' not found.")

        # FFprobe command to get metadata
        cmd = [
            'ffprobe', '-v', 'error',
            '-print_format', 'json',
            '-show_format',
            '-show_streams',
            file_path
        ]

        # Running the command
        result = subprocess.run(
            cmd, stdout=subprocess.PIPE, stderr=subprocess.PIPE, text=True)

        # Checking for any errors from ffprobe
        if result.returncode != 0:
            raise subprocess.CalledProcessError(
                result.returncode, cmd, output=result.stdout, stderr=result.stderr)

        # Parsing the result to JSON and return
        return json.loads(result.stdout)

    except FileNotFoundError as e:
        print(f"Error: {e}")
        return None
    except subprocess.CalledProcessError as e:
        print(f"FFprobe error: {e.stderr}")
        return None
    except json.JSONDecodeError:
        print("Error decoding JSON from ffprobe output.")
        return None
    except Exception as e:
        print(f"An unexpected error occurred: {e}")
        return None


# Calling the custom function
metadata = get_video_metadata_ffprobe('./videos/sample.mp4')
if metadata:
    print(json.dumps(metadata, indent=4))
else:
    print("Failed to retrieve metadata.")
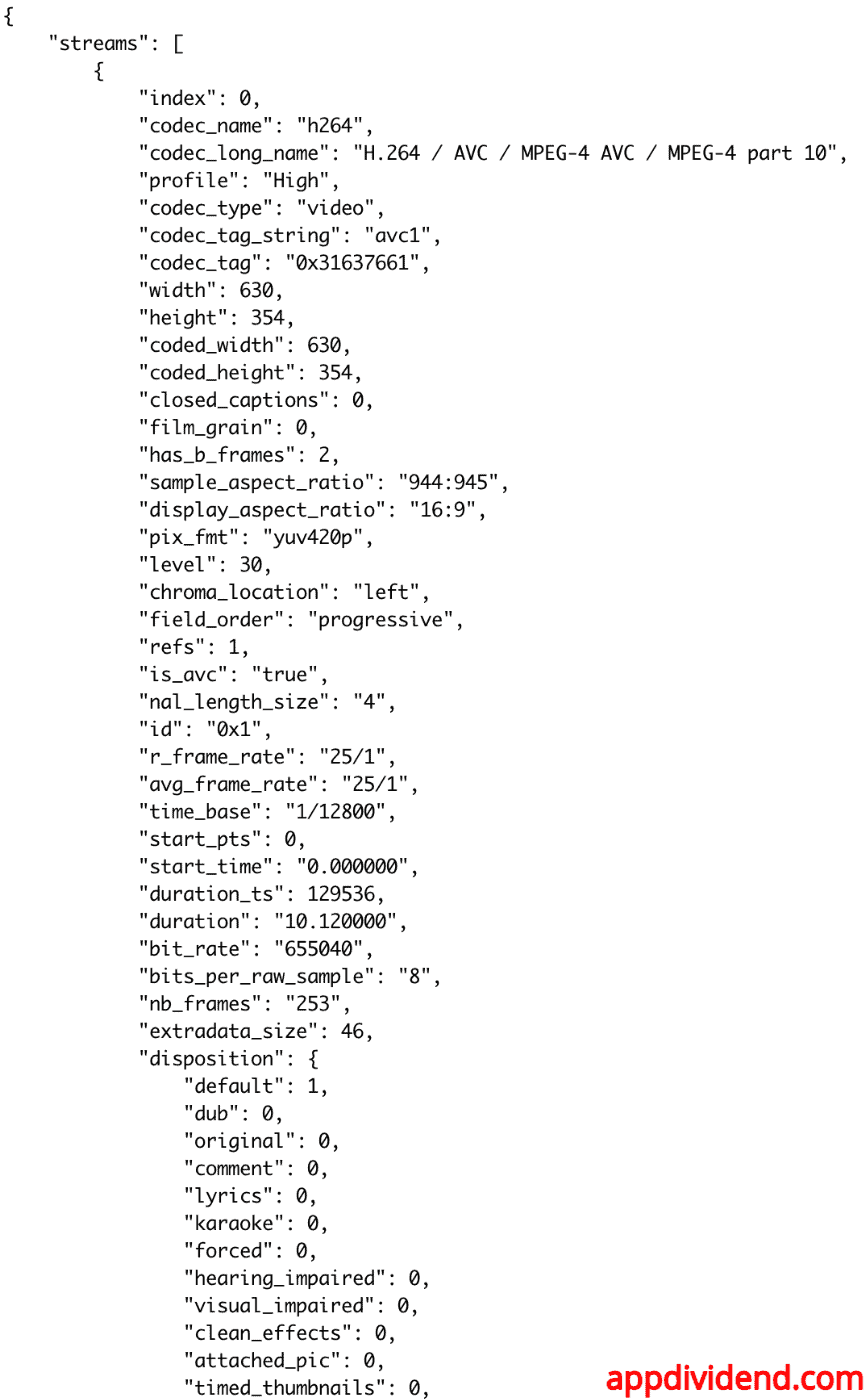
Output
The image below denotes how our output looks:

The ffprobe approach is efficient, fast, and suitable for extensive video processing.
From the above output image, you can see that it provides metadata, including code_name, code_type, width, height, start_time, duration, bit_rate, and more.
However, this ffprobe approach is dependent on the FFMpeg library. So you must install it on your machine.
Method 2: Using ffmpeg-python
The ffmpeg-python is a third-party library and a Pythonic way to implement complex FFMpeg commands in code.
The above diagram simplifies the process of getting json as metadata from a video.
Install the ffmpeg-python library using the command below: pip install ffmpeg-python
import ffmpeg
import json


def get_video_metadata_ffmpeg_python(file_path):
    try:
        # Attempting to probe the video file for metadata
        probe = ffmpeg.probe(file_path)
        return probe

    except ffmpeg.Error as e:
        # Handle errors from ffmpeg
        print(f"FFmpeg error: {e.stderr.decode('utf-8')}")
        return None
    except FileNotFoundError as e:
        print(f"File not found: {e}")
        return None
    except Exception as e:
        # Catch any other errors
        print(f"An unexpected error occurred: {e}")
        return None


# Usage
metadata = get_video_metadata_ffmpeg_python('./videos/sample.mp4')
if metadata:
    print(json.dumps(metadata, indent=4))
else:
    print("Failed to retrieve metadata.")
Output
Using ffmpeg-python, we can avoid the subprocess call, and hence it works fast. However, you still need to install ffmpeg in your system to work correctly.
If you are already using the ffmpeg system for your video processing project, then I recommend using the ffmpeg-python library.
Time measurement for each method
I ran a test and found that ffmpeg-python takes less time to fetch the metadata from the video, making it the fastest approach. Below is the bar chart of this finding:

I hope you understand everything and choose the best path for your project.