
To use Laravel 11 with MongoDB, we will use this “mongodb/laravel-mongodb” package.
Here is the step-by-step guide:
Step 1: Install Laravel Project
composer create-project --prefer-dist laravel/laravel laramongo
Go inside the folder.
cd laramongo
Install the laravel/ui package.
composer require laravel/ui
Add the Bootstrap scaffolding using laravel/ui:
php artisan ui bootstrap
The final step is to build a CSS and JS File.
Run these two below commands one by one:
npm install

npm run dev
Step 2: Installing Mongodb library and extension
Before starting our project, we must install the MongoDB libraries for Laravel and the PHP extension for MongoDB.
I am using MacOS, so if you are using Mac, then follow the below instructions:
sudo pecl install mongodb
If you are using Windows, use the Mongo library related to Windows.
You must ensure the mongodb extension is enabled in your php.ini file.
The location of your php.ini file will vary depending on your operating system.
Add the following line to your php.ini file:
extension="mongodb.so"
Go inside the root of your laravel application, open the terminal, and install the “mongodb/laravel-mongodb” package.
composer require mongodb/laravel-mongodb
If the mongodb library and extension are installed correctly, the above package will be successfully installed!
Start the mongodb service so that it will connect to our mongodb client.
Step 3: Connect the Laravel application with MongoDB
For this project, I am using MongoDB Compass as a client:
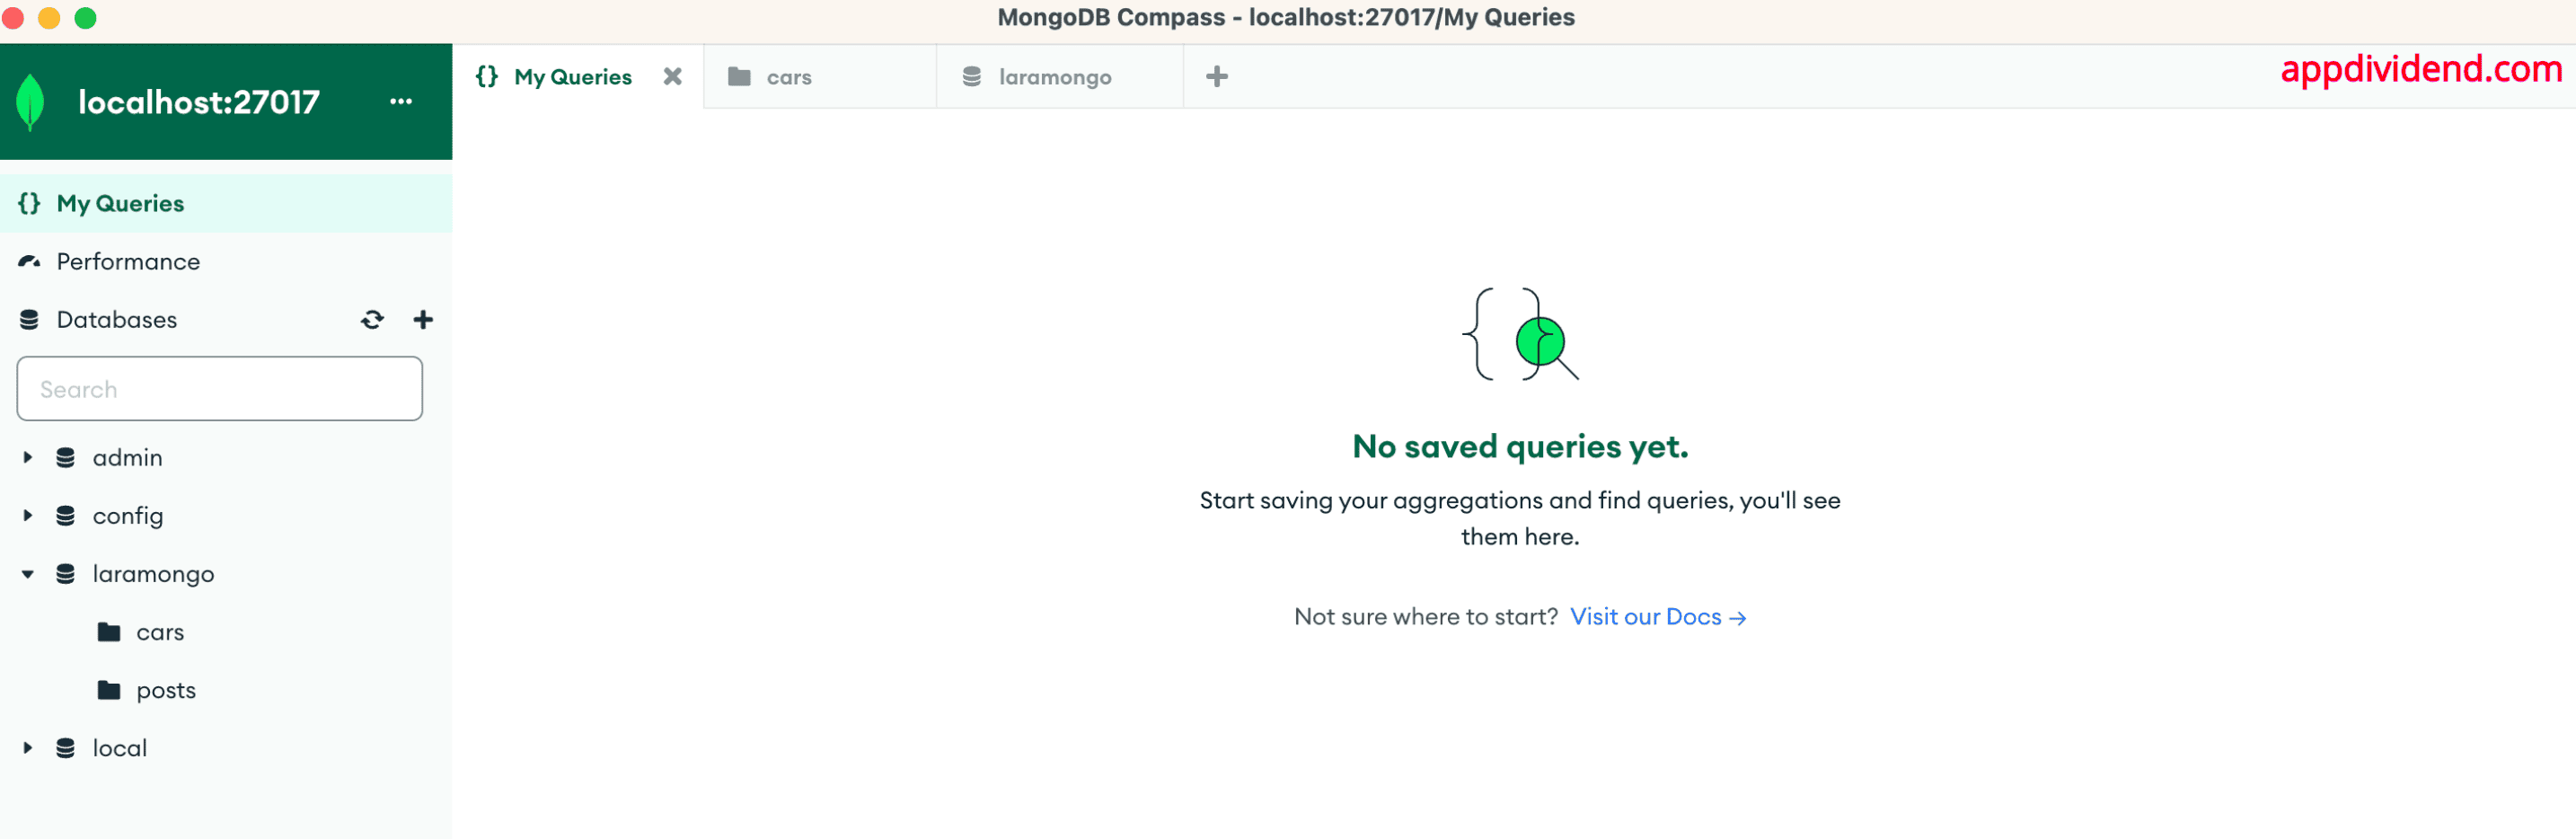
Here, you can see that my client compass is connected to the MongoDB server.
So, when a new collection is added, we will verify it here, just like we were checking on the phpmyadmin server for the MySQL database.
Come to our Laravel project and write config code to connect our Laravel application to the MongoDB server.
// config >> database.php

'mongodb' => [
            'driver' => 'mongodb',
            'dsn' => env('DB_URI', 'mongodb://localhost:27017/laramongo'),
            'database' => 'laramongo',
],
Your DB_URI can change based on your Mongo server, username, and password. I am using localhost, so this is my URI.
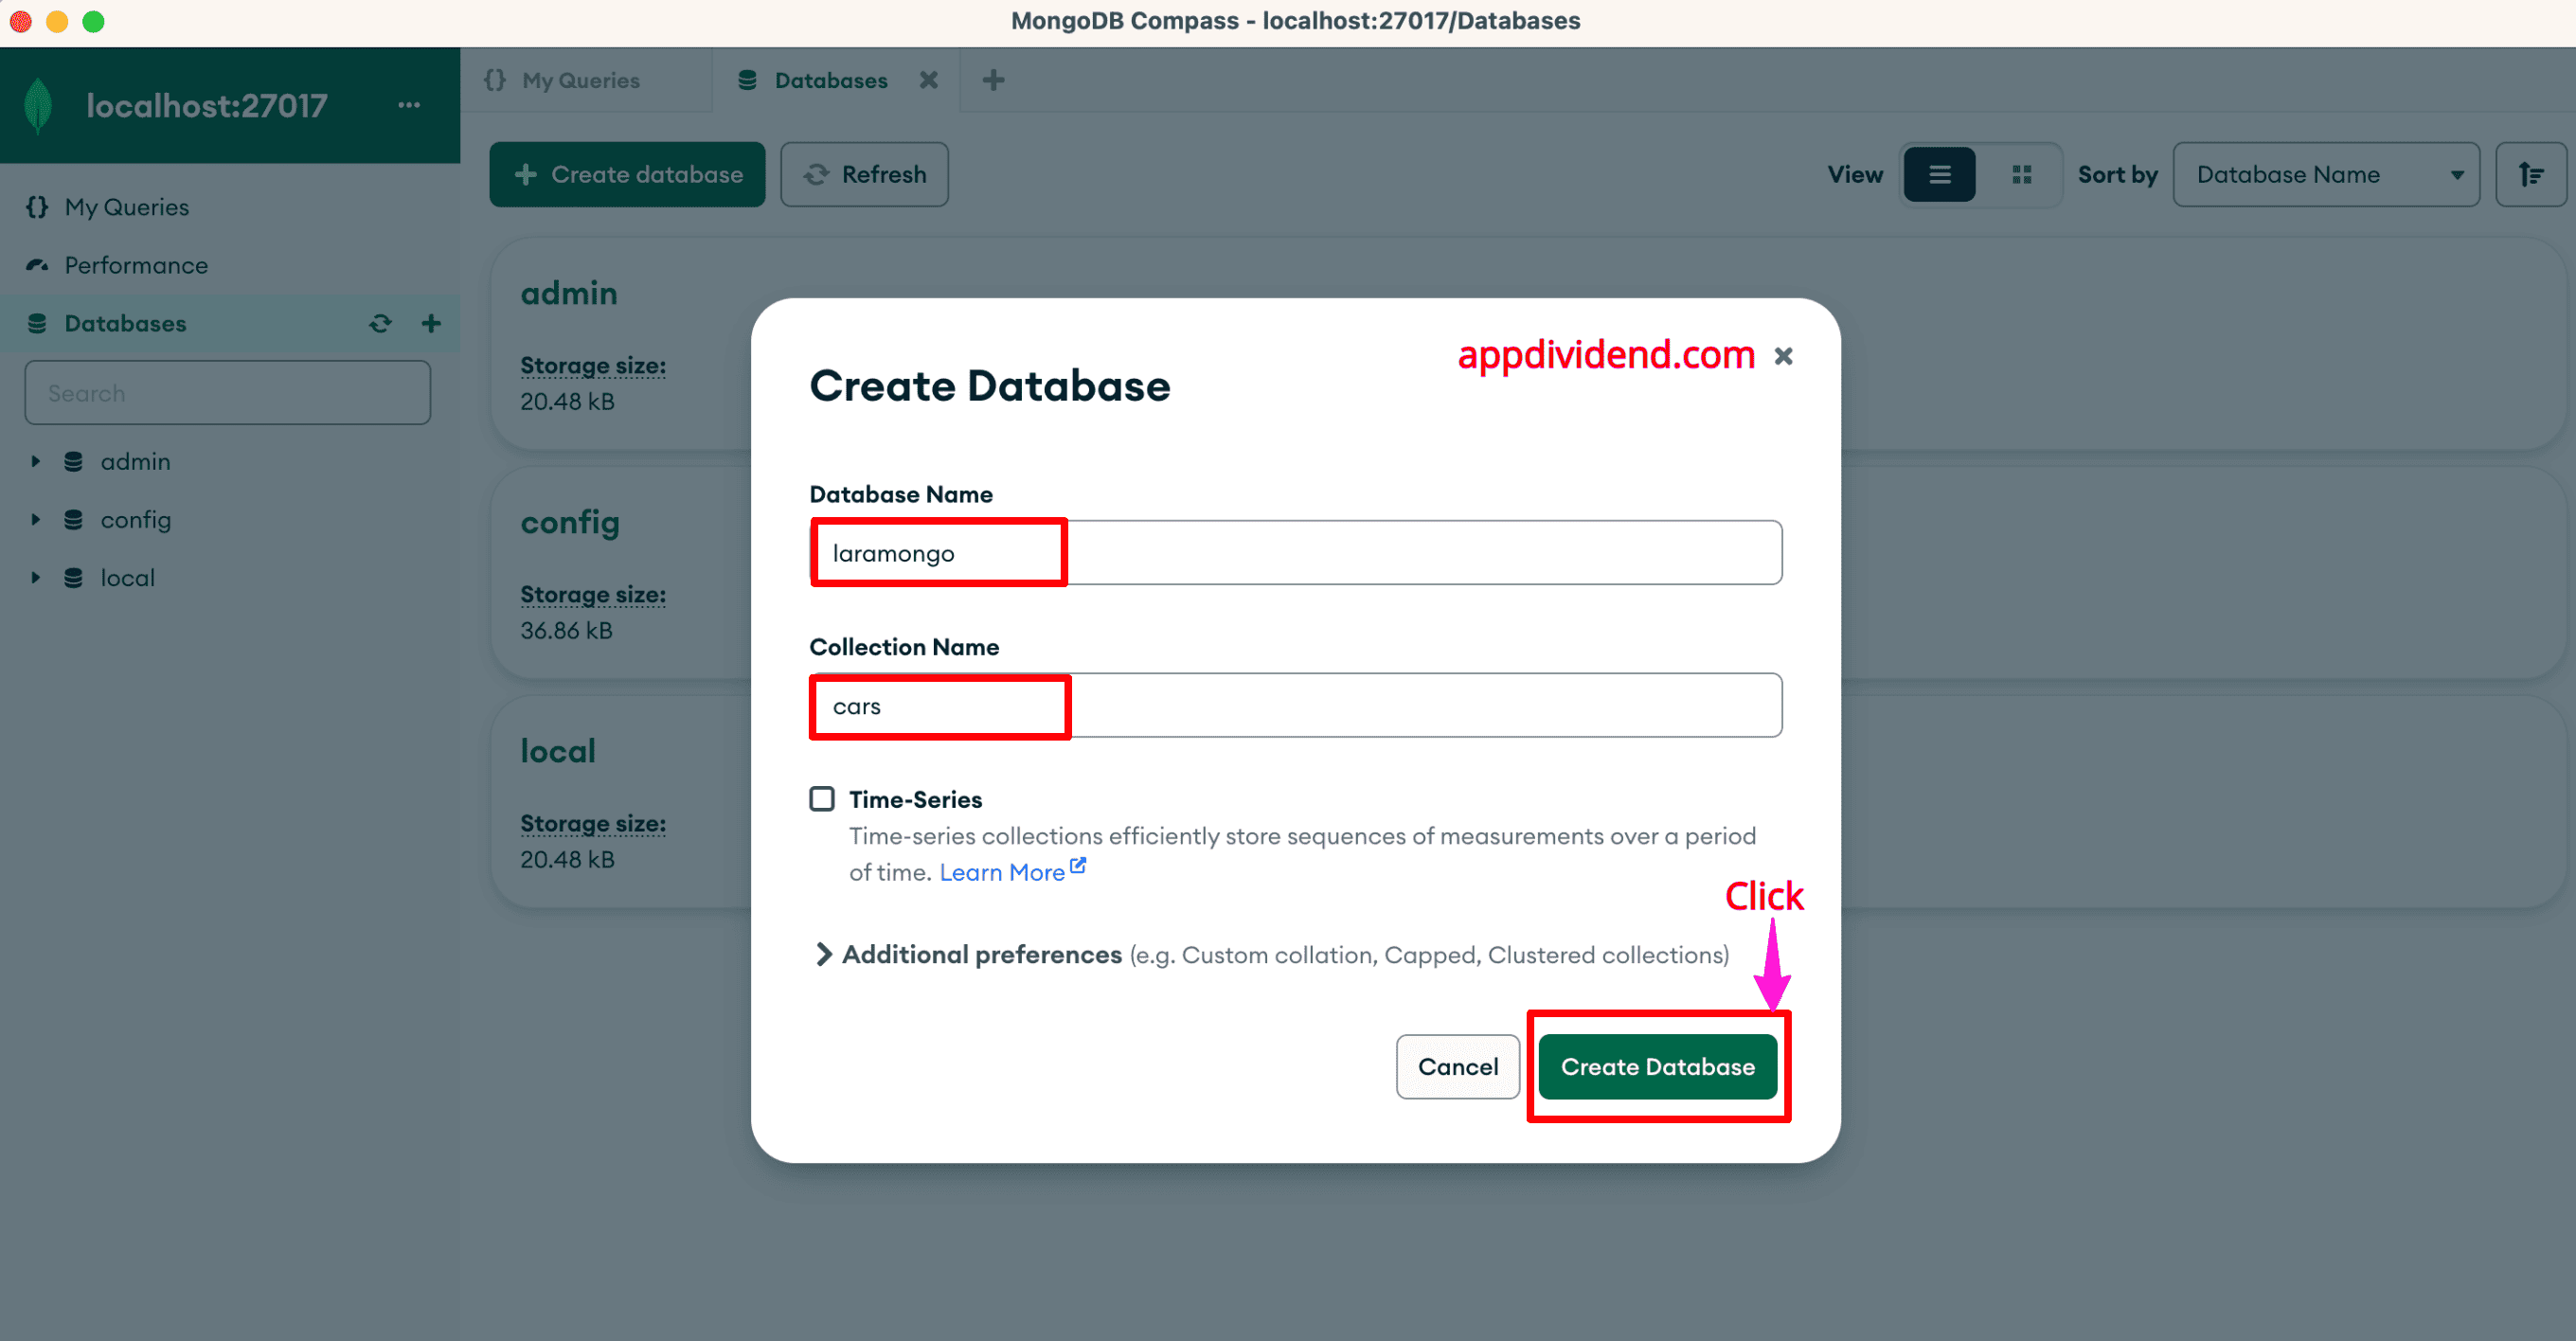
Create a Database and Collection inside MongoDB compass like this:
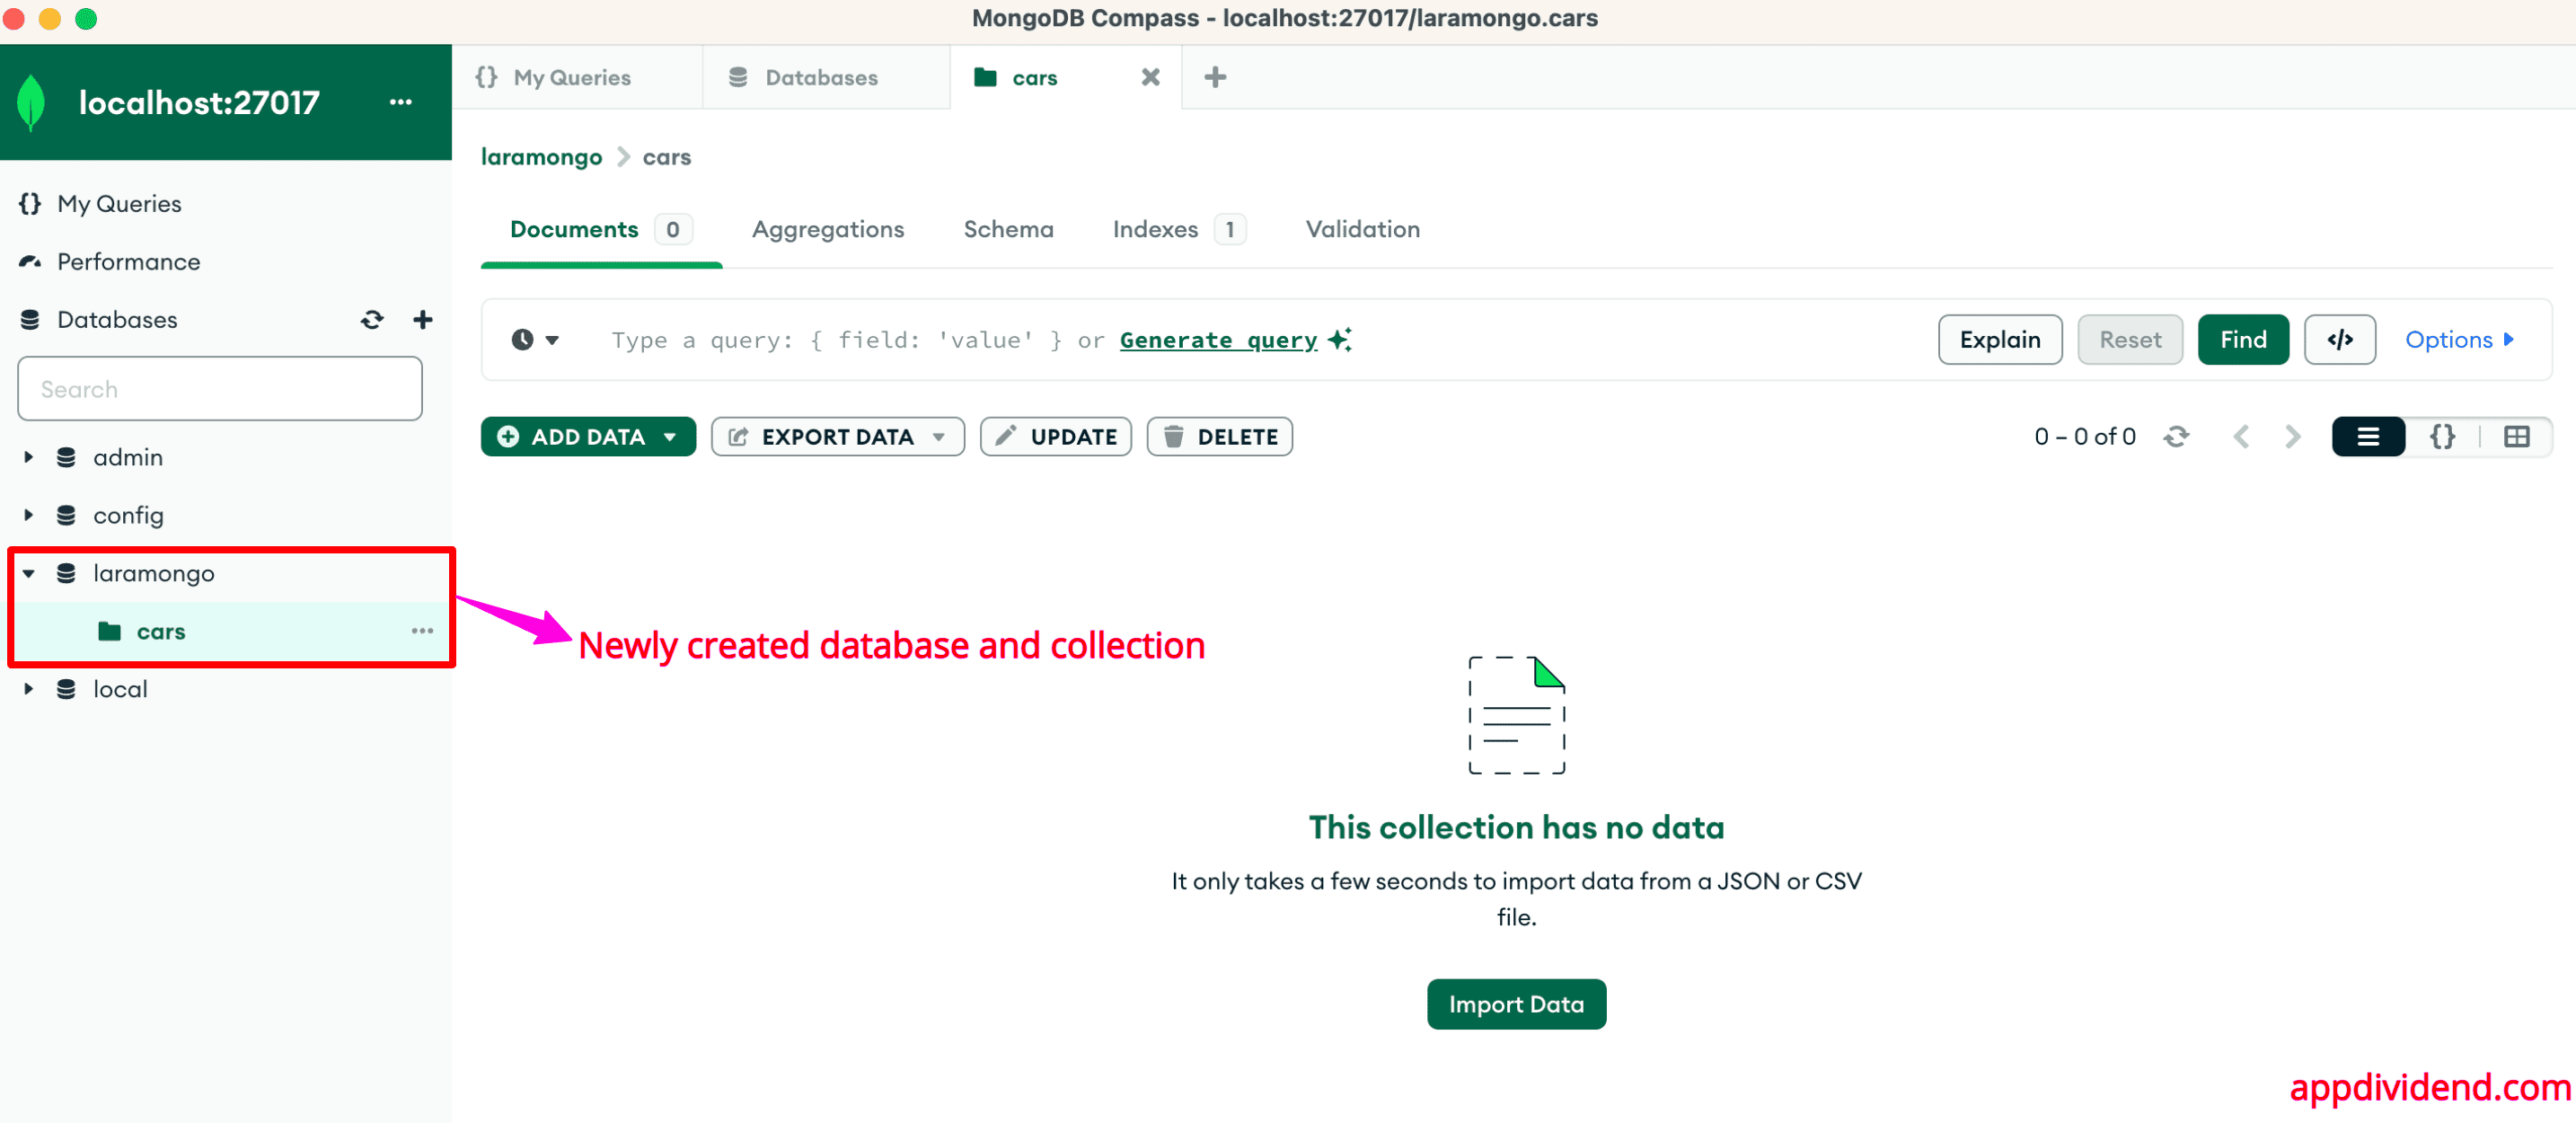
After creating, it looks like this:
Step 4: Create a model and controller
Let’s head to the terminal at the root of our Laravel application and create a model and controller files:
php artisan make:model Car

php artisan make:controller CarController --resource
Go to the Car.php model and replace your existing code with this code:
<?php

namespace App\Models;

use Illuminate\Database\Eloquent\Factories\HasFactory;
use MongoDB\Laravel\Eloquent\Model;


class Car extends Model
{
    use HasFactory;

    protected $connection = 'mongodb';
    protected $collection = 'cars';

    protected $fillable = [
        'carcompany', 'model','price'
    ];
}
Here, you can see that we import the Model class from MongoDB\Laravel\Eloquent\Model.
We also defined the $connection variable, which is “mongodb,” and the $collection, which is “cars.”
We will save three fields in the MongoDB database. To prevent the Mass Assignment Exception, we defined three $fillable properties.
Step 5: Register the route
We created a Resource Controller, so go to the routes >> web.php file and add the below code:
<?php

// web.php

use Illuminate\Support\Facades\Route;
use App\Http\Controllers\CarController;

Route::resource('cars', CarController::class);
Go to the terminal and type this command to see the registered routes:
php artisan route:list

Step 6: Create a master blade view
Create a file called layout.blade.php inside the resources >> views folder and add the below code:
// layout.blade.php

<!DOCTYPE html>
<html lang="en">
  <head>
    <meta charset="UTF-8">
    <meta name="viewport" content="width=device-width, initial-scale=1.0">
    <meta http-equiv="X-UA-Compatible" content="ie=edge">
    <title>Laravel MongoDB CRUD</title>
    @vite(['resources/sass/app.scss', 'resources/js/app.js'])
  </head>
  <body>
    <div class="container">
      @yield('content')
    </div>
  </body>
</html>
Here, we defined a master template for the rest of our project.
We are using the vite build tool to create CSS and JS assets and bundle them together. To include the vite, we are using the @vite directive inside the blade file.
Step 7: Create three views for the CRUD application
We will create a simple web form that will accept the card details and redirect it to the index page, where there will be a list of all the cars; from then, you can update the specific car details and delete the car.
Go inside the resources >> views folder and create three blade files:
The first file is create.blade.php, and add the below code:
// create.blade.php

@extends('layout')

@section('content')
<h2>Create Car Details</h2>
<form method="post" action="{{ route('cars.store') }}">
    @csrf
    <div class="mb-3 row justify-content-center">
        <div class="col-md-4">
            <label for="Carcompany" class="form-label">Car Company:</label>
            <input type="text" class="form-control" name="carcompany" id="Carcompany">
        </div>
    </div>
    <div class="mb-3 row justify-content-center">
        <div class="col-md-4">
            <label for="Model" class="form-label">Model:</label>
            <input type="text" class="form-control" name="model" id="Model">
        </div>
    </div>
    <div class="mb-3 row justify-content-center">
        <div class="col-md-4">
            <label for="Price" class="form-label">Price:</label>
            <input type="text" class="form-control" name="price" id="Price">
        </div>
    </div>
    <div class="row justify-content-center">
        <div class="col-md-4 text-center">
            <button type="submit" class="btn btn-info">Add Car</button>
        </div>
    </div>
</form>
@endsection
The second file is edit.blade.php, and add the below code:
// edit.blade.php

@extends('layout')

@section('content')
<h2>Update Car Details</h2>
<form method="post" action="{{ route('cars.update', $car->id) }}">
    @csrf
    @method('PATCH')
    <div class="mb-3 row justify-content-center">
        <div class="col-md-4">
            <label for="Carcompany" class="form-label">Car Company:</label>
            <input type="text" class="form-control" name="carcompany" id="Carcompany"
                value="{{$car->carcompany}}">
        </div>
    </div>
    <div class="mb-3 row justify-content-center">
        <div class="col-md-4">
            <label for="Model" class="form-label">Model:</label>
            <input type="text" class="form-control" name="model" id="Model"
                value="{{$car->model}}">
        </div>
    </div>
    <div class="mb-3 row justify-content-center">
        <div class="col-md-4">
            <label for="Price" class="form-label">Price:</label>
            <input type="text" class="form-control" name="price" id="Price"
                value="{{$car->price}}">
        </div>
    </div>
    <div class="row justify-content-center">
        <div class="col-md-4 text-center">
            <button type="submit" class="btn btn-success">Update</button>
        </div>
    </div>
</form>
@endsection
The last file is the index.blade.php file:
// index.blade.php

@extends('layout')

@section('content')
    <h2>Car Listing</h2>
    <a href="{{route('cars.create')}}" class="btn btn-success">Add Car</a></td>
    @if (\Session::has('success'))
      <div class="alert alert-success">
        <p>{{ \Session::get('success') }}</p>
      </div>
     @endif
    <table class="table table-striped">
    <thead>
      <tr>
        <th>ID</th>
        <th>Company</th>
        <th>Model</th>
        <th>Price</th>
        <th colspan="2">Action</th>
      </tr>
    </thead>
    <tbody>

      @foreach($cars as $car)
      <tr>
        <td>{{$car->id}}</td>
        <td>{{$car->carcompany}}</td>
        <td>{{$car->model}}</td>
        <td>{{$car->price}}</td>
        <td><a href="{{route('cars.edit', $car->id)}}" class="btn btn-warning">Edit</a></td>
        <td>
          <form action="{{route('cars.destroy', $car->id)}}" method="post">
            @csrf
            <input name="_method" type="hidden" value="DELETE">
            <button class="btn btn-danger" type="submit">Delete</button>
          </form>
        </td>
      </tr>
      @endforeach
    </tbody>
  </table>
@endsection
We wrote all the necessary code for the web form to create and edit the details and display the list of cars.
Step 8: Complete the CRUD operations code
The only thing remaining is to update the CarController.php file and complete all the functions that will create a car, display a listing of all the cars, update the car, and delete the car.
Open the CarController.php file and replace it with the below code:
<?php

// CarController.php

namespace App\Http\Controllers;

use Illuminate\Http\Request;
use App\Models\Car;

class CarController extends Controller
{
    /**
     * Display a listing of the resource.
     */
    public function index()
    {
        $cars = Car::all();

        return view('index', compact('cars'));
    }

    /**
     * Show the form for creating a new resource.
     */
    public function create()
    {
        return view('create');
    }

    /**
     * Store a newly created resource in storage.
     */
    public function store(Request $request)
    {
        $car = new Car();
        $car->carcompany = $request->get('carcompany');
        $car->model = $request->get('model');
        $car->price = $request->get('price');
        $car->save();

        return redirect('cars')->with('success', 'Car has been successfully added');
    }

    /**
     * Display the specified resource.
     */
    public function show(string $id)
    {
        //
    }

    /**
     * Show the form for editing the specified resource.
     */
    public function edit(string $id)
    {
        $car = Car::find($id);
        return view('edit', compact('car'));
    }

    /**
     * Update the specified resource in storage.
     */
    public function update(Request $request, string $id)
    {
        $car = Car::find($id);
        $car->carcompany = $request->get('carcompany');
        $car->model = $request->get('model');
        $car->price = $request->get('price');
        $car->save();

        return redirect('/cars')->with('success', 'Car Data is successfully updated');
    }

    /**
     * Remove the specified resource from storage.
     */
    public function destroy(string $id)
    {
        $car = Car::findOrFail($id);
        $car->delete();

        return redirect('/cars')->with('success', 'Car Data is successfully deleted');
    }
}
Save the file. Go to the root of the Laravel project and start the development server using this command:
php artisan serve
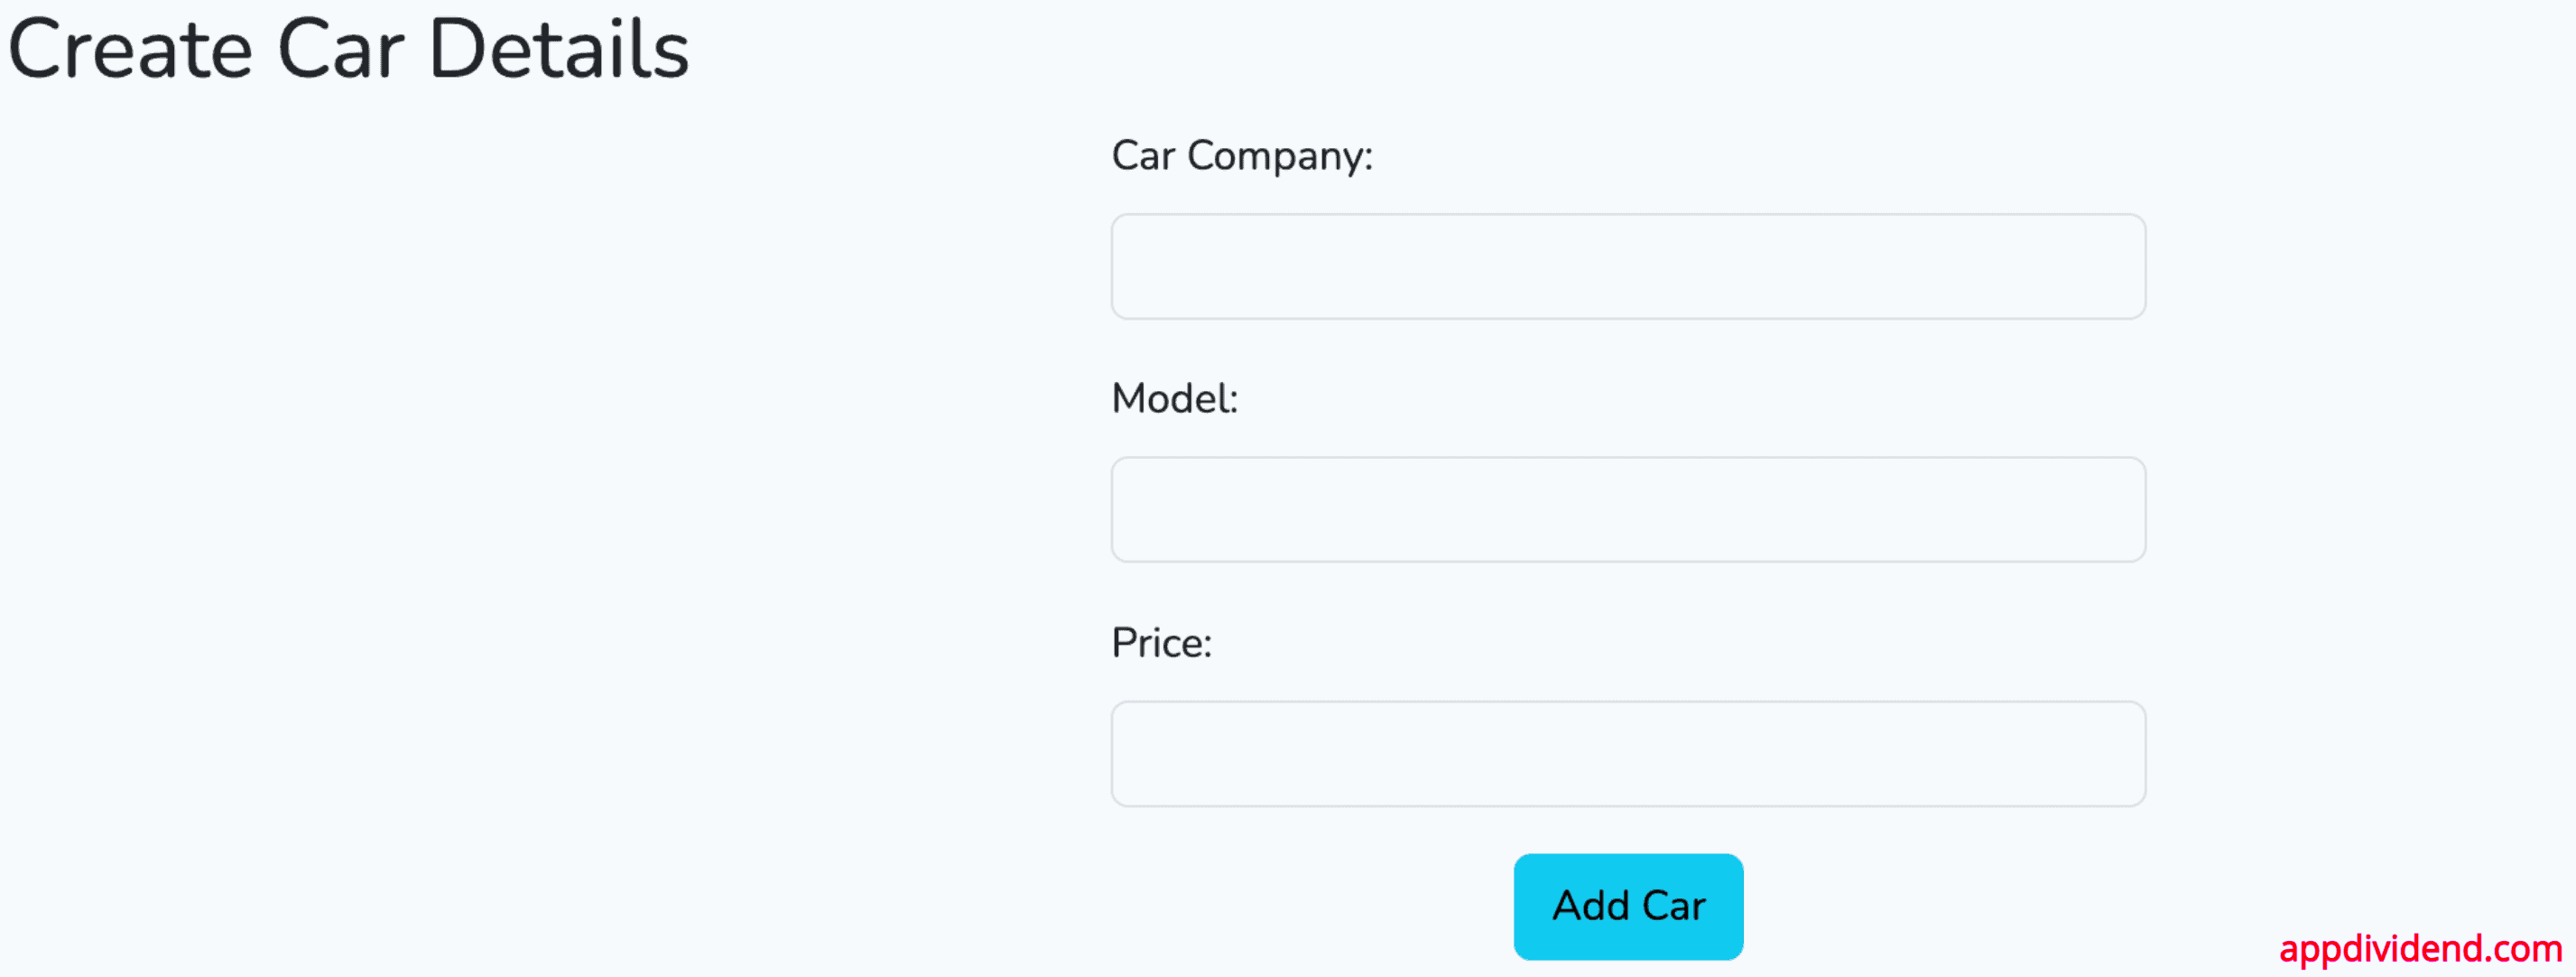
Go to this URl: http://localhost:8000/cars/create, and you will see a form like this:
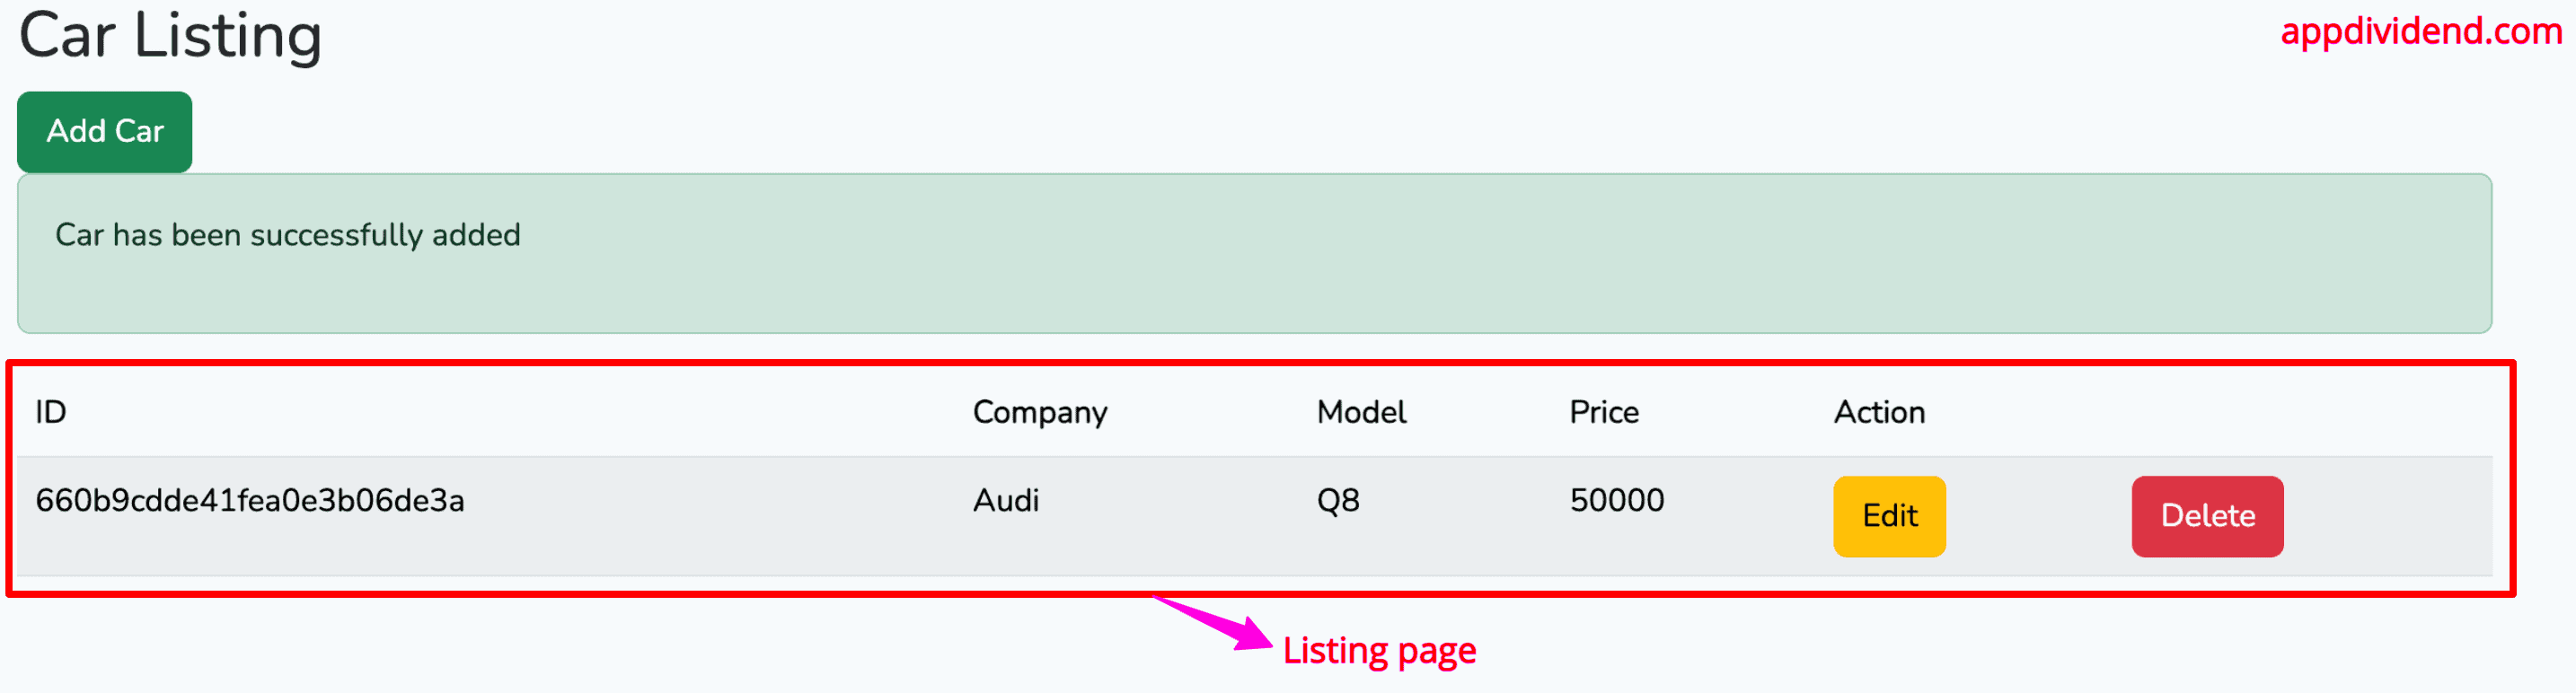
Enter the details, and you will be redirected to a listing page, which is the index.blade.php view: http://localhost:8000/cars
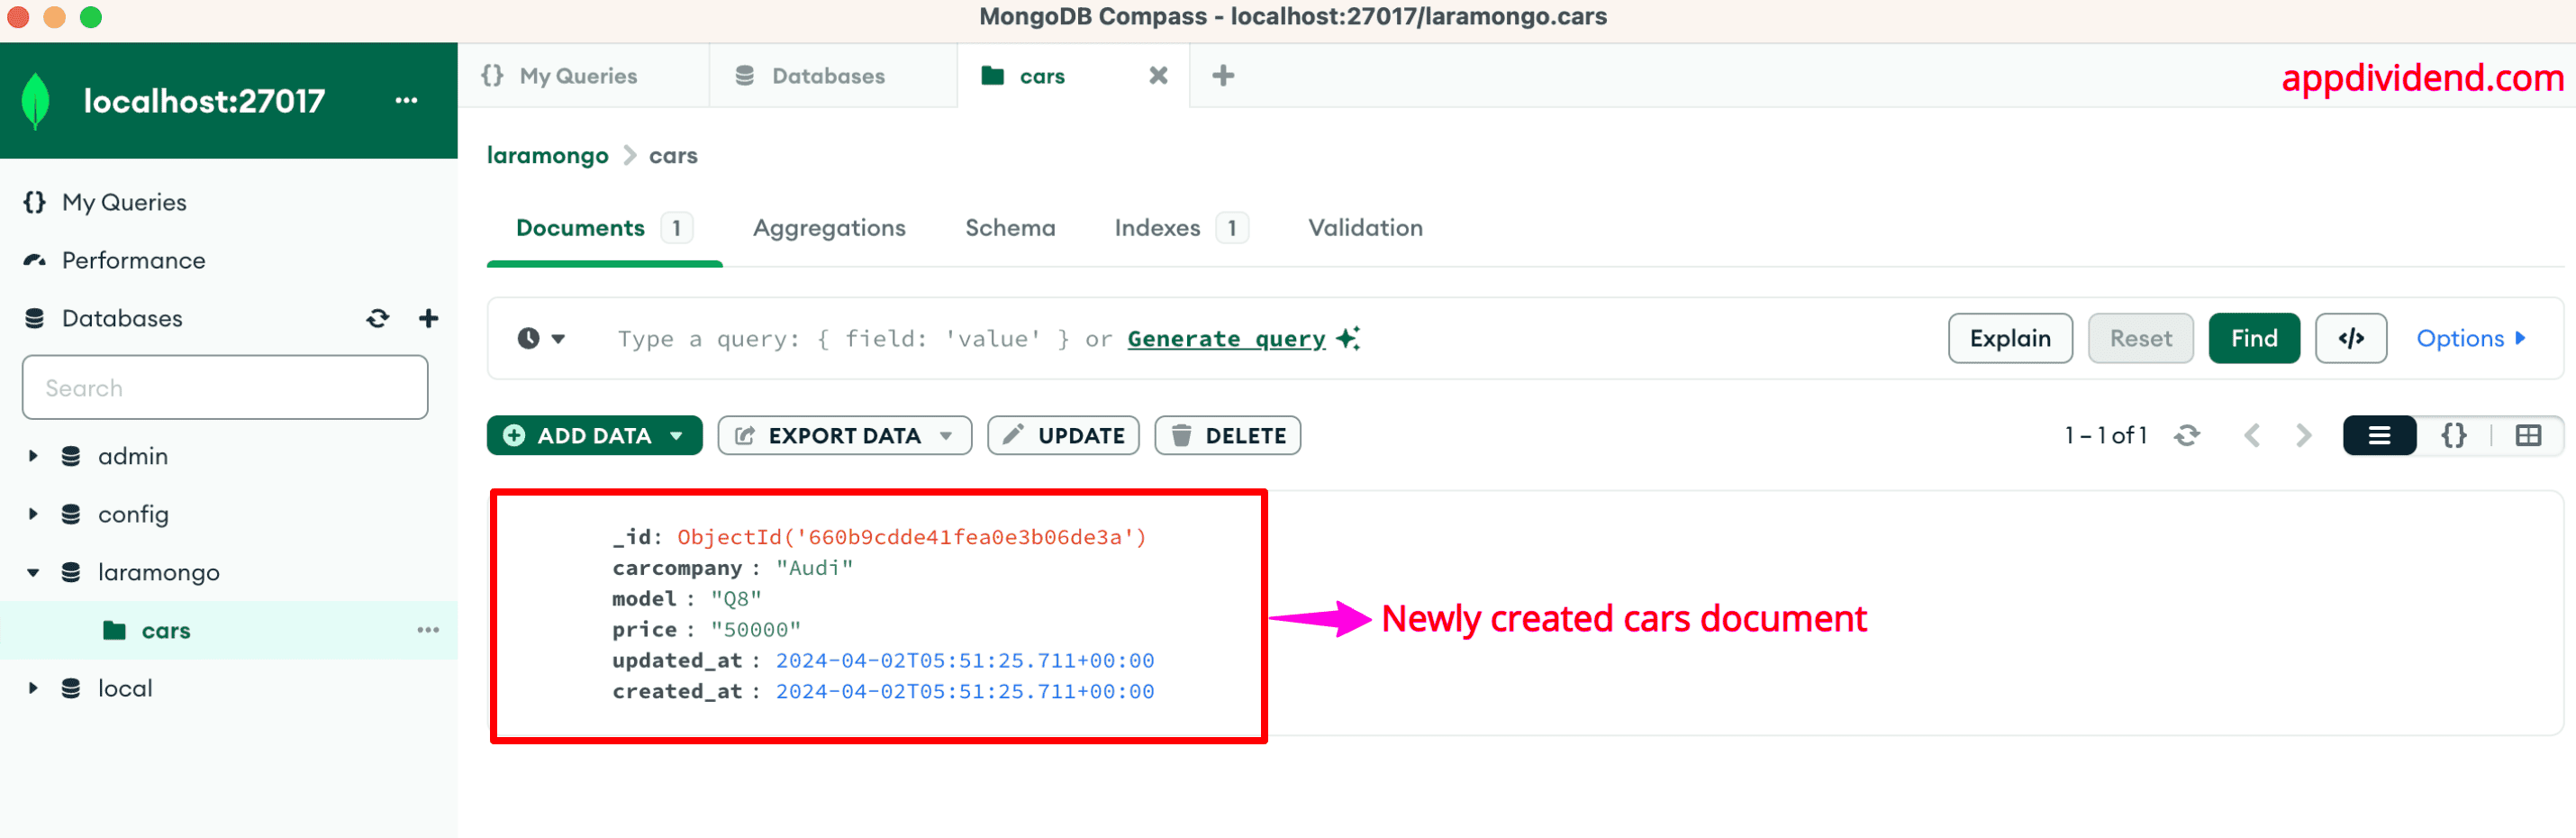
Head over to the MongoDB database, and you will see one document has been added to the cars collection:
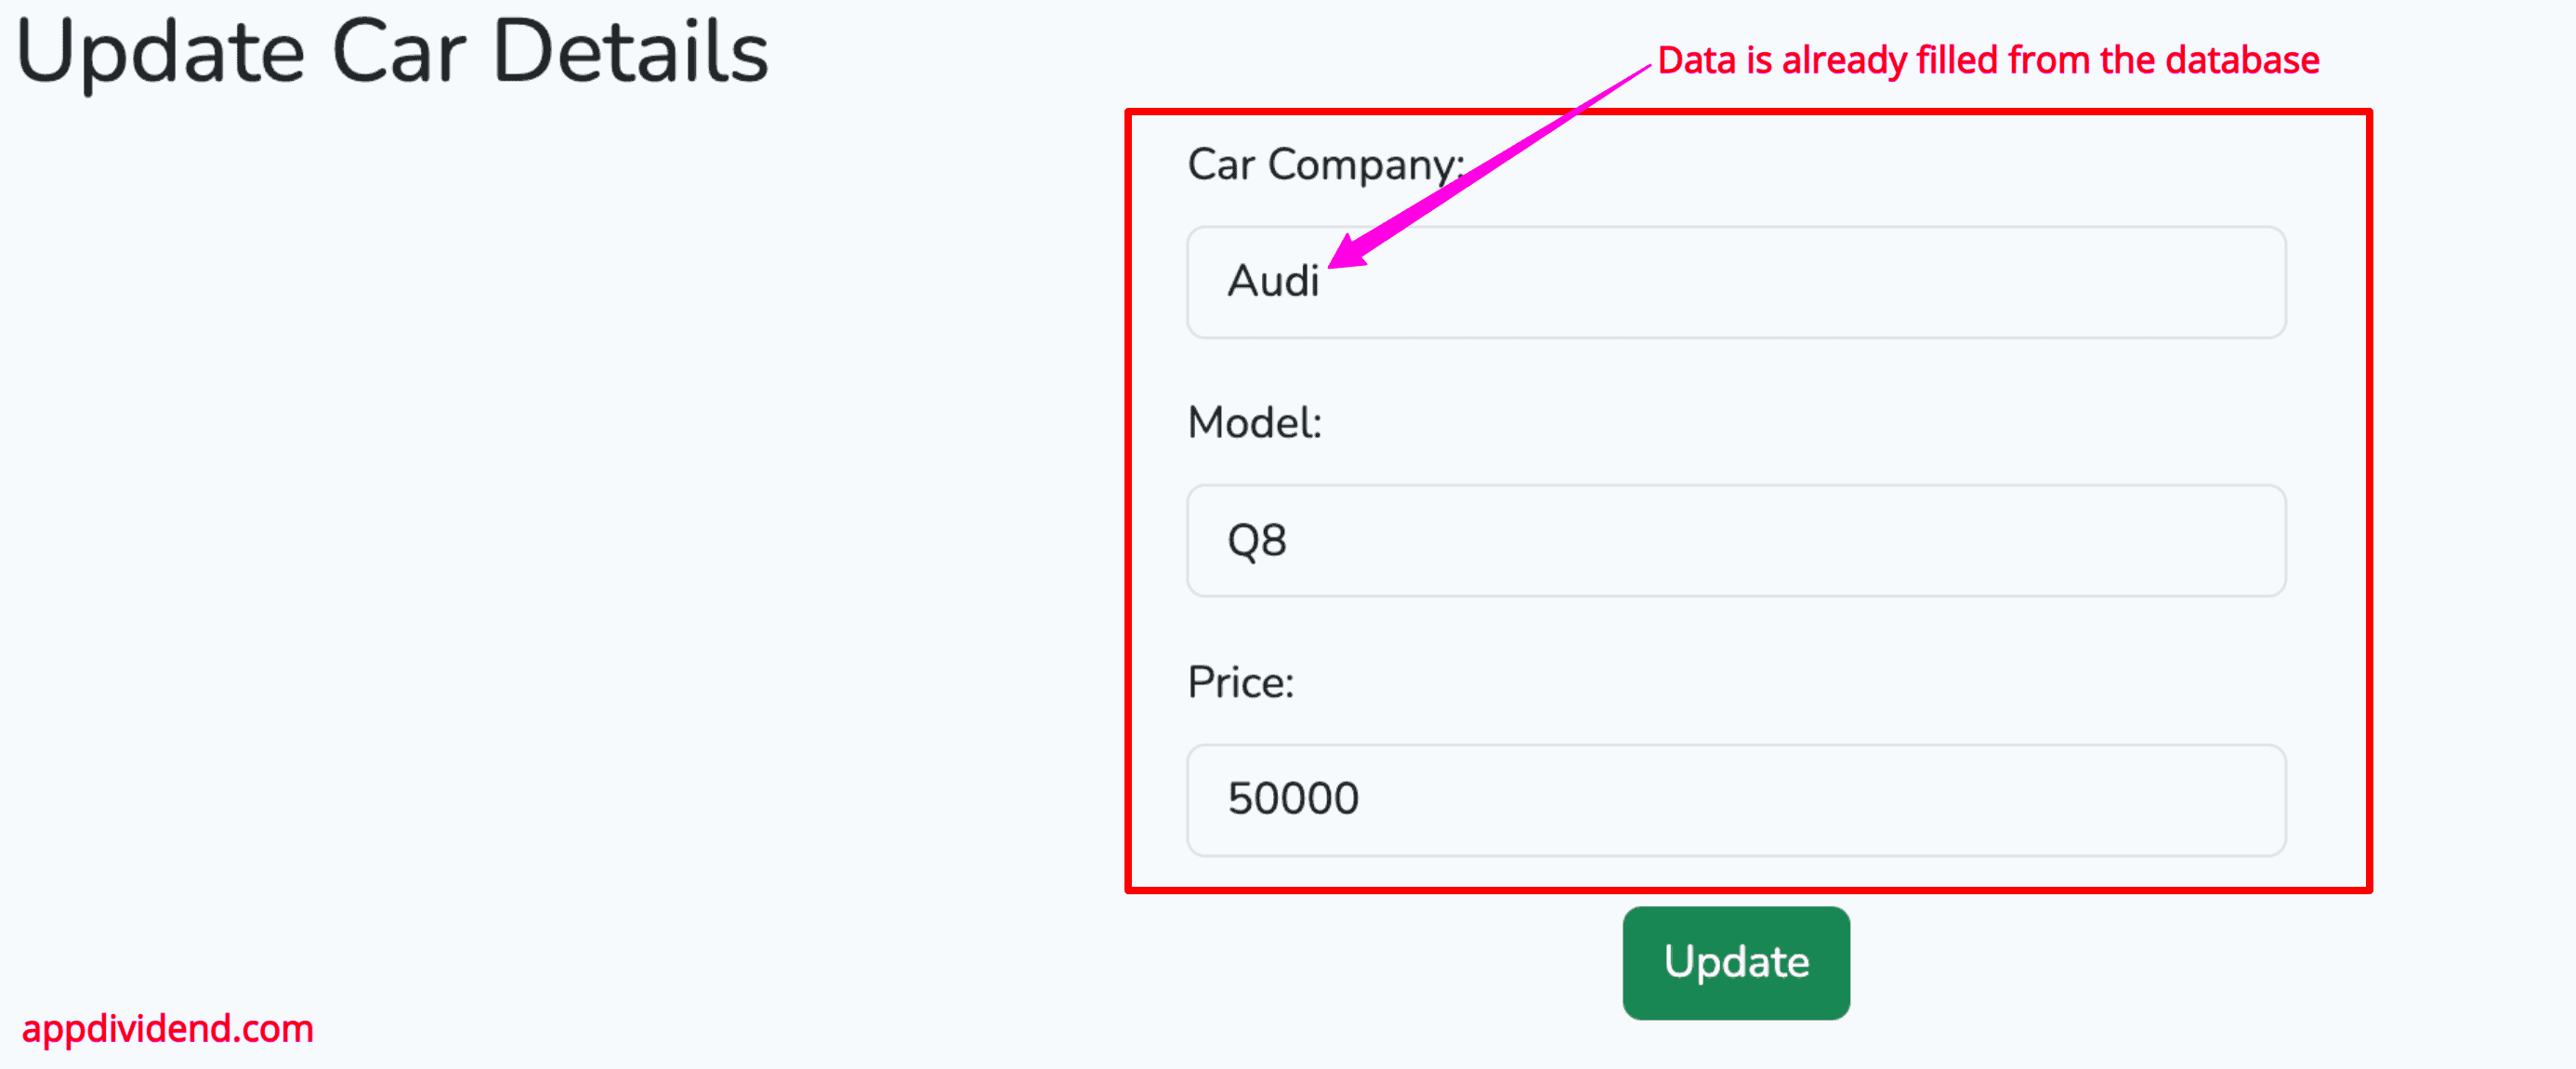
Now, go to http://localhost:8000/cars and click on the Edit button.
You will be redirected to this page: http://localhost:8000/cars/660b9cdde41fea0e3b06de3a/edit
Your URL will be different based on the _id attribute’s value because it is unique for every MongoDB document.
Let’s update this document by changing the price from 50000 to 30000.

Now, click on the delete button and it will remove the document from the MongoDB database.
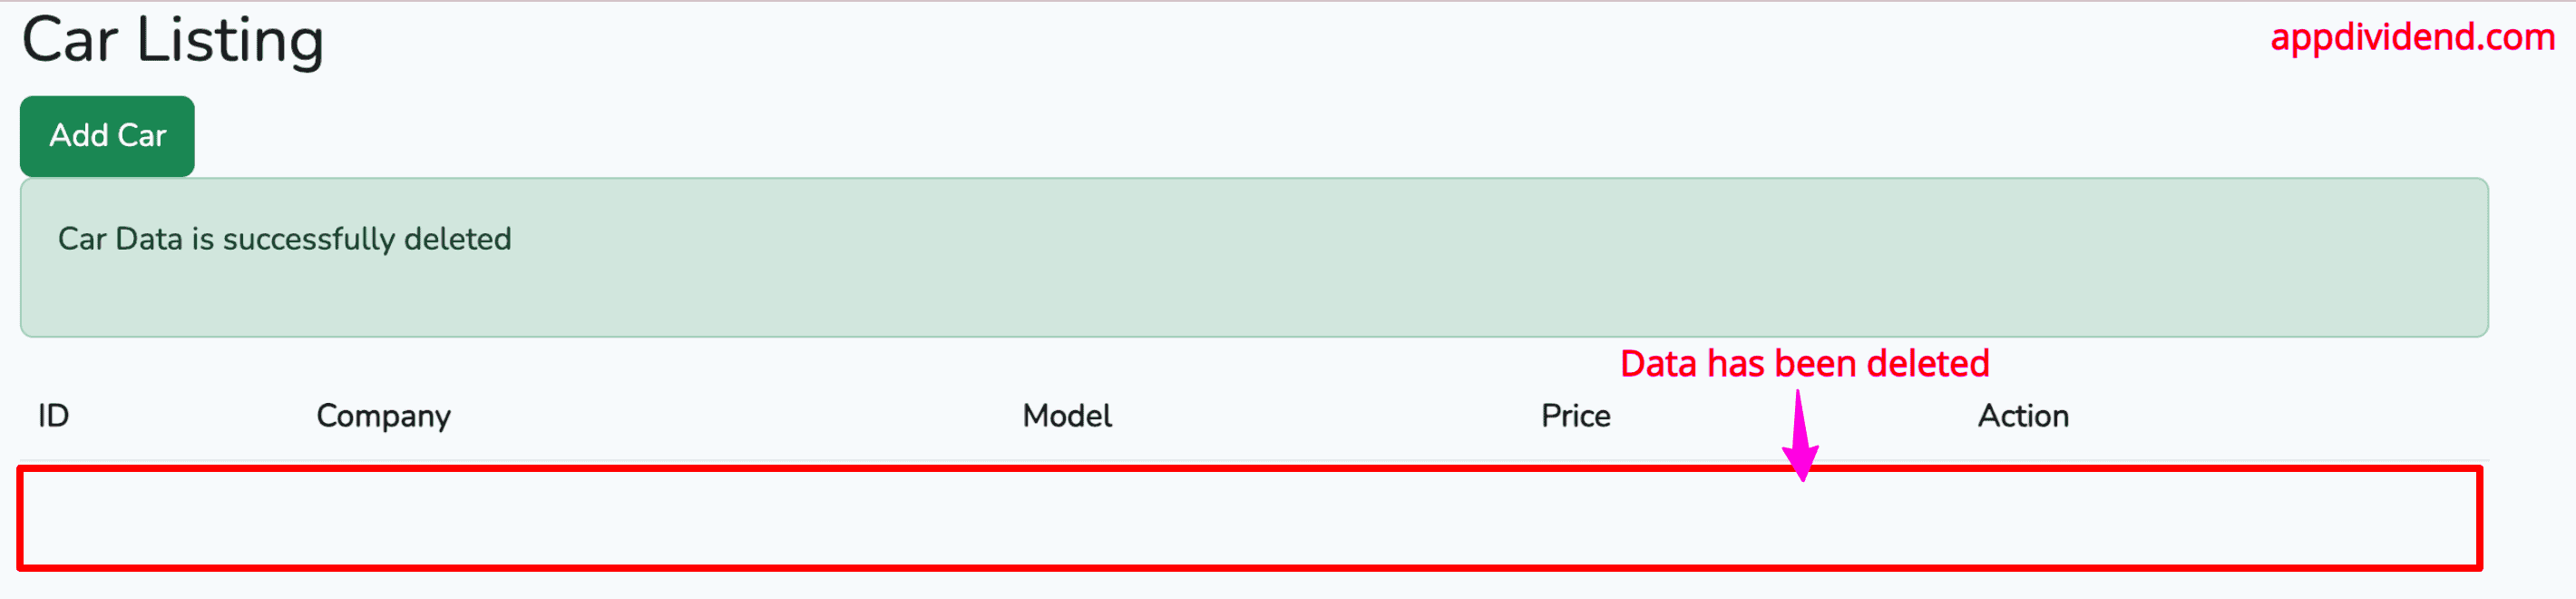
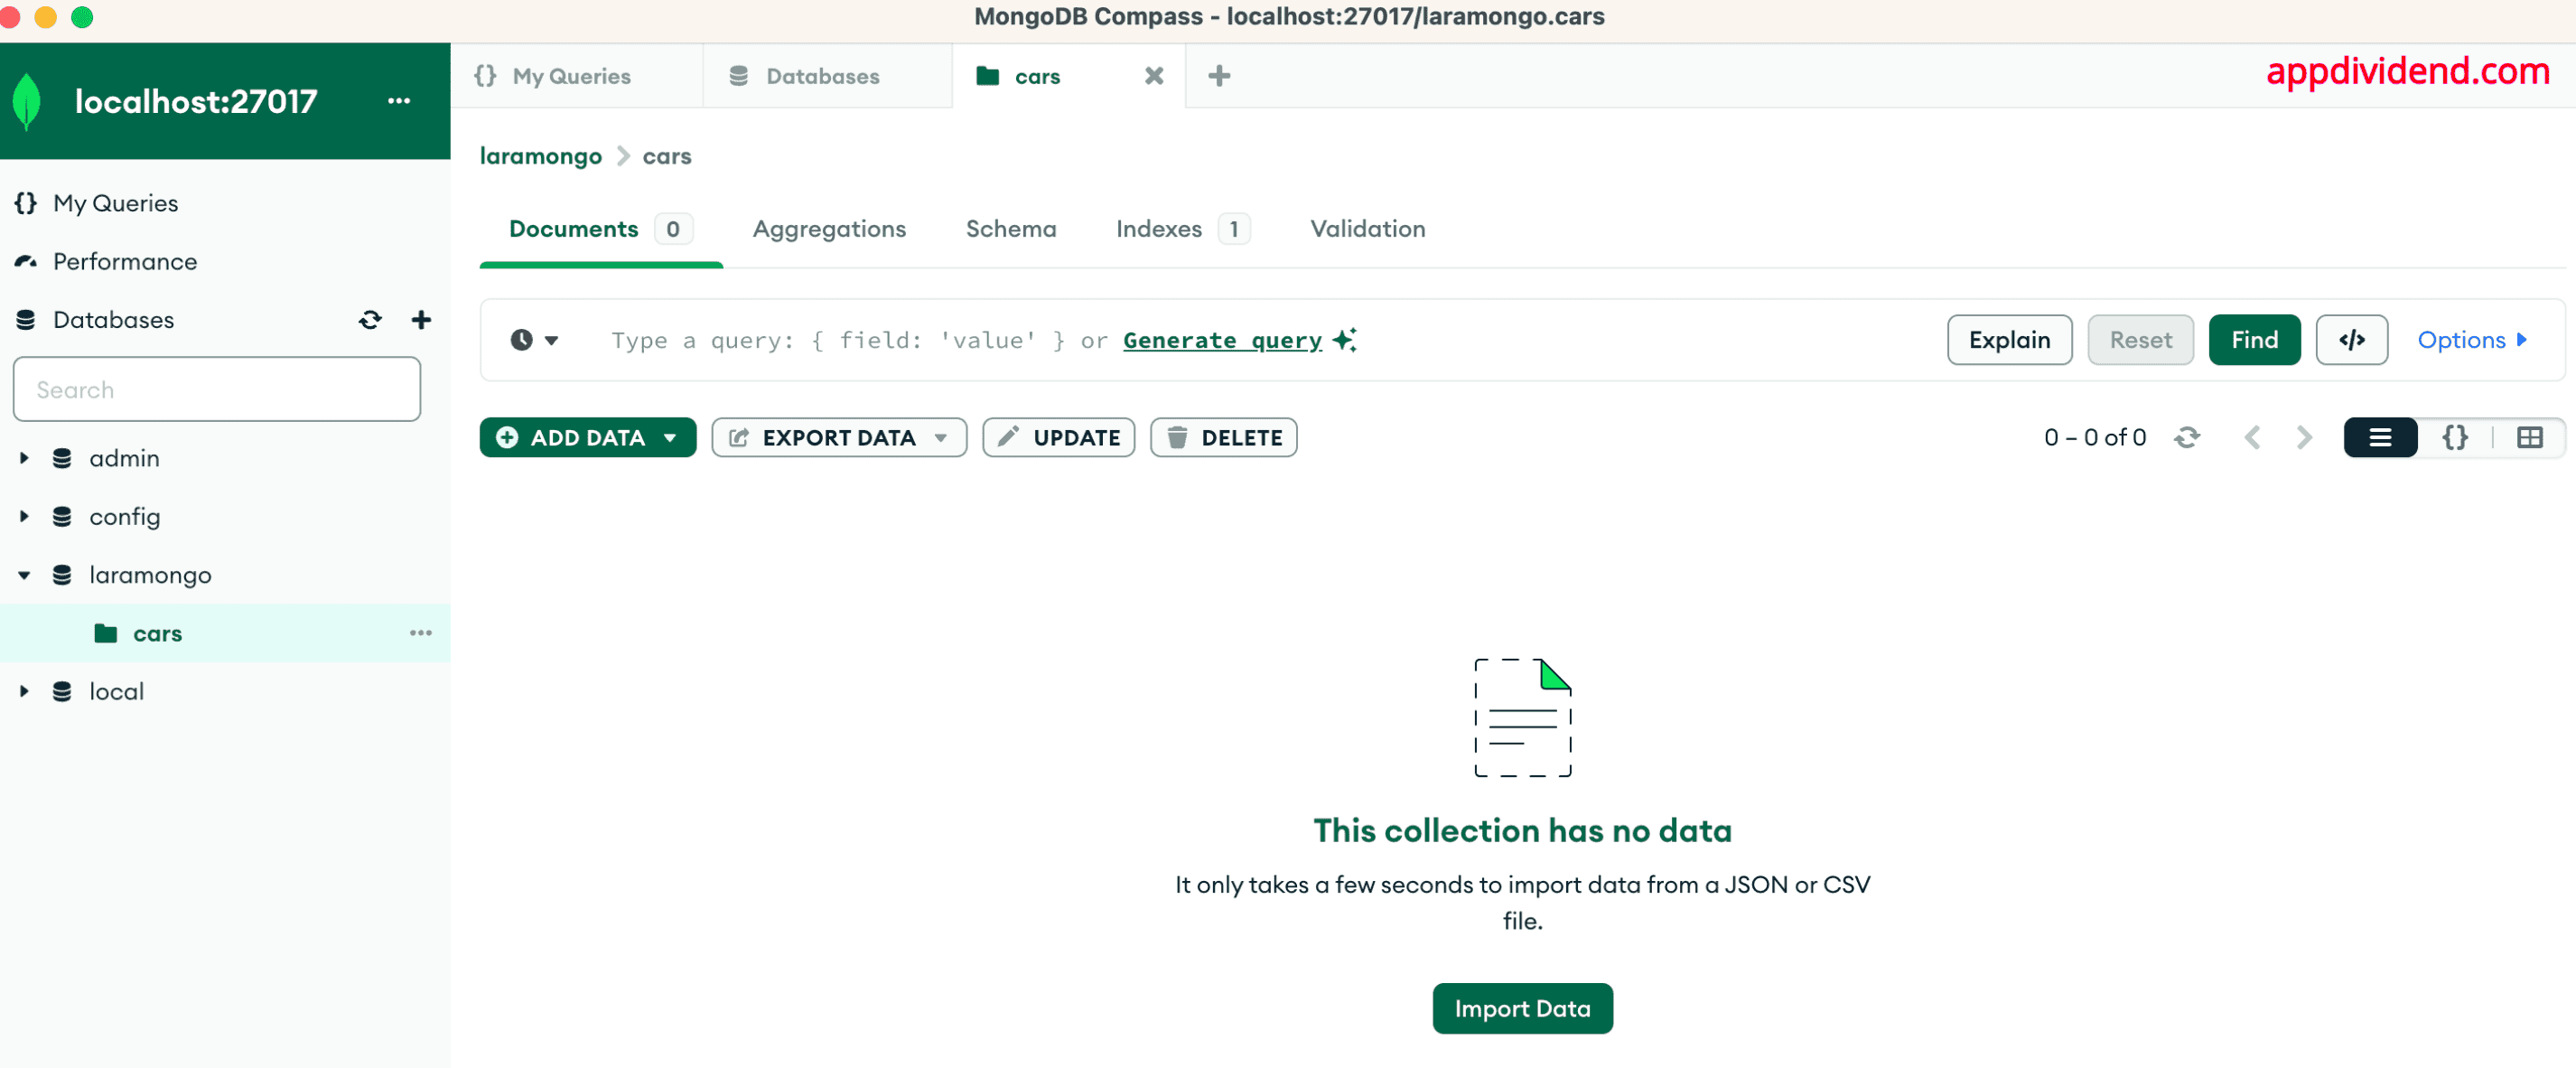
Head to the MongoDB Compass and see that the document has been deleted!
I have put the complete code on Github. Do check it out: Github Code
That’s it!

Amalendu kar
Thank you so much..
Krunal
Thanks mate!
Pawan sai
Which one will be the default page.
Krunal
The default page is not here in this app. You need to go to listing page. From then, you can add, update or delete the car details. This app is just a showcase of how to connect Laravel 11 application with MongoDB database.
Ahmad
thank you so much. this helps a lot
Krunal
Thank you mate!
Ankit
Thanks… It really helps.
Shasi Kanth Dulipalla
Very useful tutorial… thanks a lot for sharing..
Krunal
Thank you! Keep learning and sharing.
james
Thanks so much for this
Krunal
Thank you! Keep learning and sharing
Alaa
very useful and simple tutorial
Krunal
Yes, I have made it so simple and step-by-step so that anyone can find this tutorial helpful and easy to learn.
sepehr
very useful
Vaibhav Nadgonde
any idea how to configure laravel with mongo on ubuntu18.04?
Krunal
Yes, install the mongodb on ubuntu, start the mongodb server and connect it to laravel by placing its DB URI.
Jalal
“Class ‘MongoDB\Driver\Manager’ not found”
Mateus
Could you fix the issue about “Class ‘MongoDB\Driver\Manager’ not found”?
I’m having the same problem here
Krunal
I have updated this tutorial and now you can fix the issue easily!
mohamed ramdan
perfect thanks for this
Krunal
Thanks man!
Bai MaoLi
Great tutorial for beginner
Thanks.
Krunal
Yes, I have made it so easy so that it can help beginners!
Brenda Perez
Thank you so much
Krunal
Thanks!
gio
thanks a lot for sharing.. 😀
Ken
Thanks , works smoothly
Jose
Hi, I’m following the steps for the installation but when the jenssegers component was installed it gives me this error:
Warning: PHP Startup: Unable to load dynamic library ‘C:/laragon/bin/php/php-7.1.12-Win32-VC14-x64/ext\php_mongodb.dll’ – No se puede encontrar el modulo especificado.
I think it’s the route he’s using \ and not /
but I’m not sure and if that is not how to solve it.
I am sure that if the corresponding dll is in the correct one, if you could help me Thanks
I’m using w10 64, laravel 5.6
nilesh dabhi
thank you
fogang
thank you so much
moinkhan
which version of mongodb you shoud be used?
kabil
Please use version 1.6; when i used version 1.3 it throws me error
sunny
Call to a member function prepare() on null
Krunal
Make sure that your connection to the MongoDB is proper!
Sanjeet
Even after following the steps there will be configuration issue,
Just type following command before proceeding the steps
1. # sudo apt install php-pear
2. #sudo apt install php-dev
3. #sudo pecl install mongodb
Add a small code in .ini file (directory:Computer/etc/php/ph7.2/apache2/.ini) i’e
extension=mongodb.so
4. #sudo phpenmod mongodb
Krunal
Yes, configuring MongoDB with PHP is not easy but I have explained step-by-step, so any readers won’t get any error!
Galang Yoga
How to User::find() on nested collection ?
Krunal
I don’t understand your question. Can you please elaborate?
Deepraj
how t use where condition instead of find() .. such as Car::where(‘model’,220)->get(); …. its giving me empty array.
Krunal
May be your connection is not correctly established or there is no document in the mongodb database. Please try to add the document and make sure that your configurations are correct!
Haytham
How to interact with mongodb using laravel ?
Krunal
This tutorial is all about communicating between Laravel and MongoDB!
Ivan
How to use relationship in laravel with mongodb such as mysql?