

To use datepicker in React, you can use the “react-datepicker” package.
React datepicker is a simple and reusable component that can help you integrate the date and time picker with some custom functionality. If you need to use a locale other than the default en-US, you’ll also need to import that into your project from date-fns).
You must also require the CSS file from this package (or provide your own).
Step 1: Create a new React.js project
To create a new React Project, we will use the Vite template:
npm create vite@latest date-app -- --template react
Go inside the project folder “date-app” and install the dependencies using this command:
cd date-app

npm install
Also, install the Bootstrap 5 css using this command:
npm install bootstrap --save
Start the development server using this command:
npm run dev
Step 2: Install the react-datepicker
Here is the command to install the package in this project:
npm install react-datepicker --save
Also, install the react-icons using this command:
npm install react-icons --save
Modify the src/main.jsx file and import Bootstrap CSS, react-datepicker’s custom css like this:
import React from 'react'
import ReactDOM from 'react-dom/client'

import 'bootstrap/dist/css/bootstrap.min.css';
import "react-datepicker/dist/react-datepicker.css";
import "./index.css";

import App from './App.jsx'

ReactDOM.createRoot(document.getElementById('root')).render(
  <React.StrictMode>
    <App />
  </React.StrictMode>,
)
The src/index.css file looks like this:
/* Apply these styles to the body or a parent container to use flexbox for centering */
body {
  display: flex;
  justify-content: center;
  align-items: center;
  min-height: 100vh;
  margin: 0;
  background-color: #f8f9fa; /* Optional background color */
}

.datePickerWrapper {
  display: flex;
  align-items: center;
  padding: 10px;
  background-color: white;
  box-shadow: 0 4px 8px rgba(0, 0, 0, 0.1);
  border-radius: 4px;
}
Step 3: Create a basic datepicker
First, we need to import the DatePicker component from the ‘react-datepicker’ library:
import DatePicker from "react-datepicker";
Here, the DatePicker is a controller component.
We will define a state variable and update the state of the variable when we pick the date.
To update the state variable, we use the useState() hook, which is used inside the functional component.
Write the following code inside the “src/App.jsx” file:
import { useState } from "react";
import DatePicker from "react-datepicker";
import { FaCalendarAlt } from "react-icons/fa";

function App() {
  const [date, setDate] = useState(new Date());

  return (
    <div className="datePickerWrapper">
      <FaCalendarAlt className="datePickerIcon" />
      <DatePicker selected={date} onChange={(date) => setDate(date)} />
    </div>
  );
}

export default App;
Save this file, navigate to the browser, and go to this URL: http://localhost:5173/

In this example, we set the initial date as today’s date, which is 6th May 2024. We set a default date by passing a date value as an argument to the useState().
If you want to set the initial date as any date, you can pass that specific date to the useState hook.
You can also set a data from a date string:
const dateString = "2023-11-20";

const [date, setDate] = useState(new Date(dateString));

Select a range of dates
In real-life web applications, we have two date components:
- Start date
- End date
To select a range of dates using react-datepicker, you can utilize two DatePicker components and manage the start and end dates with the state. This enables users to pick a range’s beginning and ending dates.
Add the below code inside the src/index.css file:
/* Apply these styles to the body or a parent container to use flexbox for centering */
body {
    display: flex;
    justify-content: center;
    align-items: center;
    min-height: 100vh;
    margin: 0;
    background-color: #f8f9fa;
    /* Optional background color */
}

.datePickerWrapper {
    display: flex;
    align-items: center;
    justify-content: center;
    gap: 20px;
    /* Provides spacing between elements */
    padding: 20px;
    background-color: #fff;
    /* White background for the date picker area */
    box-shadow: 0 4px 8px rgba(0, 0, 0, 0.1);
    border-radius: 8px;
    margin-top: 20px;
}

.datePickerIcon {
    color: #495057;
    /* A neutral, dark gray color for the icons */
    cursor: pointer;
    font-size: 1.5rem;
    /* Makes the icon slightly larger */
}

/* Custom styles for react-datepicker */
.react-datepicker-wrapper {
    flex-grow: 1;
    /* Allows the date picker input to fill the space */
}

.react-datepicker__input-container {
    width: 100%;
    /* Ensures the input fills the container */
}

input {
    width: 100%;
    /* Full width */
    padding: 0.5rem 0.75rem;
    /* Padding inside the input */
    border: 1px solid #ced4da;
    /* A light grey border */
    border-radius: 0.25rem;
    /* Rounded corners */
    font-size: 1rem;
    /* Readable text size */
}

input:focus {
    border-color: #80bdff;
    /* Highlight color when focused */
    outline: none;
    /* Removes default focus outline */
    box-shadow: 0 0 0 0.2rem rgba(0, 123, 255, .25);
    /* Adds a subtle 'glow' effect on focus */
}
This is just for basic styling.
Add the below code inside src/App.jsx file:
import { useState } from "react";
import DatePicker from "react-datepicker";
import { FaCalendarAlt } from "react-icons/fa";

function App() {
  const [startDate, setStartDate] = useState(null);
  const [endDate, setEndDate] = useState(null);

  return (
    <div className="datePickerWrapper">
      <div>
        <FaCalendarAlt className="datePickerIcon" />
        <DatePicker
          selected={startDate}
          onChange={(date) => setStartDate(date)}
          selectsStart
          startDate={startDate}
          endDate={endDate}
          dateFormat="MMMM d, yyyy"
          placeholderText="Start date"
        />
      </div>
      <div>
        <FaCalendarAlt className="datePickerIcon" />
        <DatePicker
          selected={endDate}
          onChange={(date) => setEndDate(date)}
          selectsEnd
          startDate={startDate}
          endDate={endDate}
          minDate={startDate}
          dateFormat="MMMM d, yyyy"
          placeholderText="End date"
        />
      </div>
    </div>
  );
}

export default App;
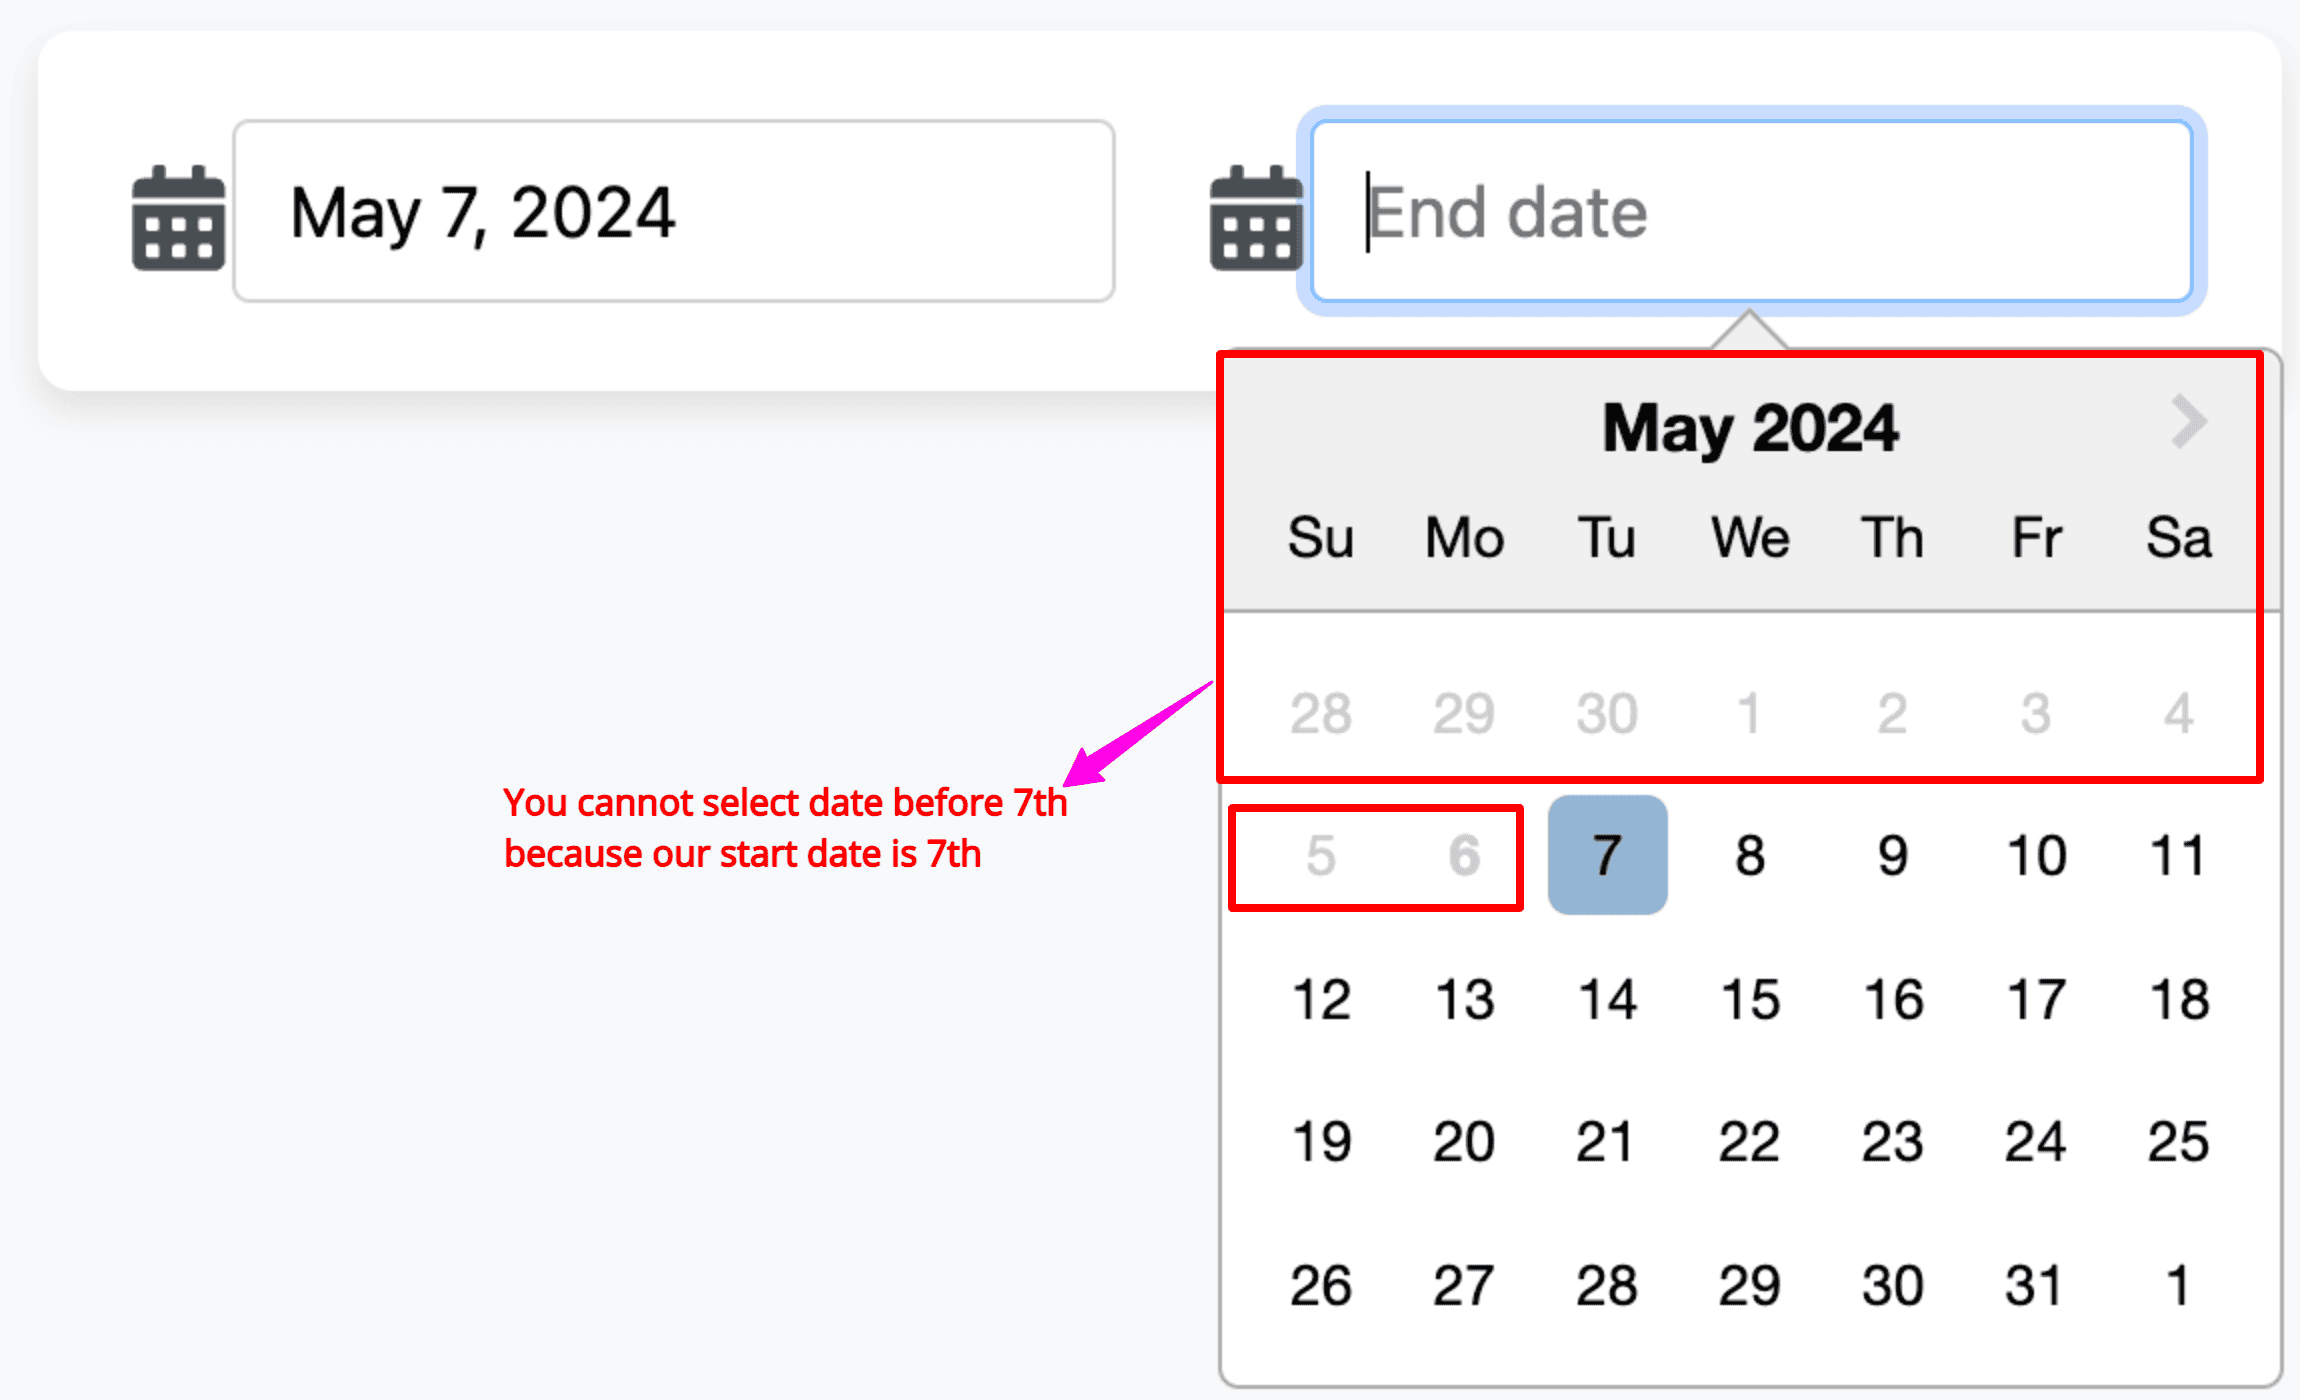
In this code, we defined two state variables for two date components:
- startDate
- endDate
When the user selects the startDate and endDate, the value of these state variables will be updated using the useState hook.
The startDate and endDate props ensure they know each other’s selected dates. This is important for enabling proper functionality, such as disabling end dates before the start date.
The minDate prop on the end date picker(second datepicker) ensures that no date before the startDate can be selected.
Selecting time
You can configure the DatePicker component to show a DateTime selection UI.
import { useState } from "react";
import DatePicker from "react-datepicker";
import { FaCalendarAlt } from "react-icons/fa";

function App() {
  const [dateTime, setDateTime] = useState(new Date());

  return (
    <div className="datePickerWrapper">
      <FaCalendarAlt className="datePickerIcon" />
      <DatePicker
        selected={dateTime}
        onChange={(date) => setDateTime(date)}
        showTimeSelect
        timeFormat="HH:mm"
        timeIntervals={15}
        timeCaption="time"
        dateFormat="MMMM d, yyyy h:mm aa"
      />
    </div>
  );
}

export default App;
In this code, we added a prop called “showTimeSelect” that displays a time for a user to select.
Set the timeIntervals prop to show 15-minute or 5-minute intervals instead.
The minTime and maxTime props allow you to turn off times before or after a specific time.
You can define your date and time format by passing the “dateFormat” property. Adjust this format based on how you want users to view the selected date and time.
The timeCaption labels for the time section of the datetime picker.

Implementing a Range with Time Selection
import { useState } from "react";
import DatePicker from "react-datepicker";
import { FaCalendarAlt } from "react-icons/fa";

function App() {
  const [startDateTime, setStartDateTime] = useState(new Date());
  const [endDateTime, setEndDateTime] = useState(new Date());

  return (
    <div className="datePickerWrapper">
      <div>
        <FaCalendarAlt className="datePickerIcon" />
        <DatePicker
          selected={startDateTime}
          onChange={(date) => setStartDateTime(date)}
          selectsStart
          startDate={startDateTime}
          endDate={endDateTime}
          showTimeSelect
          timeFormat="HH:mm"
          timeIntervals={15}
          timeCaption="Start Time"
          dateFormat="MMMM d, yyyy h:mm aa"
        />
      </div>
      <div>
        <FaCalendarAlt className="datePickerIcon" />
        <DatePicker
          selected={endDateTime}
          onChange={(date) => setEndDateTime(date)}
          selectsEnd
          startDate={startDateTime}
          endDate={endDateTime}
          minDate={startDateTime}
          showTimeSelect
          timeFormat="HH:mm"
          timeIntervals={15}
          timeCaption="End Time"
          dateFormat="MMMM d, yyyy h:mm aa"
        />
      </div>
    </div>
  );
}

export default App;
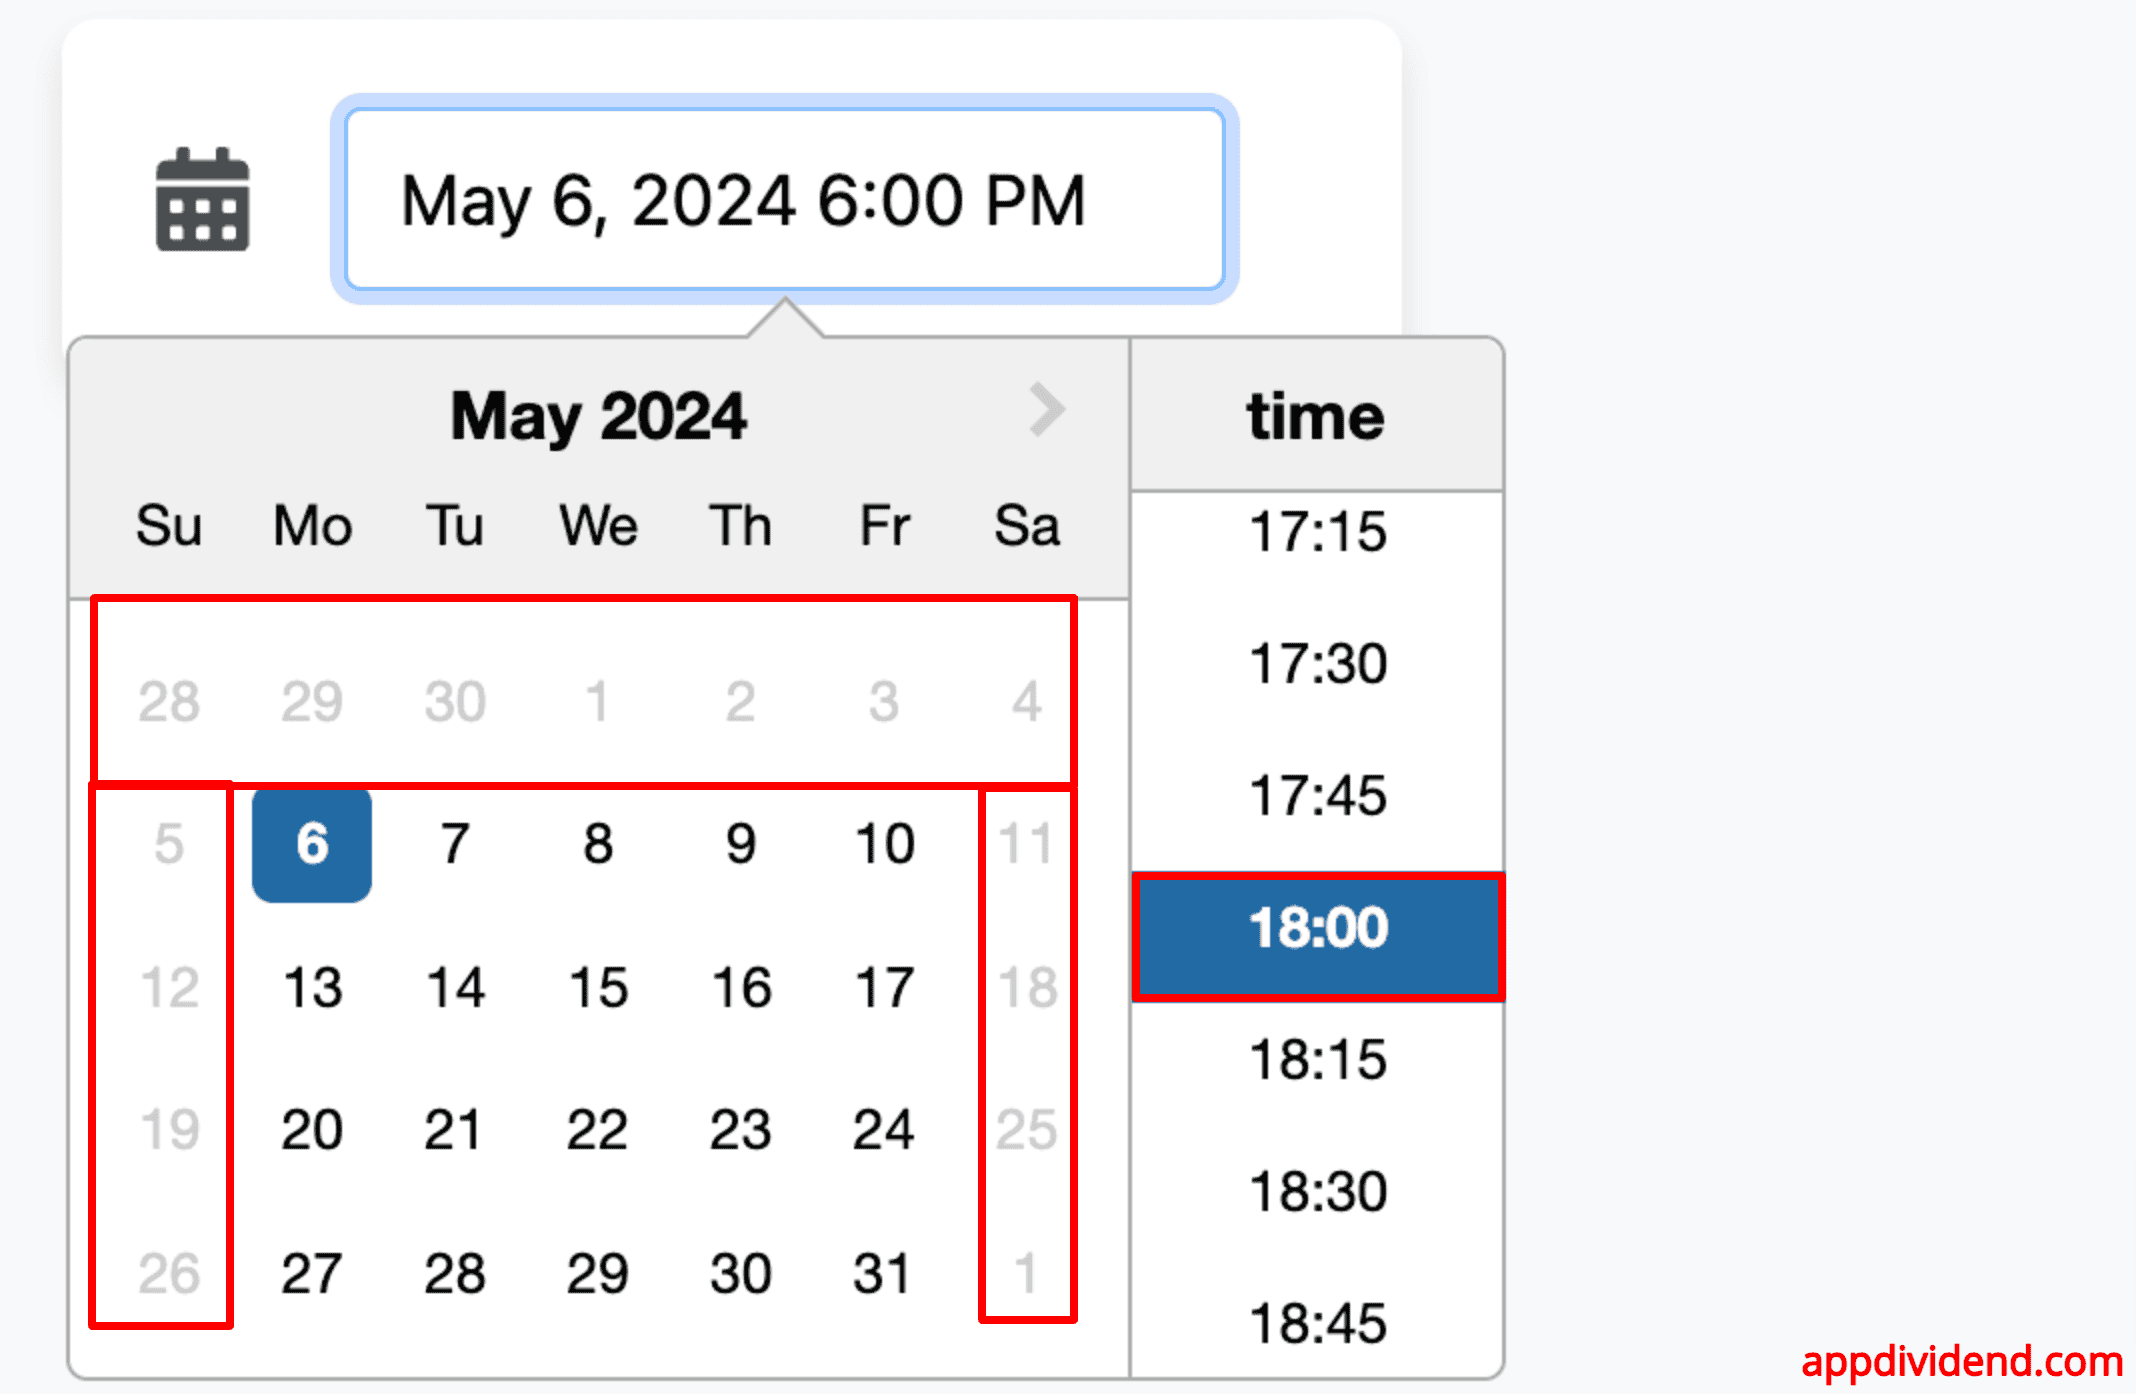
Here is what it looks like:

This setup ensures that both the start and end times can be selected with respect to the date.
This range of time selection is helpful in event scheduling, booking systems, or any application where the exact timing of an event’s start and end time is crucial.
Conditionally disable dates
To conditionally disable dates in the react-datepicker component, you can use the excludeDates or filterDate prop.
The filterDate prop is particularly useful as it allows you to specify a function determining whether each date should be enabled or disabled.
import { useState } from "react";
import DatePicker from "react-datepicker";
import { FaCalendarAlt } from "react-icons/fa";

function App() {
  const [dateTime, setDateTime] = useState(new Date());
  const isWeekday = (date) => {
    const day = date.getDay();
    return day !== 0 && day !== 6;
  };

  const holidays = [
    new Date(new Date().getFullYear(), 0, 1),
    new Date(new Date().getFullYear(), 11, 25),
  ];

  const isNotHoliday = (date) => {
    return !holidays.some(
      (holiday) =>
        date.getDate() === holiday.getDate() &&
        date.getMonth() === holiday.getMonth()
    );
  };

  const filterDate = (date) => {
    return isWeekday(date) && isNotHoliday(date);
  };

  return (
    <div className="datePickerWrapper">
      <FaCalendarAlt className="datePickerIcon" />
      <DatePicker
        selected={dateTime}
        onChange={(date) => setDateTime(date)}
        showTimeSelect
        timeFormat="HH:mm"
        timeIntervals={15}
        timeCaption="time"
        dateFormat="MMMM d, yyyy h:mm aa"
        minDate={new Date()}
        filterDate={filterDate}
      />
    </div>
  );
}

export default App;
Adjust the holidays array and filtering logic as needed for your particular use case.
That’s all!

John
The first example with date thx…
raftar2097
it doesnt work dont
edd
doesnt work. feil in node_modules
Srikanth
Kunal I want the tutorial for React Datepicker only for time. please help me.
TJ VanToll
If you’re looking for other DatePicker options check out the KendoReact DatePicker: https://www.telerik.com/kendo-react-ui/components/dateinputs/datepicker/. It’s simple to use and has some pretty advanced extensibility options as well ?