

To create a form validation in express, use the “express-validator” package. We will create a form and send the POST request to the server, and if the request fails against the validation, it will respond with an error message.
Here is the step-by-step guide to form data validation in Node.js with express-validator.
Step 1: Create an express project
Create a new project directory called validation-app using the below command:
mkdir validation-app

cd validation-app
Install the express-validator and other various packages using this command:
npm install express hbs expression-session express-validator body-parser cookie-parser
Step 2: Importing ES Module
To use ES Modules instead of require, use the type:module in the package.json file:
{
  "type": "module",
  "dependencies": {
    "body-parser": "^1.20.2",
    "express": "^4.19.2",
    "express-session": "^1.18.0",
    "express-validator": "^7.1.0",
    "hbs": "^4.2.0"
  }
}
Step 3: Create a Node.js server
Create a server.js file in a root folder. The server.js file will always first run because it creates a server for us, and we are using express, so add the following code in the server.js file.
import express from 'express';

const PORT = 4000;

const app = express();

app.listen(PORT, () => {
    console.log('Server is running on port 4000');
});
Step 4: Install Handlebars Templating Engine
We have already installed the handlebars library. Now, we need to configure that template engine to use it.
Create a public and views folder inside the project folder root. Inside the views folder, create the partials folder.
Set the templating engine for the express project. Type the following code in the server.js file.
// server.js

import express from 'express';

import path from 'path';
import hbs from 'hbs';
import { fileURLToPath } from 'url';
import { dirname } from 'path';

const PORT = 4000;

const app = express();

// Resolve __dirname equivalent in ESM
const __filename = fileURLToPath(import.meta.url);
const __dirname = dirname(__filename);

// Set up the view engine
app.set('view engine', 'hbs');
app.set('views', path.join(__dirname, 'views'));
hbs.registerPartials(path.join(__dirname, 'views/partials'));

// Define the root route
app.get('/', (req, res) => {
    res.render('index', { title: 'Home' });
});

app.listen(PORT, () => {
    console.log('Server is running on port 4000');
});
In this code, we included a handlebars templating engine and defined the public directory as a static directory.
Step 5: Configure the express-validator module.
The body-parser module parses the incoming request data. The express-session module stores session data, such as error and success messages.
Add the following code inside the server.js file.
// server.js

import bodyParser from 'body-parser';

// Middleware setup
app.use(bodyParser.urlencoded({ extended: true }));
app.use(bodyParser.json());
We used express-validator as a middleware function. It will help to check the input against the validation.
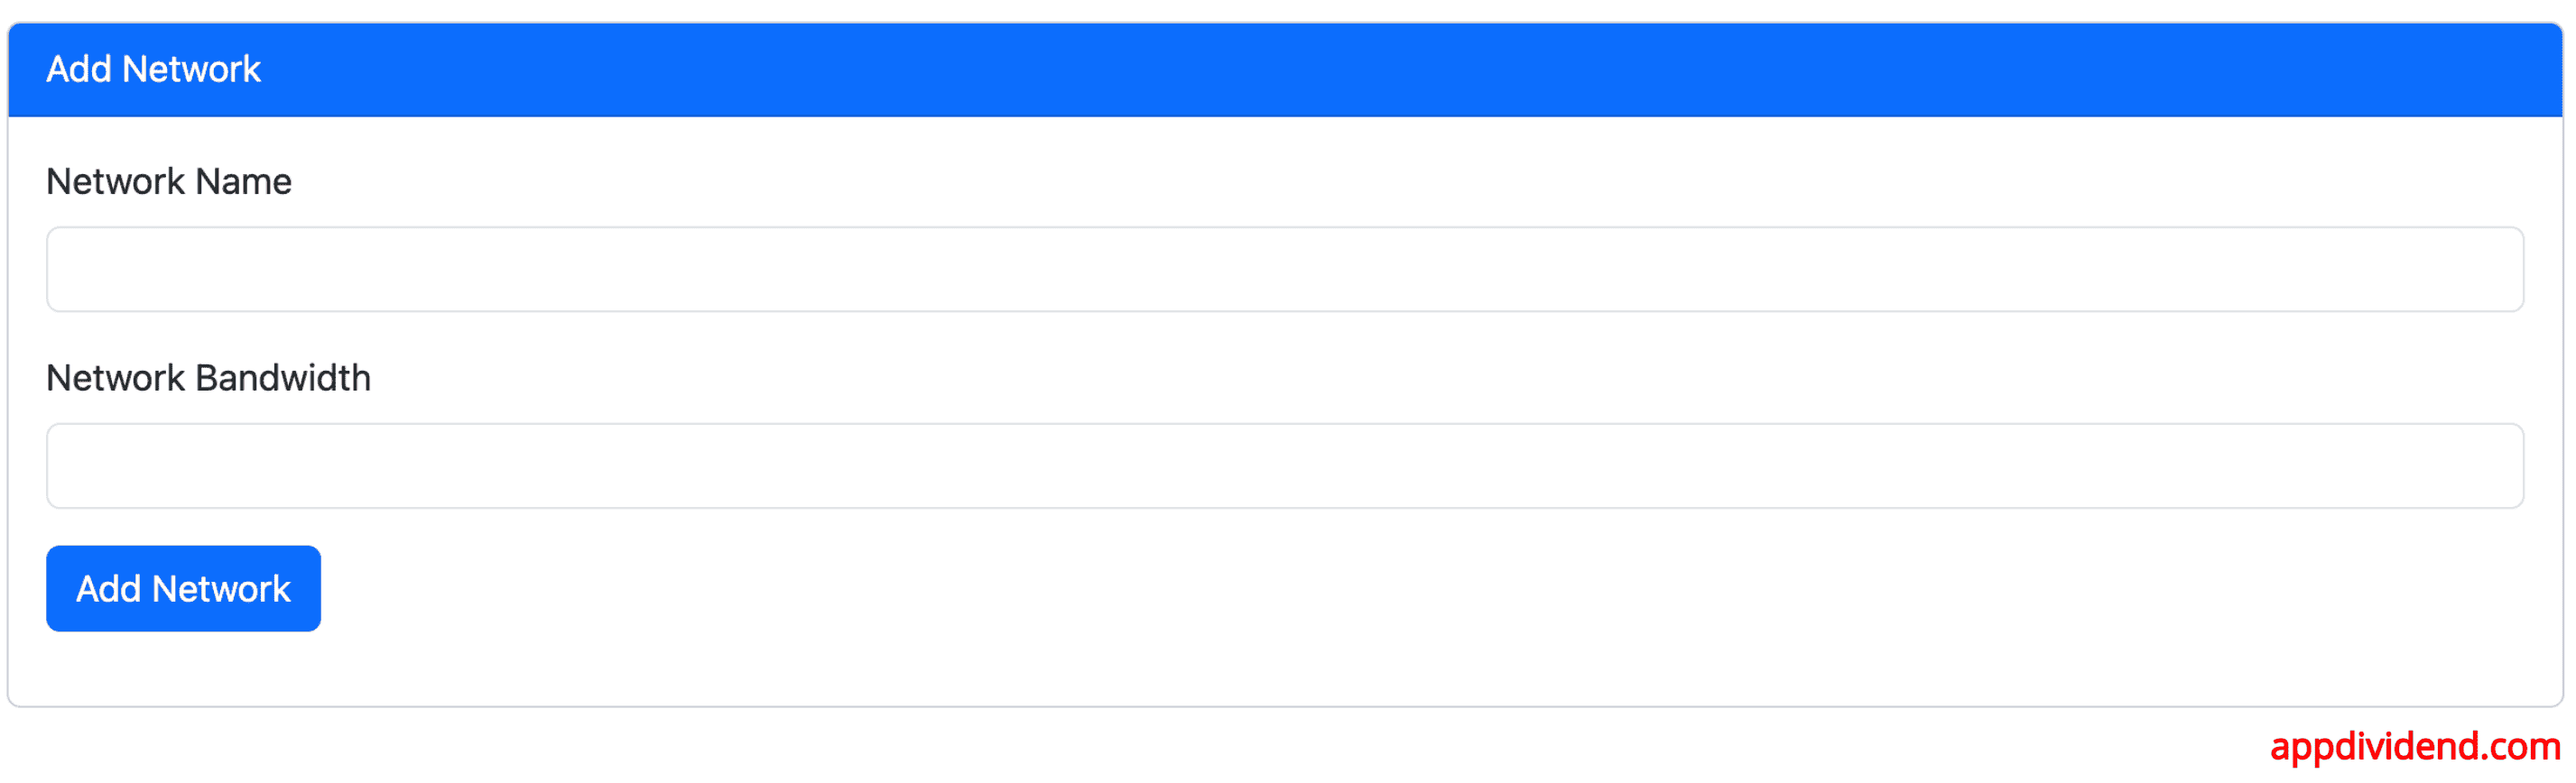
Step 6: Create a bootstrap form.
In the views folder, create a file called a blockchain.hbs and add the code below to it.
<html lang="en">
  <head>
    <title>Add Network</title>
    <link
      href="https://cdn.jsdelivr.net/npm/bootstrap@5.3.0/dist/css/bootstrap.min.css"
      rel="stylesheet"
    />
  </head>
  <body>
    <div class="container mt-5">
      <div class="card">
        <div class="card-header bg-primary text-white">
          Add Network
        </div>
        <div class="card-body">
          <form method="post" action="/blockchain/post">
            <div class="mb-3">
              <label class="form-label">Network Name</label>
              <input type="text" class="form-control" name="name" />
            </div>
            <div class="mb-3">
              <label class="form-label">Network Bandwidth</label>
              <input type="text" class="form-control" name="bandwidth" />
            </div>
            <div class="mb-3">
              <button type="submit" class="btn btn-primary">Add Network</button>
            </div>
          </form>
        </div>
      </div>
    </div>
  </body>
</html>
We need to render this file but have not yet defined the routes, so let’s do that.
Step 7: Define an Express Router for our application.
Create a routes folder in the root. In that folder, create one file called blockchain.route.js and add the below code.
// blockchain.routes.js

import express from 'express';

const router = express.Router();

router.get('/', (req, res) => {
   res.render('blockchain');
});

export default router;
Next, import this route file into the server.js file.
// server.js

import blockchainRouter from './routes/blockchain.route.js';

// Use the blockchain router
app.use('/blockchain', blockchainRouter);
Step 8: Define the validations.
First, we need to handle the GET and POST requests. So, let’s define our application’s post route.
Add the below code inside the blockchain.route.js file:
// blockchain.route.js

import express from 'express';
import { check, validationResult } from 'express-validator';

const router = express.Router();

router.get('/', (req, res) => {
    res.render('blockchain', { success: req.session.success, errors: req.session.errors });
    req.session.errors = null;
    req.session.success = null;
});

router.post('/post', [
    check('name', 'Name is required').notEmpty(),
    check('bandwidth', 'Bandwidth is required').notEmpty()
], (req, res) => {
    const errors = validationResult(req);
    if (!errors.isEmpty()) {
        req.session.errors = errors.array();
        req.session.success = false;
        res.redirect('/blockchain');
    } else {
        req.session.success = true;
        res.redirect('/');
    }
});

export default router;
First, it checks the name property from the request object, which should not be empty. Then, it monitors bandwidth, which should not be empty.
If any of them fails against Validation, all the validation errors are stored in the errors variable.
If the errors variable is not empty, it will redirect us to the form page with the errors. Otherwise, redirect to the home route. Also, define the form action. We need to give this post route to catch the submitted values.
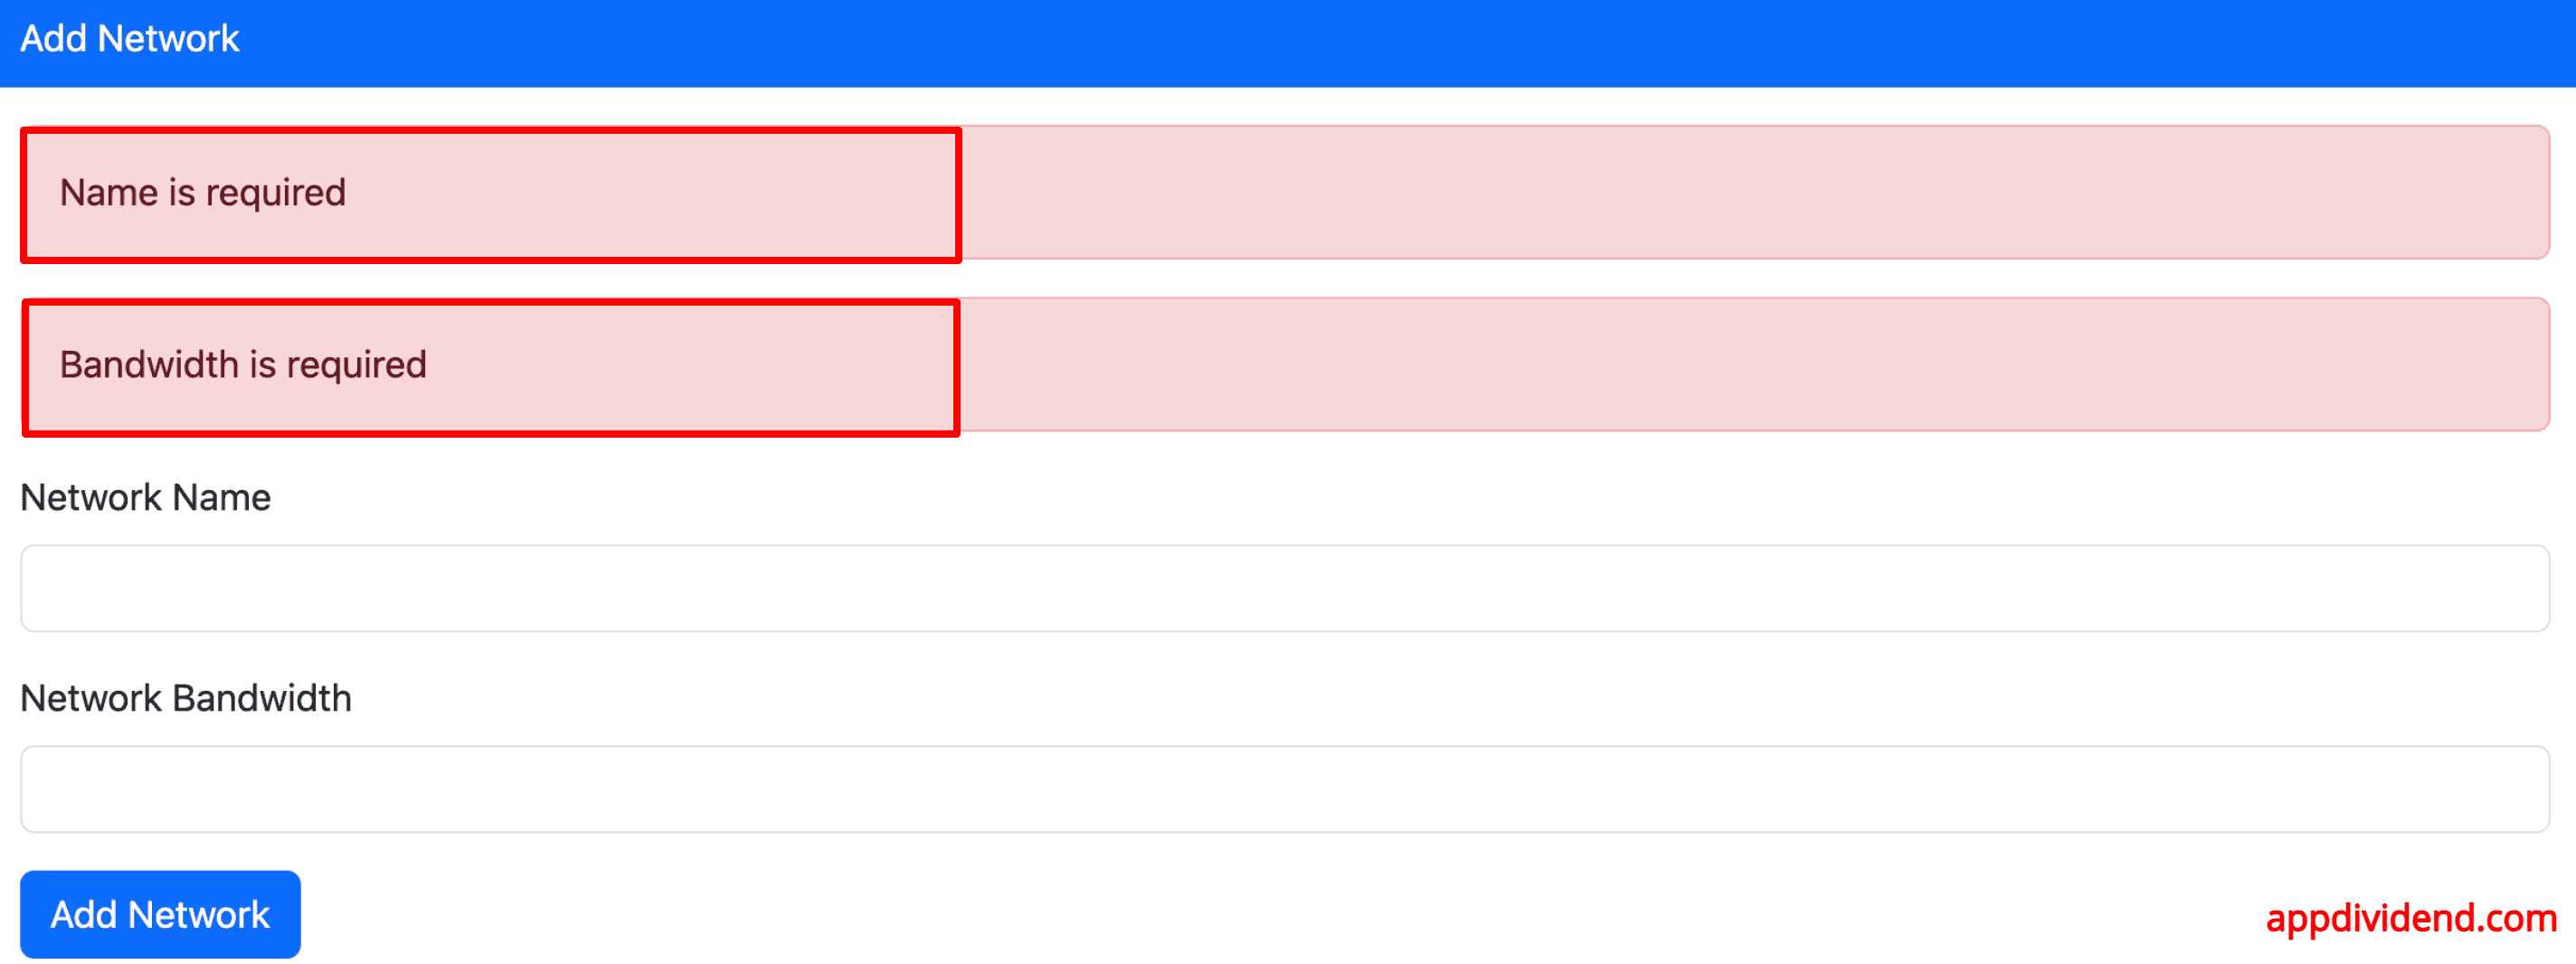
If you submit the form without any values, it will redirect back to the errors. However, I have not displayed any errors until now. So let us do that.
Step 9: Display the errors.
In the blockchain.hbs file, write the following code after the container class to display the errors.
{{#if errors}}
    {{#each errors}}
          <p class="alert alert-danger">{{this.msg}}</p>
    {{/each}}
{{/if}}
We used handlebars, so its syntax is like the above. If there are errors, we can access its property message, which has all of our validation messages.
The express-validator function will set the msg property for us. We need to put that errors object into a session and then display it on the front.
The complete code for blockchain.hbs file looks like this:
<html lang="en">
  <head>
    <title>Add Network</title>
    <link
      href="https://cdn.jsdelivr.net/npm/bootstrap@5.3.0/dist/css/bootstrap.min.css"
      rel="stylesheet"
    />
  </head>
  <body>
    <div class="container mt-5">
      <div class="card">
        <div class="card-header bg-primary text-white">
          Add Network
        </div>
        <div class="card-body">
          {{#if errors}}
            {{#each errors}}
              <p class="alert alert-danger">{{this.msg}}</p>
            {{/each}}
          {{/if}}
          <form method="post" action="/blockchain/post">
            <div class="mb-3">
              <label class="form-label">Network Name</label>
              <input type="text" class="form-control" name="name" />
            </div>
            <div class="mb-3">
              <label class="form-label">Network Bandwidth</label>
              <input type="text" class="form-control" name="bandwidth" />
            </div>
            <div class="mb-3">
              <button type="submit" class="btn btn-primary">Add Network</button>
            </div>
          </form>
        </div>
      </div>
    </div>
  </body>
</html>
And finally, the server.js file looks like this:
import express from 'express';
import session from 'express-session';
import bodyParser from 'body-parser';
import path from 'path';
import hbs from 'hbs';
import { fileURLToPath } from 'url';
import { dirname } from 'path';

import blockchainRouter from './routes/blockchain.route.js';

const PORT = 4000;

const app = express();

// Middleware setup
app.use(bodyParser.urlencoded({ extended: true }));
app.use(bodyParser.json());

// Resolve __dirname equivalent in ESM
const __filename = fileURLToPath(import.meta.url);
const __dirname = dirname(__filename);

app.use(session({
    secret: 'krunal', // Replace with a secure secret key
    resave: false,
    saveUninitialized: true,
    cookie: { secure: false } // Set to true if using HTTPS
}));

// Set up the view engine
app.set('view engine', 'hbs');
app.set('views', path.join(__dirname, 'views'));
hbs.registerPartials(path.join(__dirname, 'views/partials'));

// Use the blockchain router
app.use('/blockchain', blockchainRouter);

// Define the root route
app.get('/', (req, res) => {
    res.render('index', { title: 'Home' });
});

app.listen(PORT, () => {
    console.log('Server is running on port 4000');
});
Step 10: Running the application
Go to the terminal and start the development server:
node server

Server is running on port 4000
Go to this URL: http://localhost:4000/blockchain
If you don’t fill the Network name and Network bandwidth, you will get the error like this:
If you fill out the details correctly, you will see the home route like this:

That’s it.

Jan Kuchar
This is straight forward and I’ve done this. I wonder if there is an easy way to make a good use of Bootstrap’s ‘is-invalid’ classes with validation errlr message right under the input. We’d need some way to identify each error and then check for that error in temllate. Is it possible with express-validator?
Chandana Kithalagama
express-validator v3 has an alternative way to define validation. Worth check that out as it may match your specific requirements and tastes.
https://www.npmjs.com/package/express-validator
Rapsan jani
This tutorial is really useful. It works well. and I have got the best way from these tutorials. So, Thanks for sharing the knowledge.
Avinash Kumar
This tutorial is really useful. It works well. and I have got the best way from these tutorials. So, Thanks for sharing the knowledge in express-validator package in node js.