
Here is the step-by-step guide to uploading and removing multiple images in Laravel 11 using the Dropzone library.
Step 1: Create a Laravel Project
composer create-project --prefer-dist laravel/laravel dropzonefileupload
Go inside the project.
cd dropzonefileupload
Step 2: Set up a MySQL database
Set up the database in the .env file.
DB_CONNECTION=mysql
DB_HOST=127.0.0.1
DB_PORT=8889
DB_DATABASE=dropzonefileupload
DB_USERNAME=root
DB_PASSWORD=root
Step 3: Install jQuery, Dropzone, and laravel/ui package
Open the terminal or CMD in the root of your Laravel project and install the laravel/ui package.
composer require laravel/ui
Add the Bootstrap scaffolding using laravel/ui:
php artisan ui bootstrap
Install the jQuery and dropzone using this command:
npm install jquery dropzone
Go to the resources >> js >> app.js file and add the below code:
// app.js

import './bootstrap';

import $ from 'jquery';

window.jQuery = window.$ = $;

// Import Dropzone
import Dropzone from "dropzone";

window.Dropzone = Dropzone;

// Optional: Import Dropzone CSS if you want to use the default styling
import "dropzone/dist/dropzone.css";
In this code, you can see that we imported jQuery, dropzone.js, and dropzone.css files.
Save this file, go to the CMD or terminal, and install the remaining assets.
npm install
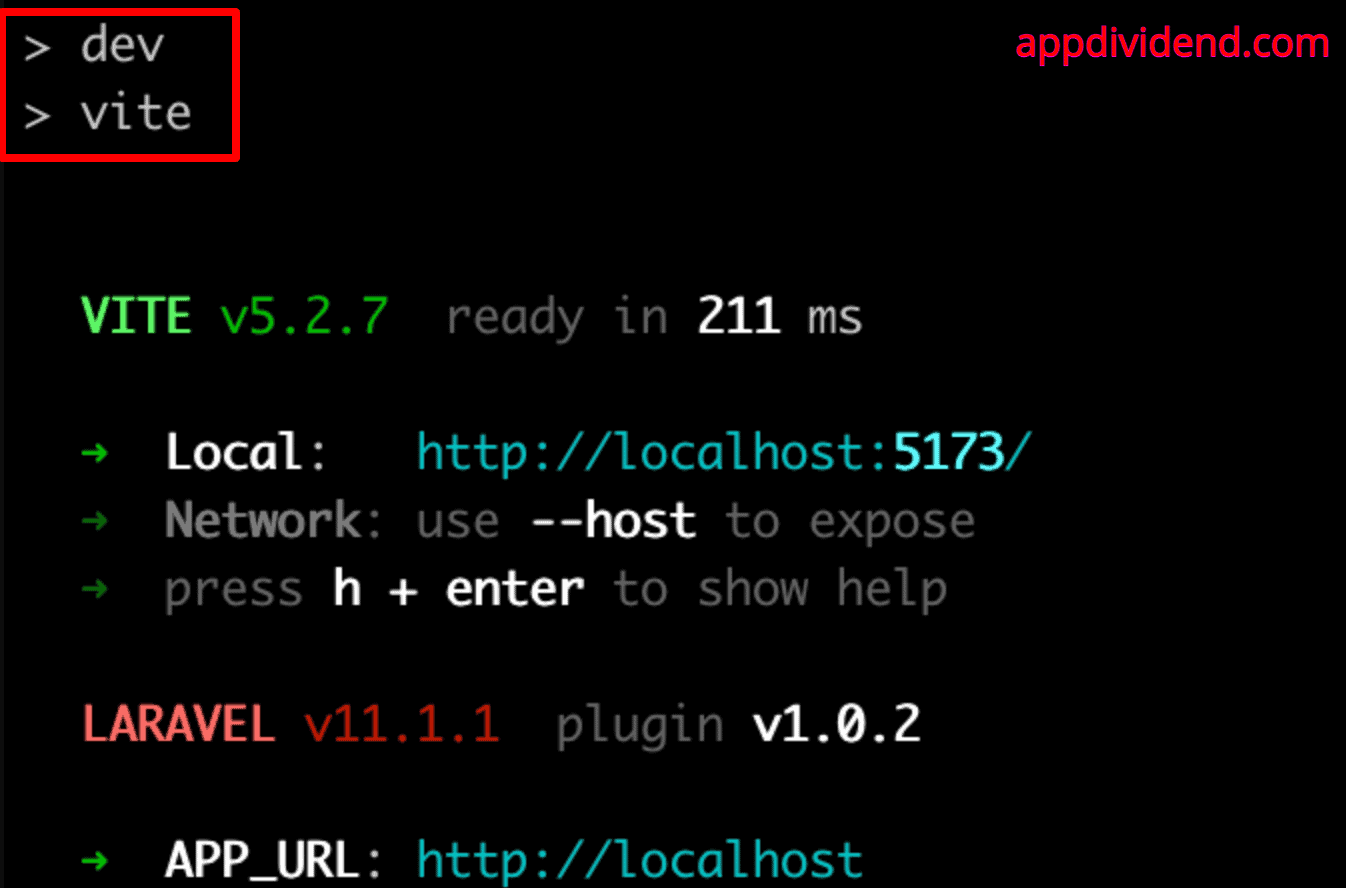
Now, compile all the CSS and JS assets by running this command:
npm run dev
It will start the vite development server that will create assets that we will use in our Laravel application.
Step 4: Create a model and migration file
Type the following command in your cmd.
php artisan make:model ImageUpload -m
It will create two files.
- ImageUpload.php model.
- create__image_uploads_table migration file.
We need to create a Schema for the image upload table. So navigate to Laravel >> database >> migrations >> create__image_uploads_table.
<?php

use Illuminate\Database\Migrations\Migration;
use Illuminate\Database\Schema\Blueprint;
use Illuminate\Support\Facades\Schema;

return new class extends Migration
{
    /**
     * Run the migrations.
     */
    public function up(): void
    {
        Schema::create('image_uploads', function (Blueprint $table) {
            $table->id();
            $table->text('filename');
            $table->timestamps();
        });
    }

    /**
     * Reverse the migrations.
     */
    public function down(): void
    {
        Schema::dropIfExists('image_uploads');
    }
};
Go to the terminal and migrate all the files into the database tables by typing this command:
php artisan migrate
Step 5: Create a Controller file.
You can create a Controller using this command:
php artisan make:controller ImageUploadController
Create two functions inside the ImageUploadController.php file:
<?php

namespace App\Http\Controllers;

use Illuminate\Http\Request;
use App\Models\ImageUpload;

class ImageUploadController extends Controller
{
    public function store(Request $request)
    {
    }

    public function destroy(Request $request)
    {
    }
}
We will add the code in both of the functions later!
Let’s register the routes for these functions. Open the routes >> web.php file and add the below code.
<?php

// web.php

use Illuminate\Support\Facades\Route;
use App\Http\Controllers\ImageUploadController;

Route::get('/', function () {
    return view('welcome');
});

Route::post('image/upload/store', [ImageUploadController::class, 'store']);
Route::post('image/delete', [ImageUploadController::class, 'destroy']);
Step 6: Add a web form
For this small project, we will use the default welcome.blade.php file.
Add the below code inside the welcome.blade.php file.
<!DOCTYPE html>
<html lang="en">
<head>
    <meta charset="UTF-8">
    <meta name="viewport" content="width=device-width, initial-scale=1.0">
    <meta http-equiv="X-UA-Compatible" content="ie=edge">
    <meta name="_token" content="{{csrf_token()}}" />
    <title>Laravel Dropzone File Upload</title>
    @vite(['resources/sass/app.scss', 'resources/js/app.js'])
</head>
<body>
    <div class="container">
        <h3>Laravel Multiple Images Upload Using Dropzone</h3>
        <form method="post" action="{{ url('image/upload/store') }}" enctype="multipart/form-data"
            class="dropzone" id="dropzone">
            @csrf
        </form>
    </div>
    <script type="module">
        $(document).ready(function() {
            new Dropzone('#dropzone', {
            });
        });
    </script>
</body>
</html>
In this file, we used the @vite directive to include all the local assets in our Laravel application.
Make sure to add the @vite directive inside the <head> tag.
Save this file, go to the terminal, and start the laravel development server using this command:
php artisan serve
Go to this URL: http://localhost:8000/
You will see the input form field to upload multiple images like this:

Step 7: Configure Dropzone
Let’s write a JavaScript code to send an image to the Laravel server, upload it, and save the name into the database.
Add the code below inside the welcome.blade.php file.
In the file above, we are appending configuration options for Dropzone.
You can find any of the configuration options available in the Dropzone documentation.
Make sure to add the below code inside the <body> tag:
<script type="module">
        $(document).ready(function() {
            new Dropzone('#dropzone', {
                maxFilesize: 12,
                renameFile: function(file) {
                    var dt = new Date();
                    var time = dt.getTime();
                    return time+file.name;
                },
                acceptedFiles: ".jpeg,.jpg,.png,.gif",
                addRemoveLinks: true,
                timeout: 5000,
                success: function(file, response)
                {
                    console.log(response);
                },
                error: function(file, response)
                {
                    return false;
                }
            });
        });
</script>
Let’s go through each option.
- maxFilesize is set to 12. Dropzone will only allow images with a size of less than 12MB. You can make it smaller or higher based on your requirements.
- renameFile function invoked before the file is uploaded to the server and renames the file.
-
acceptedFiles checks the file’s mime type or extension against this list. We define .jpeg,.jpg,.png,.gif. You can change it based on your needs.
- addRemoveLinks is set to true. Dropzone will display the Remove button to remove our uploaded file.
- timeout is set to 5000
After adding the above code, our welcome.blade.php file looks like this:
// welcome.blade.php

<!DOCTYPE html>
<html lang="en">
<head>
    <meta charset="UTF-8">
    <meta name="viewport" content="width=device-width, initial-scale=1.0">
    <meta http-equiv="X-UA-Compatible" content="ie=edge">
    <meta name="_token" content="{{csrf_token()}}" />
    <title>Laravel Dropzone File Upload</title>
    @vite(['resources/sass/app.scss', 'resources/js/app.js'])
</head>
<body>
    <div class="container">
        <h3>Laravel Multiple Images Upload Using Dropzone</h3>
        <form method="post" action="{{ url('image/upload/store') }}"
            enctype="multipart/form-data"
            class="dropzone" id="dropzone">
            @csrf
        </form>
    </div>
    <script type="module">
        $(document).ready(function() {
            new Dropzone('#dropzone', {
                maxFilesize: 12,
                renameFile: function(file) {
                    var dt = new Date();
                    var time = dt.getTime();
                    return time+file.name;
                },
                acceptedFiles: ".jpeg,.jpg,.png,.gif",
                addRemoveLinks: true,
                timeout: 5000,
                success: function(file, response)
                {
                    console.log(response);
                },
                error: function(file, response)
                {
                    return false;
                }
            });
        });
    </script>
</body>
</html>
Step 8: Upload and save the multiple files on the server
We need to code the store() function to upload multiple files on the server and save the names into the database.
public function store(Request $request)
{
        $image = $request->file('file');
        $imageName = $image->getClientOriginalName();
        $image->move(public_path('images'), $imageName);

        $imageUpload = new ImageUpload();
        $imageUpload->filename = $imageName;
        $imageUpload->save();
        return response()->json(['success' => $imageName]);
}
The store() function uploads all the input images to the “public/images” folder and saves the name into the database.
Go to this http://localhost:8000/ and upload multiple images, and you will see something like this:

You can see that we uploaded five images to the server.
Now, to verify whether the images are uploaded to the public/images directory, go to the directory.
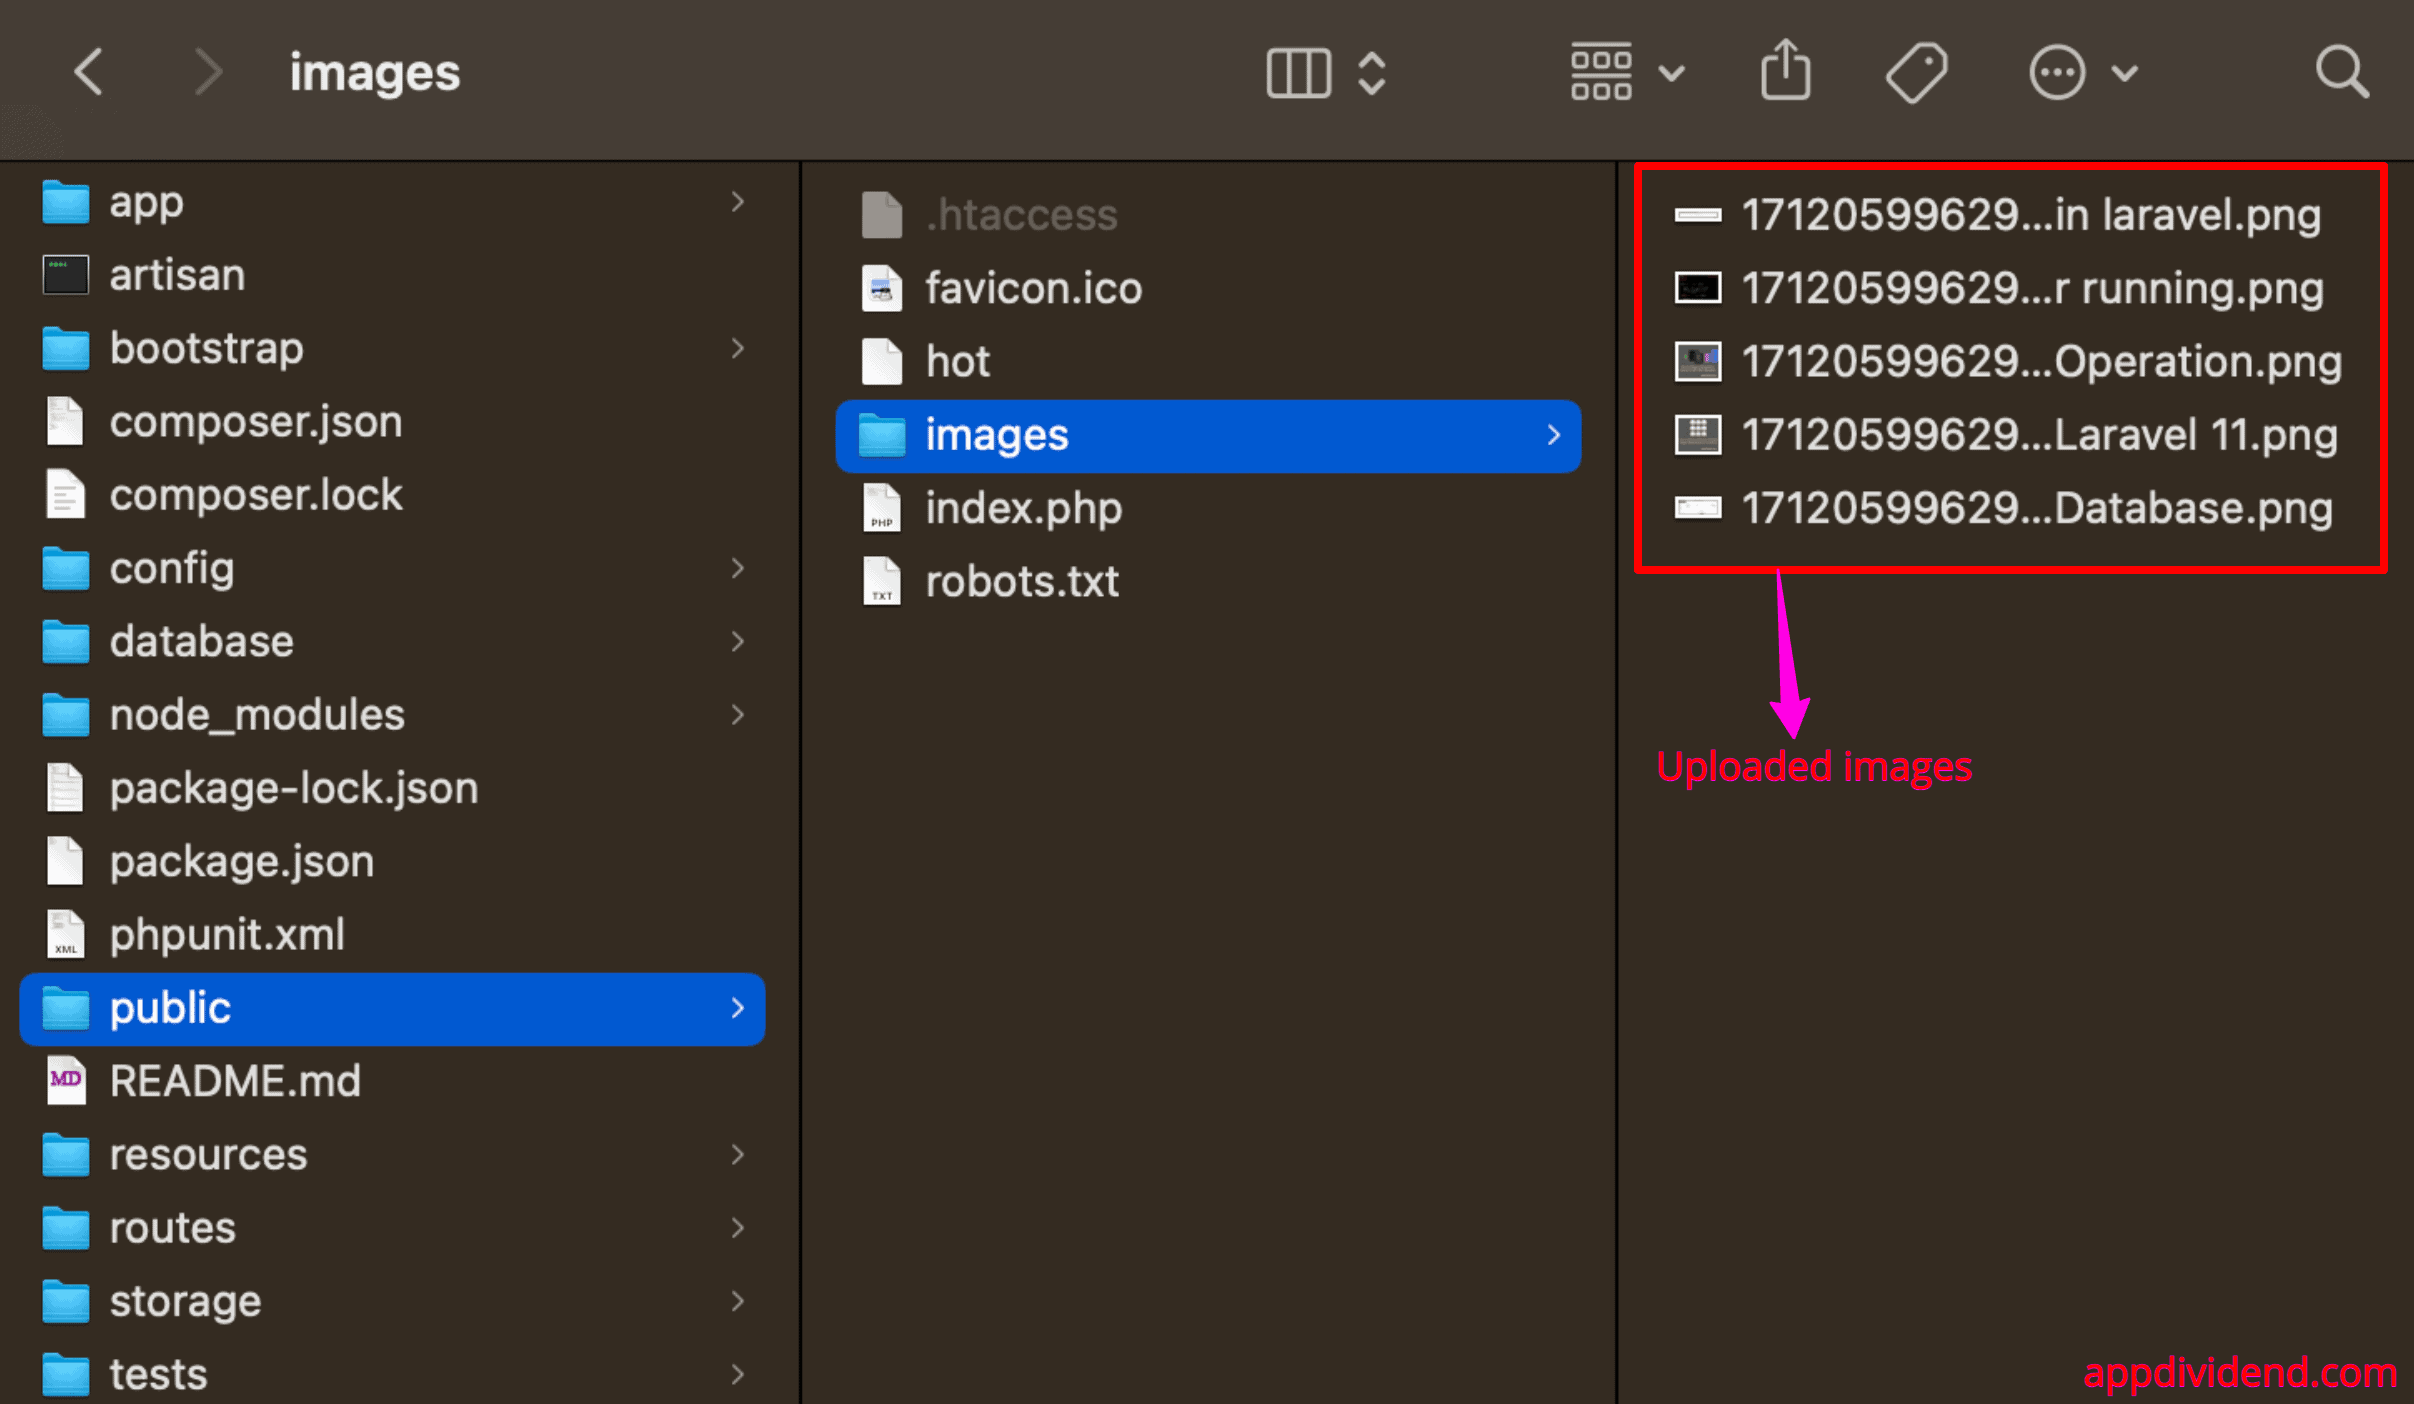
And our multiple images are successfully uploaded to the server!
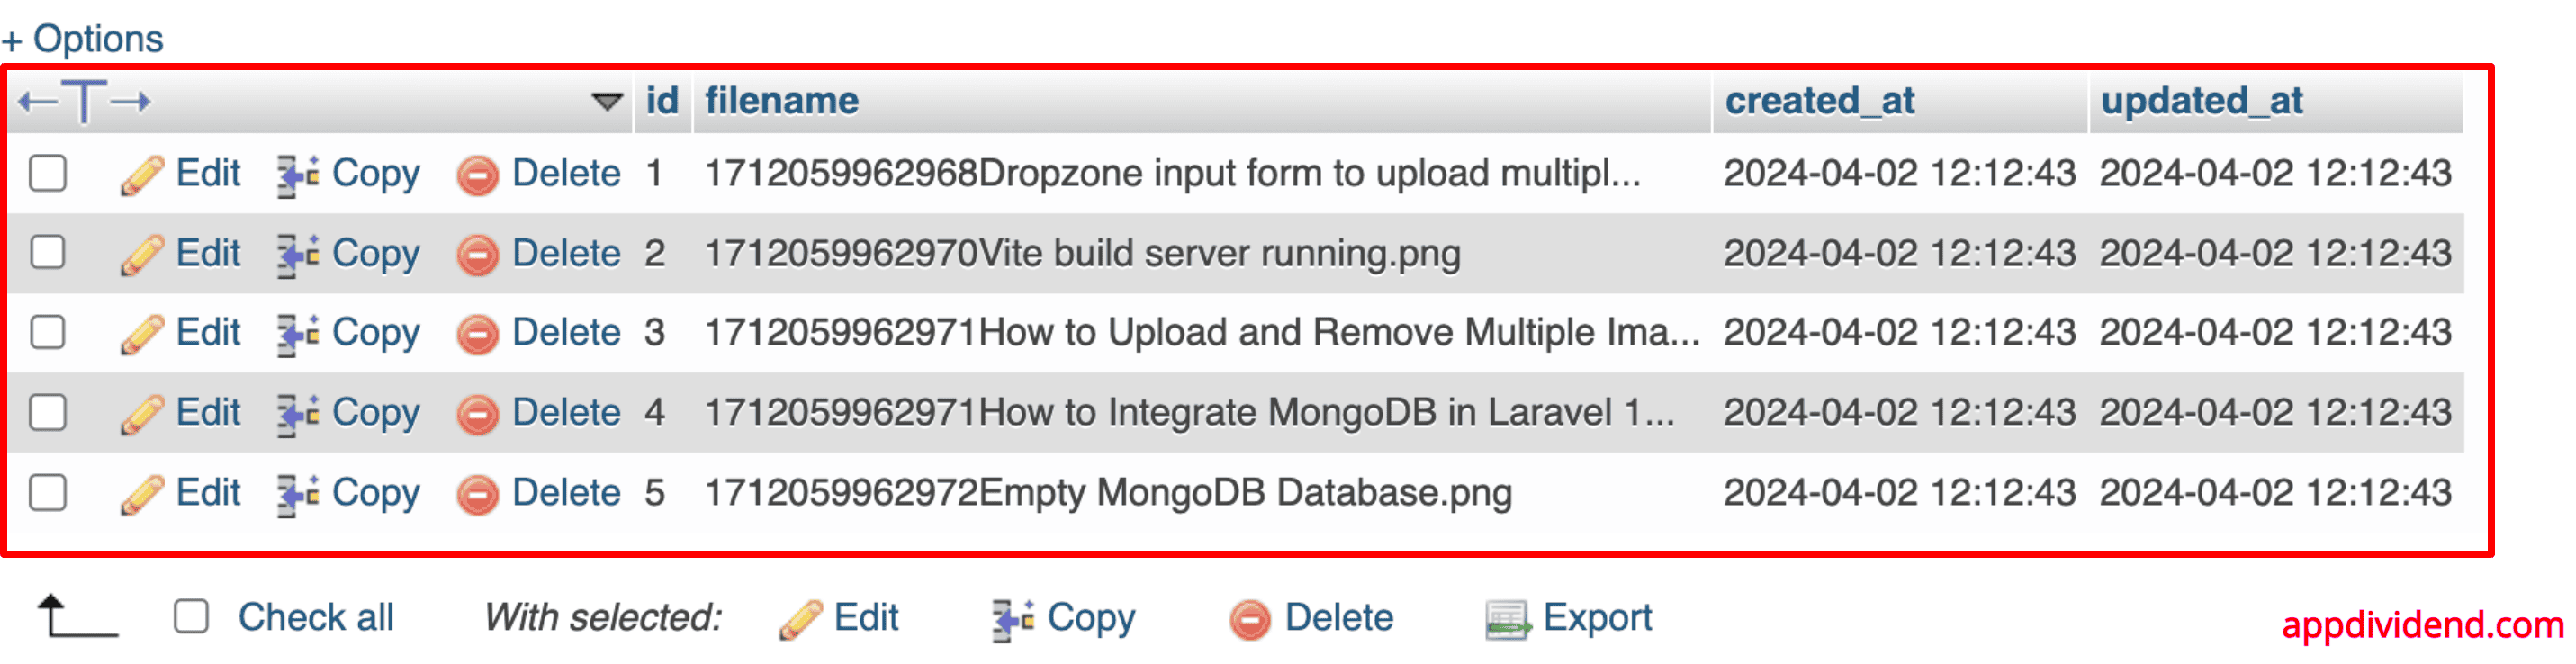
Head to the phpmyadmin server and check out the image_uploads table:
Step 9: Remove the file from the file system and delete the image data
To remove the file, we need to add the removedFile() function in the dropzone configuration.
Here is the complete welcome.blade.php file:
<!DOCTYPE html>
<html lang="en">
<head>
    <meta charset="UTF-8">
    <meta name="viewport" content="width=device-width, initial-scale=1.0">
    <meta http-equiv="X-UA-Compatible" content="ie=edge">
    <meta name="_token" content="{{csrf_token()}}" />
    <title>Laravel Dropzone File Upload</title>
    @vite(['resources/sass/app.scss', 'resources/js/app.js'])
</head>
<body>
    <div class="container">
        <h3>Laravel Multiple Images Upload Using Dropzone</h3>
        <form method="post" action="{{ url('image/upload/store') }}" enctype="multipart/form-data"
            class="dropzone" id="dropzone">
            @csrf
        </form>
    </div>
    <script type="module">
        $(document).ready(function() {
            new Dropzone('#dropzone', {
                maxFilesize: 12,
                renameFile: function(file) {
                    var dt = new Date();
                    var time = dt.getTime();
                    return time+file.name;
                },
                acceptedFiles: ".jpeg,.jpg,.png,.gif",
                addRemoveLinks: true,
                timeout: 5000,
                success: function(file, response)
                {
                    console.log(response);
                },
                error: function(file, response)
                {
                    return false;
                },
                removedfile: function(file)
                {
                    var name = file.upload.filename;
                    $.ajax({
                        headers: {
                            'X-CSRF-TOKEN': $('meta[name="_token"]').attr('content')
                        },
                        type: 'POST',
                        url: '{{ url("image/delete") }}',
                        data: {filename: name},
                        success: function (data){
                            console.log("File has been successfully removed!!");
                        },
                        error: function(e) {
                            console.log(e);
                        }});
                    var fileRef;
                    return (fileRef = file.previewElement) != null ?
                    fileRef.parentNode.removeChild(file.previewElement) : void 0;
                },
            });
        });
    </script>
</body>
</html>
You can see that we added a new function called removedFile() which will send a delete request to our laravel server and remove the images and data.
To handle this delete request, we need to add the destroy() function to delete files from the server and remove the data from the database.
Add the following code in the FileUploadController.php‘s destroy() function.
 public function destroy(Request $request)
{
        $filename = $request->get('filename');
        ImageUpload::where('filename', $filename)->delete();

        $path = public_path() . '/images/' . $filename;
        if (file_exists($path)) {
            unlink($path);
        }
        return $filename;
}
That’s it! The above code will unlink (delete) the files from the server as well as from the database.
Here is the complete code on Github.

rajiv bikram
very helpful post thank you for sharing. keep it great work man.
Agus
Great post.
A question, when the fileStore() function is called?
Ashish gupta
I want to ask a question , file store is call when form submit , but in your case submit function is missing . and
Call to a member function getClientOriginalName() on null is generate fetal error when running the script.
So i think , you need to recheck your code and test it again.
tize
me also same prob?did u fix it
Saman
when i uploaded file into drop box console log show me this error
“POST http://127.0.0.1:8000/admin/store 500 (Internal Server Error)”
would you please help me ?
ThnkYou
Yeh Ximin
copied exactyle but does not work:
exception: “Symfony\Component\HttpKernel\Exception\HttpException”
Thusitha Avinda
Perfect Code, thanks
php artisan migration
https://stackoverflow.com/questions/42244541/laravel-migration-error-syntax-error-or-access-violation-1071-specified-key-wa
Thusitha Avinda
source code : https://github.com/thusithawijethunga/laravel-with-dropzone
José
Hi the code is 5* but if i need to refresh or get back to see the uploaded images e can’t. Can you post some code or do a tutorial how to get the images that already are stored.
christopher price
Also you should used named routes whenever possible. This tutorial is a little amateur.
christopher price
Also,
CRSF token in the ajax call should be like this
‘X-CSRF-TOKEN’: $(‘meta[name=”csrf-token”]’).attr(‘content’)
not like this
‘X-CSRF-TOKEN’: $(‘meta[name=”_token”]’).attr(‘content’)
POOJA RAMRAO
Hi can you please help e to integrate dropzone?
I am trying to integrate dropzone in foreach loop but it is not working
Please help me if you can
Rikki
it very helpful,Thank you .
Yaman HACIOĞLU
Thanks for this helpful content. But i would like to ask, how can i use dropzone in form? I mean, i have a form which is creating a category for my blog and i need to add featured image …
Thanks for your assistant 🙂
david
me too bro, it should be checked again 🙁
Samuel
Very nice and helpful