
![Laravel 7 CRUD Tutorial [Step-by-step Guide]](https://appdividend.com/wp-content/uploads/2020/03/Laravel-7-CRUD-Tutorial-Step-by-step-Guide.png)
Here is the step-by-step guide to creating a crud application in Laravel 7.
Step 1: Laravel 7 Install
Type the following command.
composer create-project --prefer-dist laravel/laravel:^7.0 laravel7crud
Go inside the laravel7crud folder. First, I must install the frontend dependencies for frontend scaffolding using the following command.
cd laravel7crud

npm install
Step 2: Configure the MySQL Database
I created the MySQL database called laravel7crud and wrote the MySQL credentials inside the .env file.
Before migration, we need to set up the MySQL database, assuming you can create a database using PHPMyAdmin.
My .env config for MySQL Database is the following.
DB_CONNECTION=mysql
DB_HOST=127.0.0.1
DB_PORT=3306
DB_DATABASE=laravel7crud
DB_USERNAME=root
DB_PASSWORD=root
Please don’t write your username and password anywhere other than in the .env file, which is created to store secret credentials.
Laravel always ships with default migration files, so you can generate the tables in the database using the following command.
php artisan migrate
Step 3: Create a model and migration files
We have already set up a MySQL database; now, let’s look at the migrations. Migration is used to save the details in the database table, and it’s the properties, so you don’t have to manually generate all the tables by going to a database interface or something like phpmyadmin.
We can create the migrations using Artisan with the “make: migration” command.
Type the following command to create the model and migration files.
php artisan make:model Corona -m
In laravel, the model’s name has to be singular, and the name of migration should be plural so it can automatically find the table name.
It will create the Corna.php file and [timestamp]create_coronas_table.php migration file.
Write the following code inside [timestamp]create_coronas_table.php file.
public function up()
{
        Schema::create('coronas', function (Blueprint $table) {
            $table->id();
            $table->string('country_name');
            $table->string('symptoms');
            $table->integer('cases');
            $table->timestamps();
        });
}
One specific change from Laravel 6 to Laravel 7 is that we now explicitly define the id() column name, which means it is the primary key, and it automatically auto-increments to 1.
Again run the migration using the following command.
php artisan migrate
If you need to reverse the migrations, you can use a migrate: rollback command to execute the down() function like php artisan migrate:rollback.
Add the fillable property inside the Corona.php file.
<?php

// Corona.php

namespace App;

use Illuminate\Database\Eloquent\Model;

class Corona extends Model
{
    protected $fillable = ['country_name', 'symptoms', 'cases'];
}
We can specify all the properties to modify the behavior of a model.
We can write the $table property, which determines the name of the table with which this model will interact with future operations.
Step 4: Create routes and controller
Create a controller. First, create the CoronaController using the following command.
php artisan make:controller CoronaController --resource
Note that we have also added the –resource flag, which will define six methods inside the ShowController, namely:
- Index (This function is used for displaying a list of coronavirus cases)
- Create (This function will show the view with a form for creating a case)
- Store (This function is used for creating a corona case inside the database. Note: create method submits to store method)
- Show (This function will display a specified corona case)
- Edit (This function will show the form for editing a Corona case. The Form will be filled with the existing Corona case data)
- Update (This function is used for updating a corona case inside the database. Note: edit submits to update method)
- Destroy (This function is used for deleting the specified corona case).
Insert the following line of code inside the routes >> web.php file.
Like the —resource flag, laravel has a resource() method that will generate all the above routes. You can also use the method instead of specifying them individually, like above.
By adding the following code line, we have registered multiple routes for our app. We can check it using the following command.
See the output.
php artisan route:list
+--------+-----------+-----------------------+-----------------+-----------------------------------------------+--------------+
| Domain | Method    | URI                   | Name            | Action                                        | Middleware   |
+--------+-----------+-----------------------+-----------------+-----------------------------------------------+--------------+
|        | GET|HEAD  | /                     |                 | Closure                                       | web          |
|        | GET|HEAD  | api/user              |                 | Closure                                       | api,auth:api |
|        | GET|HEAD  | coronas               | coronas.index   | App\Http\Controllers\CoronaController@index   | web          |
|        | POST      | coronas               | coronas.store   | App\Http\Controllers\CoronaController@store   | web          |
|        | GET|HEAD  | coronas/create        | coronas.create  | App\Http\Controllers\CoronaController@create  | web          |
|        | GET|HEAD  | coronas/{corona}      | coronas.show    | App\Http\Controllers\CoronaController@show    | web          |
|        | PUT|PATCH | coronas/{corona}      | coronas.update  | App\Http\Controllers\CoronaController@update  | web          |
|        | DELETE    | coronas/{corona}      | coronas.destroy | App\Http\Controllers\CoronaController@destroy | web          |
|        | GET|HEAD  | coronas/{corona}/edit | coronas.edit    | App\Http\Controllers\CoronaController@edit    | web          |
+--------+-----------+-----------------------+-----------------+-----------------------------------------------+--------------+
Step 5: Configure Bootstrap 4
The Bootstrap and Vue scaffolding provided by Laravel is located in the laravel/ui Composer package, which may be installed using Composer.
composer require laravel/ui
Once the laravel/ui package has been installed, you may install the frontend scaffolding using the ui Artisan command.
php artisan ui bootstrap
See the output.
php artisan ui bootstrap
Step 6: Create the views
Inside the views directory, we also need to create a layout file.
We will create the file inside the views directory called layout.blade.php.
Add the following code in the layout.blade.php file.
<!DOCTYPE html>
<html lang="en">
<head>
  <meta charset="UTF-8">
  <meta name="viewport" content="width=device-width, initial-scale=1.0">
  <meta http-equiv="X-UA-Compatible" content="ie=edge">
  <title>Laravel 7 CRUD Example</title>
  <link href="{{ asset('css/app.css') }}" rel="stylesheet" type="text/css" />
</head>
<body>
  <div class="container">
    @yield('content')
  </div>
  <script src="{{ asset('js/app.js') }}" type="text/js"></script>
</body>
</html>
Inside the resources >> views folder, create the following three view files.
- create.blade.php
- edit.blade.php
- index.blade.php
Inside the create.blade.php file, write the following code.
@extends('layout')

@section('content')
<style>
  .uper {
    margin-top: 40px;
  }
</style>
<div class="card uper">
  <div class="card-header">
    Add Corona Virus Data
  </div>
  <div class="card-body">
    @if ($errors->any())
      <div class="alert alert-danger">
        <ul>
            @foreach ($errors->all() as $error)
              <li>{{ $error }}</li>
            @endforeach
        </ul>
      </div><br />
    @endif
      <form method="post" action="{{ route('coronas.store') }}">
          <div class="form-group">
              @csrf
              <label for="country_name">Country Name:</label>
              <input type="text" class="form-control" name="country_name"/>
          </div>
          <div class="form-group">
              <label for="symptoms">Symptoms :</label>
              <textarea rows="5" columns="5" class="form-control" name="symptoms"></textarea>
          </div>
          <div class="form-group">
              <label for="cases">Cases :</label>
              <input type="text" class="form-control" name="cases"/>
          </div>
          <button type="submit" class="btn btn-primary">Add Data</button>
      </form>
  </div>
</div>
@endsection
We need to open the CoronaController.php file, and on the create() method, we need to return the view, the create.blade.php file.
// CoronaController.php

public function create()
{
   return view('create');
}
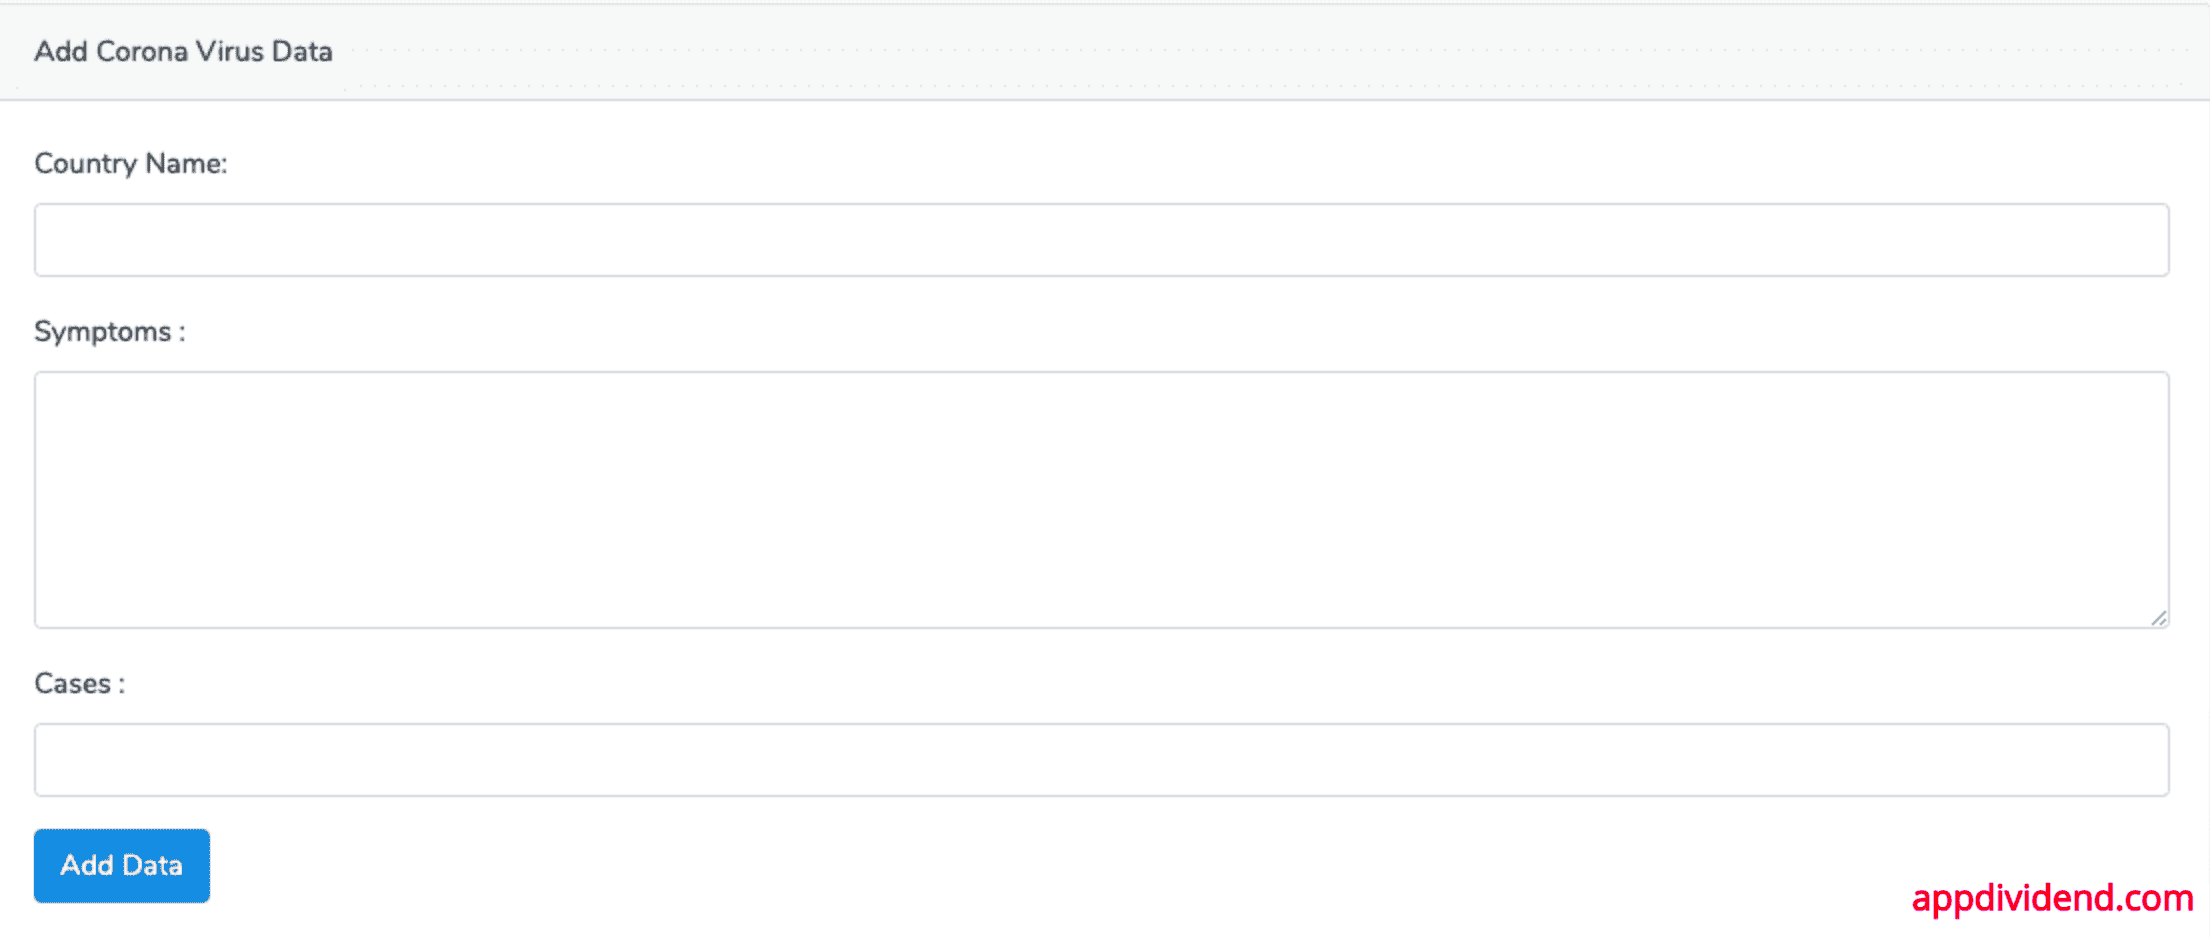
Go to http://localhost:8000/coronas/create or http://laravel7crud.test/coronas/create.
You will see something like the following.
Step 7: Add Validation rules and save the data
<?php

// CoronaController.php

namespace App\Http\Controllers;

use Illuminate\Http\Request;
use App\Corona;
Write the following code inside the CoronaController.php file’s store() function.
// CoronaController.php

public function store(Request $request)
{
        $validatedData = $request->validate([
            'country_name' => 'required|max:255',
            'symptoms' => 'required',
            'cases' => 'required|numeric',
        ]);
        $show = Corona::create($validatedData);

        return redirect('/coronas')->with('success', 'Corona Case is successfully saved');
}
Here, we have first checked for all three fields of the form.
If the incoming data fails any rules, it will directly go to the form with the error messages.
The store() method has a $request object as a parameter to access form data.
The first thing you want to do is validate the form of data.
We can use the $request->validate() function for validation, which will receive the array of validation rules.
Validation rules[] is the associative array.
The key will be the field_name and the value with the validation rules.
The second parameter is an optional array for custom validation messages.
Rules are separated with a pipe sign “|.” We are using the most basic validation rules.
If the validation fails, it will redirect to the form page with error messages. After the validation, we create a new case and save that case in the database.
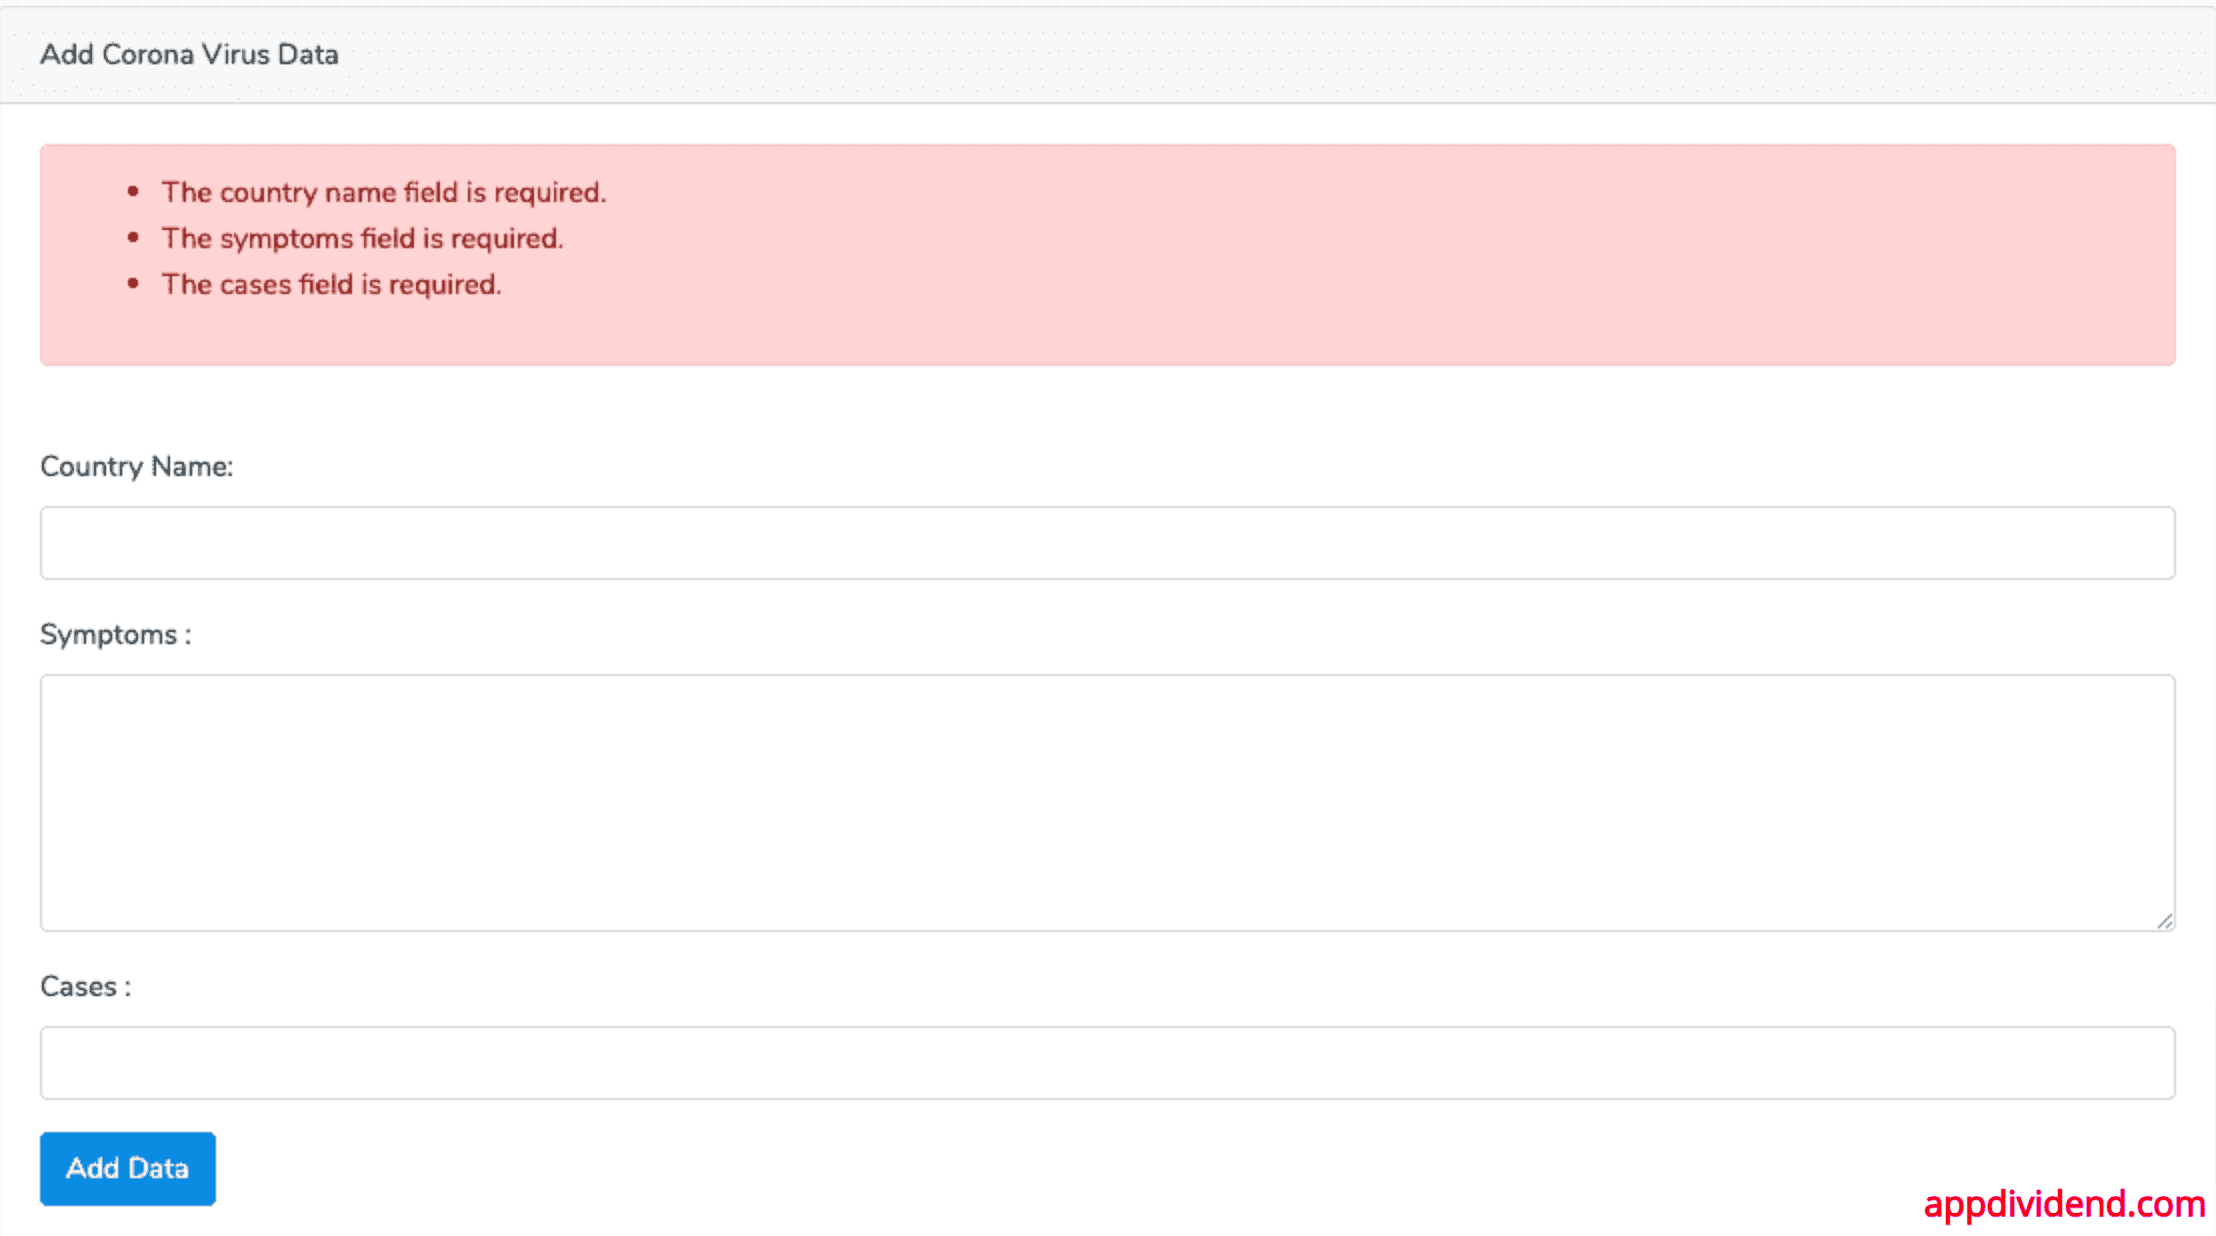
We need to loop through the error messages inside the create.blade.php file, which we have already done.
If you leave all the form fields empty, you will find an error message like this image.
If you fill the form fields correctly, then it will create a new row in the database. Thus, I have created a new Case.
Step 8: Display the data.
We need to write the CoronaController’s index function to return the index view with data fetched from the database. Write the following code inside the index() function.
// CoronaController.php

public function index()
{
        $coronacases = Corona::all();

        return view('index', compact('coronacases'));
}
Create an index.blade.php inside the views folder and add the following code.
@extends('layout')

@section('content')
<style>
  .uper {
    margin-top: 40px;
  }
</style>
<div class="uper">
  @if(session()->get('success'))
    <div class="alert alert-success">
      {{ session()->get('success') }}
    </div><br />
  @endif
  <table class="table table-striped">
    <thead>
        <tr>
          <td>ID</td>
          <td>Country Name</td>
          <td>Symptoms</td>
          <td>Cases</td>
          <td colspan="2">Action</td>
        </tr>
    </thead>
    <tbody>
        @foreach($coronacases as $case)
        <tr>
            <td>{{$case->id}}</td>
            <td>{{$case->country_name}}</td>
            <td>{{$case->symptoms}}</td>
            <td>{{$case->cases}}</td>
            <td><a href="{{ route('coronas.edit', $case->id)}}" class="btn btn-primary">Edit</a></td>
            <td>
                <form action="{{ route('coronas.destroy', $case->id)}}" method="post">
                  @csrf
                  @method('DELETE')
                  <button class="btn btn-danger" type="submit">Delete</button>
                </form>
            </td>
        </tr>
        @endforeach
    </tbody>
  </table>
<div>
@endsection
We looped through the coronacases’ array and displayed the data in a table format.
Also, we have added two buttons for the edit and delete operations.

Step 9: Create Edit and Update Operation
Add the following code inside the CoronaController.php file’s edit function.
// CoronaController.php

public function edit($id)
{
        $coronacase = Corona::findOrFail($id);

        return view('edit', compact('coronacase'));
}
Create the new file inside the views folder called edit.blade.php and add the following code.
@extends('layout')

@section('content')
<style>
  .uper {
    margin-top: 40px;
  }
</style>
<div class="card uper">
  <div class="card-header">
    Edit Corona Virus Data
  </div>
  <div class="card-body">
    @if ($errors->any())
      <div class="alert alert-danger">
        <ul>
            @foreach ($errors->all() as $error)
              <li>{{ $error }}</li>
            @endforeach
        </ul>
      </div><br />
    @endif
      <form method="post" action="{{ route('coronas.update', $coronacase->id ) }}">
          <div class="form-group">
              @csrf
              @method('PATCH')
              <label for="country_name">Country Name:</label>
              <input type="text" class="form-control" name="country_name" value="{{ $coronacase->country_name }}"/>
          </div>
          <div class="form-group">
              <label for="symptoms">Symptoms :</label>
              <textarea rows="5" columns="5" class="form-control" name="symptoms">{{ $coronacase->symptoms }}</textarea>
          </div>
          <div class="form-group">
              <label for="cases">Cases :</label>
              <input type="text" class="form-control" name="cases" value="{{ $coronacase->cases }}"/>
          </div>
          <button type="submit" class="btn btn-primary">Update Data</button>
      </form>
  </div>
</div>
@endsection
Go to any edit page of the listing data.
Go to http://laravel7crud.test/coronas/1/edit or whatever URL of yours.
Add the following code inside the CoronaController’s update() function.
// CoronaController.php

public function update(Request $request, $id)
{
        $validatedData = $request->validate([
            'country_name' => 'required|max:255',
            'symptoms' => 'required',
            'cases' => 'required|numeric',
        ]);
        Corona::whereId($id)->update($validatedData);

        return redirect('/coronas')->with('success', 'Corona Case Data is successfully updated');
}
You can update all the data in the database.
Step 10: Create Delete Functionality
Write the following code inside the CoronaController’s destroy() function.
// CoronaController.php

public function destroy($id)
{
        $coronacase = Corona::findOrFail($id);
        $coronacase->delete();

        return redirect('/coronas')->with('success', 'Corona Case Data is successfully deleted');
}
Go to the URL: http://laravel7crud.test/coronas and try to remove the Corona Case data.
You can see that you have successfully removed the case.
Our complete CoronaController.php code looks like below.
<?php

// CoronaController.php

namespace App\Http\Controllers;

use Illuminate\Http\Request;
use App\Corona;

class CoronaController extends Controller
{
    /**
     * Display a listing of the resource.
     *
     * @return \Illuminate\Http\Response
     */
    public function index()
    {
        $coronacases = Corona::all();

        return view('index', compact('coronacases'));
    }

    /**
     * Show the form for creating a new resource.
     *
     * @return \Illuminate\Http\Response
     */
    public function create()
    {
        return view('create');
    }

    /**
     * Store a newly created resource in storage.
     *
     * @param  \Illuminate\Http\Request  $request
     * @return \Illuminate\Http\Response
     */
    public function store(Request $request)
    {
        $validatedData = $request->validate([
            'country_name' => 'required|max:255',
            'symptoms' => 'required',
            'cases' => 'required|numeric',
        ]);
        $show = Corona::create($validatedData);

        return redirect('/coronas')->with('success', 'Corona Case is successfully saved');
    }

    /**
     * Display the specified resource.
     *
     * @param  int  $id
     * @return \Illuminate\Http\Response
     */
    public function show($id)
    {
        //
    }

    /**
     * Show the form for editing the specified resource.
     *
     * @param  int  $id
     * @return \Illuminate\Http\Response
     */
    public function edit($id)
    {
        $coronacase = Corona::findOrFail($id);

        return view('edit', compact('coronacase'));
    }

    /**
     * Update the specified resource in storage.
     *
     * @param  \Illuminate\Http\Request  $request
     * @param  int  $id
     * @return \Illuminate\Http\Response
     */
    public function update(Request $request, $id)
    {
        $validatedData = $request->validate([
            'country_name' => 'required|max:255',
            'symptoms' => 'required',
            'cases' => 'required|numeric',
        ]);
        Corona::whereId($id)->update($validatedData);

        return redirect('/coronas')->with('success', 'Corona Case Data is successfully updated');
    }

    /**
     * Remove the specified resource from storage.
     *
     * @param  int  $id
     * @return \Illuminate\Http\Response
     */
    public function destroy($id)
    {
        $coronacase = Corona::findOrFail($id);
        $coronacase->delete();

        return redirect('/coronas')->with('success', 'Corona Case Data is successfully deleted');
    }
}
That’s it.

Roger
Thanx for this, well done!
Verdy
fix your github code button
Krunal
Fixed. Thanks, for pointing out.
joko winahyu
best tutorial. thanks
Sergio
Thanks for the tutorial!
But I got this error on the edit link
InvalidArgumentException
View [edit] not found.
the correct one would not be … /edit/1 ?
Cheers!
Humanofit
Thanks you but how can i upload image with this tutorial?
Hernan
Hi! im getting Facade\Ignition\Exceptions\ViewException
Undefined variable: coronacases,
i first made my own CRUD following urs then tryed coping yours and get the same error, any idea why?
im using laravel 7 on Xampp
Gabriel Paolo Mondragon
AWESOME TUTORIAL!!! THANK YOU!!! WELL EXPLAINED AND CLEAR!!!
Shafiul
Nice turorial