
Here is the step-by-step guide to create a crud application in Angular.
Step 1: Create an Angular 8 project

Install the Bootstrap 4 CSS Framework using the following command. It is not a necessary step, and you can also choose your CSS Framework.
npm install bootstrap --save
Add it inside an angular.json file.
"styles": [
   "src/styles.css",
   "./node_modules/bootstrap/dist/css/bootstrap.min.css"
 ],
It will include a bootstrap CSS file; we can use the bootstrap classes inside any file.
Start an Angular development server using the following command.
ng serve -oThe server starts at http://localhost:4200/. You can see the output in the browser. It is an initial Angular home screen.
Step 2: Create Angular components
Hit the following command to generate the Angular Components. We will perform create, read, and update operations. So we will create three components.
ng g c product-add --skipTests=true
ng g c product-get --skipTests=true
ng g c product-edit --skipTests=true
Write the following code inside an app-routing.module.ts file.
// app-routing.module.ts

import { NgModule } from '@angular/core';
import { Routes, RouterModule } from '@angular/router';
import { ProductAddComponent } from './product-add/product-add.component';
import { ProductEditComponent } from './product-edit/product-edit.component';
import { ProductGetComponent } from './product-get/product-get.component';

const routes: Routes = [
  {
    path: 'product/create',
    component: ProductAddComponent
  },
  {
    path: 'edit/:id',
    component: ProductEditComponent
  },
  {
    path: 'products',
    component: ProductGetComponent
  }
];

@NgModule({
  imports: [RouterModule.forRoot(routes)],
  exports: [RouterModule]
})
export class AppRoutingModule { }
You can see inside the app.component.html file that the <router-outlet> directive is there. This directive helps us to render the different components based on route URI.
Write the following code inside the app.component.html file.
<nav class="navbar navbar-expand-sm bg-light">
  <div class="container-fluid">
    <ul class="navbar-nav">
      <li class="nav-item">
        <a routerLink="product/create" class="nav-link" routerLinkActive="active">
          Create Product
        </a>
      </li>
      <li class="nav-item">
        <a routerLink="products" class="nav-link" routerLinkActive="active">
          Products
        </a>
      </li>
    </ul>
  </div>
</nav>

<div class="container">
  <router-outlet></router-outlet>
</div>
Save the file, go to the browser,, and click on two links. The different components can be seen based on navigation.

Step 4: Configure the Angular routing progress indicator.
Type the following command to install the ng2-slim-loading-bar library.
npm install ng2-slim-loading-bar --saveIf you install the third-party packages right now, it is not compatible with Angular 8. We need to install the following library to bridge the gap between Angular 8 and the third-party packages. That is it.
npm install rxjs-compat --saveImport the SlimLoadingBarModule inside an app.module.ts file.
// app.module.ts

import { SlimLoadingBarModule } from 'ng2-slim-loading-bar';

imports: [
    ...
    SlimLoadingBarModule
],
The next step is to include the styling that comes with the library inside the src >> styles.css file.
@import "../node_modules/ng2-slim-loading-bar/style.css";
Step 5: Add Angular router events.
Write the following code inside the app.component.ts file.
// app.component.ts

import { Component } from '@angular/core';
import {SlimLoadingBarService} from 'ng2-slim-loading-bar';
import { NavigationCancel,
        Event,
        NavigationEnd,
        NavigationError,
        NavigationStart,
        Router } from '@angular/router';

@Component({
  selector: 'app-root',
  templateUrl: './app.component.html',
  styleUrls: ['./app.component.css']
})
export class AppComponent {
  title = 'angular8tutorial';
  constructor(private loadingBar: SlimLoadingBarService, private router: Router) {
    this.router.events.subscribe((event: Event) => {
      this.navigationInterceptor(event);
    });
  }
  private navigationInterceptor(event: Event): void {
    if (event instanceof NavigationStart) {
      this.loadingBar.start();
    }
    if (event instanceof NavigationEnd) {
      this.loadingBar.complete();
    }
    if (event instanceof NavigationCancel) {
      this.loadingBar.stop();
    }
    if (event instanceof NavigationError) {
      this.loadingBar.stop();
    }
  }
}
Display the routing indicator. We need to insert an ng2-slim-loading-bar directive inside the app.component.html file at the top of the page.
<!-- app.component.html -->

<ng2-slim-loading-bar color="blue"></ng2-slim-loading-bar>
<nav class="navbar navbar-expand-sm bg-light">
  <div class="container-fluid">
    <ul class="navbar-nav">
      <li class="nav-item">
        <a routerLink="product/create" class="nav-link" routerLinkActive="active">
          Create Product
        </a>
      </li>
      <li class="nav-item">
        <a routerLink="products" class="nav-link" routerLinkActive="active">
          Products
        </a>
      </li>
    </ul>
  </div>
</nav>

<div class="container">
  <router-outlet></router-outlet>
</div>
Step 6: Add Bootstrap 4 to the HTML form
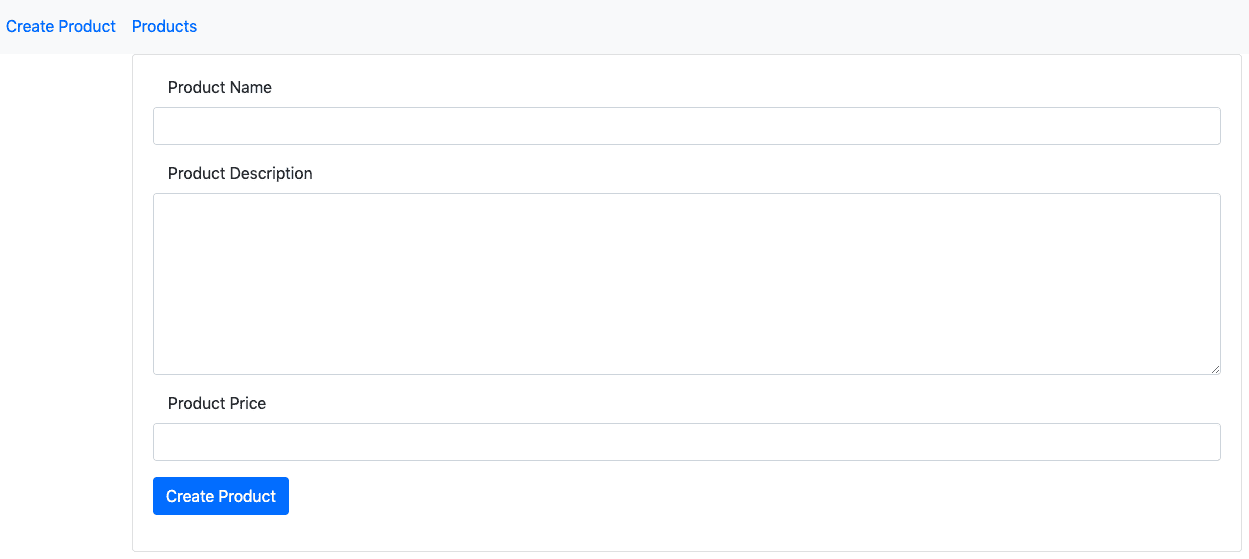
Inside the product-add.component.html file, add the following Bootstrap 4 form. We have three HTML fields for this demo.
<!-- product-add.component.html -->

<div class="card">
  <div class="card-body">
    <form>
      <div class="form-group">
        <label class="col-md-4">Product Name</label>
        <input type="text" class="form-control" />
      </div>
      <div class="form-group">
        <label class="col-md-4">Product Description </label>
        <textarea class="form-control" rows = 7 cols = "5"></textarea>
      </div>
      <div class="form-group">
        <label class="col-md-4">Product Price</label>
        <input type="text" class="form-control" />
      </div>
      <div class="form-group">
        <button type="submit" class="btn btn-primary">Create Product</button>
      </div>
    </form>
  </div>
</div>
Step 7: Create Angular 8 form validation
For form validation, we have two options. Template-based and Reactive Forms Module. We will use the ReactiveFormsModule approach.
Import the ReactiveFormsModule inside the app.module.ts file. It comes with an Angular project by default.
// app.module.ts

import { ReactiveFormsModule } from '@angular/forms';

imports: [
    ...
    ReactiveFormsModule
],
Write the following code inside the product-add.component.ts file.
// product-add.component.ts

import { Component, OnInit } from '@angular/core';
import { FormGroup,  FormBuilder,  Validators } from '@angular/forms';

@Component({
  selector: 'app-product-add',
  templateUrl: './product-add.component.html',
  styleUrls: ['./product-add.component.css']
})
export class ProductAddComponent implements OnInit {

  angForm: FormGroup;
  constructor(private fb: FormBuilder) {
    this.createForm();
  }

  createForm() {
    this.angForm = this.fb.group({
      ProductName: ['', Validators.required ],
      ProductDescription: ['', Validators.required ],
      ProductPrice: ['', Validators.required ]
    });
  }

  ngOnInit() {
  }

}
Write the following code inside the product-add.component.html file.
<!-- product-add.component.html -->

<div class="card">
  <div class="card-body">
    <form [formGroup]="angForm" novalidate>
      <div class="form-group">
        <label class="col-md-4">Product Name</label>
        <input type="text" class="form-control"
          formControlName="ProductName"
          #ProductName />
      </div>
      <div *ngIf="angForm.controls['ProductName'].invalid && (angForm.controls['ProductName'].dirty || angForm.controls['ProductName'].touched)" class="alert alert-danger">
        <div *ngIf="angForm.controls['ProductName'].errors.required">
          Product Name is required.
        </div>
      </div>
      <div class="form-group">
        <label class="col-md-4">Product Description </label>
        <textarea class="form-control" rows = 7 cols = "5"
        formControlName="ProductDescription"
        #ProductDescription></textarea>
      </div>
      <div *ngIf="angForm.controls['ProductDescription'].invalid && (angForm.controls['ProductDescription'].dirty || angForm.controls['ProductDescription'].touched)" class="alert alert-danger">
        <div *ngIf="angForm.controls['ProductDescription'].errors.required">
          Product Description is required.
        </div>
      </div>
      <div class="form-group">
        <label class="col-md-4">Product Price</label>
        <input type="text" class="form-control"
          formControlName="ProductPrice"
          #ProductPrice
        />
      </div>
      <div *ngIf="angForm.controls['ProductPrice'].invalid && (angForm.controls['ProductPrice'].dirty || angForm.controls['ProductPrice'].touched)" class="alert alert-danger">
        <div *ngIf="angForm.controls['ProductPrice'].errors.required">
          Product Price is required.
        </div>
      </div>
      <div class="form-group">
        <button type="submit" class="btn btn-primary"
        [disabled]="angForm.pristine || angForm.invalid" >
          Create Product
        </button>
      </div>
    </form>
  </div>
</div>
Save the file and go to the browser, and you can see if you do not put any value inside the input box, you will see the errors.

Step 8: Add and configure the HttpClientModule
Import the HttpClientModule inside an app.module.ts file.
// app.module.ts

import { HttpClientModule } from '@angular/common/http';

imports: [
   ...
    HttpClientModule
 ],
Step 9: Create a typescript model file.
Inside the src >> app folder, create one file called Product.ts and add the following code.
// Product.ts

export default class Product {
  ProductName: string;
  ProductDescription: string;
  ProductPrice: number;
}
Step 10: Create an Angular Service file.
The service file’s primary use is adding all of our AJAX code inside that file. So, it sends an Ajax request to the backend server and retrieves the data from the backend server.
ng g service products --skipTests=trueYour necessary products.service.ts file looks like this.
// products.service.ts

import { Injectable } from '@angular/core';

@Injectable({
  providedIn: 'root'
})
export class ProductsService {

  constructor() { }
}
Import the products.service.ts file into the app.module.ts file.
// app.module.ts

import { ProductsService } from './products.service';

providers: [ ProductsService ],
Step 11: Submit form values to the node server
We need to write the code to send the HTTP POST request with the data to the Node.js server and store the data in the MongoDB database.
Write the following code inside the products.service.ts file.
// products.service.ts
import { Injectable } from '@angular/core';
import { HttpClient } from '@angular/common/http';
@Injectable({
providedIn: 'root'
})
export class ProductsService {
uri = 'http://localhost:4000/products';
constructor(private http: HttpClient) { }
addProduct(ProductName, ProductDescription, ProductPrice) {
const obj = {
ProductName,
ProductDescription,
ProductPrice
};
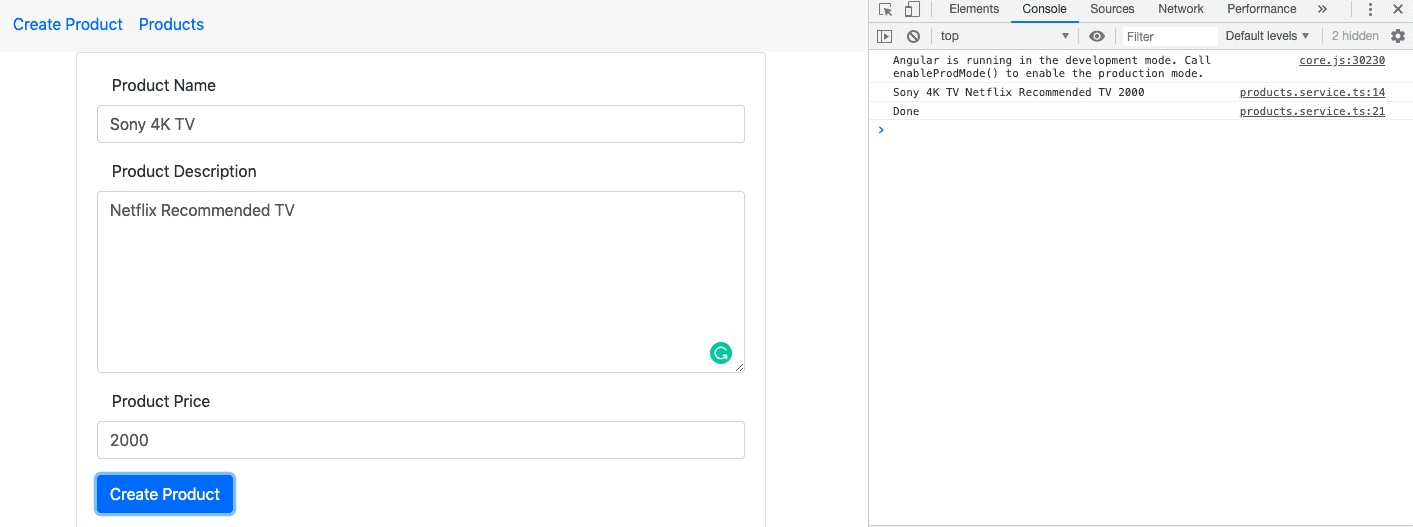
console.log(obj);
this.http.post(`${this.uri}/add`, obj)
.subscribe(res => console.log('Done'));
}
}
We have defined our backend API URL, but we have not created a backend yet.
We will do it in the following couple of steps.
We need to add the click event to the Add Product Button. So add the following code inside a product-add.component.html file.
<div class="form-group">
        <button (click) = "addProduct(ProductName.value, ProductDescription.value, ProductPrice.value)" type="submit" class="btn btn-primary"
        [disabled]="angForm.pristine || angForm.invalid" >
          Create Product
        </button>
</div>
When there are no errors, we can submit the form, which will call the component’s addPropduct function. From there, we will call the angular service, and the service will send the HTTP Post request to the Node.js server.
Add the addProduct function inside the product-add.component.ts file. So write the following code inside the product-add.component.ts file.
// product-add.component.ts

import { Component, OnInit } from '@angular/core';
import { FormGroup, FormBuilder, Validators } from '@angular/forms';
import { ProductsService } from '../products.service';

@Component({
  selector: 'app-product-add',
  templateUrl: './product-add.component.html',
  styleUrls: ['./product-add.component.css']
})
export class ProductAddComponent implements OnInit {

  angForm: FormGroup;
  constructor(private fb: FormBuilder, private ps: ProductsService) {
    this.createForm();
  }

  createForm() {
    this.angForm = this.fb.group({
      ProductName: ['', Validators.required ],
      ProductDescription: ['', Validators.required ],
      ProductPrice: ['', Validators.required ]
    });
  }

  addProduct(ProductName, ProductDescription, ProductPrice) {
    this.ps.addProduct(ProductName, ProductDescription, ProductPrice);
  }

  ngOnInit() {
  }

}
Step 12: Create a backend API in Node
Open the terminal inside the API folder and type the following command. It will generate the package.json file using NPM. We do not want to specify each option individually; we are typing the following command.
npm init -yInstall the following node-specific modules.
npm install express body-parser cors mongoose --saveI do not want to restart the node server each time; I change the file. So I am installing the nodemon server. What it does is that when I modify a server.js file, it restarts a node.js server automatically.
npm install nodemon --save-devInside the API folder, create one file called the server.js file. Add the following code inside that file.
// server.js

const express = require('express'),
    path = require('path'),
    bodyParser = require('body-parser'),
    cors = require('cors'),
    mongoose = require('mongoose');

    const app = express();
    let port = process.env.PORT || 4000;

    const server = app.listen(function(){
        console.log('Listening on port ' + port);
    });
Next, connect the MongoDB database with our node express application.
If you have not installed a MongoDB database, install it and start the MongoDB server using the following command.
mongod Create one file called DB.js inside the api root project folder. Write the following code inside a DB.js file.
// DB.js

module.exports = {
  DB: 'mongodb://localhost:27017/ng8crud'
};
Import this DB.js file inside our server.js file and use the Mongoose library to set up the database connection with MongoDB. We can also use Mongoose to save the data in the database using the Mongoose ORM.
Write the following code inside a server.js file to connect our MongoDB application to a Node.js server.
// server.js

const express = require('express'),
    path = require('path'),
    bodyParser = require('body-parser'),
    cors = require('cors'),
    mongoose = require('mongoose'),
    config = require('./DB');

    mongoose.Promise = global.Promise;
    mongoose.connect(config.DB, { useNewUrlParser: true }).then(
      () => {console.log('Database is connected') },
      err => { console.log('Can not connect to the database'+ err)}
    );

    const app = express();
    app.use(bodyParser.json());
    app.use(cors());
    const port = process.env.PORT || 4000;

    const server = app.listen(port, function(){
     console.log('Listening on port ' + port);
    });
Save the above server.js file, go to the terminal, and start the node server using the following command. Remember, we are using nodemon.
nodemon serverNow, you have three servers running.
- Angular Development Server for frontend.
- Nodemon server for the backend.
- MongoDB server for database.
Remember, all three servers are running fine without any error; otherwise, our application will not work, and it will crash.
Step 13: Create a route and model files.
Create two folders inside the api root folder called routes and models.
In the models’ folder, create one model called Product.js.
// Product.js

const mongoose = require('mongoose');
const Schema = mongoose.Schema;

// Define collection and schema for Product
let Product = new Schema({
  ProductName: {
    type: String
  },
  ProductDescription: {
    type: String
  },
  ProductPrice: {
    type: Number
  }
},{
    collection: 'Product'
});

module.exports = mongoose.model('Product', Product);
We defined our schema for the Product collection. We have three fields called ProductName, ProductDescription, and ProductPrice.
In the routes folder, create one file called product.route.js.
Write the CRUD code inside the product.route.js file.
// product.route.js

const express = require('express');
const app = express();
const productRoutes = express.Router();

// Require Product model in our routes module
let Product = require('../models/Product');

// Defined store route
productRoutes.route('/add').post(function (req, res) {
  let product = new Product(req.body);
  product.save()
    .then(product => {
      res.status(200).json({'Product': 'Product has been added successfully'});
    })
    .catch(err => {
    res.status(400).send("unable to save to database");
    });
});

// Defined get data(index or listing) route
productRoutes.route('/').get(function (req, res) {
  Product.find(function (err, products){
    if(err){
      console.log(err);
    }
    else {
      res.json(products);
    }
  });
});

// Defined edit route
productRoutes.route('/edit/:id').get(function (req, res) {
  let id = req.params.id;
  Product.findById(id, function (err, product){
      res.json(product);
  });
});

//  Defined update route
productRoutes.route('/update/:id').post(function (req, res) {
  Product.findById(req.params.id, function(err, product) {
    if (!product)
      res.status(404).send("Record not found");
    else {
      product.ProductName = req.body.ProductName;
      product.ProductDescription = req.body.ProductDescription;
      product.ProductPrice = req.body.ProductPrice;

      product.save().then(product => {
          res.json('Update complete');
      })
      .catch(err => {
            res.status(400).send("unable to update the database");
      });
    }
  });
});

// Defined delete | remove | destroy route
productRoutes.route('/delete/:id').get(function (req, res) {
    Product.findByIdAndRemove({_id: req.params.id}, function(err, product){
        if(err) res.json(err);
        else res.json('Successfully removed');
    });
});

module.exports = productRoutes;
Our final server.js file looks like this.
// server.js

const express = require('express'),
    path = require('path'),
    bodyParser = require('body-parser'),
    cors = require('cors'),
    mongoose = require('mongoose'),
    config = require('./DB');

   const productRoute = require('./routes/product.route');
    mongoose.Promise = global.Promise;
    mongoose.connect(config.DB, { useNewUrlParser: true }).then(
      () => {console.log('Database is connected') },
      err => { console.log('Can not connect to the database'+ err)}
    );

    const app = express();
    app.use(bodyParser.json());
    app.use(cors());
    app.use('/products', productRoute);
    const port = process.env.PORT || 4000;

    const server = app.listen(port, function(){
     console.log('Listening on port ' + port);
    });
Go to the terminal and start the node server if you have not already started.

Step 14: Save data in the MongoDB database
If your servers are up and running, you can go to the browser, fill in the form data, and add the Product. If you are successful, you will see something like this on your screen.
Sometimes, if you are running an adblocker on the browser, then it will not work. So please turn off the adblocker and try this example again.
We can check on the database using the following commands.
First, open the Mongo shell on the 4th tab because all three other tabs are occupied now.
mongo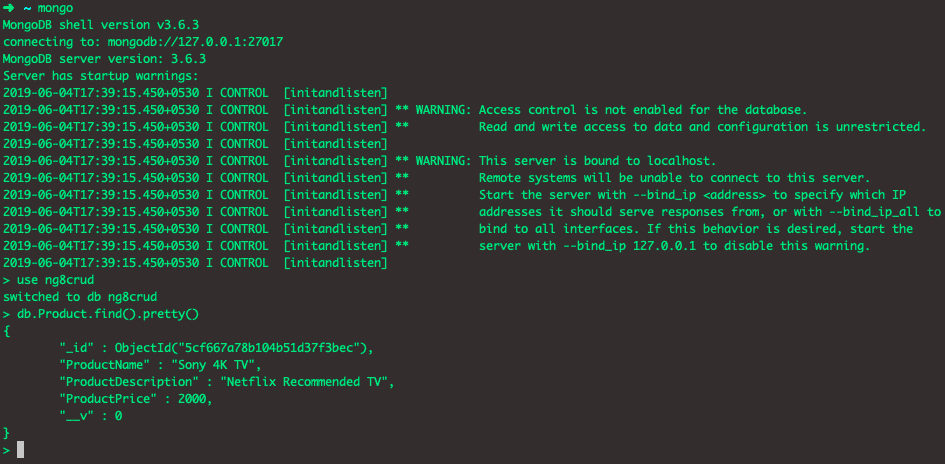
Step 15: Show the data on Angular Frontend
Inside the product-get.component.html file, write the following code.
<!-- product-get.component.html -->

<table class="table table-hover">
  <thead>
  <tr>
      <td>Product Name</td>
      <td>Product Description</td>
      <td>Product Price</td>
      <td colspan="2">Actions</td>
  </tr>
  </thead>

  <tbody>
      <tr *ngFor="let product of products">
          <td>{{ product.ProductName }}</td>
          <td>{{ product.ProductDescription }}</td>
          <td>{{ product.ProductPrice }}</td>
          <td><a [routerLink]="['/edit', product._id]" class="btn btn-primary">Edit</a></td>
          <td><a [routerLink]="" class="btn btn-danger">Delete</a></td>
      </tr>
  </tbody>
</table>
Inside the products.service.ts file, we need to write the function that fetches the product data from the MongoDB database and displays it in the Angular application.
// products.service.ts

getProducts() {
    return this
           .http
           .get(`${this.uri}`);
  }
Write the following code inside the product-get.component.ts file.
// product-get.component.ts

import { Component, OnInit } from '@angular/core';
import Product from '../Product';
import { ProductsService } from '../products.service';

@Component({
  selector: 'app-product-get',
  templateUrl: './product-get.component.html',
  styleUrls: ['./product-get.component.css']
})
export class ProductGetComponent implements OnInit {

  products: Product[];
  constructor(private ps: ProductsService) { }

  ngOnInit() {
    this.ps
      .getProducts()
      .subscribe((data: Product[]) => {
        this.products = data;
    });
  }

}
Save the file, go to the browser, and switch to this URL: http://localhost:4200/products. You can see the listing of the products.

Step 16: Edit and update fields
We need to fetch the data from the MongoDB database using _id wise and display that data in the product-edit.component.html file.
When the product-edit.component.html loads, we send an AJAX request to the node server, fetch the particular row using the _id, and display the data to their respective fields inside the HTML form.
Write the following code inside the product-edit.component.ts file.
// product-edit.component.ts

import { Component, OnInit } from '@angular/core';
import { FormGroup, FormBuilder, Validators } from '@angular/forms';
import { ActivatedRoute, Router } from '@angular/router';
import { ProductsService } from '../products.service';

@Component({
  selector: 'app-product-edit',
  templateUrl: './product-edit.component.html',
  styleUrls: ['./product-edit.component.css']
})
export class ProductEditComponent implements OnInit {

  angForm: FormGroup;
  product: any = {};

  constructor(private route: ActivatedRoute, private router: Router, private ps: ProductsService, private fb: FormBuilder) {
      this.createForm();
 }

  createForm() {
    this.angForm = this.fb.group({
      ProductName: ['', Validators.required ],
      ProductDescription: ['', Validators.required ],
      ProductPrice: ['', Validators.required ]
    });
  }

  ngOnInit() {
    this.route.params.subscribe(params => {
        this.ps.editProduct(params['id']).subscribe(res => {
          this.product = res;
      });
    });
  }
}
Here, when the product-edit component.ts render, it will call the ngOnInit method, send an HTTP request to the node server, and fetch the data from an _id to display inside the product-edit component.html file.
Inside the products.service.ts file, we need to code the editProduct function to send an HTTP request.
// products.service.ts

import { Injectable } from '@angular/core';
import { HttpClient } from '@angular/common/http';

@Injectable({
  providedIn: 'root'
})
export class ProductsService {

  uri = 'http://localhost:4000/products';

  constructor(private http: HttpClient) { }

  addProduct(ProductName, ProductDescription, ProductPrice) {
    console.log(ProductName, ProductDescription, ProductPrice);
    const obj = {
      ProductName,
      ProductDescription,
      ProductPrice
    };
    this.http.post(`${this.uri}/add`, obj)
        .subscribe(res => console.log('Done'));
  }

  getProducts() {
    return this
           .http
           .get(`${this.uri}`);
  }

  editProduct(id) {
    return this
            .http
            .get(`${this.uri}/edit/${id}`);
    }
}
We need to write the form inside the product-edit.component.html file.
<!-- product-edit.component.html -->

<div class="card">
  <div class="card-body">
    <form [formGroup]="angForm" novalidate>
      <div class="form-group">
        <label class="col-md-4">Product Name</label>
        <input type="text" class="form-control"
          formControlName="ProductName"
          #ProductName
          [(ngModel)] = "product.ProductName"/>
      </div>
      <div *ngIf="angForm.controls['ProductName'].invalid && (angForm.controls['ProductName'].dirty || angForm.controls['ProductName'].touched)" class="alert alert-danger">
        <div *ngIf="angForm.controls['ProductName'].errors.required">
          Product Name is required.
        </div>
      </div>
      <div class="form-group">
        <label class="col-md-4">Product Description </label>
        <textarea class="form-control" rows = 7 cols = "5"
        formControlName="ProductDescription"
        #ProductDescription [(ngModel)] = "product.ProductDescription"></textarea>
      </div>
      <div *ngIf="angForm.controls['ProductDescription'].invalid && (angForm.controls['ProductDescription'].dirty || angForm.controls['ProductDescription'].touched)" class="alert alert-danger">
        <div *ngIf="angForm.controls['ProductDescription'].errors.required">
          Product Description is required.
        </div>
      </div>
      <div class="form-group">
        <label class="col-md-4">Product Price</label>
        <input type="text" class="form-control"
          formControlName="ProductPrice"
          #ProductPrice
          [(ngModel)] = "product.ProductPrice"
        />
      </div>
      <div *ngIf="angForm.controls['ProductPrice'].invalid && (angForm.controls['ProductPrice'].dirty || angForm.controls['ProductPrice'].touched)" class="alert alert-danger">
        <div *ngIf="angForm.controls['ProductPrice'].errors.required">
          Product Price is required.
        </div>
      </div>
      <div class="form-group">
        <button (click) = "updateProduct(ProductName.value, ProductDescription.value, ProductPrice.value)" type="submit" class="btn btn-primary"
        [disabled]="angForm.invalid" >
          Update Product
        </button>
      </div>
    </form>
  </div>
</div>
Save the file, go to the listing page, and click on the edit button to see the populated form fields from the database.
You can also see the warning like the following. Ignore this demo tutorial.
You’re using ngModel on the same form field as formControlName.
Support for using the ngModel input property and ngModelChange event with
reactive form directives have been deprecated in Angular v6 and will be removed
in Angular v7.
// products.service.ts

updateProduct(ProductName, ProductDescription, ProductPrice, id) {
    const obj = {
      ProductName,
      ProductDescription,
      ProductPrice
    };
    this
      .http
      .post(`${this.uri}/update/${id}`, obj)
      .subscribe(res => console.log('Done'));
}
Write the updateProduct() function inside the product-edit.component.ts file.
// product-edit.component.ts

updateProduct(ProductName, ProductDescription, ProductPrice, id) {
    this.route.params.subscribe(params => {
      this.ps.updateProduct(ProductName, ProductDescription, ProductPrice, params.id);
      this.router.navigate(['products']);
    });
  }
In the above function, we get the form values from the HTML forms and send the PUT request to the node server with the updated values.
At the backend, the update function will call and update the values inside the MongoDB database.
Save the file, and you will be able to update the data.
Step 17: Delete form data.
We must define the click event on the delete button inside the product-get.component.html file.
<!-- product-get.component.html -->

<tbody>
      <tr *ngFor="let product of products">
          <td>{{ product.ProductName }}</td>
          <td>{{ product.ProductDescription }}</td>
          <td>{{ product.ProductPrice }}</td>
          <td><a [routerLink]="['/edit', product._id]" class="btn btn-primary">Edit</a></td>
          <td><a (click) = "deleteProduct(product._id)" class="btn btn-danger">Delete</a>
      </tr>
  </tbody>
Write the deleteProduct function inside the product-get.component.ts file.
// product-get.component.ts

deleteProduct(id) {
    this.ps.deleteProduct(id).subscribe(res => {
      this.products.splice(id, 1);
    });
}
The above function will send the ID to the server to delete the row from the database, and on the front end, we are using the Javascript splice() function to remove the data from the Angular application.
Create the deleteProduct() function inside the product.service.ts file. We will send an ID in this AJAx request to delete the data from the backend.
// products.service.ts

deleteProduct(id) {
    return this
              .http
              .get(`${this.uri}/delete/${id}`);
  }
That’s it!

N S Patil
Hi krunal,
Thank you very much for this first.
There is one thing which i found, when we update the record it is getting updating in database but not getting reflecting get products view however it reflects when we refresh the get products view.
As I am seeing yoy have use this.router.navigate([‘products’]); in updateProduct method. is any additional configuration need to set to get immediate refection on viewproducts page as soon as we update the record.
Thanks
N s Patil
Anon
You need to navigate when the update is done.
Change the http.post in the updateProduct function in products.service.ts for this:
this.http.post(`${this.uri}/update/${id}`, obj).subscribe(res => this.router.navigate([‘products’]));
This is a quick way to fix this.
Hans Hellberg
Thanks very impressive Tutorial.
What happened to the ClientApp folder, Is that only used in Visual Studio ASP.NET projects?
Krunal
Thanks man!!
Hans Hellberg
I made it to the
#Step 8: Configure the HttpClientModule,
And my browser looks like this
https://drive.google.com/file/d/19Az-Z3Iv4AaiBicmPkBrbvktNHB5U4b4/view?usp=sharing
Any ide what went wrong?
Levent
Very nice tutorial, but how can we ignore that warning when you are doing a tutorial for Angular 8. Do you have an editing solution without mixing the [(ngModel)] with Reactive Forms?
Krunal
Thanks man!!
Kaleem
i followed your angular 7 CRUD and there was the same warning. i thought this time you rectify this, but you did not. why?
Matt
After completing this tutorial, I tried to run ng build –prod and got this:
ERROR in srcappproduct-editproduct-edit.component.html (41,17) expected 4 arguments, but got 3
multiv123
I’m getting the same error.
jesus
hi great tutorial, Im following, but, unfortunely, when I try to start the nodemon server to start to the next step for connect to the mongoDb , the terminal show me this error
[nodemon] 1.19.1
[nodemon] to restart at any time, enter `rs`
[nodemon] watching: *.*
[nodemon] starting `ng serve server`
An unhandled exception occurred: Project ‘server’ does not support the ‘serve’ target.
See “D:\Users\FANAZC~1.FAR\AppData\Local\Temp\ng-B48UQn\angular-errors.log” for further details.
[nodemon] failed to start process, “ng serve” exec not found
[nodemon] Error
can you help me to solve this, in google I didn´t find info
Vijay
Hi @Jesus Says
You must run the nodemon server inside the API path in cmd prompt.
like this
C:\Users\MEAN\store\api>nodemon server
[nodemon] 1.19.1
[nodemon] to restart at any time, enter `rs`
[nodemon] watching: *.*
[nodemon] starting `node server.js`
Listening on port 4000
Database is connected
jesus
LOL yeah , I realized of that mistake thanks a lot, today finally ended the crud (thanks to my job I didn´t) best regards
mahi
zone-evergreen.js:2952 POST http://localhost:4000/products/add 400 (Bad Request)
scheduleTask @ zone-evergreen.js:2952
scheduleTask @ zone-evergreen.js:378
onScheduleTask @ zone-evergreen.js:272
scheduleTask @ zone-evergreen.js:372
scheduleTask @ zone-evergreen.js:211
scheduleMacroTask @ zone-evergreen.js:234
scheduleMacroTaskWithCurrentZone @ zone-evergreen.js:1107
(anonymous) @ zone-evergreen.js:2985
proto. @ zone-evergreen.js:1428
(anonymous) @ http.js:2065
_trySubscribe @ Observable.js:42
subscribe @ Observable.js:28
(anonymous) @ subscribeTo.js:20
subscribeToResult @ subscribeToResult.js:7
_innerSub @ mergeMap.js:59
_tryNext @ mergeMap.js:53
_next @ mergeMap.js:36
next @ Subscriber.js:49
(anonymous) @ scalar.js:4
_trySubscribe @ Observable.js:42
subscribe @ Observable.js:28
call @ mergeMap.js:21
subscribe @ Observable.js:23
call @ filter.js:13
subscribe @ Observable.js:23
call @ map.js:16
subscribe @ Observable.js:23
addProduct @ products.service.ts:21
addProduct @ product-add.component.ts:26
(anonymous) @ ProductAddComponent.html:39
handleEvent @ core.js:34789
callWithDebugContext @ core.js:36407
debugHandleEvent @ core.js:36043
dispatchEvent @ core.js:22533
(anonymous) @ core.js:33721
(anonymous) @ platform-browser.js:1789
invokeTask @ zone-evergreen.js:391
onInvokeTask @ core.js:30885
invokeTask @ zone-evergreen.js:390
runTask @ zone-evergreen.js:168
invokeTask @ zone-evergreen.js:465
invokeTask @ zone-evergreen.js:1603
globalZoneAwareCallback @ zone-evergreen.js:1629
Show 13 more frames
core.js:7187 ERROR HttpErrorResponse {headers: HttpHeaders, status: 400, statusText: “Bad Request”, url: “http://localhost:4000/products/add”, ok: false, …}
defaultErrorLogger @ core.js:7187
handleError @ core.js:7239
next @ core.js:31614
schedulerFn @ core.js:27846
__tryOrUnsub @ Subscriber.js:185
next @ Subscriber.js:124
_next @ Subscriber.js:72
next @ Subscriber.js:49
next @ Subject.js:39
emit @ core.js:27808
(anonymous) @ core.js:30943
invoke @ zone-evergreen.js:359
run @ zone-evergreen.js:124
runOutsideAngular @ core.js:30830
onHandleError @ core.js:30940
handleError @ zone-evergreen.js:363
runTask @ zone-evergreen.js:171
invokeTask @ zone-evergreen.js:465
ZoneTask.invoke @ zone-evergreen.js:454
timer @ zone-evergreen.js:2650
setTimeout (async)
scheduleTask @ zone-evergreen.js:2671
scheduleTask @ zone-evergreen.js:378
onScheduleTask @ zone-evergreen.js:272
scheduleTask @ zone-evergreen.js:372
scheduleTask @ zone-evergreen.js:211
scheduleMacroTask @ zone-evergreen.js:234
scheduleMacroTaskWithCurrentZone @ zone-evergreen.js:1107
(anonymous) @ zone-evergreen.js:2686
proto. @ zone-evergreen.js:1428
hostReportError @ hostReportError.js:2
error @ Subscriber.js:158
_error @ Subscriber.js:75
error @ Subscriber.js:55
_error @ Subscriber.js:75
error @ Subscriber.js:55
_error @ Subscriber.js:75
error @ Subscriber.js:55
notifyError @ OuterSubscriber.js:7
_error @ InnerSubscriber.js:14
error @ Subscriber.js:55
onLoad @ http.js:1961
invokeTask @ zone-evergreen.js:391
onInvokeTask @ core.js:30885
invokeTask @ zone-evergreen.js:390
runTask @ zone-evergreen.js:168
invokeTask @ zone-evergreen.js:465
invokeTask @ zone-evergreen.js:1603
globalZoneAwareCallback @ zone-evergreen.js:1640
load (async)
customScheduleGlobal @ zone-evergreen.js:1742
scheduleTask @ zone-evergreen.js:378
onScheduleTask @ zone-evergreen.js:272
scheduleTask @ zone-evergreen.js:372
scheduleTask @ zone-evergreen.js:211
scheduleEventTask @ zone-evergreen.js:237
(anonymous) @ zone-evergreen.js:1911
(anonymous) @ http.js:2053
_trySubscribe @ Observable.js:42
subscribe @ Observable.js:28
(anonymous) @ subscribeTo.js:20
subscribeToResult @ subscribeToResult.js:7
_innerSub @ mergeMap.js:59
_tryNext @ mergeMap.js:53
_next @ mergeMap.js:36
next @ Subscriber.js:49
(anonymous) @ scalar.js:4
_trySubscribe @ Observable.js:42
subscribe @ Observable.js:28
call @ mergeMap.js:21
subscribe @ Observable.js:23
call @ filter.js:13
subscribe @ Observable.js:23
call @ map.js:16
subscribe @ Observable.js:23
addProduct @ products.service.ts:21
addProduct @ product-add.component.ts:26
(anonymous) @ ProductAddComponent.html:39
handleEvent @ core.js:34789
callWithDebugContext @ core.js:36407
debugHandleEvent @ core.js:36043
dispatchEvent @ core.js:22533
(anonymous) @ core.js:33721
(anonymous) @ platform-browser.js:1789
invokeTask @ zone-evergreen.js:391
onInvokeTask @ core.js:30885
invokeTask @ zone-evergreen.js:390
runTask @ zone-evergreen.js:168
invokeTask @ zone-evergreen.js:465
invokeTask @ zone-evergreen.js:1603
globalZoneAwareCallback @ zone-evergreen.js:1629
Show 41 more frames
products.service.ts:19 {ProductName: “jbkj”, ProductDescription: “hfh”, ProductPrice: “yu”}
:4000/products/add:1 POST http://localhost:4000/products/add 400 (Bad Request)
core.js:7187 ERROR HttpErrorResponse {headers: HttpHeaders, status: 400, statusText: “Bad Request”, url: “http://localhost:4000/products/add”, ok: false, …}
Joey
// add port variable in app.listen like this so node server is available
const server = app.listen(port,function(){
console.log(‘Listening on port ‘ + port);
});
Diego
I had the same problem. In which file do I add this code?
Ikhsan
Hi, in server.js
const server = app.listen(port, function() {
console.log(“Listening on port ” + port);
});
Vijay
Hi @Jesus Says
You must run the nodemon server inside the API path in cmd prompt.
like this
C:\Users\MEAN\store\api>nodemon server
[nodemon] 1.19.1
[nodemon] to restart at any time, enter `rs`
[nodemon] watching: *.*
[nodemon] starting `node server.js`
Listening on port 4000
Database is connected
Janani
In step 12, npm install nodemon –save-dev did not work for me. But npm install -g nodemon worked. (reference: https://www.npmjs.com/package/nodemon)
Krunal
Okay, that means you need to install it globally.
g
ERROR Error: “Uncaught (in promise): Error: Cannot match any routes. URL Segment: ‘products/edit/5d4948982897c040147caed3’
noMatchError@http://localhost:4200/vendor.js:93863:16
apply/<@http://localhost:4200/vendor.js:93827:28
error@http://localhost:4200/vendor.js:104256:31
_error@http://localhost:4200/vendor.js:101306:26
error@http://localhost:4200/vendor.js:101286:18
_error@http://localhost:4200/vendor.js:101306:26
error@http://localhost:4200/vendor.js:101286:18
_error@http://localhost:4200/vendor.js:101306:26
error@http://localhost:4200/vendor.js:101286:18
………………………….
Any idea ?
g
My “Edit” button doesn’t work.
g
Solved. In app-routing.module.ts
you need path: ‘products/edit/:id’,
not path: ‘edit/:id’,
Thanks.
g
Solved.
You need path: ‘products/edit/:id’,
not path: ‘edit/:id’,
Thanks.
g
path: ‘products/edit/:id’,
Lorenzo
Hi krunal,
Thank you very much for this great tutorial.
I have a question:
I tried to insert a inside the form but when I try to take the value of the select the console.log prints “undefined”
This is my html
Order
Select
One
Two
Three
I think the error is here.
(In the future I will replace the options with an ngfor)
Where am I wrong?
Can you give an example also for the ?
Thanks a lot.
Krunal
Please log your request in the node.js console and analyze the form data you are getting at the node.js server.
g
path: ‘products/edit/:id’,
Alex Vieira
Awesome
The Tutorial is really complete and extraordinarily explained and it is easy to understand, even for new users of angular.
Also bring us to mongodb that is a incredible NOSQL Database and sure the Node.js (Awesome).
Krunal
Thanks buddy!!
Francisco Oliveira
I got a message saying ERR_EMPTY_RESPONSE, any idea?
Krunal
Please check your database and see the inserted values otherwise log the request in the console.
Richard Lockyer
In step 12 nodemon should be installed globally otherwise when you start it you will get an error stating:
-bash: nodemon: command not found
Try
sudo npm install -g nodemon –save-dev
Francisco Oliveira
It worked already thx
If i want to use more than 1 schema how can i do it? Let’s say i want a login page and create accounts,do i need another script like server.js just for login routes?
Krunal
You need to define all of your routes let’s say in routes folder and import all the routes module inside the server.js file. There is only one server.js file for every project. You just need to import the different routing module inside the server.js file and you are good to go.
Multiv123
Hey, I’m trying to get search to work, but the query string keeps returning all the values from the database.
How do I filter the values from the querystring?
Krunal
I guess you need to log the query string value and analyze where is something wrong.
g
DELETE is not working properly. In product-get.component.html you give to the
deleteProduct function product._id which is not an id it’s just a hash.
so why would the splice in product-get.component.ts in deleteProduct function work?
I removed the splice and it works.
Krunal
Javascript splice() function is used to remove a particular item from the id or index from the array
atul
super cool very useful to me thank you very much
Krunal
Thanks, buddy
Diego
[Error] Failed to load resource: the server responded with a status of 404 (Not Found) (add, line 0)
And it happens for add, edit, like the folders and files wasn’t there. I think it could be writing on db forbidden on my Mac or uri problems on code, may be….
nalini
I am getting below error in the debugger console when I try to add
Object { headers: {…}, status: 400, statusText: “Bad Request”, url: “http://localhost:4000/products/add”, ok: false, name: “HttpErrorResponse”, message: “Http failure response for http://localhost:4000/products/add: 400 Bad Request”, error: “unable to save to database” }
Krunal
Sometimes, the adblocker blocks the network request. Disable it and try again.
nalini
please ignore above is solved after passing correct data
Diego
How do you solved this?
Youenn
try to pass correct data like :
name : Apple
desc : apple from a tree,
price : 100
Youenn
if someone is having trouble with nodemon server try this : npx nodemon server.js
Henry Blanco
Hi Krunal and all the community here.
I want to thank you for this excellent tutorial and all the help provided here. It has been very helpful for me.
Henry
Palanisamy
Great tutorial !! Simply awesome !! Step by step guide for anybody starting to learn server side java script programming. I will definitely encourage anybody to go through this tutorial.
Cheers !
Pal
Krunal
Thanks and keep learning and sharing.
Lucas Alves
Is there any way to do with MySQL instead of mongo?
Zak Leber
yes but is not good idea
Toes
Very good article Krunal for Angular8.
Just one change done : added “@import “../node_modules/bootstrap/dist/css/bootstrap.css”; in style.css to apply the css. rest is fine.
Krunal
That would also find.
Goutham SV
Hi ,
For updating the current value, i didnt saw PUT method written anywhere above.
Can someone please explain this?
Krunal
You can update any value using the post method by providing the id for that particular record.
Govind
Where i need run this cmd inside API root folder or Angular root folder or globally in cmd
The next thing is to connect the MongoDB database with our node express application.
If you have not installed a MongoDB database, then install it and then start the MongoDB server using the following command.
mongod
Krunal
For node.js api, please run inside the node root folder and for angular development server, please run the command from angular root folder.
Azeem
Krunal, can i tried it in root and in api folder but it shows error.
mongo : The term ‘mongo’ is not recognized as the name of a cmdlet, function, script file, or operable program. Check the spelling
of the name, or if a path was included, verify that the path is correct and try again.
At line:1 char:1
+ mongo
+ ~~~~~
+ CategoryInfo : ObjectNotFound: (mongo:String) [], CommandNotFoundException
+ FullyQualifiedErrorId : CommandNotFoundException
I’m using visualstudio code. can you help me about this?
Mohammed
I am new to Angular. And my primary interest is to follow the development of CRUD example using MongoDB. I have found this article very useful in learning the technology. But I am facing a problem. I don’t have any errors. All the servers – Mongo, Express and ng – are running fine. But when I click on the Create Product button nothing happens, that is, the mongo db is not updated.
Can any one help?
Krunal
Log the input form values at node console and see what you are getting.
arun
when we submit product form that’s not submit the form value in mongodb and not fetch any record’s. where is the issues.
Josh Harris
Fantastic tutorial! Two notes for anybody out there who might be puzzled.
In Step 16, the updateProduct method on the product-edit.component.ts accepts 4 arguments, but should only accept 3. Remove the id and it will still work because the id passed to the service doesn’t come from outside the method. It comes from the route parameters defined within the method itself.
In Step 17, the deleteProduct method always removes the first item in the list on the template. To fix, pass the index for the product in the array from the template to the method (like this: https://stackoverflow.com/questions/44612400/how-to-pass-the-index-value-of-a-ngfor-loop-into-the-component), and use it as the first argument in the splice method instead of the id. The ID isn’t the correct value to pass to the splice method to remove the deleted item from the array, you must pass the index value.
Hozaifa
can you achieve CRUD operations without any database?
gayan
can you make post with image upload as a example add productimage to this
Vipul
Hi, Kunal
It’s a fantastic tutorial, Thanks for this.
But facing one error, help to resolve it
ERROR in src/app/product-edit/product-edit.component.html:43:30 – error TS2554: Expected 4 arguments, but got 3.
43 <button (click) = "updateProduct(ProductName.value, ProductDescription.value, ProductPrice.value)" type="submit" class="btn btn-primary"