
We will create separate frontend (Vue.js) and backend (Laravel 11) projects so you can easily understand how this works.
The file upload component will be created in Vue.js, and Laravel provides a backend API to handle the file, save its meta information, and upload it to the server. We will upload an image to the server.
Here is the step-by-step guide:
Step 1: Create a new Vue.js Project.
Open your terminal or CMD and type the following command to create a new project:
npm create vite@latest vue-file-app -- --template vue
It will create a new folder called “vue-file-app”.
Go inside a folder:
cd vue-file-app
Install the dependencies using this command:
npm install
It will start a development server, and you can access your project by going to this URL: http://localhost:5173/
Step 2: Install Bootstrap 5
We will use Bootstrap CSS Framework to style our Vue components.
npm install bootstrap --save
Import the Bootstrap CSS file inside the “src/main.js” file:
import { createApp } from 'vue';
import App from './App.vue';

import 'bootstrap/dist/css/bootstrap.min.css';

const app = createApp(App);

app.mount('#app');
If you go to the “src” folder, you will see a file called “App.vue”.
Update the App.vue file with the below code:
<template>
  <div id="app" class="container mt-5">
    <form>
      <h1 className="mb-3">Vue File Upload</h1>
      <div className="mb-3">
        <input className="form-control" type="file" />
      </div>
      <button type="submit" className="btn btn-primary">Upload</button>
    </form>
  </div>
</template>

<script>
export default {

}
</script>
Save this file and go to the browser, and you will see your upload field like this:
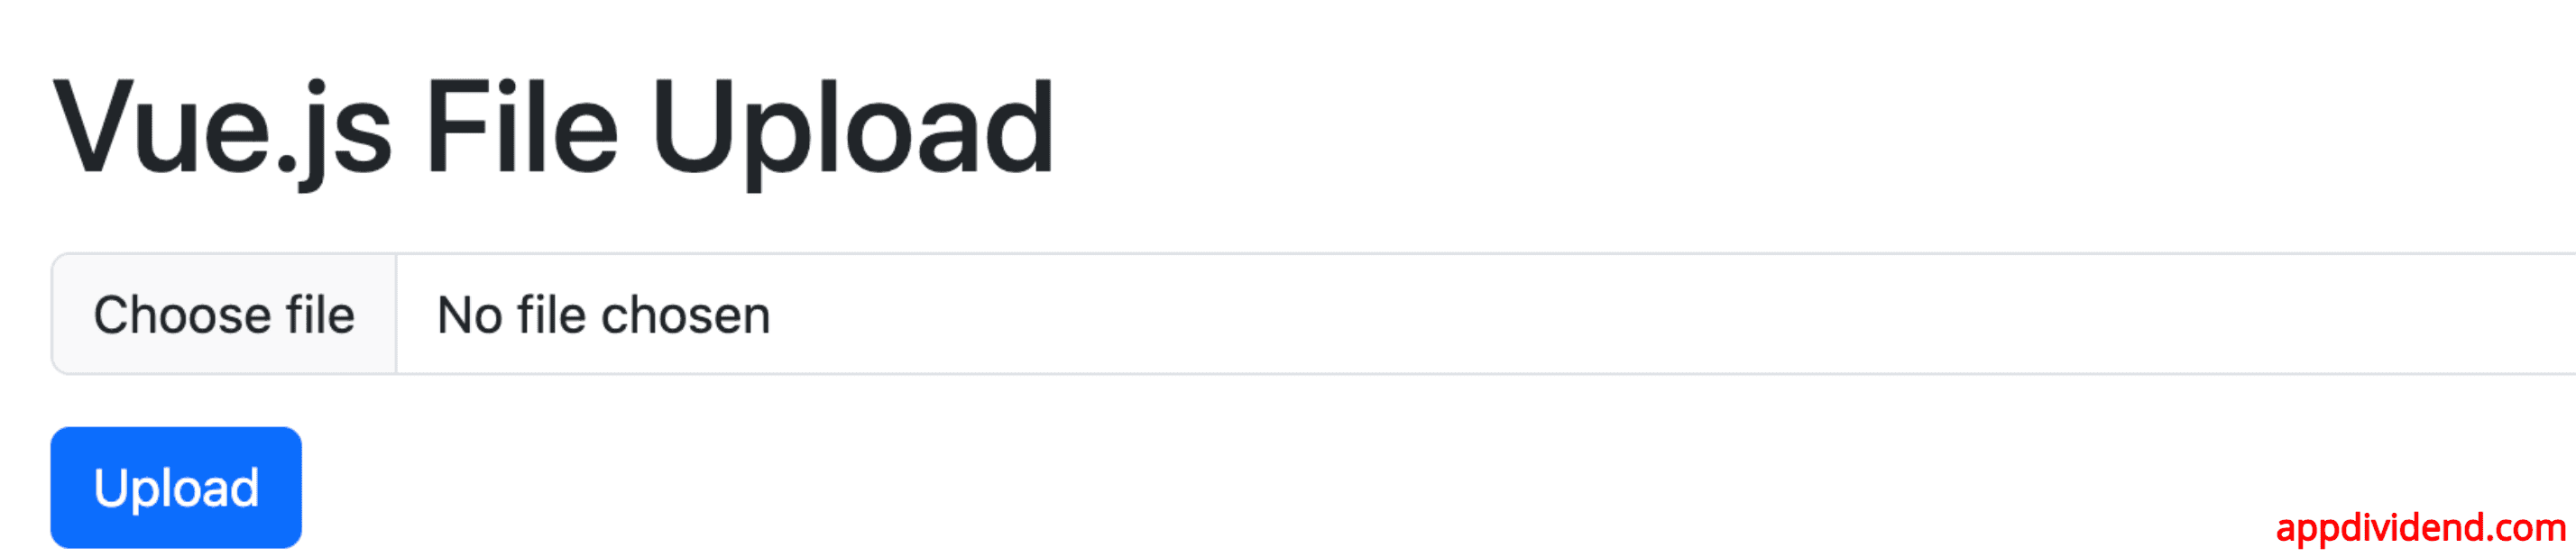
Step 3: Adding a state and event
We will add two events that will trigger respective functions:
1) @submit
2) @change
The @submit event will trigger when the form is submitted.
The @change event will trigger when you try to upload a file.
Add the code below to the src/App.vue file:
<template>
  <div id="app" class="container mt-5">
    <form @submit="formSubmit">
      <h1 class="mb-3">Vue.js File Upload</h1>
      <div class="mb-3">
        <input class="form-control" type="file" @change="onFileChange" />
      </div>
      <button type="submit" class="btn btn-primary">Upload</button>
    </form>
  </div>
</template>

<script setup>
import { ref } from 'vue';

const file = ref(null);

const onFileChange = (e) => {
  file.value = e.target.files[0];
};

const formSubmit = async (e) => {
  e.preventDefault();

  const formData = new FormData();
  formData.append('file', file.value);
};
</script>
In this code, we defined two functions for two events.
The onFileChange() function will be called when the @change event is triggered.
The formSubmit() function will be called when the @submit event is triggered.
Inside the formSubmit() function, we create a FormData object and append a file to that object.
Step 4: Install Axios
We must install a client-side HTTP library to send a POST request to the Laravel Server.
Axios is the most famous and helpful library for a client to send an HTTP request to the server.
Let’s install that library:
npm install axios
Step 5: Sending a POST Request
Import the axios library inside src/App.vue file, configure the request object, and send it to the Laravel server like this:
<template>
  <div id="app" class="container mt-5">
    <form @submit="formSubmit">
      <h1 class="mb-3">Vue.js File Upload</h1>
      <div class="mb-3">
        <input class="form-control" type="file" @change="onFileChange" />
      </div>
      <button type="submit" class="btn btn-primary">Upload</button>
    </form>
    <!-- Success message -->
    <div v-if="success" class="alert alert-success mt-3">
      File uploaded successfully!
    </div>
    <!-- Error message -->
    <div v-if="output" class="alert alert-danger mt-3">
      There was an error uploading the file: {{ output.message }}
    </div>
  </div>
</template>

<script setup>
import { ref } from 'vue';
import axios from 'axios';

const file = ref(null);
const success = ref(false);
const output = ref('');

const onFileChange = (e) => {
  file.value = e.target.files[0];
};

const formSubmit = async (e) => {
  e.preventDefault();

  const config = {
    headers: { 'content-type': 'multipart/form-data' }
  };

  const formData = new FormData();
  formData.append('file', file.value);

  try {
    const response = await axios.post('http://localhost:8000/api/upload', formData, config);
    success.value = response.data.success;
    output.value = '';
  } catch (error) {
    output.value = error;
    success.value = false;
  }
};
</script>
In this code, when the form is submitted, we configure an axios post request and send that request to the Laravel API server.
Step 6: Install Laravel 11
Let’s create a backend, and right now, Laravel 11 is the latest version.
So, let’s create a Laravel project using the below command:
composer create-project laravel/laravel image-app --prefer-dist
Step 7: Configure the database.
Add your database credentials in the .env file.
DB_CONNECTION=mysql
DB_HOST=127.0.0.1
DB_PORT=8889
DB_DATABASE=fileupload
DB_USERNAME=root
DB_PASSWORD=root
Step 8: Create one model and migration file.
php artisan make:model File -m
It will create both model and migration files.
Step 9: Define the schema in the migration file.
Go to the create_files_table.php file and add the schema to it.
public function up(): void
{
        Schema::create('files', function (Blueprint $table) {
            $table->id();
            $table->string('file_name');
            $table->timestamps();
        });
}
Step 10: Publish api.php file
By default, Laravel 11 does not come with an api.php file.
To publish the api.php file, you need to publish the api.php route file using this command:
php artisan install:api
It will create an api.php file inside the routes folder.
Before defining routes, we can create a controller called FileController.php.
php artisan make:controller FileController --resource
Define the following route in the routes/api.php file.
<?php

use Illuminate\Http\Request;
use Illuminate\Support\Facades\Route;
use App\Http\Controllers\FileController;

Route::get('/user', function (Request $request) {
    return $request->user();
})->middleware('auth:sanctum');

Route::resource('upload', FileController::class);
You can always get a quick overview of your application’s routes by running the route:list artisan command.
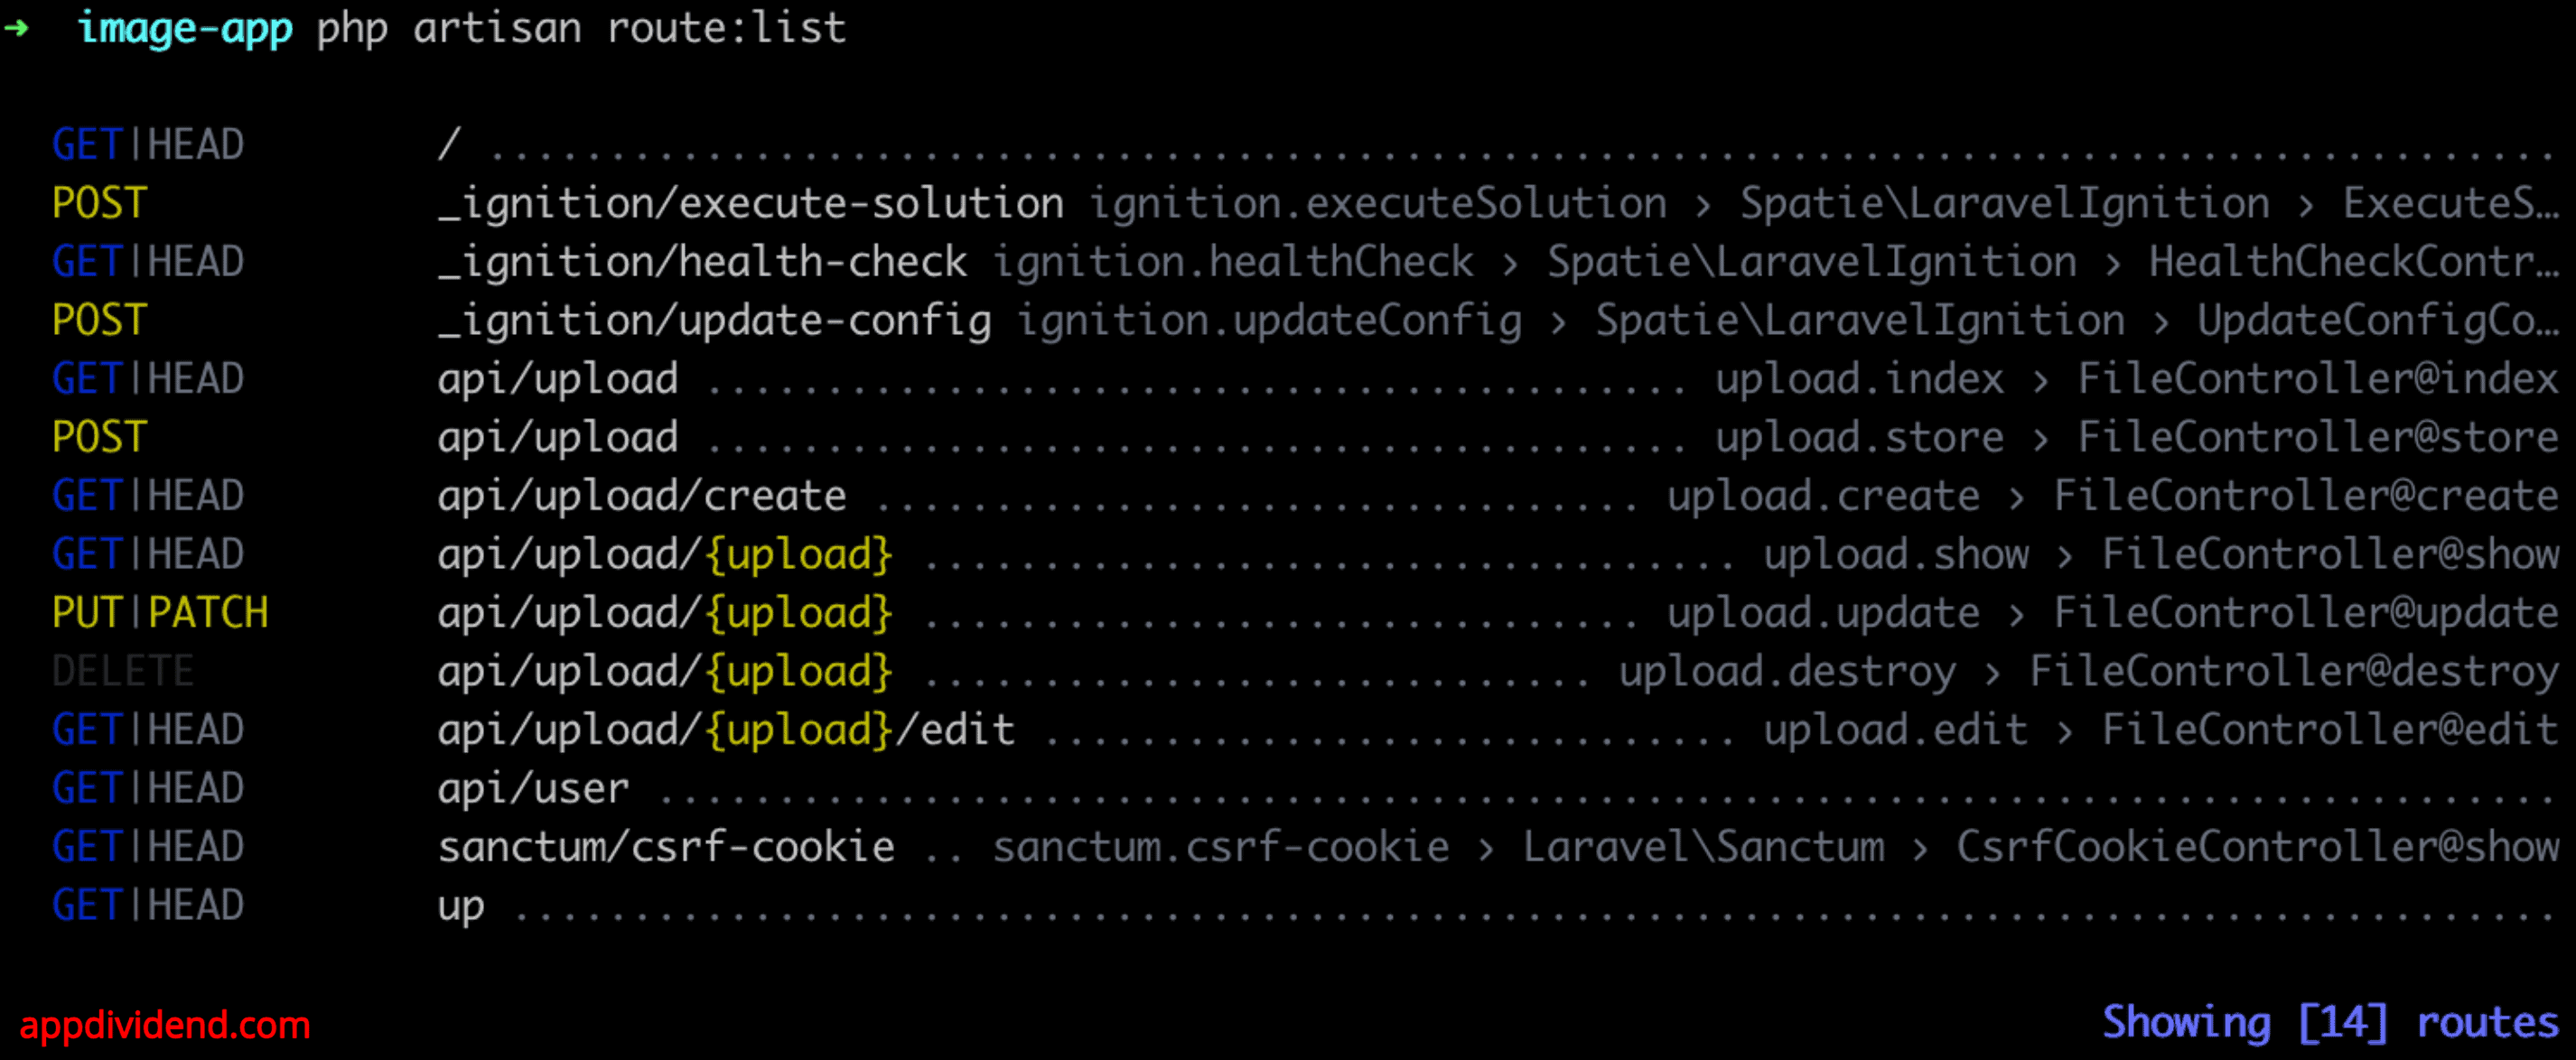
You can see that our POST request route should be like this: http://localhost:8000/api/upload
Step 11: Create a CORS Middleware
Our Vue.js project is running on the client-side development server, and the Laravel Project is running on another server.
If you try to send a request from the React development server to the Laravel API server, you will get this error: No ‘Access-Control-Allow-Origin’ header is present on the requested resource. Origin ‘http://localhost:8000’ is therefore not allowed access. The response had HTTP status code 400.
To fix this error, we need to create a middleware CORS in the Laravel Project.
To create a middleware in Laravel, type the following command:
php artisan make:middleware Cors
It will create a new file called Cors.php inside the app/Http/Middleware folder.
Add the below code inside the Cors.php file:
<?php

namespace App\Http\Middleware;

use Closure;
use Illuminate\Http\Request;
use Symfony\Component\HttpFoundation\Response;

class Cors
{
    /**
     * Handle an incoming request.
     *
     * @param  \Closure(\Illuminate\Http\Request): (\Symfony\Component\HttpFoundation\Response)  $next
     */
    public function handle(Request $request, Closure $next): Response
    {
        $response = $next($request);

        $response->headers->set('Access-Control-Allow-Origin', '*');
        $response->headers->set('Access-Control-Allow-Methods', 'POST, GET, OPTIONS, PUT, DELETE');
        $response->headers->set('Access-Control-Allow-Headers', 'Content-Type, X-Auth-Token, Origin, Authorization');

        return $response;
    }
}
Basically, we are allowing incoming requests to come from different servers.
Now, we need to register this Cors.php middleware into our Laravel application.
To do that, open the bootstrap/app.php file and add the below code:
<?php

use Illuminate\Foundation\Application;
use Illuminate\Foundation\Configuration\Exceptions;
use Illuminate\Foundation\Configuration\Middleware;
use App\Http\Middleware\Cors;

return Application::configure(basePath: dirname(__DIR__))
    ->withRouting(
        web: __DIR__ . '/../routes/web.php',
        api: __DIR__ . '/../routes/api.php',
        commands: __DIR__ . '/../routes/console.php',
        health: '/up',
    )
    ->withMiddleware(function (Middleware $middleware) {
        $middleware->api(prepend: [Cors::class,]);
    })
    ->withExceptions(function (Exceptions $exceptions) {
        //
    })->create();
Here, we are prepending the Cors middleware to the Global API middleware.
Step 12: Uploading a file to the Server
We will store a filename in the database and upload a file to the storage folder.
Add the following code inside the FileController.php file’s store() function.
public function store(Request $request)
{
        // Store the uploaded file
        $file = $request->file('file');

        if ($file) {
            $fileName = time() . '_' . $file->getClientOriginalName();
            $destinationPath = 'uploads';
            try {
                Storage::disk('local')->putFileAs(
                    $destinationPath,
                    $file,
                    $fileName
                );

                // Store file information in the database
                $uploadedFile = new File();
                $uploadedFile->file_name = $fileName;
                $uploadedFile->save();

                // Return a JSON response with success message
                return response()->json(['success' => "File uploaded successfully."], 200);
            } catch (\Exception $e) {
                // Return a JSON response with error message
                return response()->json(['message' => "Failed to upload the file.", 'error' => $e->getMessage()], 500);
            }
        } else {
            // Return a JSON response if no file was uploaded
            return response()->json(['message' => "No file uploaded."], 400);
        }
}
Here, we store the whole file inside the “storage/app/uploads” folder and save the file name in our database.
You can start the Laravel Development Server.
Type the following command.
php artisan serve
Go to this URL: http://localhost:5173/ and try to upload an image.
If you are successful, you will see a success message like this:
 Now, if you check out the database, you will see a file name like this:

That’s all!

mimie
hi,
i got this error when upload file:
“message”: “Can’t write image data to path (C:\\xampp\\htdocs\\vue-app\\public\\images/1521536190.jpeg)”,
“exception”: “Intervention\\Image\\Exception\\NotWritableException”,
“file”: “C:\\xampp\\htdocs\\vue-app\\vendor\\intervention\\image\\src\\Intervention\\Image\\Image.php”,
“line”: 143,
“trace”: [
{
“file”: “C:\\xampp\\htdocs\\vue-app\\app\\Http\\Controllers\\ImageController.php”,
“line”: 16,
“function”: “save”,
“class”: “Intervention\\Image\\Image”,
“type”: “->”
},
Moses Adetola
Check that you have public/images directory.
navid
hi,
thank you about pulish this article, but have question please, you use vm instance and set image data but this value just have value in inner scope and actuly after this scope {vm.image = …} image get default value empty
can you choose better way to set vm.image globaly not locally?
Omar Morales
what can i do if i want to upload word or pdf files? because this only works with images right?
fahad
i have a problem