
Whether you want to inform users or edit the video by aligning audio or subtitle tracks accurately, you need to determine the video’s duration.
The video format can be anything from .mp4 to .avi or .mov. When building an application, you must display metadata information to the user.
Here are five ways:
- Using opencv (opencv-python)
- Using FFprobe
- Using pymediainfo (Fastest way)
- Using FFmpeg-Python
- Using moviepy (Slowest way)
To illustrate this, I will use the “sample.mp4” video as an example.
From the video, you can see that it is around 7 seconds.
Now, we will get the length using various methods and compare each method’s time and space complexities, the total time required to fetch the length, its pros and cons, and other important information that will help the user decide which approach to take.
Method 1: Using OpenCV
OpenCV is a robust library for creating computer vision applications, and you can use it to extract metadata, including duration, from a video or image file.
We can install opencv-python using the command below:
pip install opencv-python
Here is the complete code:
import cv2


def get_video_duration_opencv(file_path):
    cap = cv2.VideoCapture(file_path)
    if not cap.isOpened():
        raise ValueError("Cannot open video file")
    fps = cap.get(cv2.CAP_PROP_FPS)
    frame_count = cap.get(cv2.CAP_PROP_FRAME_COUNT)
    duration = frame_count / fps if fps else 0
    cap.release()
    return duration


print(get_video_duration_opencv("sample.mp4"))
Output
7.666666666666667
In this code, we are calculating the duration using frame_count / fps, where fps is frames per second, which you can get from .get(cv2.CAP_PROP_FPS), and frame_count from .get(cv2.CAP_PROP_FRAME_COUNT) method.
From the output, we can see that the video is 7.666s to be precise.
The OpenCV approach is ideal when you are already working with computer vision and don’t want to install another library for this job.
Method 2: Using FFprobe
FFprobe is a command-line tool from the FFMpeg suite that helps extract metadata from media files, such as video.
If you are looking for reliable duration extraction across various formats and codecs, I highly recommend using this approach exclusively.
If you have not installed the FFMpeg suite, then you can install it using the command below:
brew install ffmpeg
Since I am using MacOS, I will use Homebrew to install dependencies. Installation and usage may vary across operating systems. If you are using Windows or Linux, do a quick Google search and install it.
I will create a custom Python function that accepts the video file and utilizes the subprocess module.run() function to get the metadata.
import subprocess
import json


def get_video_duration_ffprobe(file_path):
    cmd = [
        'ffprobe', '-v', 'error',
        '-show_entries', 'format=duration',
        '-of', 'json',
        file_path
    ]
    result = subprocess.run(cmd, stdout=subprocess.PIPE,
                            stderr=subprocess.PIPE, text=True)
    if result.returncode != 0:
        raise ValueError("ffprobe error: " + result.stderr)
    data = json.loads(result.stdout)
    return float(data['format']['duration'])


print(get_video_duration_ffprobe("sample.mp4"))
Output
7.666667
Method 3: Using pymediainfo
The pymediainfo is a Python wrapper for the mediainfo library. Before installing pymediainfo, we need to install the mediainfo package using the command below:
brew install mediainfo
Make sure that it is installed and set the environment variables.
Now, we will install the pymediainfo library:
pip install pymediainfo
It supports a wide range of video and audio formats and can extract information about multiple tracks within a media file. Here is the program:
from pymediainfo import MediaInfo

def get_video_duration_pymediainfo(file_path):
    media_info = MediaInfo.parse(file_path)
    for track in media_info.tracks:
        if track.track_type == 'General':
            return float(track.duration) / 1000  # duration in seconds
    raise ValueError("Duration not found")

print(get_video_duration_pymediainfo("sample.mp4"))
Output
7.667
We used the MediaInfo.parse() function, which accepts a video file, and then utilized the .duration property to retrieve the duration of that video file.
Method 4: Using FFmpeg-Python
There is a library called “ffmpeg-python” that allows interaction without directly invoking subprocess commands to fetch the duration of the input video file.
You can install the ffmpeg-python package using the command below:
pip install ffmpeg-python
Now, you can use the code below:
import ffmpeg


def get_video_duration_ffmpeg_python(file_path):
    try:
        probe = ffmpeg.probe(file_path)
        duration = float(probe['format']['duration'])
        return duration
    except ffmpeg.Error as e:
        raise ValueError("ffmpeg error: " + e.stderr.decode())

print(get_video_duration_ffmpeg_python("sample.mp4"))
Output
7.666667
Method 5: Using moviepy
The “moviepy” is a specific video editing library built on top of other libraries like FFmpeg. This library not only offers metadata extraction but also provides video editing capabilities.
Install the moviepy library first:
pip install moviepy
Here is the small code:
from moviepy.editor import VideoFileClip


def get_video_duration_moviepy(file_path):
    with VideoFileClip(file_path) as clip:
        return clip.duration


print(get_video_duration_moviepy("sample.mp4"))
Output
7.67
If you are looking for video editing functionalities with metadata extraction, I highly recommend using the “moviepy” library.
Measuring execution time for each approach
I want to determine the fastest approach for time-sensitive applications, which is why I will measure the time taken by each method to obtain the duration of a video. This is my personal analysis tes,t which can help decide which method a user can choose for their project.
import time
import cv2
import subprocess
import json
import ffmpeg
from moviepy.editor import VideoFileClip
from pymediainfo import MediaInfo
import matplotlib.pyplot as plt

# Function to measure execution time


def measure_execution_time(func, *args):
    start_time = time.time()
    try:
        func(*args)
    except Exception as e:
        print(f"Error in {func.__name__}: {e}")
    end_time = time.time()
    return end_time - start_time

# OpenCV method


def get_video_duration_opencv(file_path):
    cap = cv2.VideoCapture(file_path)
    if not cap.isOpened():
        raise ValueError("Cannot open video file")
    fps = cap.get(cv2.CAP_PROP_FPS)
    frame_count = cap.get(cv2.CAP_PROP_FRAME_COUNT)
    duration = frame_count / fps if fps else 0
    cap.release()
    return duration

# FFprobe method


def get_video_duration_ffprobe(file_path):
    cmd = [
        'ffprobe', '-v', 'error',
        '-show_entries', 'format=duration',
        '-of', 'json',
        file_path
    ]
    result = subprocess.run(cmd, stdout=subprocess.PIPE,
                            stderr=subprocess.PIPE, text=True)
    if result.returncode != 0:
        raise ValueError("ffprobe error: " + result.stderr)
    data = json.loads(result.stdout)
    return float(data['format']['duration'])

# FFMpeg-python method


def get_video_duration_ffmpeg_python(file_path):
    try:
        probe = ffmpeg.probe(file_path)
        duration = float(probe['format']['duration'])
        return duration
    except ffmpeg.Error as e:
        raise ValueError("ffmpeg error: " + e.stderr.decode())

# MoviePy method


def get_video_duration_moviepy(file_path):
    with VideoFileClip(file_path) as clip:
        return clip.duration

# Pymediainfo method


def get_video_duration_pymediainfo(file_path):
    media_info = MediaInfo.parse(file_path)
    for track in media_info.tracks:
        if track.track_type == 'General':
            return float(track.duration) / 1000  # duration in seconds
    raise ValueError("Duration not found")


# File path
file_path = "sample.mp4"

# Measure execution times
durations = {
    "OpenCV": measure_execution_time(get_video_duration_opencv, file_path),
    "FFprobe": measure_execution_time(get_video_duration_ffprobe, file_path),
    "FFmpeg-Python": measure_execution_time(get_video_duration_ffmpeg_python, file_path),
    "MoviePy": measure_execution_time(get_video_duration_moviepy, file_path),
    "Pymediainfo": measure_execution_time(get_video_duration_pymediainfo, file_path),
}

# Plotting the results
plt.figure(figsize=(10, 6))
bars = plt.bar(durations.keys(), durations.values(), color='skyblue')
plt.xlabel('Method')
plt.ylabel('Execution Time (seconds)')
plt.title('Execution Time Comparison for Video Duration Extraction')
plt.xticks(rotation=45)

# Adding the duration value on top of each bar
for bar in bars:
    yval = bar.get_height()
    plt.text(bar.get_x() + bar.get_width() / 2, yval,
             f'{yval:.2f}s', ha='center', va='bottom')

plt.tight_layout()
plt.show()
Output
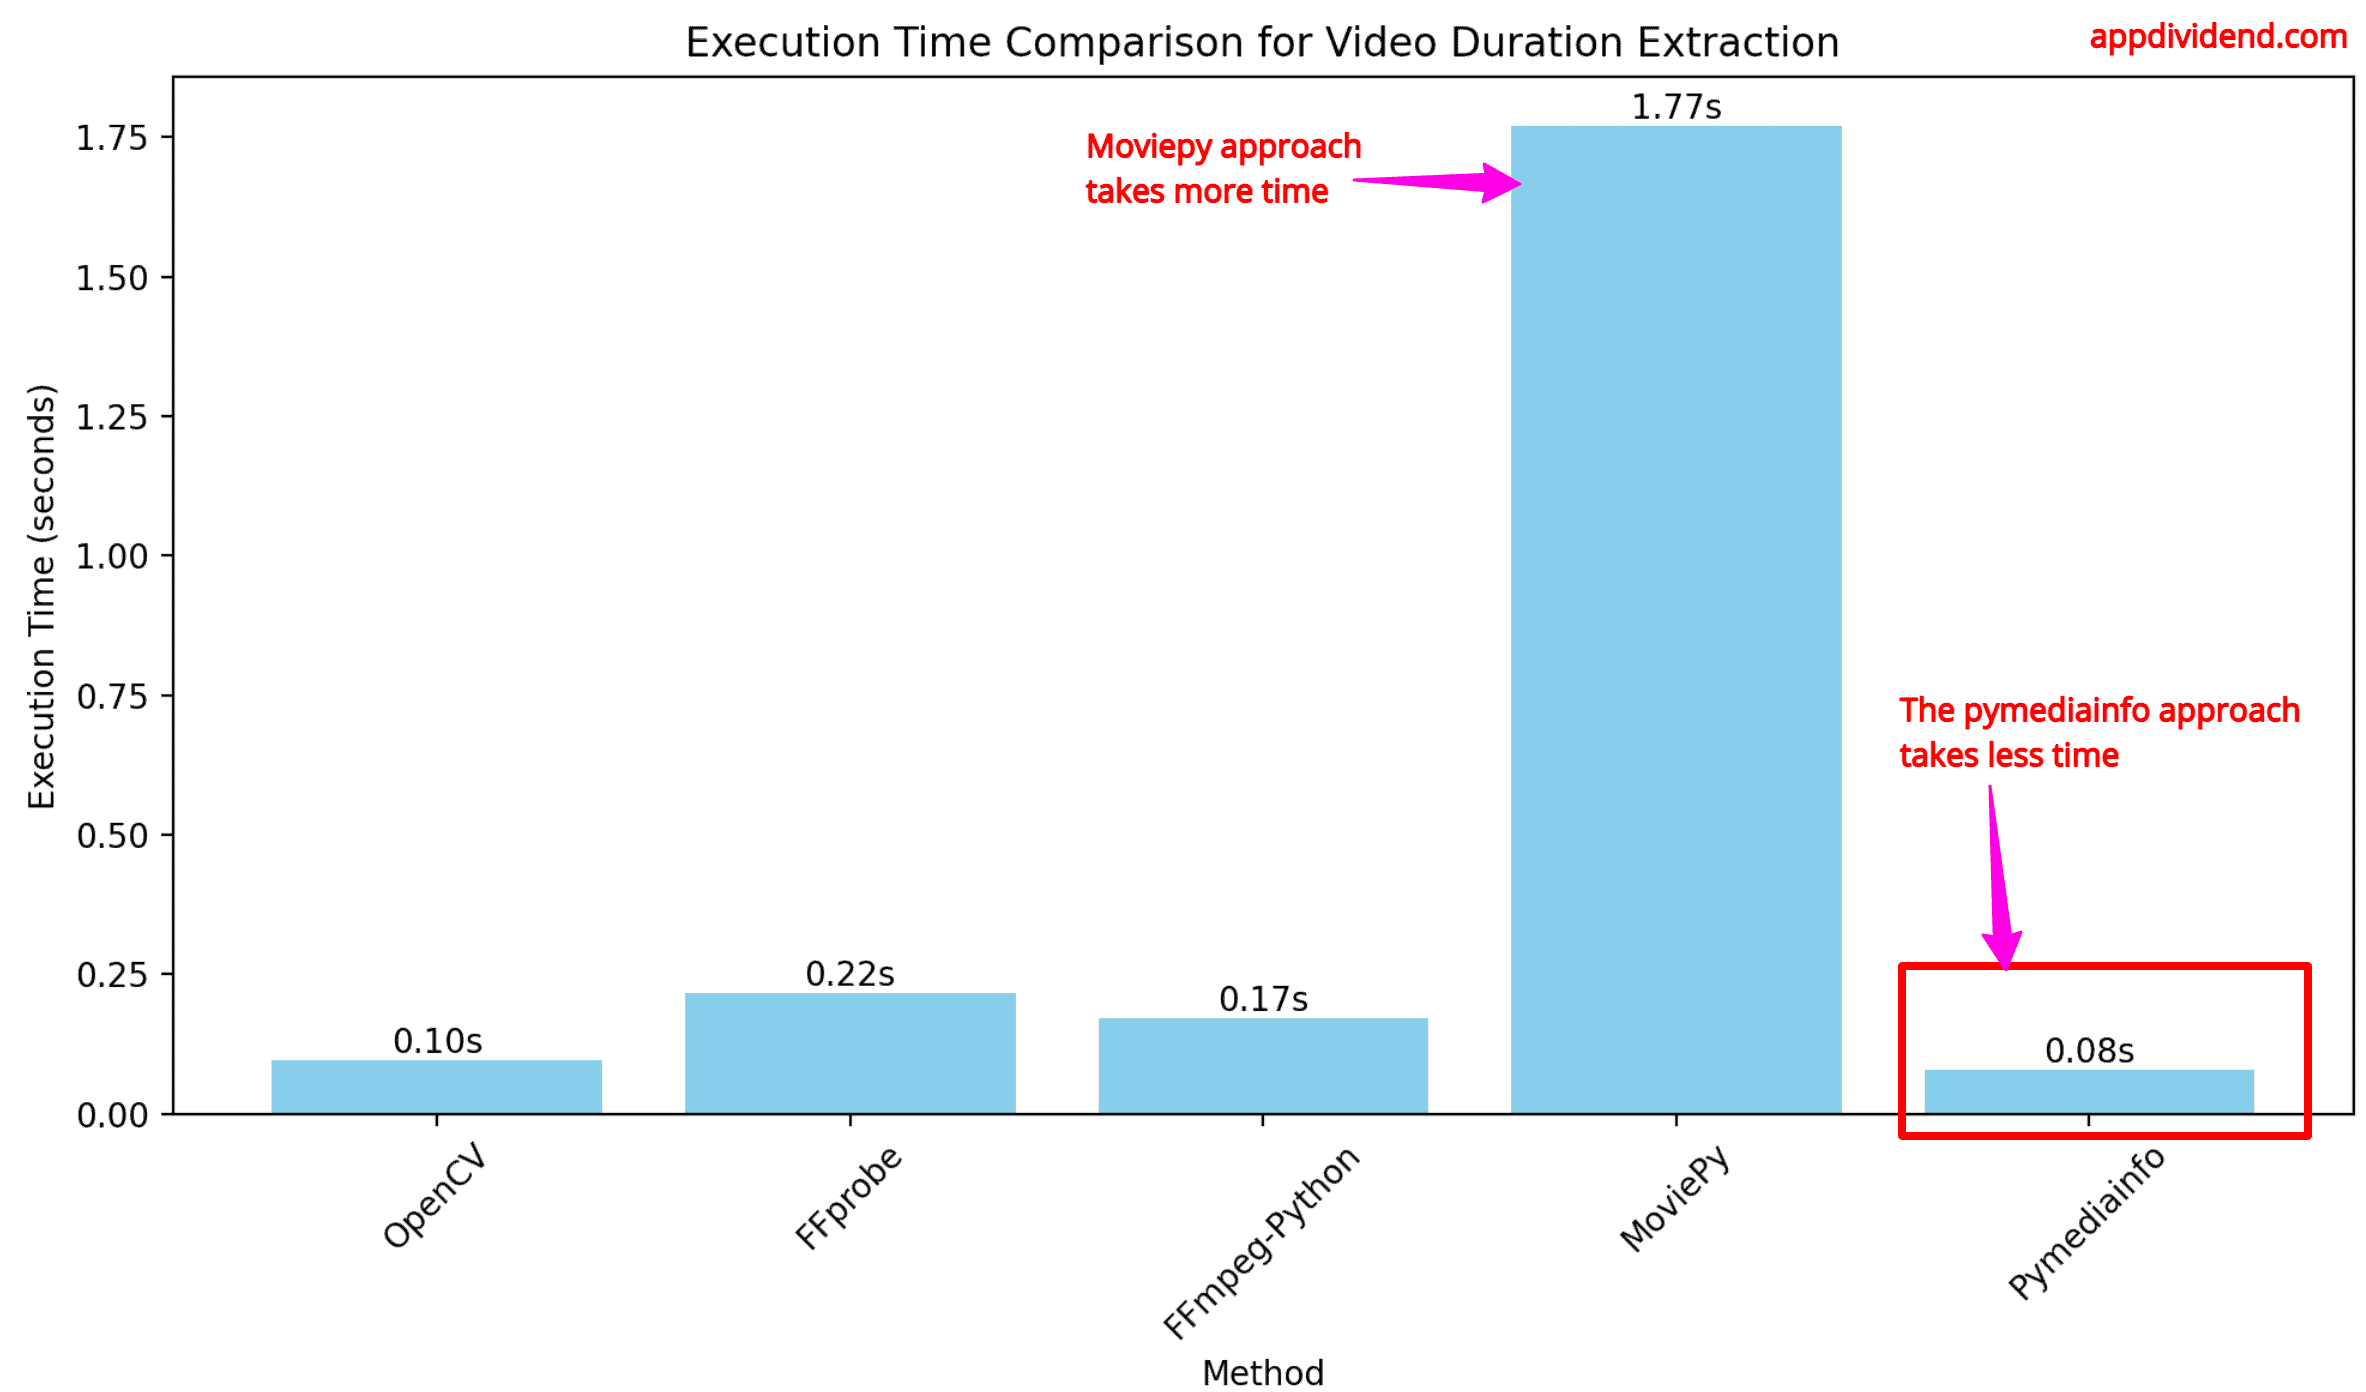
As shown in the chart above, the pymediainfo and OpenCV approaches take very little time to execute, whereas the moviepy approach takes the longest.
It again depends on the video, codec, and its length. Based on my experiments, I concluded that either OpenCV or the pymediainfo approach can be used.
Comparative Summary Table
| Method | Dependencies | Time Complexity | Space Complexity | Pros | Cons | Ideal Use Case | Execution Time |
|---|---|---|---|---|---|---|---|
| OpenCV | OpenCV | O(1) | O(1) | It is widely used.
No external tools |
Potential inaccuracy for some codecs.
Limited metadata |
If you are already using opencv for basic video processing tasks | 0.10 s |
| ffprobe (Subprocess) | FFmpeg | O(n) | O(1) | Highly accurate.
Reliable during various codecs. Comprehensive support for various video formats. |
It requires an external FFmpeg installation. | When you need precise metadata extraction. | 0.22 s |
| ffmpeg-python | FFmpeg, ffmpeg-python | O(n) | O(1) | Pythonic interface.
It leverages FFmpeg. |
It requires FFmpeg, which can be a complex process. | Projects using FFmpeg features.
It might be overkill for small tasks. |
0.17s |
| moviepy | moviepy, FFmpeg | O(1) | O(1) | It provides a simple API for video editing capabilities, including fetching the duration. | Dependency overhead.
It is significantly slower compared to other approaches. |
Projects needing both metadata and editing | 1.77 s |
| pymediainfo | MediaInfo | O(n) | O(1) | It is the fastest method.
Detailed metadata with high accuracy. |
It requires MediaInfo library installation.
Setting up on different operating systems can be challenging. |
Comprehensive media metadata extraction | 0.08s |
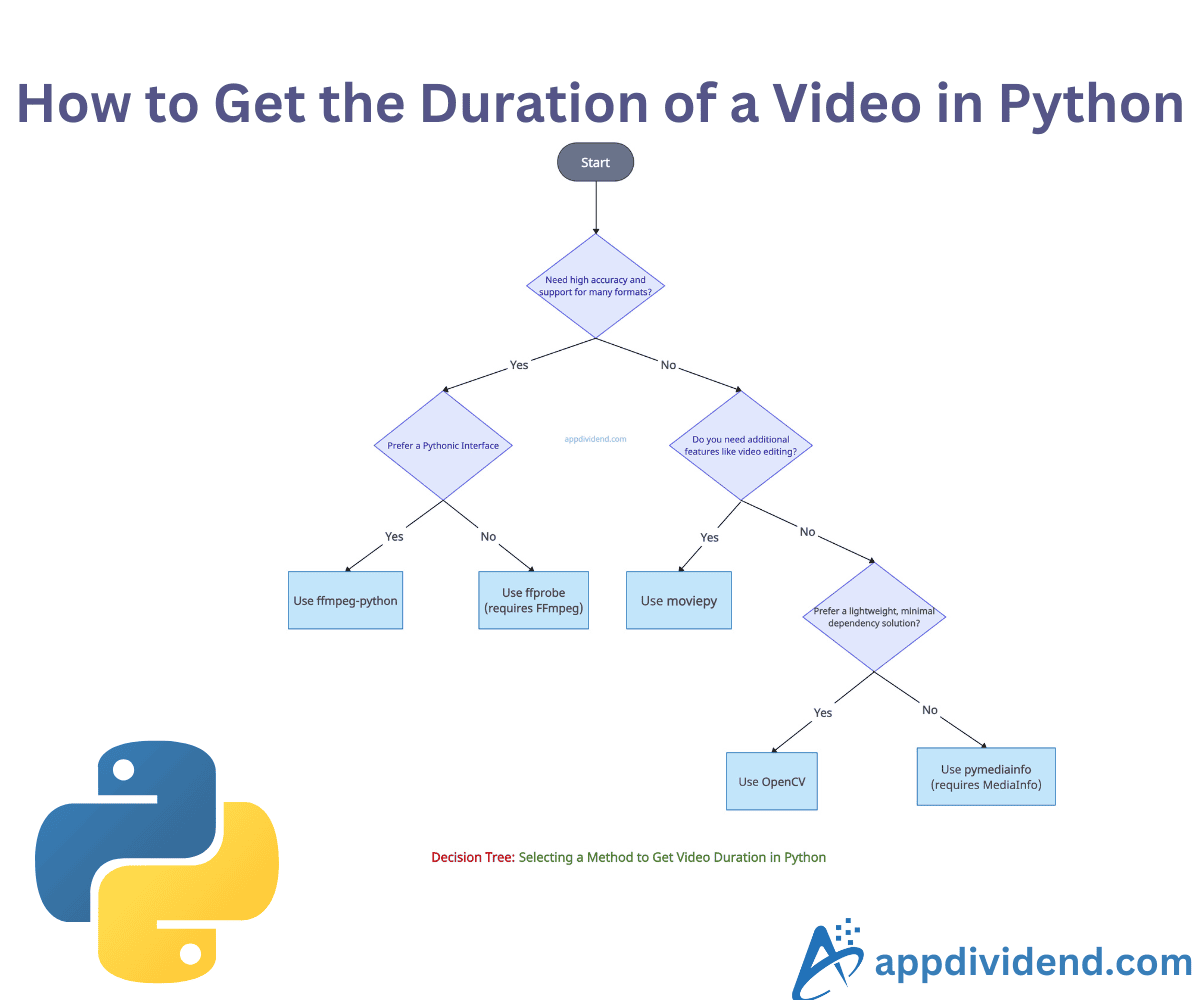
Decision Tree diagram
Visual representation always helps users understand which method to use in a given scenario.
I will create a decision tree diagram that guides users through decision points based on their specific needs (e.g., requiring high accuracy and minimal dependencies).
Here is the figure:

That’s all!