
Here is the step-by-step guide to creating a CRUD application using Laravel 11 and Vue.js 3:
Step 1: Setting up a new project
Here is the command to create a new Laravel 11 project:
composer create-project laravel/laravel newlaravue --prefer-dis
After installing the project, go to the folder.
cd newlaravue
Type the following command to install the JavaScript dependencies.
npm install
It will install the basic dependencies, but there are some dependencies that we need to install manually.
We have to build our frontend using the Vue framework using the Vite frontend building tool, so we need to install the vue and @vitejs/plugin-vue plugin:
npm install vue @vitejs/plugin-vue
Here, we installed Vue.js and an important plugin that enables Vue.js using Vite.
Now, modify the vite.config.js file, which is at the root of your project:
import { defineConfig } from 'vite';

import laravel from 'laravel-vite-plugin';
import vue from '@vitejs/plugin-vue';

export default defineConfig({
    plugins: [
        laravel({
            input: [
                'resources/sass/app.scss',
                'resources/js/app.js',
            ],
            refresh: true,
        }),
        vue({
            template: {
                transformAssetUrls: {
                    base: null,
                    includeAbsolute: false,
                },
            },
        }),
    ],
});
Step 2: Integrate Vue.js, bootstrap to Laravel application
To install the bootstrap and bootstrap-icons modules, type the below command:
npm install bootstrap bootstrap-icons --save-dev
Open the resources >> js >> bootstrap.js file and add the below code.
import 'bootstrap/dist/css/bootstrap.min.css';
import 'bootstrap-icons/font/bootstrap-icons.css';

import bootstrap from 'bootstrap/dist/js/bootstrap';
window.bootstrap = bootstrap;

import axios from 'axios';
window.axios = axios;
You can see that we imported bootstrap.min.css, bootstrap-icons.css, and axios.
We also need to install vue-axios to send an HTTP request to the Laravel server and vue-router library to create frontend routing for our application.
npm install --save-dev vue-axios vue-router
Go to the root of your Laravel project, open the terminal, and run the vite development server to compile our JavaScript files using this command:
npm run dev
It will start the development server to compile our front-end assets.
Add the below code to the resources >> views >> welcome.blade.php file.
<!doctype html>
<html lang="{{ app()->getLocale() }}">
    <head>
        <meta charset="utf-8">
        <meta http-equiv="X-UA-Compatible" content="IE=edge">
        <meta name="viewport" content="width=device-width, initial-scale=1">
        <title>Laravel Vue CRUD Application</title>
        @vite(['resources/js/app.js'])
    </head>
    <body>
        <div id="app">
        </div>
        <script>
           window.Laravel = <?php echo json_encode([
            'csrfToken' => csrf_token(),
            ]); ?>
        </script>
    </body>
</html>
You can see that here we added the @vite directive to import the app.js file, which is our build file for all the CSS and JS files.
So, ultimately, all the Vue.js files will be imported into this app.js file, which will be the main script for all of our JavaScript and CSS files.
Step 3: Create vue components
Let’s create an App.vue file inside the resources >> js folder.
Add the code below to the App.vue file.
<template>
    <div>
        <!-- Navbar -->
        <nav class="navbar navbar-expand-lg navbar-dark bg-dark">
            <div class="container">
                <router-link class="navbar-brand text-white" to="/">Laravel Vue CRUD</router-link>
                <button class="navbar-toggler" type="button" data-bs-toggle="collapse" data-bs-target="#navbarNav"
                    aria-controls="navbarNav" aria-expanded="false" aria-label="Toggle navigation">
                    <span class="navbar-toggler-icon"></span>
                </button>
                <div class="collapse navbar-collapse" id="navbarNav">
                    <ul class="navbar-nav">
                        <!-- Add more links as needed -->
                    </ul>
                </div>
            </div>
        </nav>

        <!-- Main Content -->
        <div class="container my-4">
            <router-view></router-view>
        </div>
    </div>
</template>

<script>
export default {
    // Your script content
}
</script>

<style>
/* Optionally add custom styles here */
</style>
Here, you can see that we created a navigation menu for our application, and inside the main content, we put the <router-view> tag, which will render the component based on the defined routes.
Create a components folder inside the resources >> js folder.
Inside the components folder, create three Vue components like this:
- Create.vue: This component will render the form that will create an Item.
- Edit.vue: This component will render the form through which you will edit the item.
- Index.vue: This component will list all the items.

We will add the code to all three components and the routing later in this project.
For now, let’s create a backend for our application.
Step 4: Create a database and connect to the Laravel application
For this tutorial, I am using the MySQL database with phpmyadmin client.
Here is the newly created database called “laravue”.

Now, add your database’s configuration to the .env file in the root of your Laravel project.
DB_CONNECTION=mysql
DB_HOST=127.0.0.1
DB_PORT=8889
DB_DATABASE=laravue
DB_USERNAME=root
DB_PASSWORD=root
Step 5: Create a backend in Laravel
The next step is to create a backend for our project.
We can use web routes or API routes, but for this project, we will stick with web routes.
We need to put all of our routes in the routes >> web.php file.
First, we are going to perform CRUD operations to create, update, and delete items.
Let’s define the schema for it. Then, we will create controllers and routes.
Go to your command line and type the following command. First, ensure you are at the root of our project folder.
php artisan make:model Item -m
It will create two files.
- Model file.
- Migration file.
Go to the migration file in the database >> migrations >> create_items_table and copy the following code.
<?php

use Illuminate\Database\Migrations\Migration;
use Illuminate\Database\Schema\Blueprint;
use Illuminate\Support\Facades\Schema;

return new class extends Migration {
    /**
     * Run the migrations.
     */
    public function up(): void
    {
        Schema::create('items', function (Blueprint $table) {
            $table->id();
            $table->string('name');
            $table->integer('price');
            $table->timestamps();
        });
    }

    /**
     * Reverse the migrations.
     */
    public function down(): void
    {
        Schema::dropIfExists('items');
    }
};
Go to the terminal and type the following command.
php artisan migrate
It will be an items table in the database.
An Item.php model file is also created in the app/Models folder.
It is time to create one resource controller called ItemController by typing the following command.
php artisan make:controller ItemController --resource
This ItemController contains all its CRUD operations methods. But first, we need to add the code to it.
So, I am now putting the whole file with all the operations.
<?php

// ItemController.php

namespace App\Http\Controllers;

use Illuminate\Http\Request;
use App\Models\Item;

class ItemController extends Controller
{
    /**
     * Display a listing of the resource.
     */
    public function index()
    {
        $items = Item::all();
        return response()->json($items);
    }

    /**
     * Show the form for creating a new resource.
     */
    public function create()
    {

    }

    /**
     * Store a newly created resource in storage.
     */
    public function store(Request $request)
    {
        $item = new Item([
            'name' => $request->get('name'),
            'price' => $request->get('price')
        ]);

        $item->save();
        return response()->json('Successfully added');
    }

    /**
     * Display the specified resource.
     */
    public function show(string $id)
    {
        //
    }

    /**
     * Show the form for editing the specified resource.
     */
    public function edit(string $id)
    {
        $item = Item::find($id);
        return response()->json($item);
    }

    /**
     * Update the specified resource in storage.
     */
    public function update(Request $request, string $id)
    {
        $item = Item::find($id);
        $item->name = $request->get('name');
        $item->price = $request->get('price');
        $item->save();

        return response()->json('Successfully Updated');
    }

    /**
     * Remove the specified resource from storage.
     */
    public function destroy(string $id)
    {
        $item = Item::find($id);
        $item->delete();

        return response()->json('Successfully Deleted');
    }
}
We also need to create a protected $fillable field in the Item.php file; otherwise, a ‘mass assignment exception‘ will be thrown.
<?php

// Item.php

namespace App\Models;

use Illuminate\Database\Eloquent\Factories\HasFactory;
use Illuminate\Database\Eloquent\Model;

class Item extends Model
{
    use HasFactory;

    protected $fillable = ['name', 'price'];
}
The last step would be registering the routes in the routes >> web.php file.
<?php

// web.php

use App\Http\Controllers\ItemController;
use Illuminate\Support\Facades\Route;

Route::get('/', function () {
    return view('welcome');
});

Route::resource('items', ItemController::class);
Our backend is done! Now, we will send an HTTP Request from Vue.js components, and the server will respond accordingly.
Save the file, go to the root of the project, and start the Laravel development server using this command:
php artisan serve
Step 6: Create frontend routing using vue-router
We created three Vue components inside the resources >> js >> components folder.
Let’s register the route for three components to display different views.
Write the following code inside the resources >> js >> app.js file.
import './bootstrap';
import { createApp } from 'vue';
import { createRouter, createWebHistory } from 'vue-router';


import App from './App.vue';
import Create from './components/Create.vue';
import Index from './components/Index.vue';
import Edit from './components/Edit.vue';

// Define your routes
const routes = [
    {
        name: 'Create',
        path: '/create',
        component: Create
    },
    {
        name: 'Index',
        path: '/',
        component: Index
    },
    {
        name: 'Edit',
        path: '/edit/:id',
        component: Edit
    }
];

// Create the router instance
const router = createRouter({
    history: createWebHistory(),
    routes,
});

// Create and mount the root instance
createApp(App)
    .use(router)
    .mount('#app');
In this code, we imported all the components and created the routes using the createRouter() method.
Then, register the routes to the Vue.js application using createApp().use() method.
So, our application’s “/” route will display all the items.
The “/create” route will display a form through which you can create an item.
The “/edit/id” route will display an edit form through which you can update the item.
Step 7: Create CRUD functionality
If we switch to the front end in Vue.js, we will have created three Vue components inside the components folder.
Let’s code the first component called “Create.vue”.
Add the code below to the Create.vue file.
<template>
    <div class="container mt-5">
        <div class="card shadow-lg">
            <div class="card-header bg-gradient-primary text-white">
                <h1 class="card-title">Create An Item</h1>
            </div>
            <div class="card-body">
                <div v-if="successMessage" class="alert alert-success">
                    {{ successMessage }}
                </div>
                <form @submit.prevent="addItem">
                    <div class="row g-3">
                        <div class="col-md-6">
                            <label for="itemName" class="form-label">Item Name:</label>
                            <input type="text" class="form-control" id="itemName" v-model="item.name"
                                placeholder="Enter item name" required>
                        </div>
                        <div class="col-md-6">
                            <label for="itemPrice" class="form-label">Item Price:</label>
                            <input type="text" class="form-control" id="itemPrice" v-model="item.price"
                                placeholder="Enter item price" required>
                        </div>
                    </div>
                    <div class="mt-4 text-center">
                        <button type="submit" class="btn btn-primary px-4"><i class="bi bi-plus-lg"></i> Add
                            Item</button>
                    </div>
                </form>
                <div class="mt-4 d-flex justify-content-start">
                    <router-link :to="{ name: 'Index' }" class="btn btn-outline-secondary">
                        <i class="bi bi-arrow-left-circle"></i> Return to Items List
                    </router-link>
                </div>
            </div>
        </div>
    </div>
</template>
<style>
.bg-gradient-primary {
    background: linear-gradient(45deg, #007bff, #6610f2);
}
</style>
<script>
import { reactive, ref } from 'vue';
import { useRouter } from 'vue-router';

export default {
    setup() {
        const item = reactive({ name: '', price: '' });
        const router = useRouter();
        const successMessage = ref('');

        const addItem = async () => {
            const uri = 'http://localhost:8000/items';
            try {
                await axios.post(uri, item);
                successMessage.value = 'Item added successfully!';
                setTimeout(() => {
                    successMessage.value = '';
                    router.push({ name: 'Index' });
                }, 1000);
            } catch (error) {
                console.error('Error adding item:', error);
                // Handle the error appropriately
            }
        };

        return {
            item,
            addItem,
            successMessage
        };
    }
}
</script>
In this file, we added a simple Bootstrap 5 form to accept the “Item name” and “Item price” from the user.
We then send these form details in the form of a POST request to the Laravel server.
If it is a success, we will show a success message; otherwise, log the error.
And redirect to the Index view, which we will create next.
Write the following code inside the Index.vue file:
<template>
    <div class="container mt-5">
        <h1 class="mb-4">Items</h1>
        <div v-if="successMessage" class="alert alert-success">
            {{ successMessage }}
        </div>
        <div class="d-flex justify-content-end mb-4">
            <router-link :to="{ name: 'Create' }" class="btn btn-success"><i class="bi bi-plus-lg"></i> Create New
                Item</router-link>
        </div>

        <div class="table-responsive">
            <table class="table table-hover table-bordered">
                <thead class="table-dark">
                    <tr>
                        <th scope="col">ID</th>
                        <th scope="col">Item Name</th>
                        <th scope="col">Item Price</th>
                        <th scope="col" style="width: 20%;">Actions</th>
                    </tr>
                </thead>
                <tbody>
                    <tr v-for="item in items" :key="item.id">
                        <td>{{ item.id }}</td>
                        <td>{{ item.name }}</td>
                        <td>{{ item.price }}</td>
                        <td>
                            <router-link :to="{ name: 'Edit', params: { id: item.id } }"
                                class="btn btn-sm btn-outline-primary me-2"><i class="bi bi-pencil-square me-1"></i>
                                Edit</router-link>
                            <button class="btn btn-sm btn-outline-danger" @click="openDeleteConfirmation(item.id)"> <i
                                    class="bi bi-trash me-1"></i> Delete</button>
                        </td>
                    </tr>
                </tbody>
            </table>
        </div>
    </div>

    <!-- Delete Confirmation Modal -->
    <div class="modal fade" id="deleteConfirmationModal" tabindex="-1" aria-labelledby="deleteConfirmationModalLabel"
        aria-hidden="true" ref="deleteModal">
        <div class="modal-dialog">
            <div class="modal-content">
                <div class="modal-header">
                    <h5 class="modal-title" id="deleteConfirmationModalLabel">Confirm Delete</h5>
                    <button type="button" class="btn-close" @click="closeModal" aria-label="Close"></button>
                </div>
                <div class="modal-body">
                    Are you sure you want to delete this item?
                </div>
                <div class="modal-footer">
                    <button type="button" class="btn btn-secondary" @click="closeModal">Cancel</button>
                    <button type="button" class="btn btn-danger" @click="confirmDelete">Delete</button>
                </div>
            </div>
        </div>
    </div>
</template>

<script>
import { onMounted, ref } from 'vue';

export default {
    setup() {
        const items = ref([]);
        const itemIdToDelete = ref(null);
        const deleteModal = ref(null);
        const successMessage = ref('');

        const fetchItems = async () => {
            try {
                const uri = 'http://localhost:8000/items';
                const response = await axios.get(uri);
                items.value = response.data;
            } catch (error) {
                console.error('Error fetching items:', error);
            }
        };

        const openDeleteConfirmation = (id) => {
            itemIdToDelete.value = id;
            const modalInstance = new bootstrap.Modal(deleteModal.value);
            modalInstance.show();
        };

        const closeModal = () => {
            const modalInstance = bootstrap.Modal.getInstance(deleteModal.value);
            if (modalInstance) {
                modalInstance.hide();
            }
        };

        const confirmDelete = async () => {
            if (itemIdToDelete.value !== null) {
                await deleteItem(itemIdToDelete.value);
                closeModal();
            }
        };

        const deleteItem = async (id) => {
            try {
                const uri = `http://localhost:8000/items/${id}`;
                await axios.delete(uri);
                items.value = items.value.filter((item) => item.id !== id);
                successMessage.value = 'Item deleted successfully!';
                setTimeout(() => {
                    successMessage.value = '';
                    router.push({ name: 'Index' });
                }, 1000);
            } catch (error) {
                console.error('Error deleting item:', error);
            }
        };

        onMounted(fetchItems);

        return {
            items,
            openDeleteConfirmation,
            confirmDelete,
            deleteItem,
            deleteModal,
            closeModal,
            successMessage
        };
    }
}
</script>
In this file, we created a table that will display all the items with Edit and Delete buttons.
When a user clicks the Edit button, it will be redirected to the Edit view.
If a user clicks the Delete button, we will display a confirmation message inside the Bootstrap modal.
If the user confirms, we will remove the item from the database.
Let’s add the code below to the edit.vue file.
<template>
    <div class="container mt-5">
        <div class="card shadow-lg">
            <div class="card-header bg-gradient-primary text-white">
                <h1 class="card-title text-center">Edit an Item</h1>
            </div>
            <div class="card-body">
                <div v-if="successMessage" class="alert alert-success">
                    {{ successMessage }}
                </div>
                <form @submit.prevent="updateItem">
                    <div class="row g-3">
                        <div class="col-md-6">
                            <label for="itemName" class="form-label">Item Name:</label>
                            <input type="text" id="itemName" class="form-control" v-model="item.name"
                                placeholder="Enter item name" required>
                        </div>
                        <div class="col-md-6">
                            <label for="itemPrice" class="form-label">Item Price:</label>
                            <input type="text" id="itemPrice" class="form-control" v-model="item.price"
                                placeholder="Enter item price" required>
                        </div>
                    </div>
                    <div class="text-center mt-4">
                        <button type="submit" class="btn btn-primary px-4">Update Item</button>
                    </div>
                </form>
                <div class="mt-4 d-flex justify-content-start">
                    <router-link :to="{ name: 'Index' }" class="btn btn-outline-secondary">
                        <i class="bi bi-arrow-left-circle"></i> Return to Items List
                    </router-link>
                </div>
            </div>
        </div>
    </div>
</template>

<style>
.bg-gradient-primary {
    background: linear-gradient(45deg, #007bff, #6610f2);
}
</style>

<script>
import { onMounted, reactive, ref } from 'vue';
import { useRoute, useRouter } from 'vue-router';

export default {
    setup() {
        const item = reactive({ name: '', price: '' });
        const route = useRoute();
        const router = useRouter();
        const successMessage = ref('');

        const getItem = async () => {
            try {
                const uri = `http://localhost:8000/items/${route.params.id}/edit`;
                const response = await axios.get(uri);
                Object.assign(item, response.data);
            }
            catch (error) {
                console.error("Failed to fetch item:", error);
            }
        };

        const updateItem = async () => {
            const uri = `http://localhost:8000/items/${route.params.id}`;
            console.log(uri)
            await axios.patch(uri, item);
            successMessage.value = 'Item Updated Successfully!';
            setTimeout(() => {
                successMessage.value = '';
                router.push({ name: 'Index' });
            }, 1000);
        };

        onMounted(getItem);

        return {
            item,
            updateItem,
            successMessage
        };
    }
}
</script>
Save this file and make sure to run Vite development and Laravel servers.
Go to the browser and hit this URL: http://localhost:8000/
You will see a screen like this:

If you click on the “Create New Item” button, you will be redirected to this route: http://localhost:8000/create

From here, you can create an item, and if you do it successfully, you will see a success message and be redirected back to the list page where this item will be listed!
I have created six items, and now my listing page looks like this:

If you check the MySQL database, then you will see the six entries like this:

Head to this page: http://localhost:8000/ and click on the Edit button, and you will see the Edit view like this:

If you update the details, then it will be updated in the database as well as on the listing page like this:

I have shown CRUD functionality’s Create, Read, and Update, and now the remaining functionality is Delete.
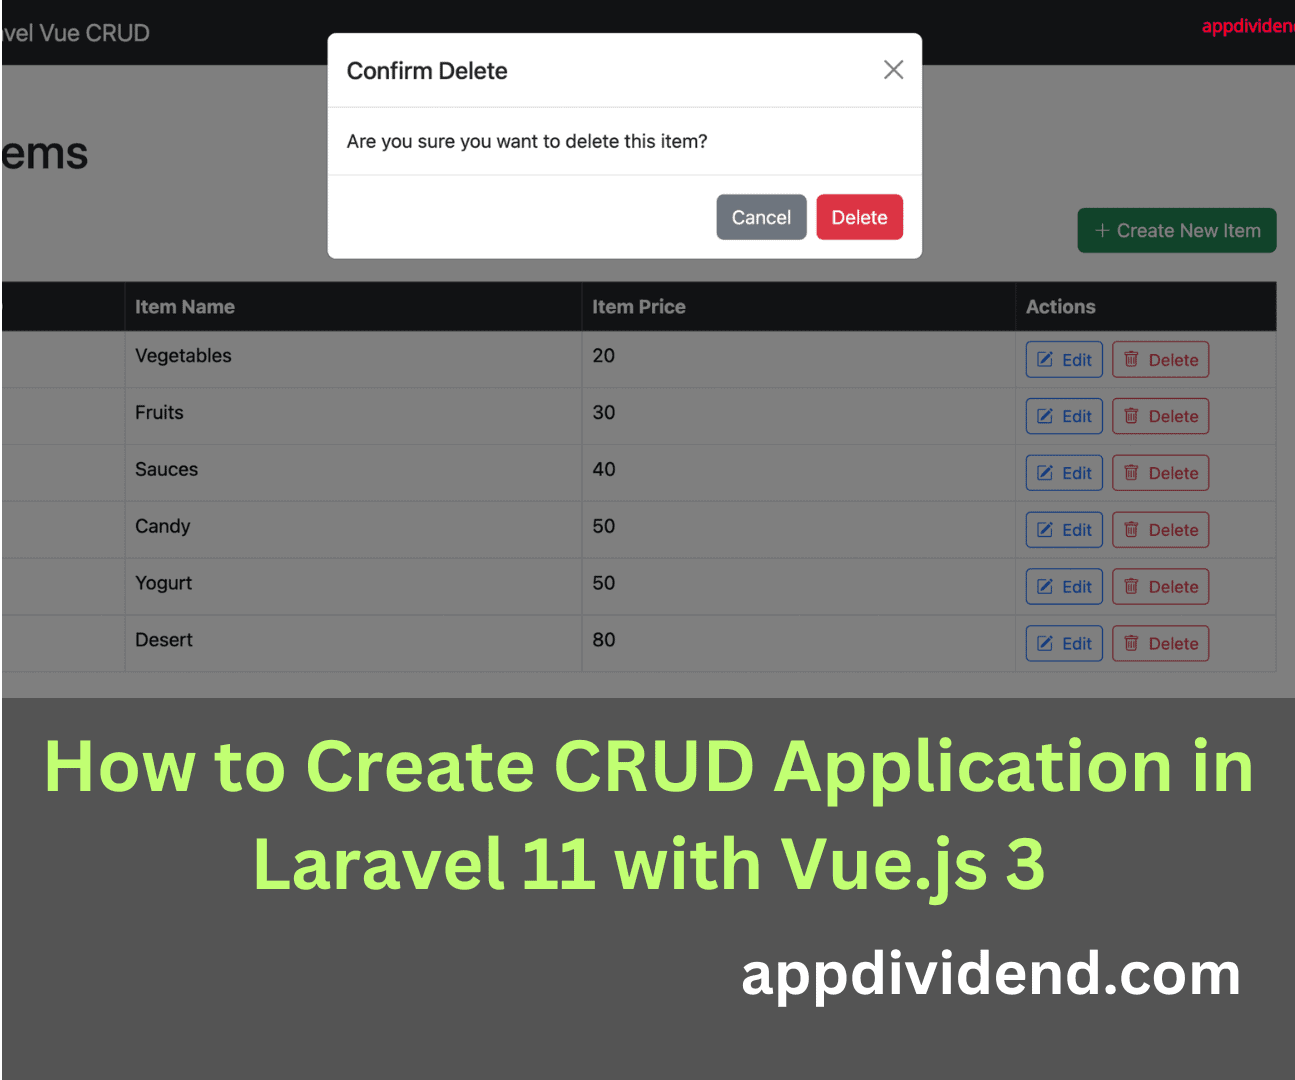
If you try to Delete the Desert item, then you will be asked a confirmation message like this:

If you press the Delete button, then it will be deleted from the database, and your index view will look like this:

And that’s it!
We successfully created a CRUD functionality with Elegant UI in Laravel 11 and Vue.js 3.4, the latest version.
Here is the complete code on GitHub.
Nicole Beharie
nice one, thanks
Michael E McGuire
Thanks, handy all-in-one-place guide. It’d make a nice info-graphic.
Mohammad Rizky Prawira
Great tutorial dude, I learn a lot from you.
One suggestion though, for the delete method, you should do loop with index.
If you splice the id, it can be different value between the item index position and the id value, because the id is auto incremented. The splice method doesnt find the start parameter if the id is larger so the items data isn’t updated.
the directive:
the button:
Delete
the function:
let uri = `http://localhost/items/${id}`;
this.items.splice(index,1);
this.axios.delete(uri);
Pooria
I have a problem now. As you said, web.php contains ‘resource’ route for ‘items’ and Vue is using ‘items’ too.
So when you are clicking the links and travel through javascript, everything is ok, but when you press F5 on your keyboard or try to access localhost:8000/edit/1, the web.php file comes in and says there is no route for ‘edit’!
Femi
A very great and super cool tutorial.
Thanks for putting this together.
I think you make the call to fetchItems ( i.e this.fetchItems(); )when any item is deleted, with this, the view is refreshed without having to refresh the page.
deleteItem(id)
{
let uri = `http://127.0.0.1:9900/items/${id}`;
this.items.splice(id, 1);
this.axios.delete(uri);
this.fetchItems();
}
Ming
Hello! thanks for this tutorial!
But i have an issue with the delete button
DELETE http://localhost:8000/items/1 500 (Internal Server Error)
Uncaught (in promise) Error: Request failed with status code 500
Femi
I think you we can also make the call to fetchItems ( i.e this.fetchItems(); ) when any item is deleted, with that the view data is refreshed without having to refresh the whole page.
deleteItem(id)
{
let uri = `http://127.0.0.1:9900/items/${id}`;
this.items.splice(id, 1);
this.axios.delete(uri);
this.fetchItems();
}
In all, a very great tutorial.
Femi
I think we can also make the call to fetchItems ( i.e this.fetchItems(); ) when any item is deleted, with that the view data is refreshed without having to refresh the whole page.
deleteItem(id)
{
let uri = `http://127.0.0.1:9900/items/${id}`;
this.items.splice(id, 1);
this.axios.delete(uri);
this.fetchItems();
}
In all, a very great tutorial.
Jun Tabudlong
This can be accomplished by adding/modifying the elements with an Index inside DisplayItem component:
1. Adding an Index to v-for and v-on:click
Delete
2. And in the deleteItem method
deleteItem(index, id)
{
let uri = `/items/${id}`;
this.items.splice(index, 1);
this.axios.delete(uri);
}
Alugbin Abiodun
Please if i want to use say summernote, where will i put the libraries???
Hitendra
How can i pass data from one component to other component?
GMananquil
well done
Flavio Ferreira
great 😉 https://github.com/fhferreira/laravel-5-vuejs
Ray
Since it is a single page app, how can I modify the route in other to allow another pages (for instance add data on users …)
cristian
Hi, how can I show related field with the other table?
horn666
it doesn’t work for me any more, example shows an empty screen without any errors
Ketan Hirpara
Hello There,
Thanks for great tutorial.
I have seen that and working fine in my local system @http://localhost:8000
But while i am running this project without “php artisan serve”, And with url: “http://192.168.2.212/vuedemo/laravue2/public/”, it is not displaying records.
Above URL is of my local system.
Please suggest me how to run project without “php artisan serve”. I have placed code in apache htdocs directory.
Thanks in advance.
Biansor
This is the only tutorial that really make sense when you are searching how to learn vue JS in laravel
Hola2017
Hi,
I got an empty page, no table, no create,no edit, no delete though the table has 4 items inserted in MySQL database, no component displayed at all.
Anyone could help on the empty page?
Yulianto Saparudin
Hi, when I delete the items, the table is not refreshing, should I add
this.axios.patch(uri, this.item).then((response) => {
this.$router.push({name: ‘DisplayItem’});
});
?
ali mousavi
error console;
Cross-Origin Request Blocked: The Same Origin Policy disallows reading the remote resource at http://localhost:8000/items. (Reason: CORS header ‘Access-Control-Allow-Origin’ missing).
Joeven
Hi,
Great tutorial.
I updated the displayitems route to /items/ but it only displayed the data as json
Joeven
I was also able to add the /items for edit and it worked fine
vicky
same problem
Majid Azizian
I have problem please help
error console:
Failed to load http://localhost:8000/items: No ‘Access-Control-Allow-Origin’ header is present on the requested resource. Origin ‘http://127.0.0.1:8000’ is therefore not allowed access.
Emily
In step 2, could you specify what config file you are editing? I don’t see any mention of the filename and I’m not sure where this file should be.
Oliver Russell
Nice tutorial for creating a single page application in Laravel and Vuejs. You can also do it without using vue-router in your app. Here is an alternative method: https://www.cloudways.com/blog/laravel-vue-single-page-app/
sidi
wow nice tutorial.
but why this not work in laravel 5.6?? or i am missing some step??
the page shown like in example. but the back-end somehow does not catch the data..
oualid abbou
Thank you for this tutorial ,, i have one problem is when my laravel&vuejs app on shared hosting the vue components doesn’t change after editing. I don’t encounter this problem on local server because i run “npm run watch” to compile assets. but on shared hosting i didn’t find a way to do that.
Karam
I recently upgraded to 5.6 from 5.2 going step by step through 5.3-5.4-5.5.
Do I need to manually copy the app.js to resources/asses/js folder?
I don’t see it there.
vicky
I have problem it display json only
mouad harmouche
great job
Sri
I got an empty page, no table, no create,no edit, no delete though the table has 4 items inserted in MySQL database, no component displayed at all.
Anyone could help on the empty page?
Hiren Gohel
@Krunal, do you know how to create baseURL in vue? I want to set it so that in future i can change it at only one place
Đặng Trần Long
When i reload page it display 404 errror. How do i do?
Romal Tandel
how to deploy laravel + VueJs SPA application on shared hosting?
laravel 5.8.2
Vuejs 2.5.17
Mark Lowe
I’m getting path issues with the REPO version. Components is on the same level as the js/app.js that seems to expect it INSIDE the js folder. Is there something I’m missing with the path setup?
Haribabu
how to Using Vue.js in Laravel 5.1