
To deploy a laravel project on Heroku from scratch, follow these steps:
- Install Heroku CLI.
- Install the Laravel.
- Create a proc file.
- Initialize git repo.
- Logging into the Heroku terminal.
- Create a Heroku app.
- Set up the Laravel encryption key.
- Push Laravel changes to Heroku.
- Then, configure the Database on Heroku.
- Add the project files and run the migration.
Let’s see one by one step in more detail.
Step 1: Install the Heroku CLI.
You can download it from this link, depending on your OS. I am using Mac, so I am installing it via homebrew.
brew install heroku/brew/heroku
After that, verify it by the following command.
heroku --versionYou will get something like this, depending on your Node.js version. “heroku-cli/6.16.12-04b3626 (darwin-x64) node-v9.10.1 “.
Step 2: Install Laravel Application.
Go to your terminal and install it using the following command.
composer create-project laravel/laravel herokularavel --prefer-distIt will install the project.
Step 3: Create a Procfile.
Inside the Laravel Root folder, make a file called Procfile.
Write the following line inside the Procfile.
web: vendor/bin/heroku-php-apache2 public/Step 4: Initialize the project as a Git repo.
Okay, initialize the Git repo using the following command.
git initStep 5: Logging Into Heroku From the Terminal.
Go to your terminal and type the following command to enter your Heroku Credentials.
heroku loginStep 6: Create a Heroku application.
Type the following command.
heroku createIt will create an application with a weird name. Mine’s name is mysterious-waters-55261.
Step 7: Setting a Laravel encryption key.
Type the following command to see the key.
php artisan key:generate --showIt will show the key; you need to copy it now.
The next step is to type the following command and not hit enter.
heroku config:set APP_KEY={Your copied key}Hit enter, and you are set up with the Application key.
Step 8: Push the changes to Heroku.
After that, add the files on Git using the following command.
git add .Commit the changes.
git commit -m "first laravel deployment to heroku"Push the changes to the Heroku server.
git push heroku masterYou will see something like this.

Step 9: Start the Application.
Type the following command to start the application on Heroku.
heroku openStep 10: Configure the Database on Heroku.
I have used Postgres Database because it is free on Heroku. So we need to use an add-on database provision provided by Heroku. You can find more here.
Type the following command to create a PGSQL database.
heroku addons:create heroku-postgresql:hobby-devYou can learn more about the data store on this URL.
Now, you can see your Database URL using the following command.
heroku configIt will give us two values.
- APP_KEY
- DATABASE_URL
Now, copy the DATABASE_URL and open your config >> database.php file.
First, change the default database to pgsql from MySQL.
At the top, you must define $DATABASE_URL = parse_url(“Your generated database URL, copy here”).
$DATABASE_URL=parse_url('Your database URL');Next, your pgsql database config array looks like this.
// database.php

'pgsql' => [
            'driver' => 'pgsql',
            'host' => $DATABASE_URL["host"],
            'port' => $DATABASE_URL["port"],
            'database' => ltrim($DATABASE_URL["path"], "/"),
            'username' => $DATABASE_URL["user"],
            'password' => $DATABASE_URL["pass"],
            'charset' => 'utf8',
            'prefix' => '',
            'schema' => 'public',
            'sslmode' => 'require',
        ],
So, your complete database.php file looks like this.
<?php

$DATABASE_URL = parse_url('Your database URL');

return [

    /*
    |--------------------------------------------------------------------------
    | Default Database Connection Name
    |--------------------------------------------------------------------------
    |
    | Here you may specify which of the database connections below you wish
    | to use as your default connection for all database work. Of course
    | you may use many connections at once using the Database library.
    |
    */

    'default' => env('DB_CONNECTION', 'pgsql'),

    /*
    |--------------------------------------------------------------------------
    | Database Connections
    |--------------------------------------------------------------------------
    |
    | Here are each of the database connections setup for your application.
    | Of course, examples of configuring each database platform that is
    | supported by Laravel is shown below to make development simple.
    |
    |
    | All database work in Laravel is done through the PHP PDO facilities
    | so make sure you have the driver for your particular database of
    | choice installed on your machine before you begin development.
    |
    */

    'connections' => [

        'sqlite' => [
            'driver' => 'sqlite',
            'database' => env('DB_DATABASE', database_path('database.sqlite')),
            'prefix' => '',
        ],

        'mysql' => [
            'driver' => 'mysql',
            'host' => env('DB_HOST', '127.0.0.1'),
            'port' => env('DB_PORT', '3306'),
            'database' => env('DB_DATABASE', 'forge'),
            'username' => env('DB_USERNAME', 'forge'),
            'password' => env('DB_PASSWORD', ''),
            'unix_socket' => env('DB_SOCKET', ''),
            'charset' => 'utf8mb4',
            'collation' => 'utf8mb4_unicode_ci',
            'prefix' => '',
            'strict' => true,
            'engine' => null,
        ],

        'pgsql' => [
            'driver' => 'pgsql',
            'host' => $DATABASE_URL["host"],
            'port' => $DATABASE_URL["port"],
            'database' => ltrim($DATABASE_URL["path"], "/"),
            'username' => $DATABASE_URL["user"],
            'password' => $DATABASE_URL["pass"],
            'charset' => 'utf8',
            'prefix' => '',
            'schema' => 'public',
            'sslmode' => 'require',
        ],

        'sqlsrv' => [
            'driver' => 'sqlsrv',
            'host' => env('DB_HOST', 'localhost'),
            'port' => env('DB_PORT', '1433'),
            'database' => env('DB_DATABASE', 'forge'),
            'username' => env('DB_USERNAME', ''),
            'password' => env('DB_PASSWORD', ''),
            'charset' => 'utf8',
            'prefix' => '',
        ],

    ],

    /*
    |--------------------------------------------------------------------------
    | Migration Repository Table
    |--------------------------------------------------------------------------
    |
    | This table keeps track of all the migrations that have already run for
    | your application. Using this information, we can determine which of
    | the migrations on disk haven't actually been run in the database.
    |
    */

    'migrations' => 'migrations',

    /*
    |--------------------------------------------------------------------------
    | Redis Databases
    |--------------------------------------------------------------------------
    |
    | Redis is an open source, fast, and advanced key-value store that also
    | provides a richer set of commands than a typical key-value systems
    | such as APC or Memcached. Laravel makes it easy to dig right in.
    |
    */

    'redis' => [

        'client' => 'predis',

        'default' => [
            'host' => env('REDIS_HOST', '127.0.0.1'),
            'password' => env('REDIS_PASSWORD', null),
            'port' => env('REDIS_PORT', 6379),
            'database' => 0,
        ],

    ],

];
Step 11: Add the file to Heroku and run migrations.
Now, add the file to Heroku.
git add .
git commit -m "added postgres database configuration"
git push heroku master
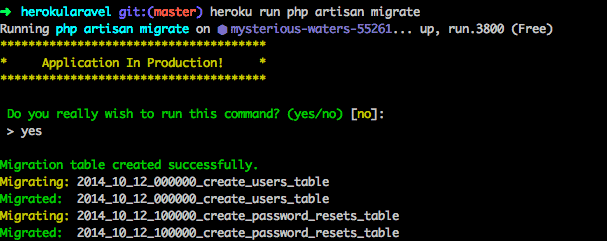
Now, run the migrations.
heroku run php artisan migrateIt will ask to run the migration on production and enter yes.
If all the configurations are correct, you will create the tables in the database.
Step 12: Create an Authentication system.
Type the following command to generate an Authentication scaffold.
php artisan make:auth
Add the files to Heroku.
git add .
git commit -m "added auth scaffold"
git push heroku master
You can see that our scaffold is generated successfully.
That’s it.

pan muangsaen
I followed your steps, but when i entered the command ‘git push heroku master’, this error pops up
remote: ! Push failed: cannot parse Procfile.
remote: ! Please try pushing again.
remote: ! If the problem persists, see http://help.heroku.com/ and provide Request ID 1f78e2e8-6a8a-917f-61ff-5cd9aac36b26.
remote:
remote:
remote: Verifying deploy…
remote:
remote: ! Push rejected to warm-chamber-31572.
remote:
it doesn’t seem to be able to register the Procfile, can you help me?
Diyata Diallo
Thank you
Matheus Campos
Hello Krunal,
Thank you for shared your knowledge with us … My application is ON perfecty !
Regards
arturas
In Connection.php line 669:
Database hosts array is empty. (SQL: select * from information_schema.tables where table_schema = public and table_
name = migrations and table_type = ‘BASE TABLE’)
In ConnectionFactory.php line 205:
Database hosts array is empty.
Moammer Farshid Enan
Hi, I have got an server error while uploading images. Any idea about this?
masoud
i tried but when i migrate it leads to the follwoing error:
C:xampphtdocsCEMS>heroku run php artisan migrate
Running php artisan migrate on ⬢ frozen-lake-11851… done
Error: connect ETIMEDOUT 44.193.194.211:5000
masoud
PLEASE HELP ME HERE EXPLANATION FOR LITTLE BIT:
‘driver’ => ‘pgsql’,
‘host’ => $DATABASE_URL[“host”],
‘port’ => $DATABASE_URL[“port”],
‘database’ => ltrim($DATABASE_URL[“path”], “/”),
‘username’ => $DATABASE_URL[“user”],
‘password’ => $DATABASE_URL[“pass”],
‘charset’ => ‘utf8’,
‘prefix’ => ”,
‘schema’ => ‘public’,
‘sslmode’ => ‘require’,
Nikunj Padhiyar
Really helpful. Thanks!
athos francisco
Cara, muito obrigado.
Salvou o trabalho aqui com Laravel no Heroku.
Estava quase saindo da Heroku, mas só falvara o Procfile